In this article, you will learn how to configure the Magento 2 Social Login Pro extension correctly. Please, check our step-by-step guide below.
Disabling Free Twitter & Facebook Login Module
In order to avoid conflicts, if you have previously installed our free Twitter & Facebook Login – you will need to remove this free extension. Please follow the instructions below.
Important information!
Make sure to follow these steps only if Plumrocket Twitter & Facebook Extension has been previously installed:
- Navigate to Twitter & Facebook Extension Configuration section.
- Disable extension in Twitter & Facebook Configuration section.
- Disable Twitter & Facebook Extension via “app/etc/config.php” (by setting ‘Plumrocket_SocialLoginFree’ => 0). Make sure to flush Magento Cache.
- Navigate back to Plumrocket section and verify you no longer see Twitter & Facebook Extension – only Social Login Pro Extension should remain.
Configuring Social Login Pro Extension for Magento 2
Follow the instructions below in order to learn how to configure Social Login Pro Extension for Magento 2.
Step-by-Step action:
- Go to the “Plumrocket ” tab in the main menu> “Social Login Pro” > select the “Configuration” tab.
- In the “Enable Extension” section select “Yes” or “No” accordingly to enable or disable this extension.
- Enter the serial key into the “Serial Key ” field provided to you after the purchase of the Social Login Pro for Magento 2 extension.

Configuring Main Settings
Step-by-Step action:
- The “Replace Templates” section allows you to replace your customer login/registration template with this extension template and display social login buttons automatically. Please, read our Magento 2 Twitter & Facebook Login Developer’s Guide if you want to keep your own template and install social buttons manually.
- The “Display on Login Form” section allows you to display Social Login buttons on magento customer login form.
- The “Display on Registration Form” section lets you display Social Login buttons on magento customer registration form.
- Use the “Social Buttons Sorting” option to configure sorting of the visual buttons. Visible buttons will be displayed by default. Hidden buttons will be listed under “show more” section in your webstore frontend.

Step-by-Step action:
- Use the “Subscribe Customers To Email Newsletter” section helps to sign up the customer to the Newsletter Subscribers list during the registration automatically.
- Use the “Login Success Page ” to redirect a user to this page after each successful login.
- The “Display Customer Photo” extracts a customer’s photo from the social network in your website header. Please see our online documentation for manual installation instructions if the photo is not shown.
- The “Required Data from Social Networks” . Many social networks share only limited user profile/personal information. If the first option is enabled, all required fields in Magento that are missing from the social network will be pre-filled with temporary data to speed-up the registration process.
- The “Registration Success Page” . The user will be redirected to this page after each successful registration.

Configuring Advanced Settings
Step-by-Step action:
- In the ” Enable logging” option select “Yes” to get logs enabled returned by the social media networks and services for future debugging. If the option is set to “No”, this function will be disabled.
- Please, click on the “Download Log ” button to download a log file. If it’s not downloaded, you can also use this path where a log file is located: /var/log/pslogin.log
- If the ” Require passwords for accounts with matching emails” option is set to “Yes” – a user must confirm password on the first social login attempt if the account with the same email already exists in Magento. When the password is approved, the user social network account will be linked to the existing Magento account. During the next social login visit, the user will not be asked for a password anymore. If this option is set to “No” – a user will skip password validation and automatically login to the existing Magento account with matching social network email and then automatically link these accounts.
- If the ” Show confirmation dialogue to avoid account duplicates” option is set to “Yes” and the user is trying to use social login button (not social register), while the account with email returned by the social network is not found in Magento, he will see a dialogue window asking to confirm whether he has already had an account or not. If the user answers “Yes,” the usual account login form will appear, and after the successful login, his social network will be linked to the existing Magento Account. If this option is set to “No” – a new Magento account will always be automatically created for users who try to login with social network email.

Configuring Social Share section
Step-by-Step action:
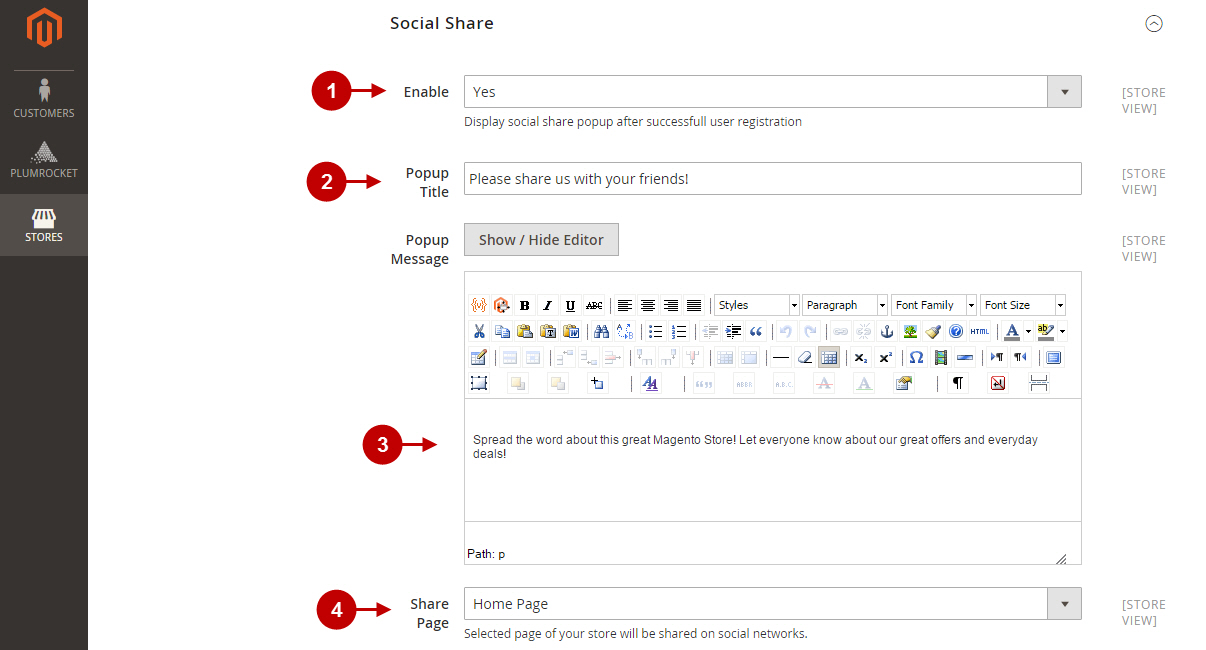
- In order to display social share popup after successful user registration use the “Enable” section.
- In the “Popup title” section specify the popup title that will appear after successful registration of your customer.
- The “Popup Message” section allows you to write the message for Social Share popup.
- Use the “Share Page” option to select the page of your store which will be shared on the social networks.
Connect Multiple Social Account
Step-by-Step action:
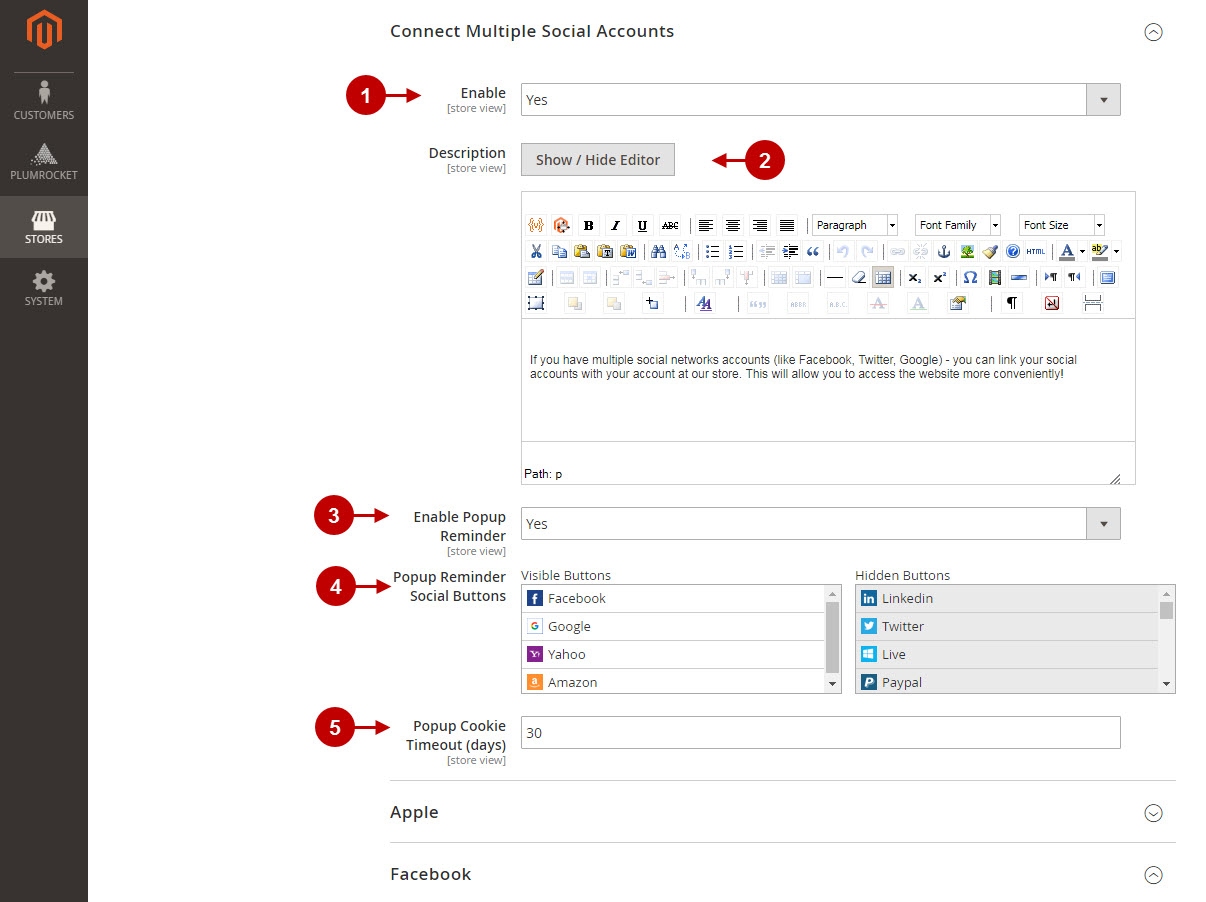
- The “Enable ” option allows customers to associate their magento account with more than one social network account from “My Account -> My Social Accounts”. Select “Yes” option to enable this option and “No” to disable it. Example: user will be able to login to the same store account with Facebook, Google, LinkedIn, etc.
- The “Description ” option allows to edit the text written above, which will be displayed in customer account -> my social accounts tab as well as in social accounts popup.
- “Enable Popup Reminder “: select “Yesto enable feature allowing customers to see a popup window after successful login, which reminds them to connect social networks to their magento store account. Select “No” to disable this option.
- “Popup Reminder Social Buttons ” option allows configuring “Visible” and “Hidden” buttons, which will appear in popup reminder. Visible buttons will be displayed by default. Hidden buttons will be listed under the “show more” section in the front-end. We recommend choosing two social buttons to be displayed in the visible section.
- “Popup Cookie Timeout (days) ” allows setting a number of days, when it will be displayed to remind a user about connecting to the particular social network. If popup reminder was closed it will be displayed again to the same user in a specified number of days. Enter “0” to never display popup again after it was closed the first time.
Configuring Facebook section
Step-by-Step action:
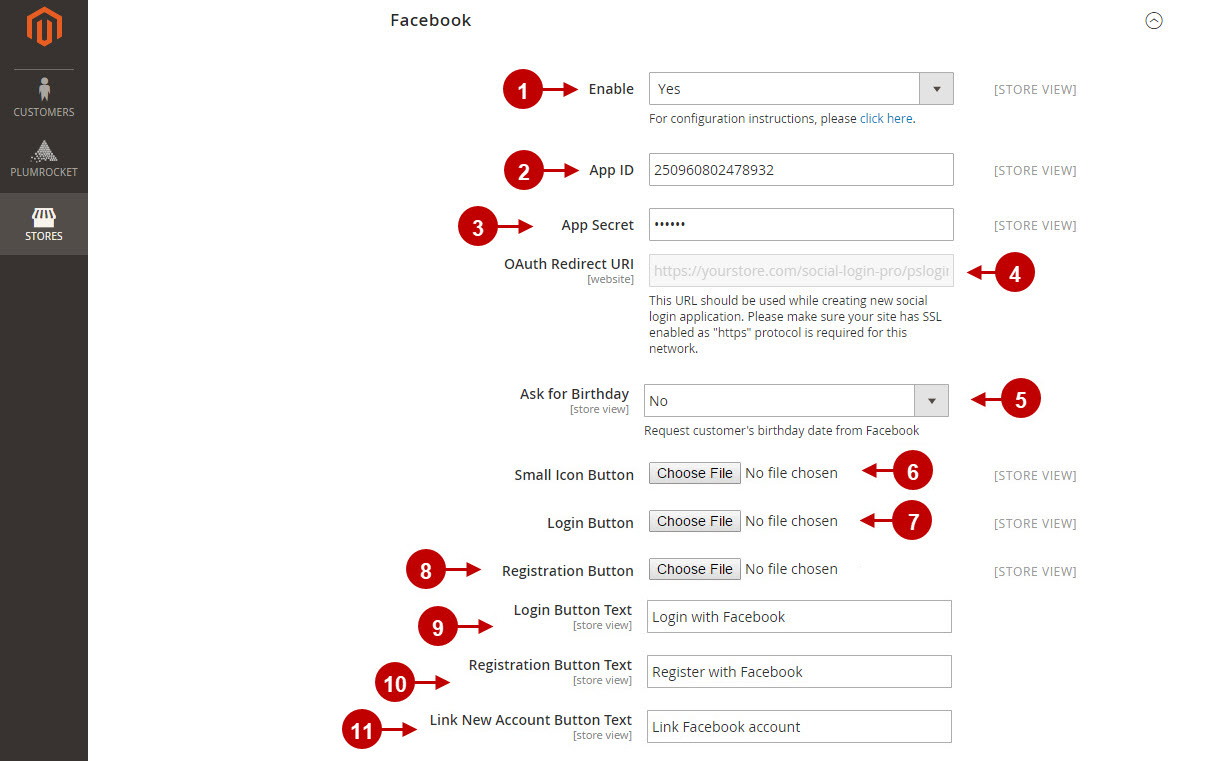
- The “Enable” option allows you to enable Facebook Login functionality for this Magento 2 Social Login extension. Please, check the Magento Facebook Login Configuration to learn how to create and set up Facebook application properly.
- In the “App ID” field specify the Facebook application ID .
- In the “App Secret” field enter the secret key provided to you after the Facebook application has been created.
- OAuth Redirect URL: you can use this URL while creating your Facebook social login application.
- Ask for Birthday: enable this option in order to get customer’s birthday date from Facebook. Note: As this this is an optional information to be pulled from Facebook network – you first need to submit this item for review in your Facebook application itself.
- Small Icon Button : allows you to select the small icon for Facebook button. It will show up if the window size is small, if there’s no text specified for Facebook login button, or if there are other social login buttons.
- Login Button: lets you select an image for the Facebook login button.
- Registration Button: allows you to select an image for registration with Facebook button.
- Login Button Text : lets you enter the text that will be displayed on Facebook login button.
- Registration Button Text: this field allows to write the text that will be displayed on Facebook registration button.
- Link New Account Button Text: allows to enter the text that will be displayed on Facebook link new account button.
Configuring Twitter section
Step-by-Step action:
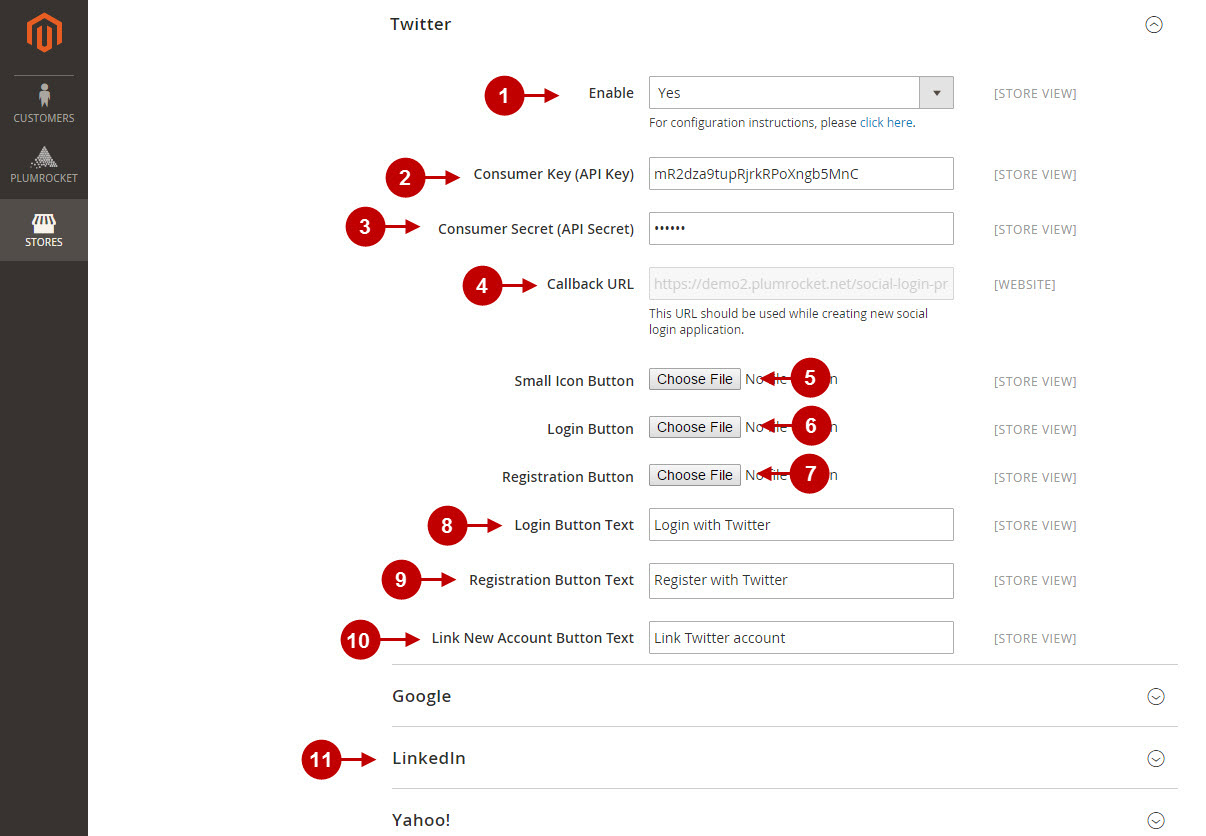
- The “Enable” option allows you to enable Twitter Login functionality for this social login extension. Please, check the Magento Twitter Login Configuration to learn how to create and set up Twitter application properly.
- In the “Consumer Key (API Key)” field specify the Consumer Key (API Key) provided to you after the Twitter application has been created.
- In the “Consumer Secret (API Secret )” field enter the secret key provided to you after Twitter application has been created.
- Callback URL: you can use this URL while creating your Twitter social login application.
- Small Icon Button : lets you select the small icon for Twitter button. It will show up if the window size is small, if there’s no text input for Twitter login button, or if there are many other social login buttons.
- Login Button: allows you to select an image for the Twitter login button.
- Registration Button: lets you select an image for registration with Twitter button.
- Login Button Text : allows you to input the text that will be displayed on Twitter login button.
- In the “Registration Button Text” field you will be able to enter the text that will be displayed on Twitter registration button.
- Link New Account Button Text: allows to enter the text that will be displayed on Twitter link new account button in your Magento 2.
- In the same way you can configure all the other social networks your customers can to login with into your webstore.
Step-by-Step action:
- Once all the configurations have been performed in the Social Login Pro Extension for Magento 2, press “Save Config” button.

Important Information:
After all the changes have been done and saved, you have to refresh and flush Magento 2 Cache.
Managing Social Accounts in Magento 2
If you need to sort customers by their social accounts, as well as to be able to check customer’s social accounts, follow the steps below:
Step-by-Step action:
- Go to “Customers ” tab in the main menu > select “All Customers ” section.
- Navigate to “Social Accounts ” section in the grid in order to be able to search customers by their social accounts.
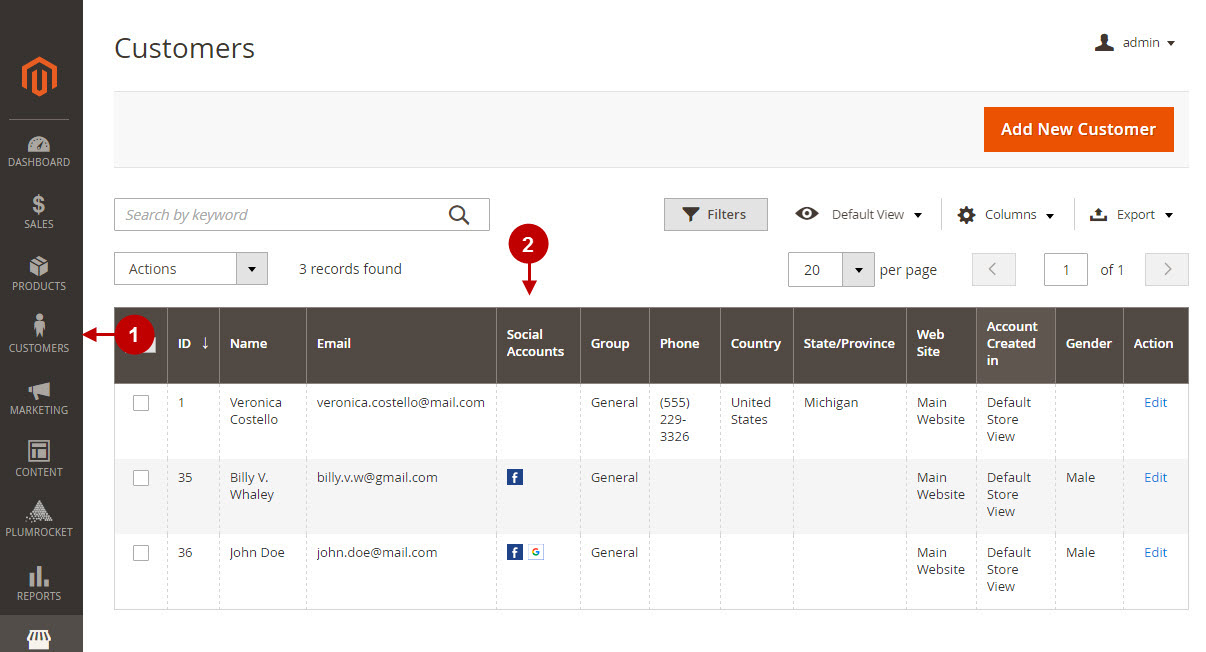
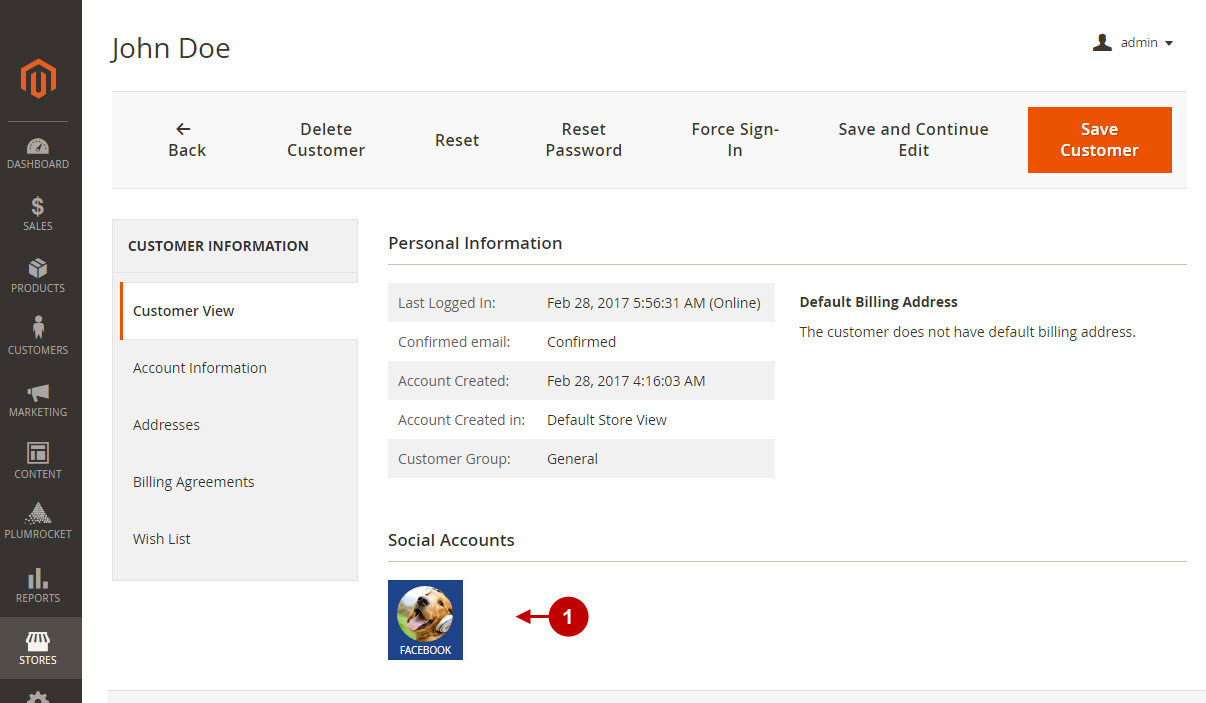
After you selected the required customer, proceed to the Customer Edit Page.
Step-by-Step action:
- “Social Accounts ” section allows to navigate to customer social account directly from Customer Page by clicking on the icon.
Statistics page
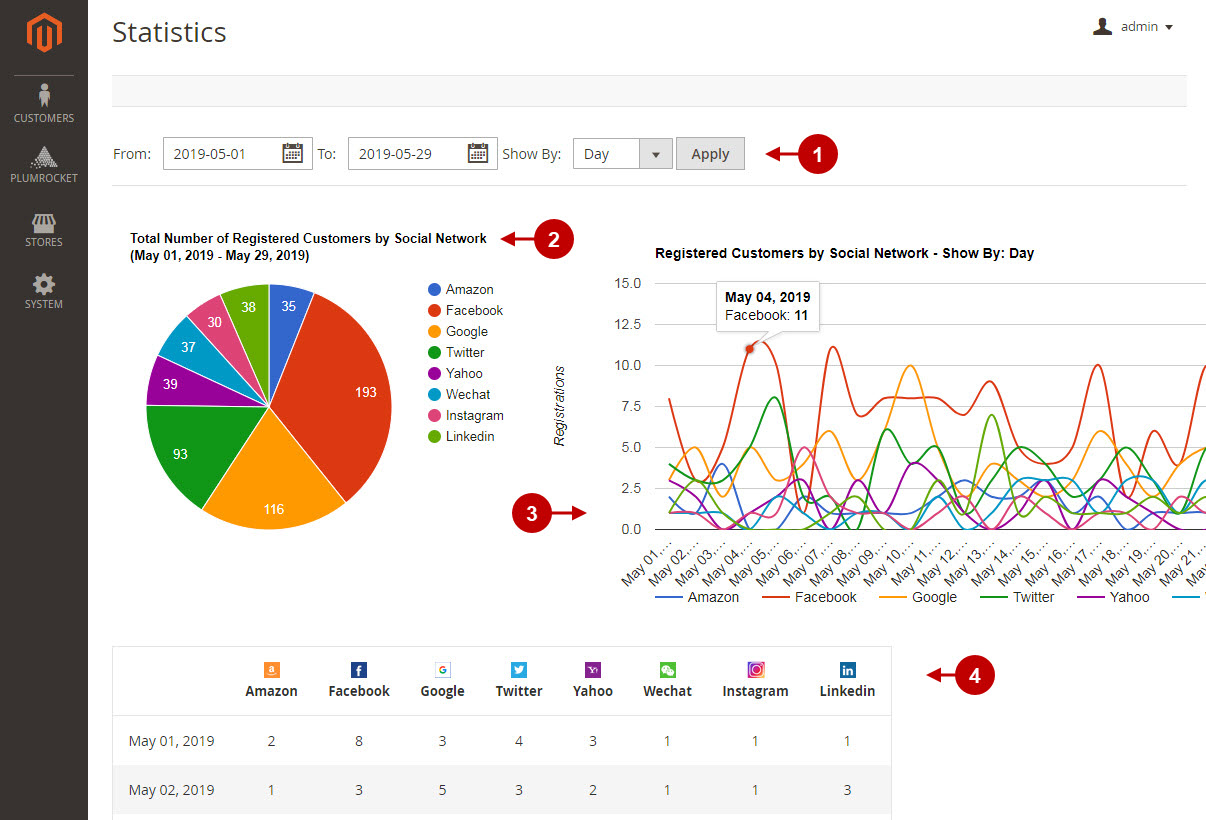
The statistics page shows a number of Registered Customers within Social Network by a certain timeframe selected by admin. This is really handy to compare Social Networks registrations activity and see what works the most for you.
Step-by-Step action:
- Use filtering options to set a timeframe of a period you would like to review. You can show the results by Day, Month or Year.
- Review Total Number of Registered Customers by each Social Network in the circle graph.
- Use a convenient statisticts diagram to check number of registered customers by day, month or year.
- This chart is the other way to review statistics by each Social Network individually.
Social Login Pro API Reference
Each of the social networks supported by this Magento 2 Social Login has its own API, that should be setup in order to work properly. Please click on the links below to setup the needed social login for your Magento 2.


