Configuring Social Login Pro Extension
Here you will learn how to correctly configure Magento Social Login. To do this, follow the instructions below.
Step-by-Step action:
- Press the “Plumrocket” tab in the menu.
- Select the “Social Login Pro” module.

Step-by-Step action:
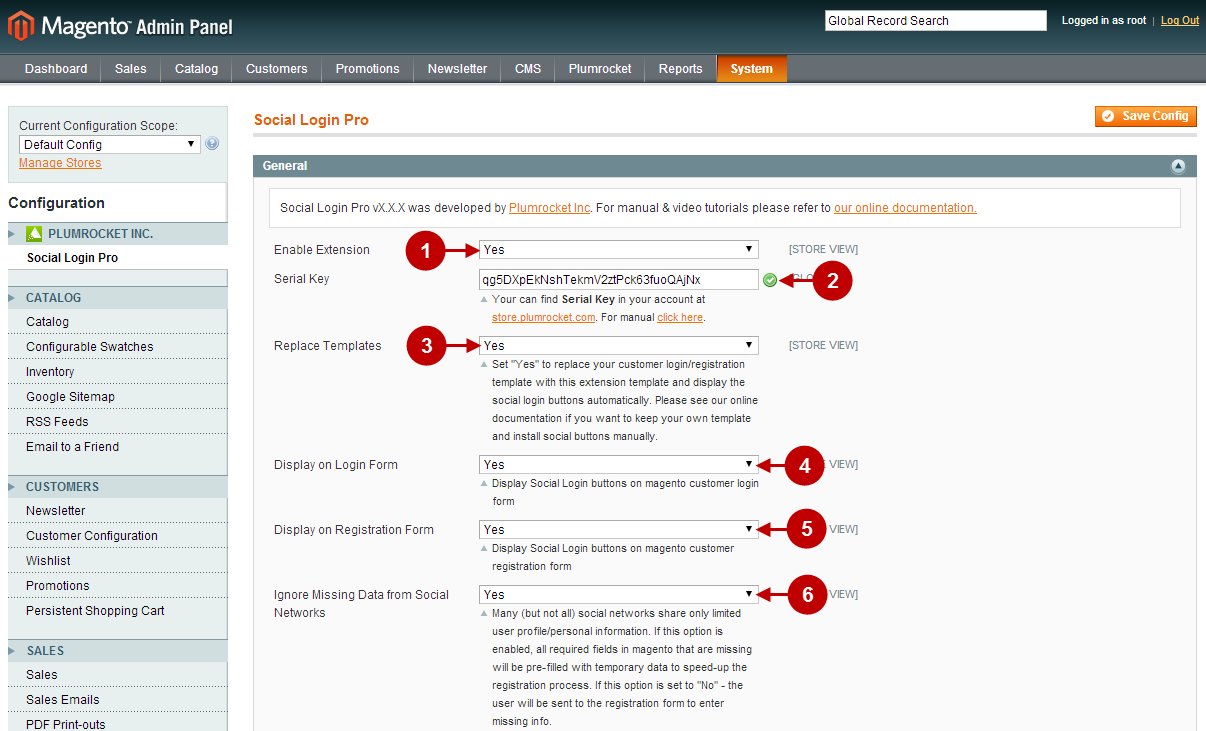
- Enable Extension: allows you to enable or disable this magento social share extension.
- Option “Serial Key”: enter unique serial key provided after the purchase for legitimate and proper functioning of your extension. Note: In most cases this field will be pre-filled with serial key automatically and the green check mark will be displayed. Otherwise please read article Serial Key Activation in order to find and paste your serial key manually.
- Replace Templates: let’s you relace your customer login/registration template with this extension template and display social login buttons automatically. Please refer to this Social Login Pro Developer’s Guide if you want to keep your own template and install social buttons manually.
- Display on Login Form: allows you to display Social Login buttons on magento customer login form.
- Display on Registration Form: allows you to display Social Login buttons on magento customer registration form.
- Ignore Missing Data from Social Networks: if this option is enabled, all required fields in magento that are missing will be pre-filled with temporary data to speed-up the registration process. If this option is set to “No” – the user will be sent back to the registration form to enter missing info. Note: This option works with the data required for account creation.
Step-by-Step action:
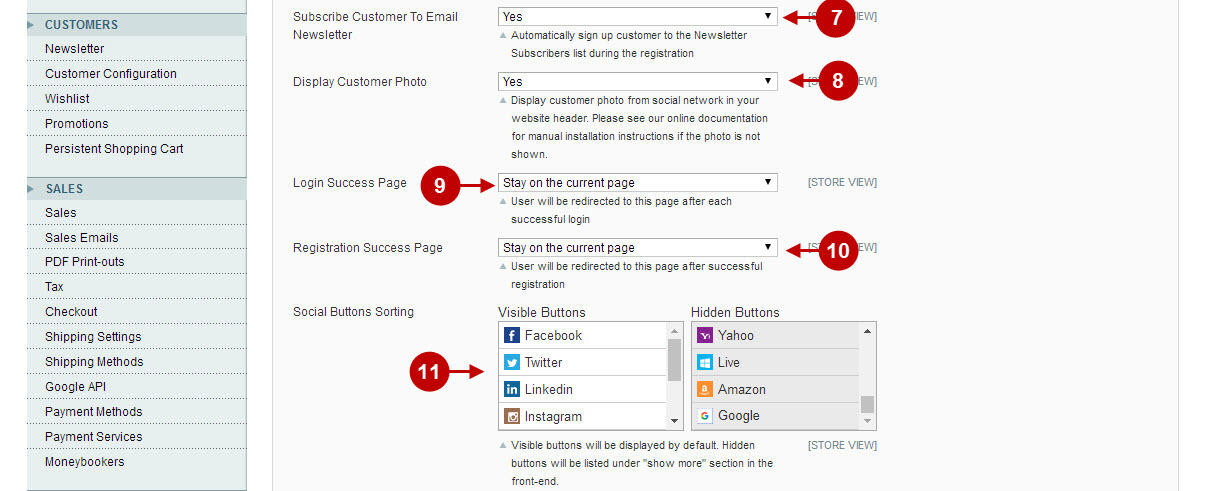
- Subscribe Customer To Email Newsletter: if this option is enabled, customerwill be automatically signed up to the Newsletter Subscribers list during the registration.
- Display Customer Photo: allows you to display customer photo from social network in your website header. If it does not show up for some reason, please refer to this manual from Social Login Pro Developer’s Guide.
- Login Success Page: let’s you select the page the user will be redirected to after each successful login.
- Registration Success Page: allows you to select the page the user will be redirected to after successful registration.
- Social Buttons Sorting: allows you to sort how the social login buttons will be displayed. Visible buttons will be displayed by default. Hidden buttons will belisted under “show more” section in the front-end.
Step-by-Step action:
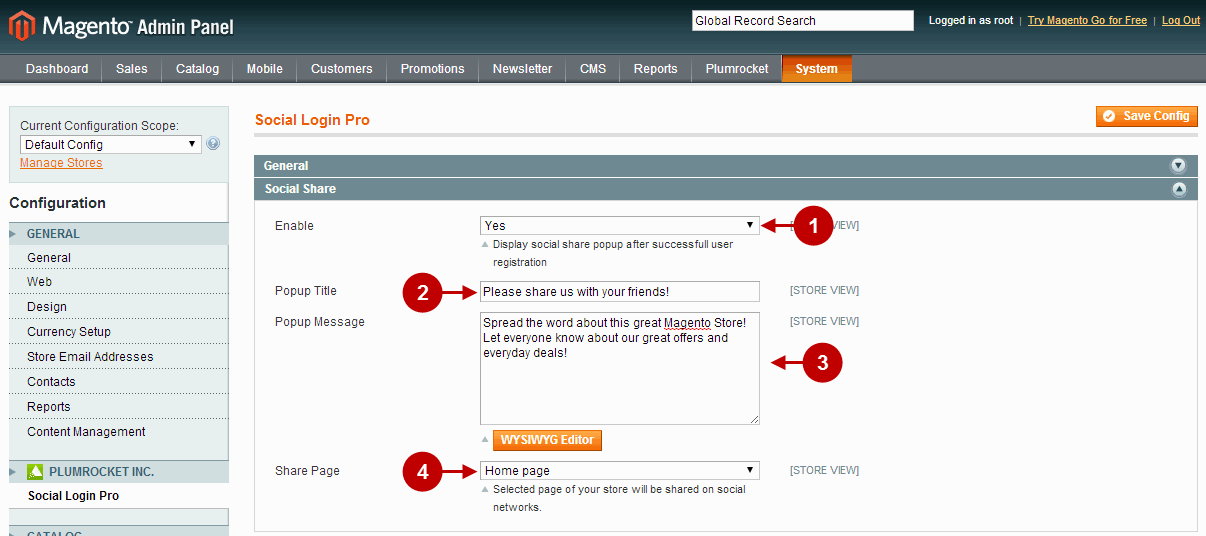
- Enable: allows you to display social share popup after successful user registration.
- Popup Title: allows you to indicate the title for the popup that will appear upon successful user registration.
- Popup Message: allows you to paste the text of the message for Social Share popup.
- Share Page: allows to select the page of your store that will be shared on social networks.
Step-by-Step action:
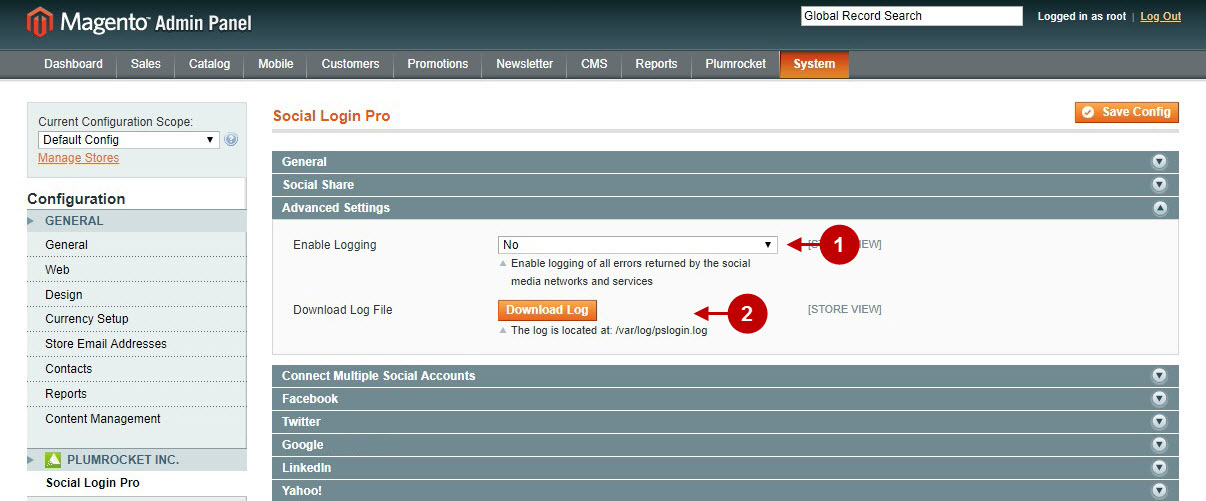
- Enable Logging: allows you to set up the logging of errors returned by the social networks and services. This works great to debug the reason of the error (e.g. application misconfiguration).
- Download Log File: allows you to download the file containing the logs that will help to debug possible error with the application. The path to the file on the server can be found under this button.
Step-by-Step action:
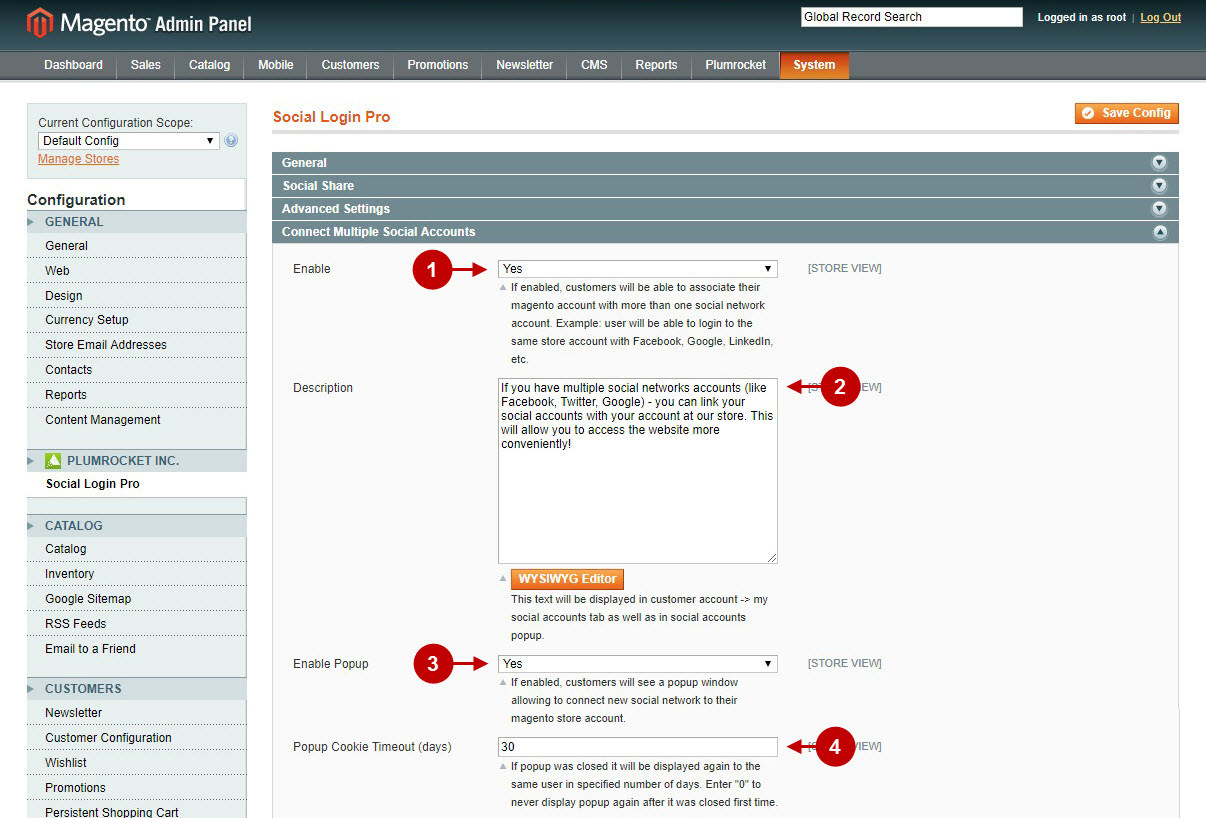
- Enable: allows your customer to associate their Magento account with more than one social network account.
- Description: set up a description to encourage customers connect multiple accounts.
- Enable Popup: allows you to show the popup that will come up after the login or registration.
- Popup Cookie Timeout (days) : allows you to determine how soon the popup will appear for customers again after it gets closed.
Step-by-Step action:
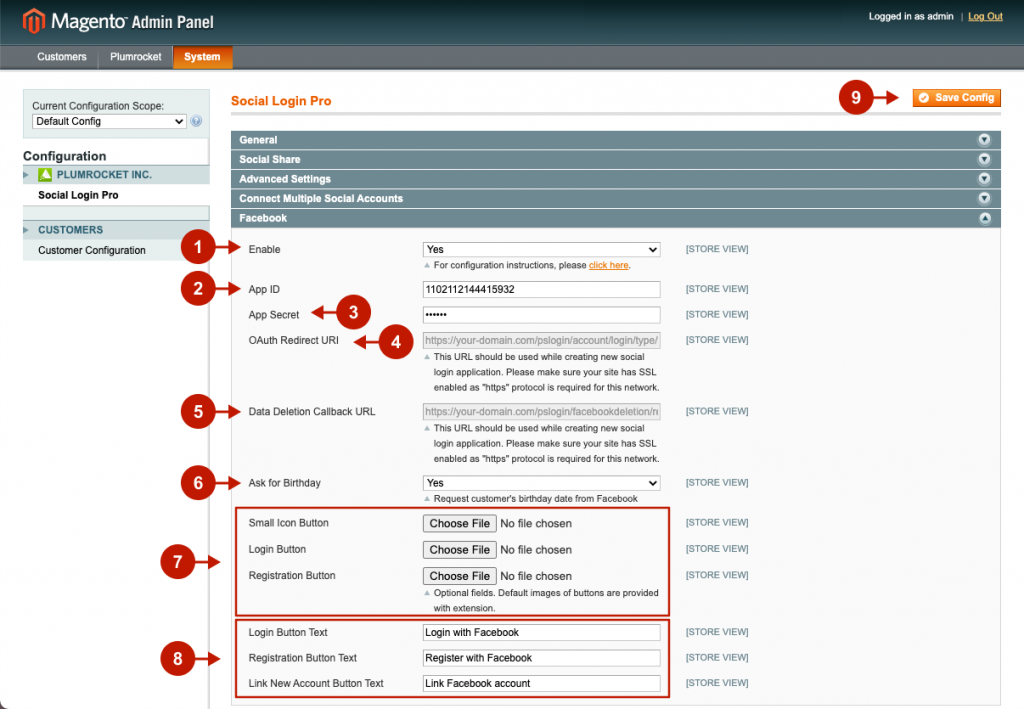
- Enable: allows you to enable the Facebook Login functionality of this magento social login extension. In order to create and configure Facebook application properly, please refer to Facebook Login Configuration article.
- App ID: allows you to indicate the Facebook application ID.
- App Secret: allows you to input the Secret Key provided to you after you create your Facebook application.
- OAuth Redirect URL: contains the full and valid OAuth Redirect URI generated for your store, that should be copied and then pasted into the according field of your Facebook application. Important: This URL should be running under the HTTPS protocol due to the Facebook’s “Enforce HTTPS” setting enabled by default. This setting requires HTTPS for OAuth Redirects and pages getting access tokens with the JavaScript SDK. All new apps created as of March 2018 have this setting on by default and you should plan to migrate any existing apps to use only HTTPS URLs by March 2019. Most major cloud application hosts provide free and automatic configuration of TLS certificates for your applications. If you self-host your app or your hosting service doesn’t offer HTTPS by default, you can obtain a free certificate for your domain(s) from Let’s Encrypt.
- Data Deletion Callback URL: contains the full URL generated for your store, which is called whenever an app user removes Facebook app and requests that you delete their data. It should be copied and then pasted into the according field of your Facebook application.
- Ask for Birthday: enable this option in order to request customer’s birthday date from Facebook. Note: As this this is an additional information to be pulled from Facebook – you will first need to submit this item for review in Facebook application itself.
- Select you own images for Facebook Small Icon Button, Login Button, and Registration Button or skip this step, as the default images are provided with the extension. The Small Icon Button shows up if the window size is small, if there’s no text input for Facebook login button, or if there are many other social login buttons.
- Specify the Facebook Login Button Text, Registration Button Text, and Link New Account Button Text.
- Click the Save Config.
Step-by-Step action:
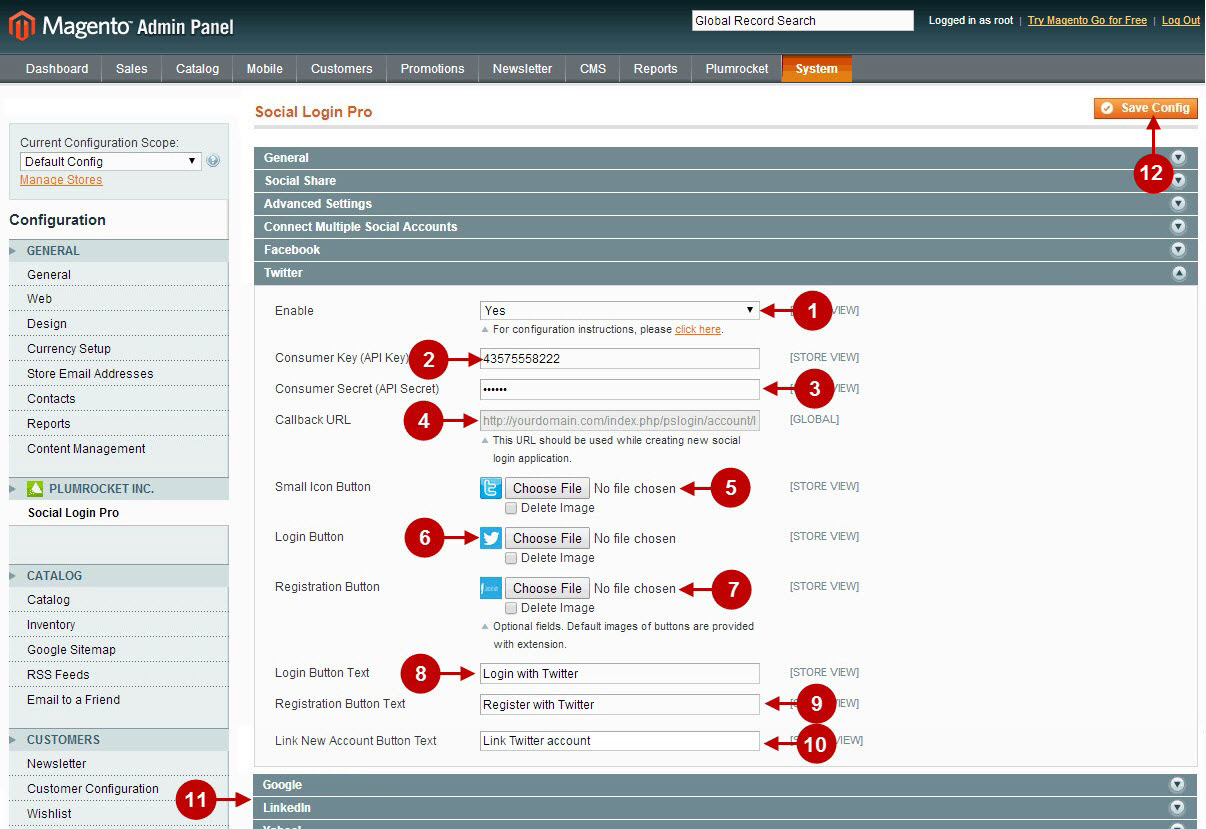
- Enable: allows you to enable the Twitter Login functionality of this magento social login extension. In order to create and configure Twitter application properly, please refer to Twitter Login Configuration article.
- Consumer key (API key): allows you to indicate the Consumer key (API key) provided to you after you create your Twitter application.
- Consumer secret (API Secret): allows you to input the Consumer secret (API Secret) provided to you after you create your Twitter application.
- Callback URL: is an auto-generated field. It allows you to copy Callback URL and paste it in according field while creating new social login application.
- Small Icon Button: allows to select the small icon for Twitter button. It will show up if the window size is small, if there’s no text input for Twitter login button, or if there are many other social login buttons.
- Login Button: allows to select the image for the Twitter login button.
- Registration Button: allows to select image for registration with Twitter button.
- Login Button Text: allows to input the text that will be displayed on Twitter login button.
- Registration Button Text: allows to input the text that will be displayed on Twitter registration button.
- Link New Account Button Text: allows to enter the text that will be displayed on Twiiter link new account button.
- This is the list of other social networks that can be setup same way as Twitter.
- Once you’re finished with configuring this Social Login Pro Magento Extension – please click the “Save Config” button to save your settings.
Managing Social Accounts
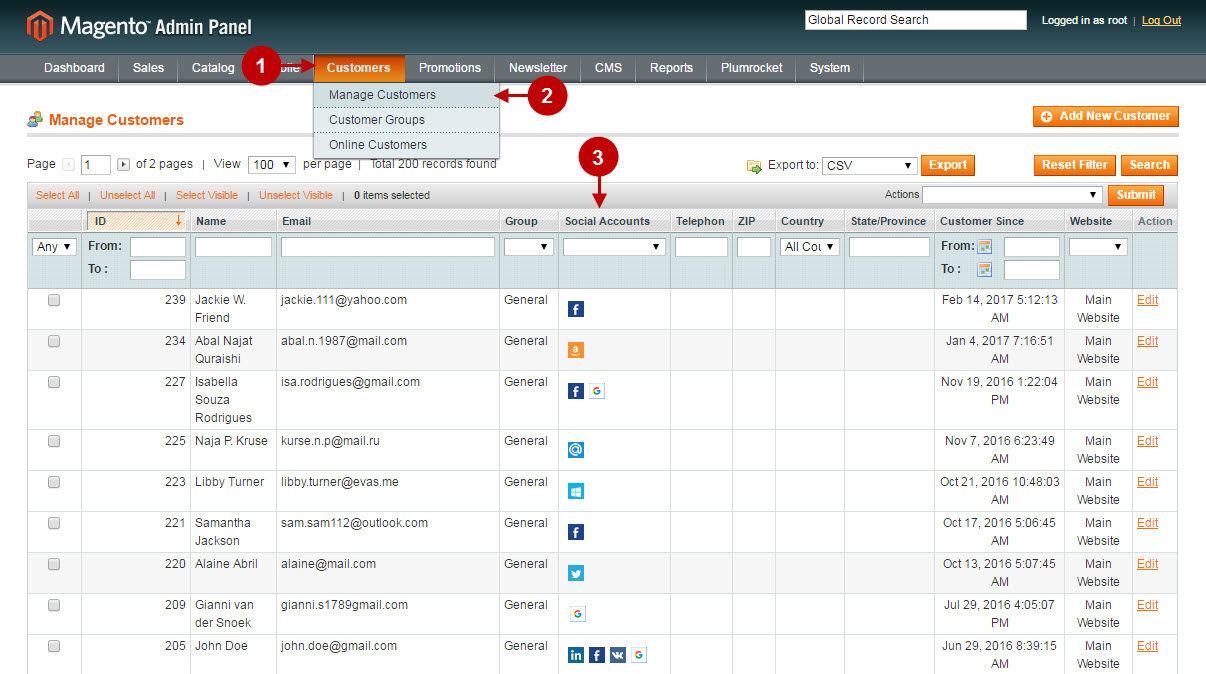
In case you want to sort customers by their social accounts, as well as to be able to view customer’s social accounts, follow the steps below:
Step-by-Step action:
- Go to “Customers” tab in the main menu.
- Select “Manage Customers” section.
- Navigate to “Social Accounts” section in the grid in order to be able to search customers by their social accounts.
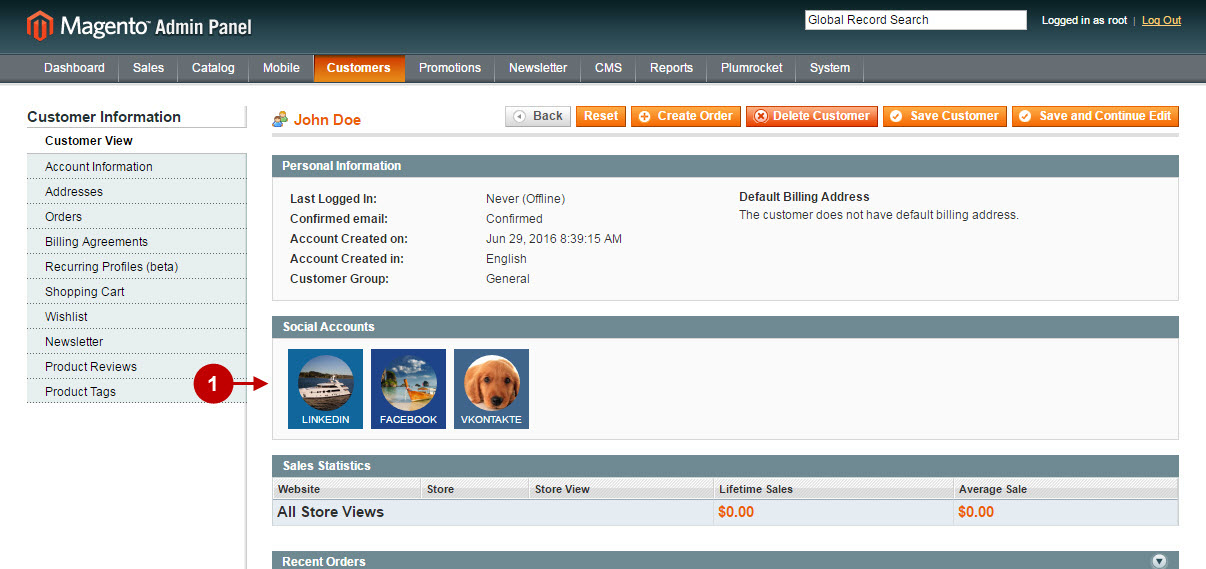
Once you selected the required customer go to the Customer Edit Page.
Step-by-Step action:
- “Social Accounts” section allows to navigate to the customer’s social account directly by clicking on the icon.
Statistics page
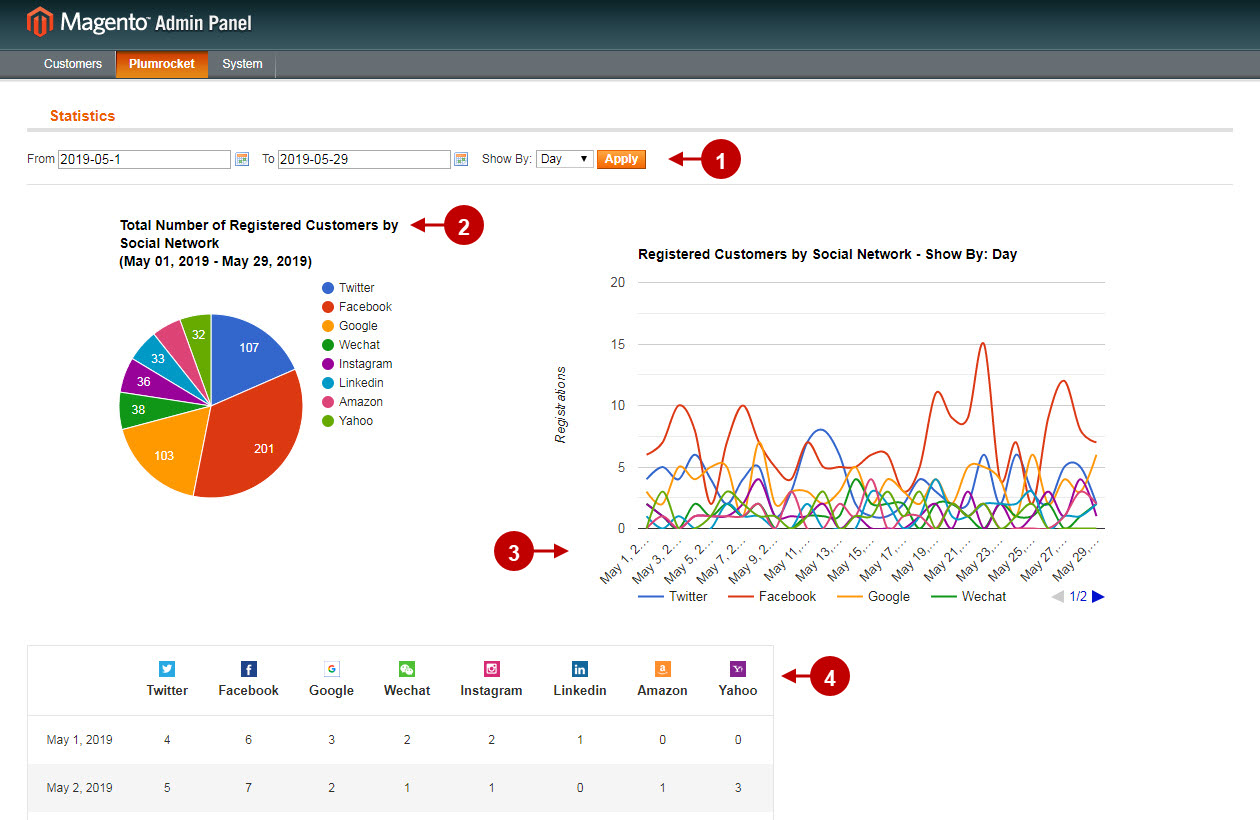
The statistics page shows a number of Registered Customers within Social Network by a certain timeframe selected by admin. This is really handy to compare Social Networks registrations activity and see what works the most for you.
Step-by-Step action:
- Use filtering options to set a timeframe of a period you would like to review. You can show the results by Day, Month or Year.
- Review Total Number of Registered Customers by each Social Network in the circle graph.
- Use a convenient statisticts diagram to check number of registered customers by day, month or year.
- This chart is the other way to review statistics by each Social Network individually.
Social Login Pro API Reference
Each of the social networks supported by this magento social login has its own API, that needs to be setup in order to work properly. Please click on the links below to setup the needed social login for your magento.


