Configuring Magento Banner Pro
In this article you will learn how to configure Magento Baner Pro Extension. Please, follow the guide below to set it properly.
Detailed description:
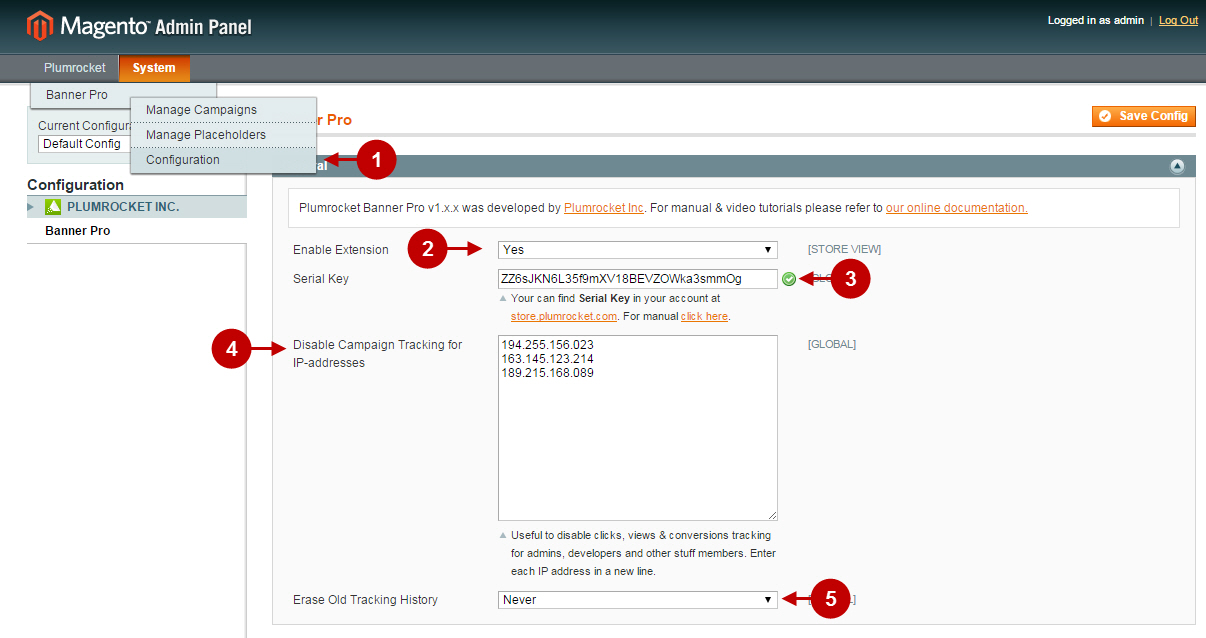
- Go to “Plumrocket” tab in the main menu -> select “Banner Pro” -> “Configuration” section.
- In the “Enable Extension” field you can enable or disable this extension.
- Into the “Serial Key” field, enter the serial key provided to you after the purchase of Magento Banner Pro Extension. Note: In most cases the key will be pre-filled automatically. If you need to install the license manually, read this License Installation guide.
- In the “Disable Campaign Tracking for IP-addresses” field you can specify IP-addresses for which clicks, views and conversions tracking will be disabled. This option is useful for admins, developers and staff members.
- In this field, specify the time period to erase the old tracking history for.
Managing Placeholders
In order to configure placeholders, follow the steps below.
Detailed description:
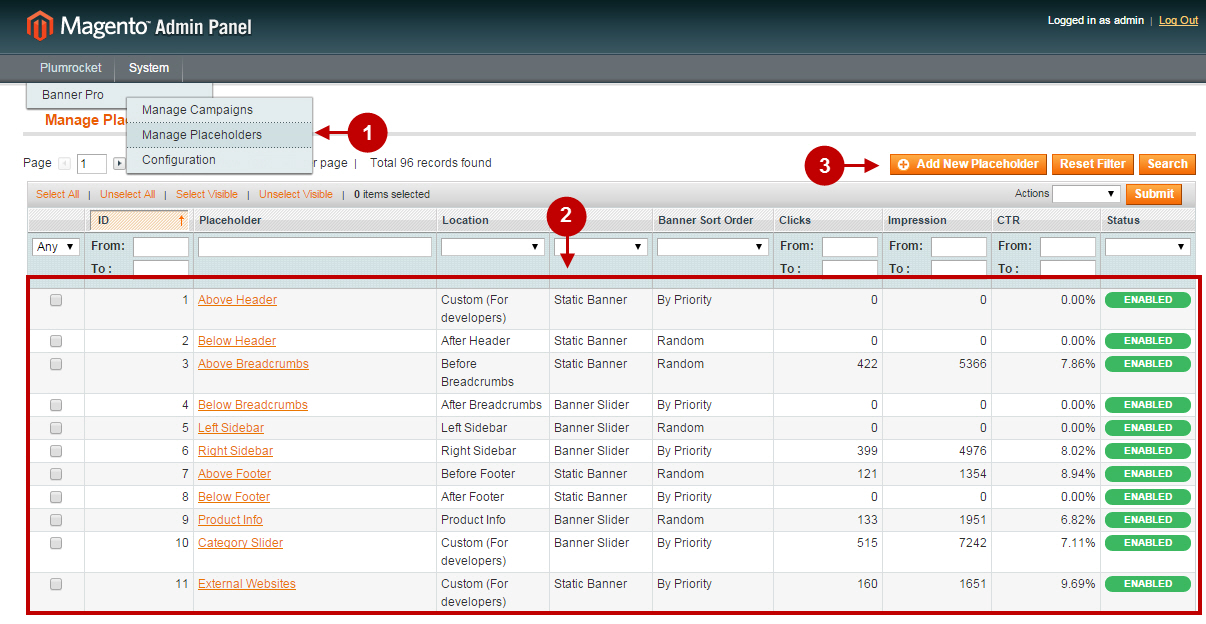
- Go to “Plumrocket” tab in the main menu -> select “Banner Pro” -> “Manage Placeholders” section.
- In this section you can see the list of all placeholders available. Select any placeholder created previously in order to edit it.
- Press “Add New Placeholder” to create new placeholder.
Creating Placeholder
Detailed description:
- “Name”: specify the name of a placeholder.
- “Status”: option allows to enable or disable a placeholder.
- “Location”: option allows you to set the location of a placeholder. Choose among: Above Header, Below Header, Above Breadcrumbs, Below Breadcrumps, Left Sidebar, Left Sidebar, Above Footer, Below Footer, Product Info, Custom (For Developers).
- “Type”: select the type of a banner: static or slider.
- “Banner Sort Order”: specify the sort order in which banners will be displayed on the Magento frontend: By Priority or Random .
- Press “Save Placeholder” in order to save your changes.
- Once the placeholder is saved, you can check banners assigned to this placeholder. Read more information on how to create banners in the “Managing Banners” chapter below.

Detailed description:
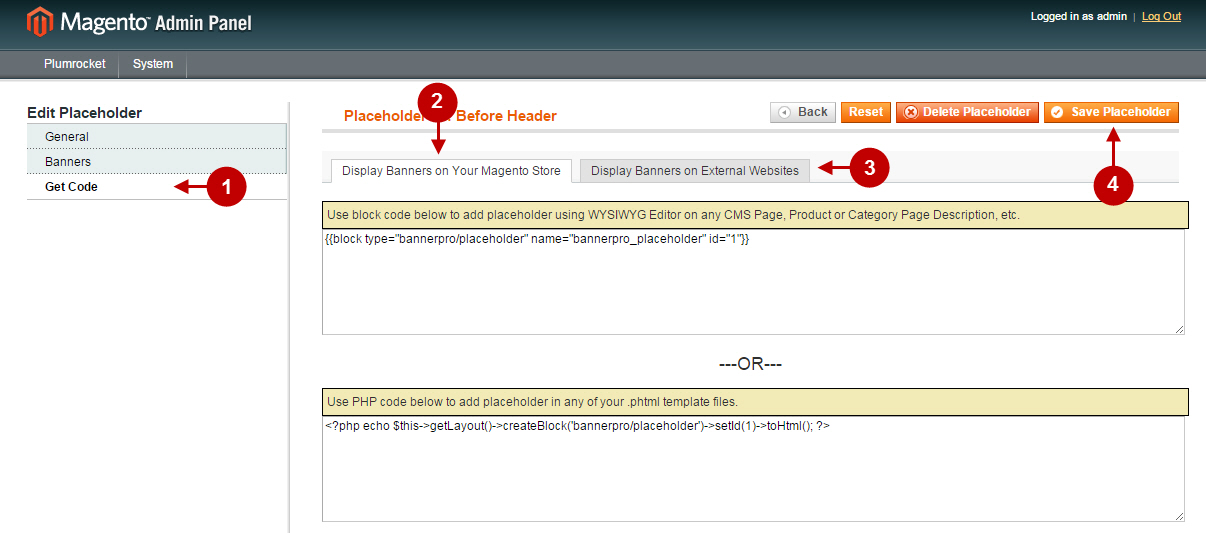
- If you select “Custom (For Developers)” location in the “Placeholders” section -> “General” tab, you need to get a code in order to create your custom placeholder.
- This is the code you can require to display Custom Placement Banners on your Magento Store. Use one of these codes to add the placeholder on any Magento store page. Check more detailed information on creating Custom Placement Banners here.
- This section contains the code you can require to display Banners on External Websites . Use the JavaScript code to add the placeholder on any external resources, such as your site, blog, forum etc. Check more detailed information on creating Banners on External Websites here.
Managing Campaigns
Marketing campaigns allow you to attract new customers to your Magento store and boost your sales. Check the instructions below and learn how create custom campaigns of your store and manage them.
Detailed description:
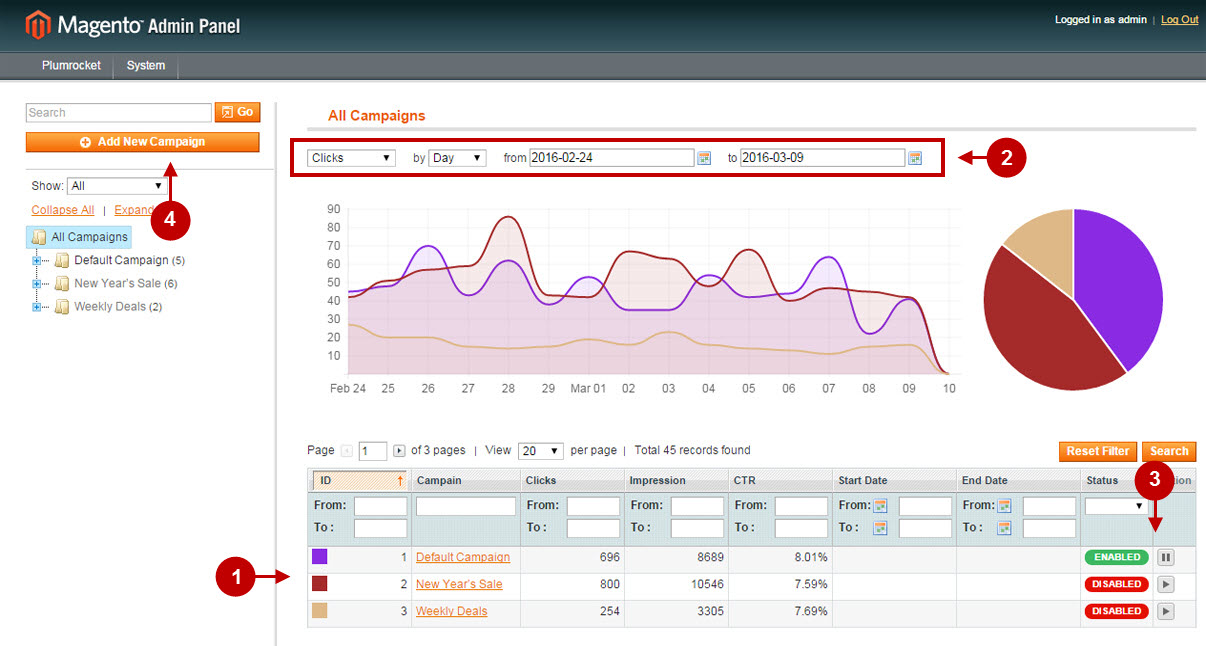
- Go to “Plumrocket” tab in the main menu -> select “Banner Pro” -> “Manage Canpaigns” section.

Detailed description:
- Using various filters you can review the statistics of your campaigns.
- Here you can check the list of existing campaigns.
- If it is required, this option allows you to set any campaign on pause quickly.
- Press “Add New Campaign” button in order to create new custom campaign.
Creating New Campaign
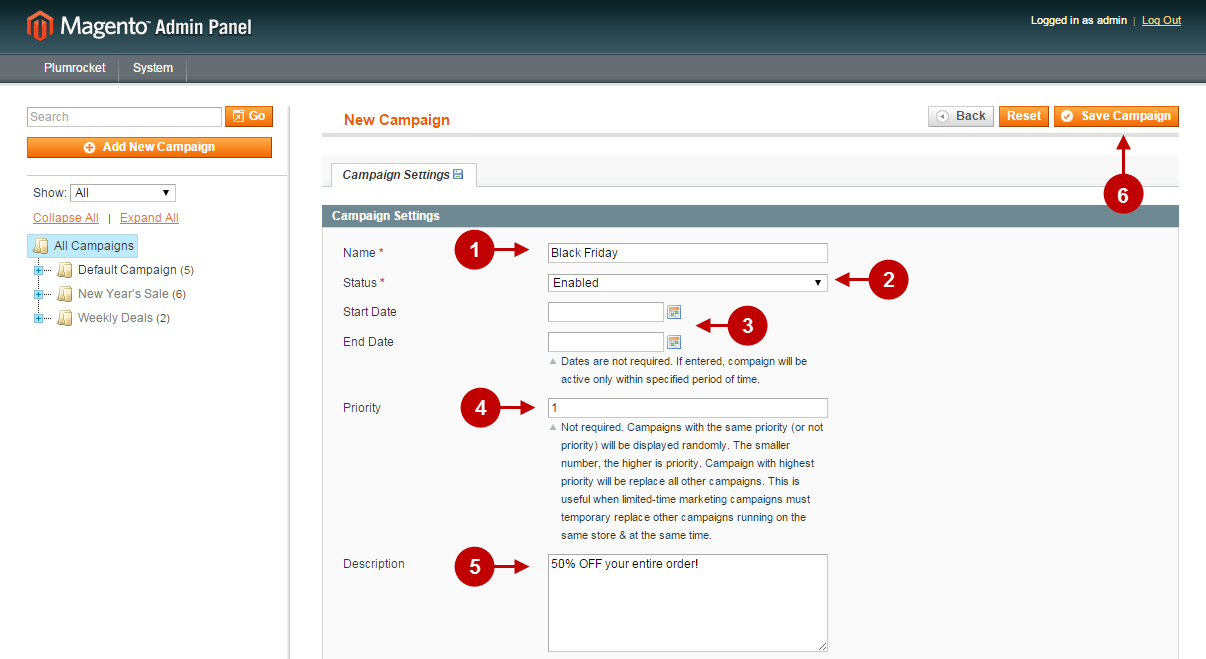
Detailed description:
- “Name”: specify the name of a campaign in this field.
- “Status”: option allows you to enable or disable a campaign.
- Specify the period of your marketing campaign duration using the “Start Date” and “End Date” options.
- Input the number in the “Priority” field. Note: The smaller the number, the higher is the priority. Campaigns with the same priority (or without a priority) will be displayed randomly. Campaign with the highest priority will replace all other campaigns.
- “Description”: option allows you to enter the description of the selected campaign.
Configuring Banner Groups
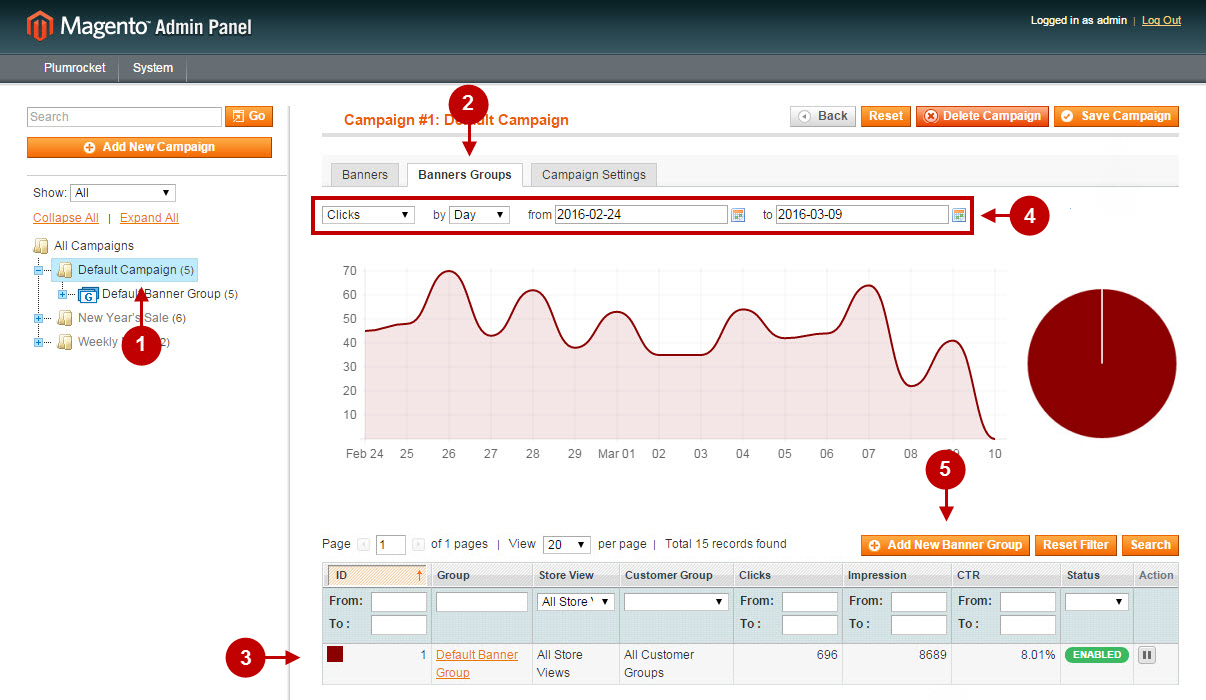
Detailed description:
- Select any campaign you need to add the banner group into. The “Default Campaign” will be displayed by default.
- Choose “Banner Groups” tab.
- Check the list of existing banner groups.
- Use various filters to review the statistics of your banner groups.
- Press “Add New Banner Group” to create new group of banners for your campaign.
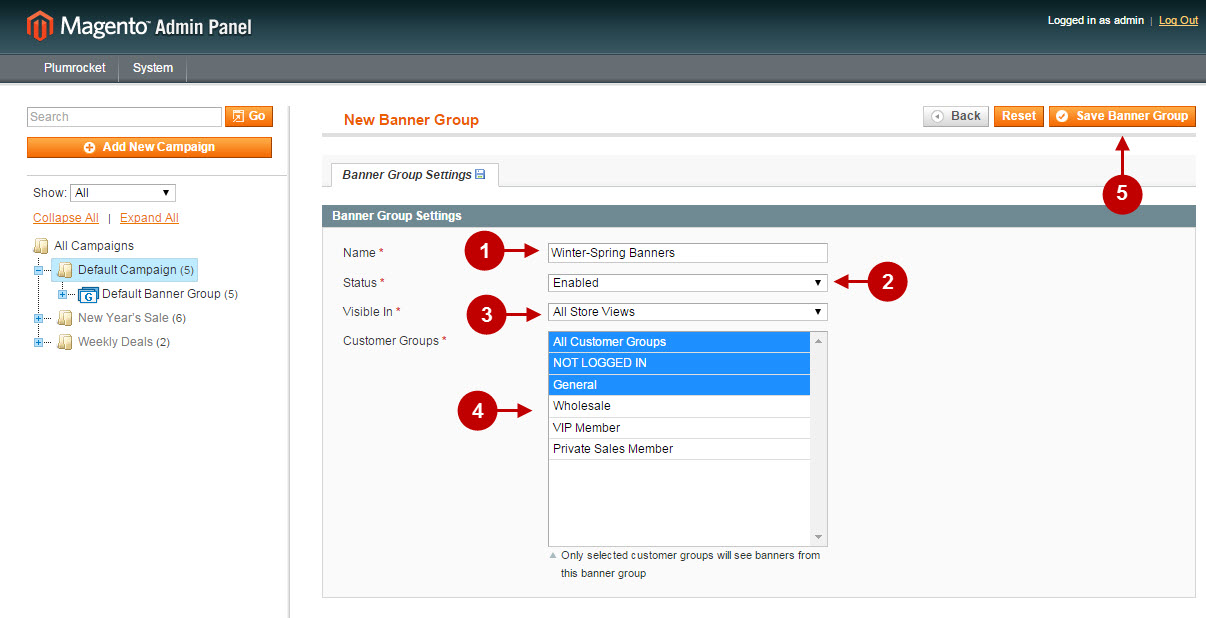
Detailed description:
- “Name”: specify the name of a banner group in this field.
- “Status”: option allows you to enable or disable a banner group.
- “Visible in”: option allows you to select the Store View the banner group will be visible in.
- “Customer Groups”: option allows you to select the customer groups who will see banners from this banner group.
Configuring Banner
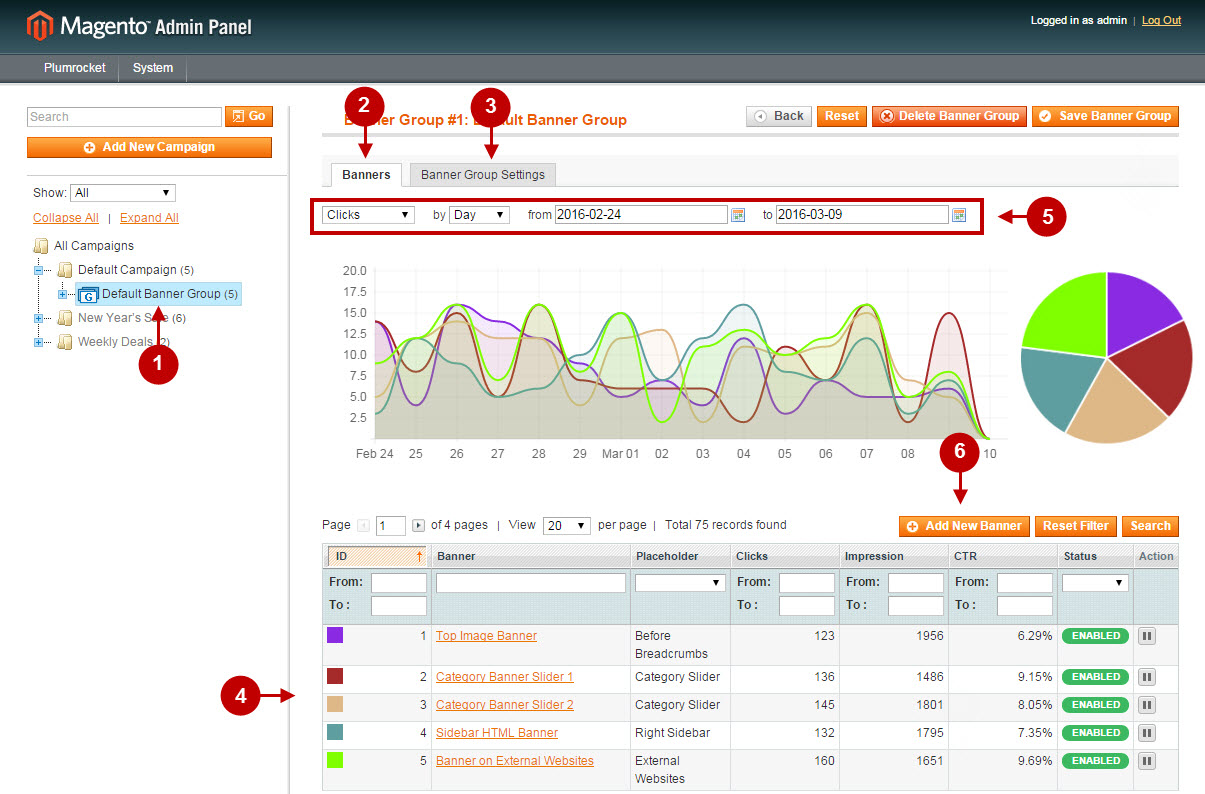
Detailed description:
- Select the banner group you need to create your banner in.
- Select the “Banners” tab.
- The “Banner Group Settings” tab allows you to change the settings of this group directly from this tab.
- Check the list of existing banners created previously.
- Use various filters to review your banners statistics.
- Press “Add New Banner” to create newly designed banner.
Detailed description:
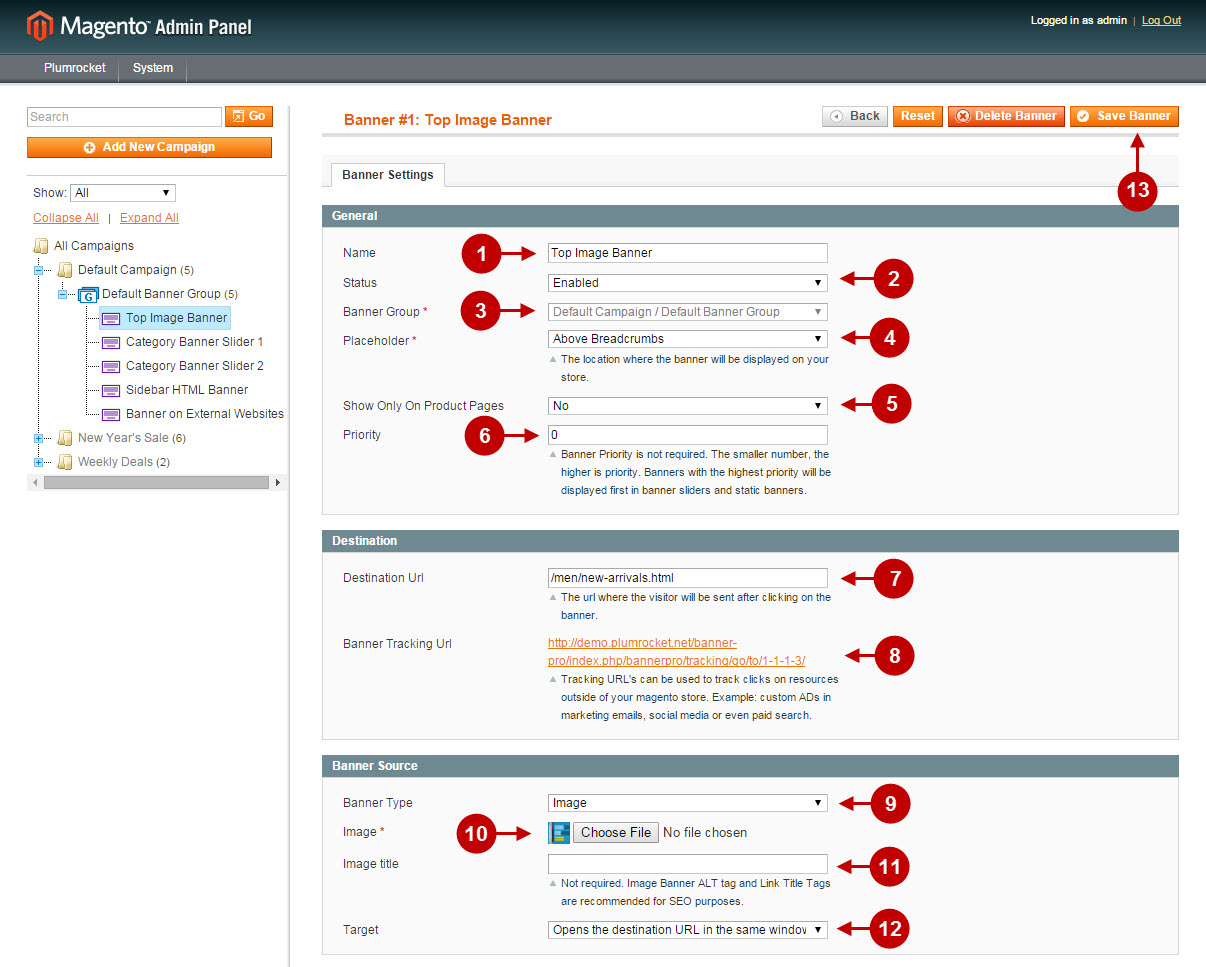
- “Name”: specify name of the banner in this field.
- “Status”: option allows you to enable or disable a banner.
- “Banner Group”: field shows you the banner group this banner is assigned to.
- “Placeholder”: option allows you to set the location where the banner will be displayed at your store.
- In the “Show Only On Product Pages” field you can choose whether the banner will be displayed only on the product pages.
- Input the number in the “Priority” field. Note: The smaller the number – the higher is the priority. Banners with the highest priority will be displayed first in banner sliders and static banners.
- “Destination URL”: enter the url where the visitor will be redirected to after clicking on the banner.
- “Banner Tracking URL”: the tracking url can be used to track clicks on banners, if they are placed on resources outside of your Magento store.
- Select Image or HTML banner type in the “Banner Type” field.
- After you selected Image banner type, upload the image file of your banner.
- For SEO purposes you can specify the image title in the “Image Title” field.
- “Target”: field allows you to select in which way the destination URL will be opened (e.g. in a new window or tab).
Detailed description:
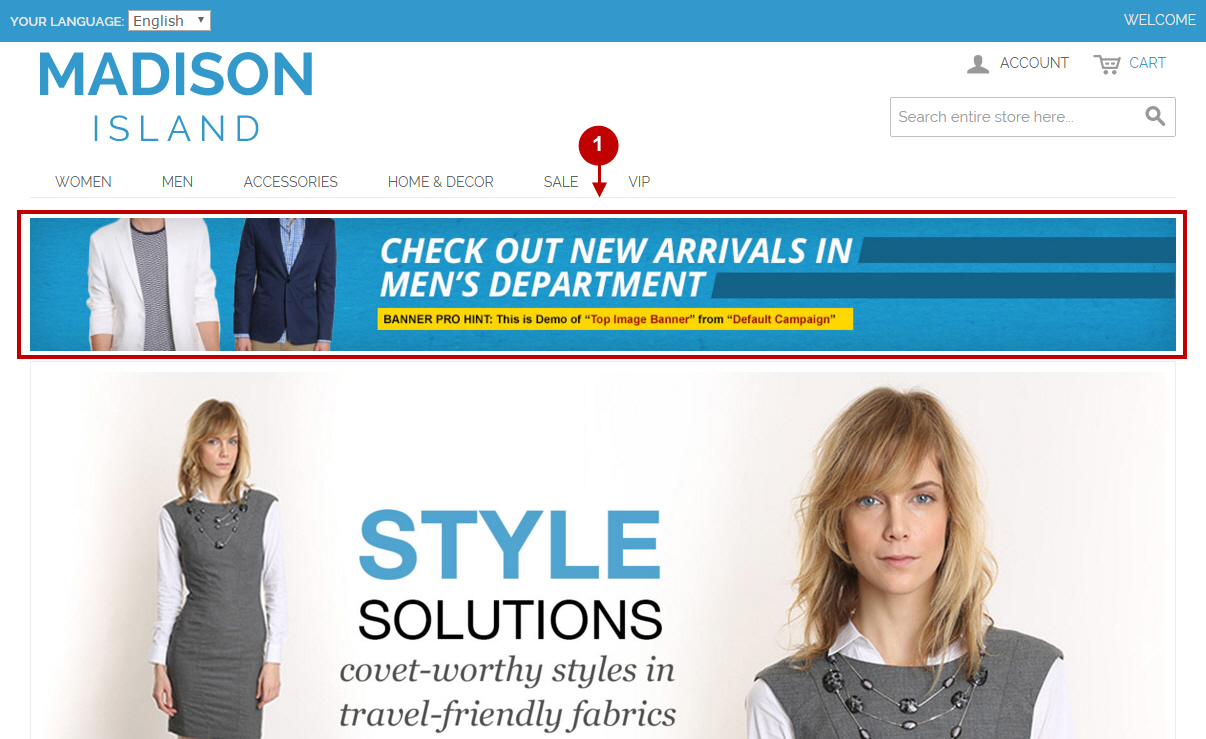
- This is how your newly created Static Banner will be displayed on Magento frontend.
Was this article helpful?
