Configuring Newsletter Popup 2.x Extension
Here you will learn how to correctly configure our Magento Newsletter Popup Extension v2.x. To do this, follow the instructions below.
Step-by-Step action:
- Press “Plumrocket” tab in the menu.
- Select “Newsletter Popup”.
- Select “Configuration”.

Step-by-Step action:
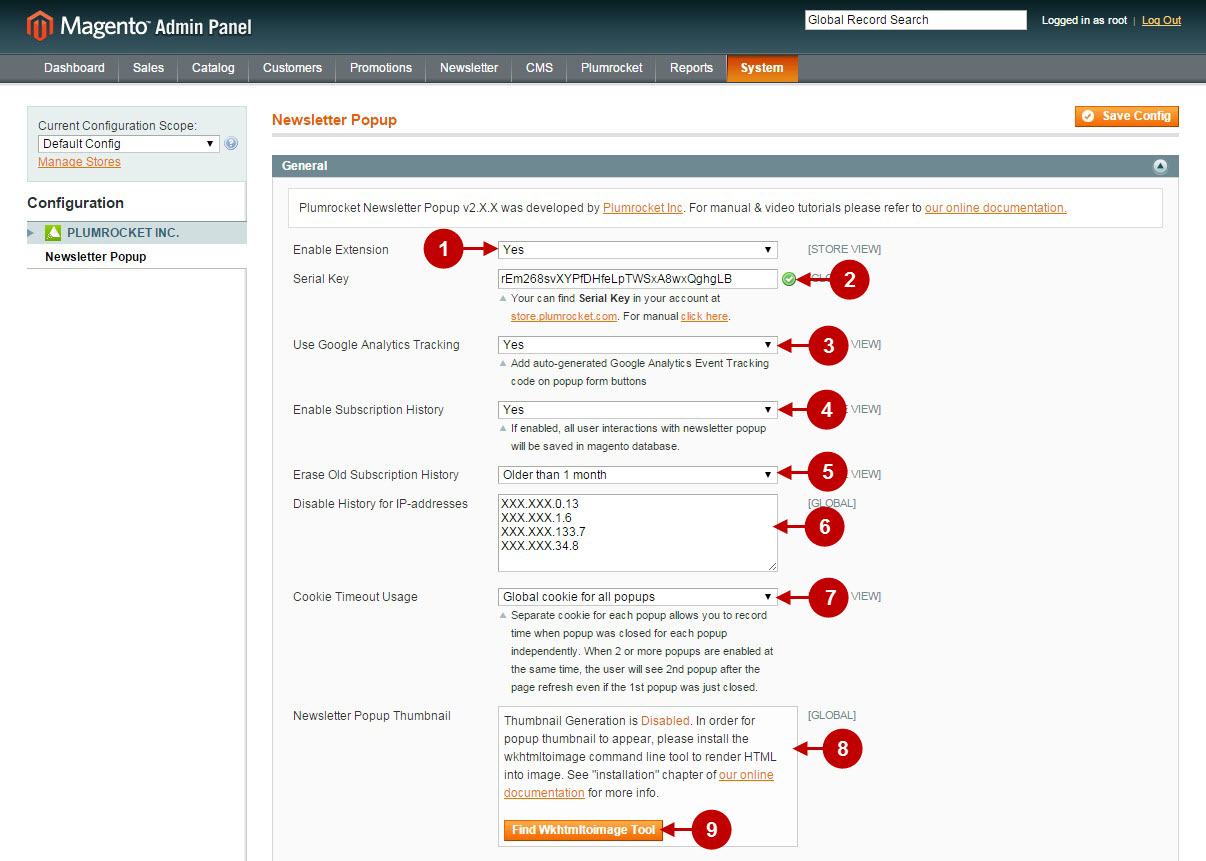
- Enable Extension: allows you to enable or disable this Newsletter Popup extension.
- Option “Serial Key”: enter unique serial key provided after the purchase for legitimate and proper functioning of your extension. Note: In most cases this field will be pre-filled with serial key automatically and the green check mark will be displayed. Otherwise please read article Serial Key Activation in order to find and paste your serial key manually.
- Option “Use Google Analytics Tracking”: allows you to select whether or not Google Analytics Tracking will be used for your Popups.
- “Enable Subscription History”: if enabled, this option allows to save all user’s interactions with Popups in magento database.
- Option “Erase Old Subscription History”: allows to select the period of time after which the Subscription History will be erased.
- “Disable History for IP-addresses”: this option allows you to indicate the IP-addresses, which interactions with popups will not be saved in magento database.
- Option “Cookie Timeout Usage”: allows you to use two different types of cookies: “Global cookie for all popups” and “Separate cookie for each popup”. This way admin will be able to record time when popup was closed for each popup independently. When 2 or more popups are enabled at the same time, the user will see 2nd popup after the page refresh even if the 1st popup was just closed.
- “Newsletter Popup Thumbnail”: indicates if “Thumbnail Generation” option for the popup is enabled or disabled.
- “Find Wkhtmltoimage Tool” button: allows you to locate this tool after installation on the server, or find it in case it was moved within the file system.
Important Information:
In order to enable Newsletter Popup Thumbnail – you will need to have the wkhtmltoimage command line tool installed as outlined here.
Step-by-Step action:
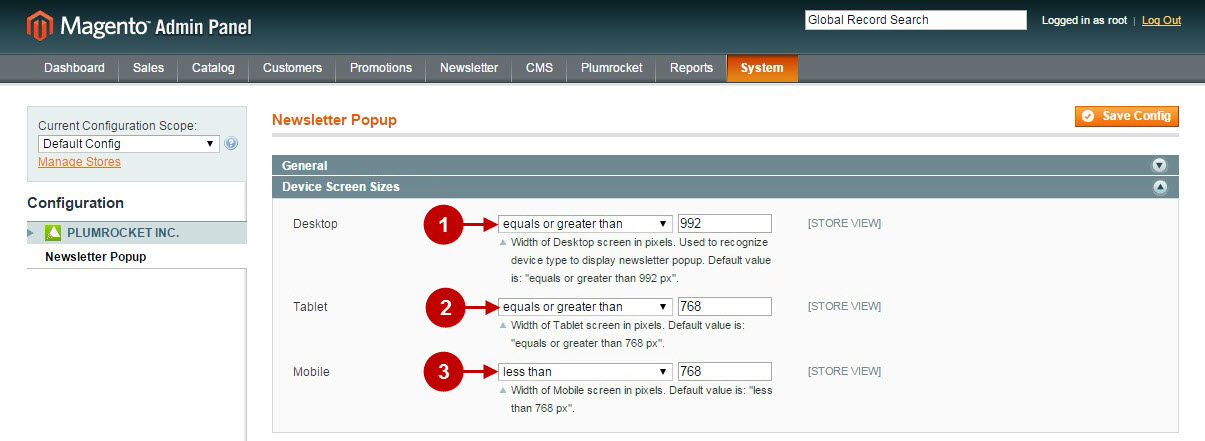
- Option “Desktop”: allows you to set the width of Desktop screen for proper display of Newsletter Popup. By default it is 992 pixels or greater.
- Option “Tablet”: allows to set the width of Tablet screen. By default it is 768 pixels or greater.
- Option “Mobile”: allows to set the width of Mobile device screen. By default it is less than 768 pixels.
Step-by-Step action:
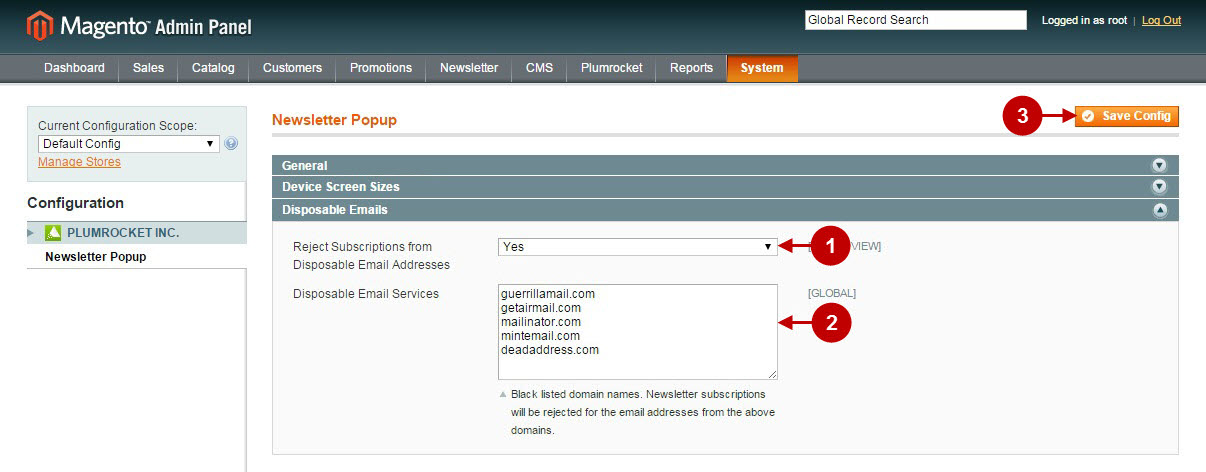
- “Reject Subscriptions from Disposable Email Addresses”: if enabled, this option will reject subscription for the email addresses from the list of disposable email services.
- Option “Disposable Email Services”: allows you to indicate the blacklisted domain names. Newsletter subscriptions will be rejected for the email addresses from these domains.
- Press “Save Config” button to save your settings.
Step-by-Step action:
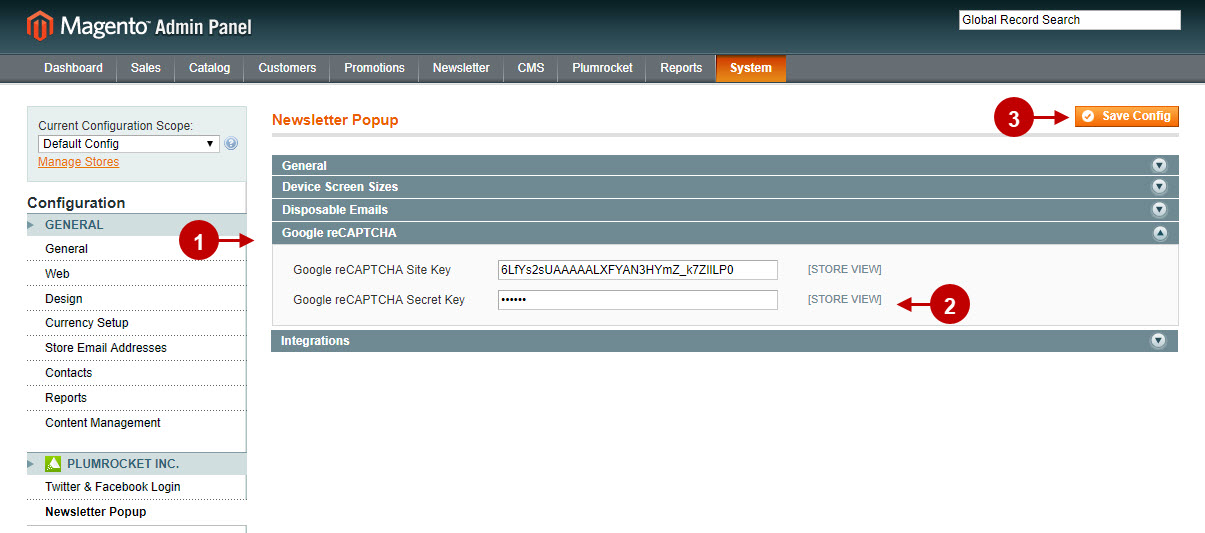
- “Google reCAPTCHA Site Key”: log into your account at google.com/recaptcha to generate your Google reCAPTCHA Site Key.
- “Google reCAPTCHA Secret Key”: log into your account (by the link provided above) to generate your Google reCAPTCHA Secret Key.
- Press “Save Config” button to save your settings.
Newsletter Popup CRM Integrations Configuration
Managing Newsletter Popups
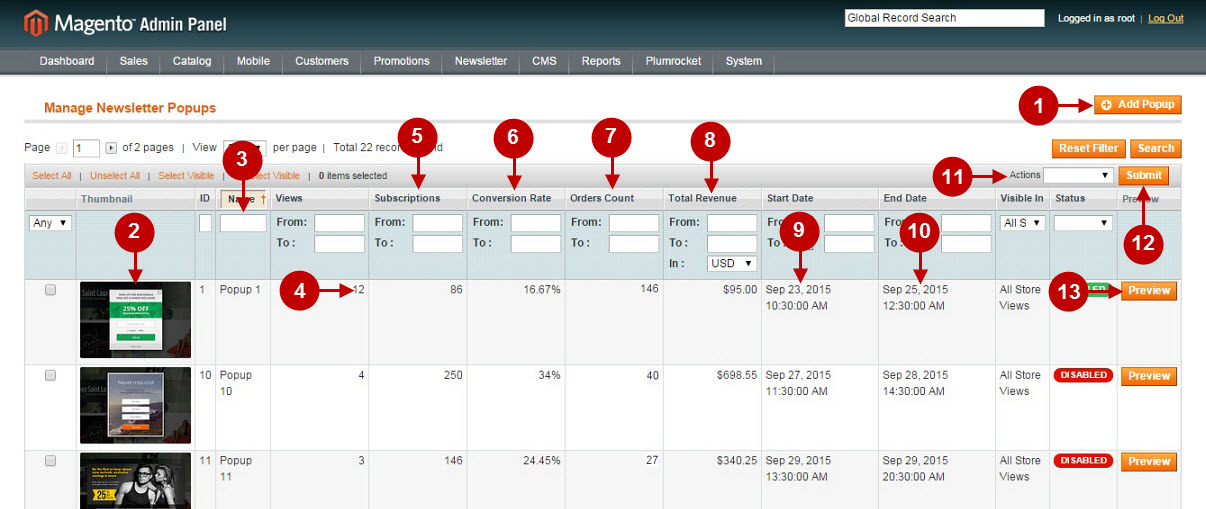
This tab allows you to preview and edit Popups. In order to access this management page, follow the steps as described below.
Step-by-Step action:
- Press the “Plumrocket” tab in the menu.
- Select “Newsletter Popup”.
- Select “Manage Popups”.

Step-by-Step action:
- You can add new popup by clicking on “Add Popup” button.
- “Thumbnail” column: allows you to see the thumbnail image of the popup.
- “Name” column: indicates the name of the popup.
- “Views” column: allows you to see the amount of users’ views of the popup.
- “Subscriptions” column: allows you to see the amount of users’ that were subscribed using specific popup.
- “Conversion Rate” column: shows the conversion rate of the popup.
- “Orders Count” column: allows you to see the amount of orders made with this popup.
- “Total Revenue” column: shows the total revenue gained with this popup.
- “Start Date” column: indicates the Start Date of the Newsletter Popup.
- “End Date” column: indicates the End Date of the Newsletter Popup.
- You can duplicate, enable, disable or delete the selected popup(s) by selecting the according action from “Actions” dropdown.
- Press “Submit” button to confirm the needed action.
- “Preview” button opens the popup in the separate window for your review.
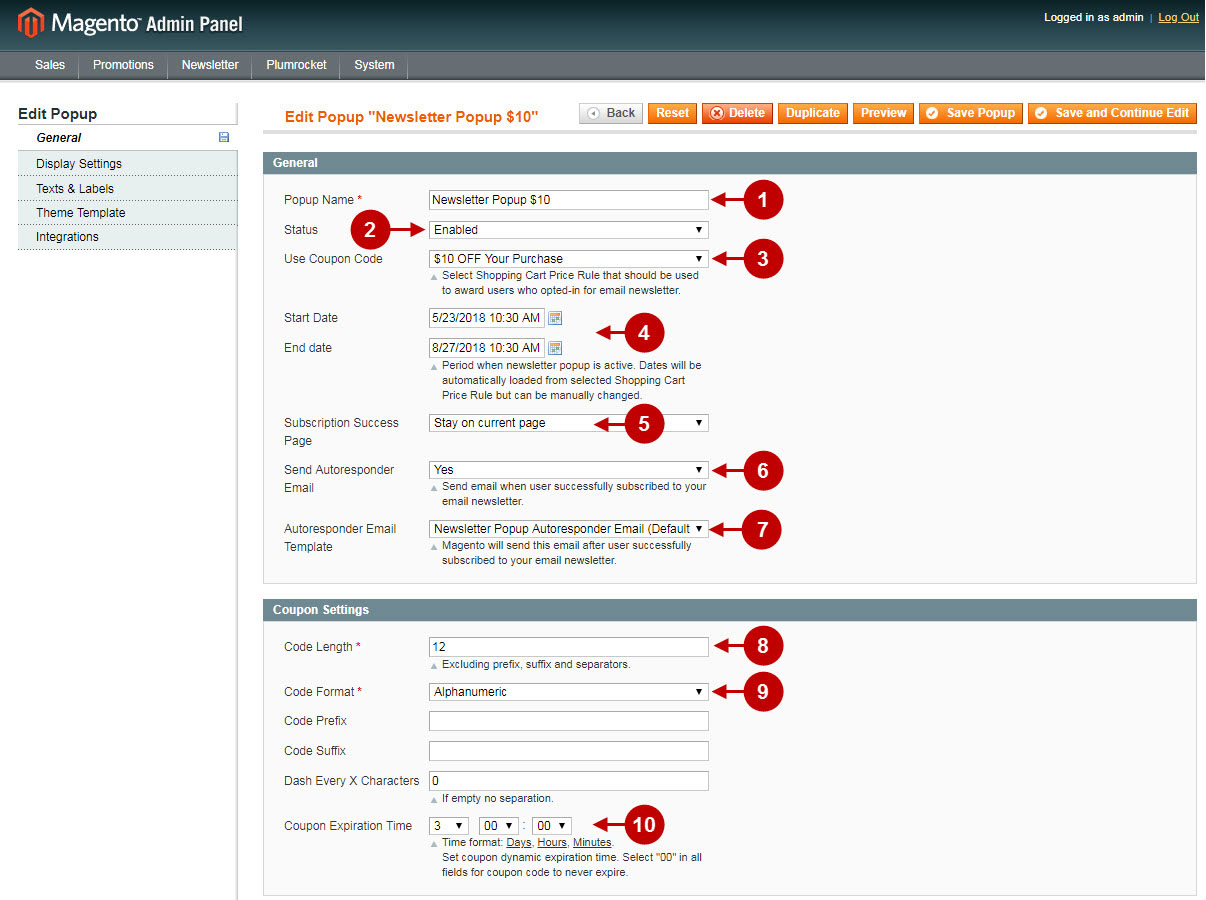
In order to configure your new Magento Newsletter Popup please follow the step-by-step instructions below.
Step-by-Step action:
- Option “Popup Name”: allows you to indicate Newsletter Popup name.
- “Status”: this option allows you to enable or disable this extension.
- Option “Use Coupon Code”: allows you to select the Shopping Cart Price Rule with coupon (if any). For more information about the rules please read Creating Shopping Cart Price Rules In Magento.
- Options “Start Date”, “End Date”: allow you to set the Start Date and End Date of the Newsletter Popup.
- Option “Subscription Success Page”: allows you to select the page where the subscriber will be transferred to after successful subscription.
- Option “Send Autoresponder Email”: allows you to choose whether or not the notification email about successful subscription will be sent to a client.
- Option “Autoresponder Email Template”: allows you to select the template that will generate notification email about successful subscription.
- Option “Code Length”: allows you to set the Discount Coupon Code length.
- Option “Code Format”: allows you to select the Discount Coupon Code format. Possible options are: “Alphanumeric” , “Alphabetical” or “Numeric”.
- Option “Coupon Expiration Time”: allows you to specify expiration time of the coupon in days, hours, minutes.
Information:
After the user has successfully subscribed to the Newsletter and the Coupon Code is generated, you can see the Coupon Expiration Date in the Shopping Cart Rule section.
Step-by-Step action:’
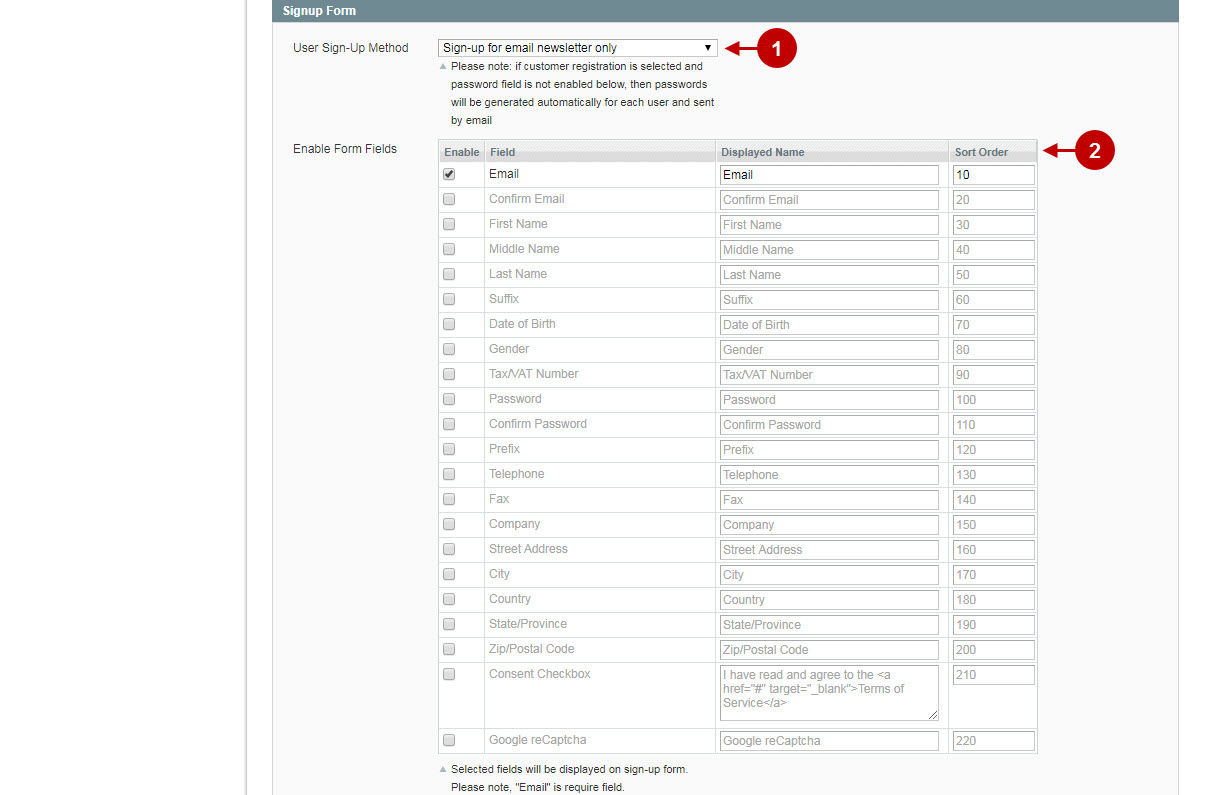
- Option “User Sign-Up Method”: allows you to select the way for customer sign-up process. Possible options are “Sign-up for email newsletter only” and “Register customer account & sign-up for newsletter”.
- Option “Enable form fields”: allows you to select, enable, rename and define sort order for the additional fields on users sign-up form.
Step-by-Step action:
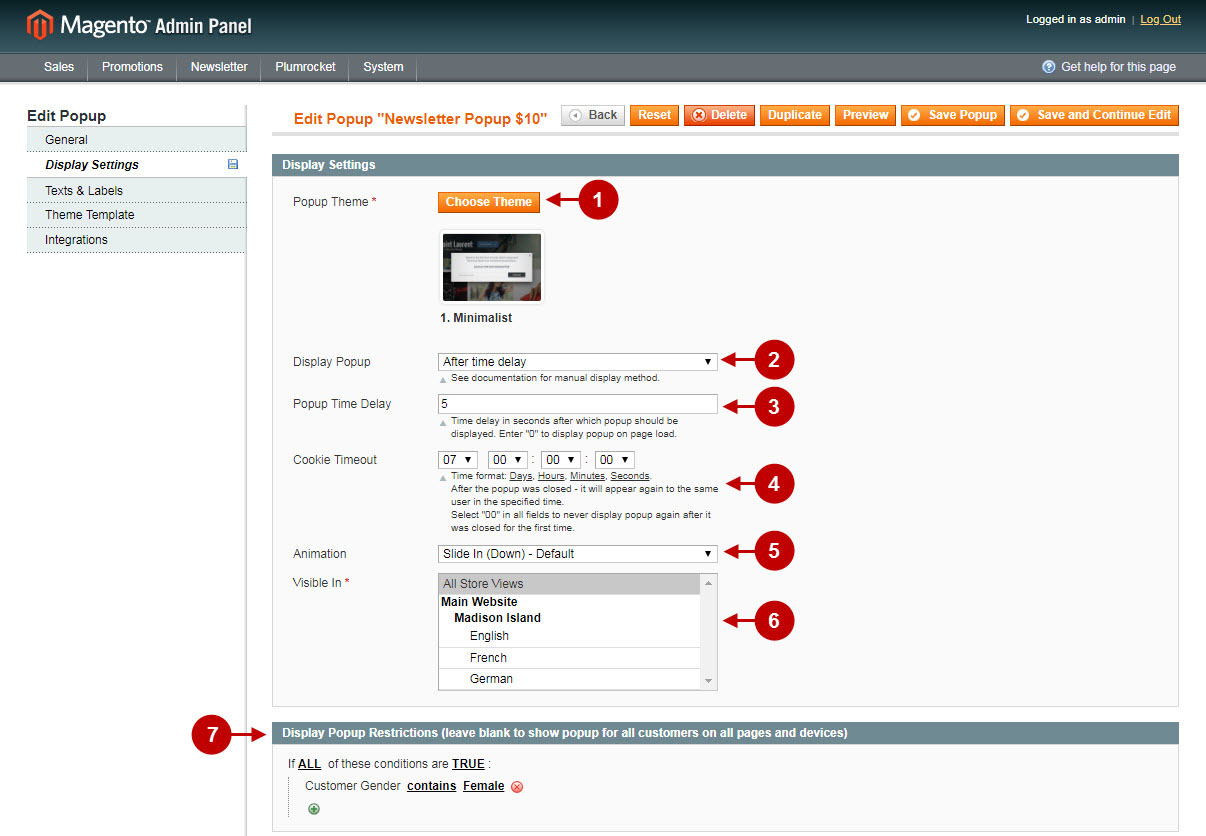
- Option “Popup theme” : Press “Choose Theme” button to select the theme for this Popup.
- Option “Display Popup”: allows you to select the option where the Popup will be displayed. Possible options are: “After time delay” , “When leaving site (out of focus)” , “On Page Scroll” , “On Mouse over” , “On click” and “Manually” . Note: If you select “On Mouse Over” or “On Click” display method – the “CSS Selector” field will appear, where you can enter the “ID” or “Class Name” of the object you want to use to trigger the newsletter popup. For the “Manually” option please refer to Magento Newsletter Popup v1.x Developers Guide and API Reference section for more information.
- “Popup Time Delay”: this option allows you to indicate the delay time after which the Popup displays.
- Option “Cookie Timeout”: allows you to set the time frame for the cookies in days, hours, minutes, seconds. Cookies are used to track whether user clicked on “subscribe” or “cancel” button. If the user choose to cancel the subscription, then the popup will be displayed again only in specified amount of days. Enter ‘0’ in this field to never display the newsletter popup again after it was closed for the first time.
- Option “Animation”: allows you to select different animation effects for popup.
- Option “Visible In”: allows you to choose for which Store view(s) the Popup will be visible.
- Section “Display Popup Restrictions”: here you can create special display popup restriction rules. As the result of these rules the popup will be displayed only if the conditions you’ve created are true or false.
Important Information:
How to calculate when is the right time to display newsletter popup? Good starting point would be your site statistics. In Google Analytics you can go to Audience -> Behavior -> Engagement and see when most visitors leave your site. The default suggested value is 5 seconds . However we always suggest to test and compare different time delays vs number of email signups as every website is different.
Step-by-Step action:
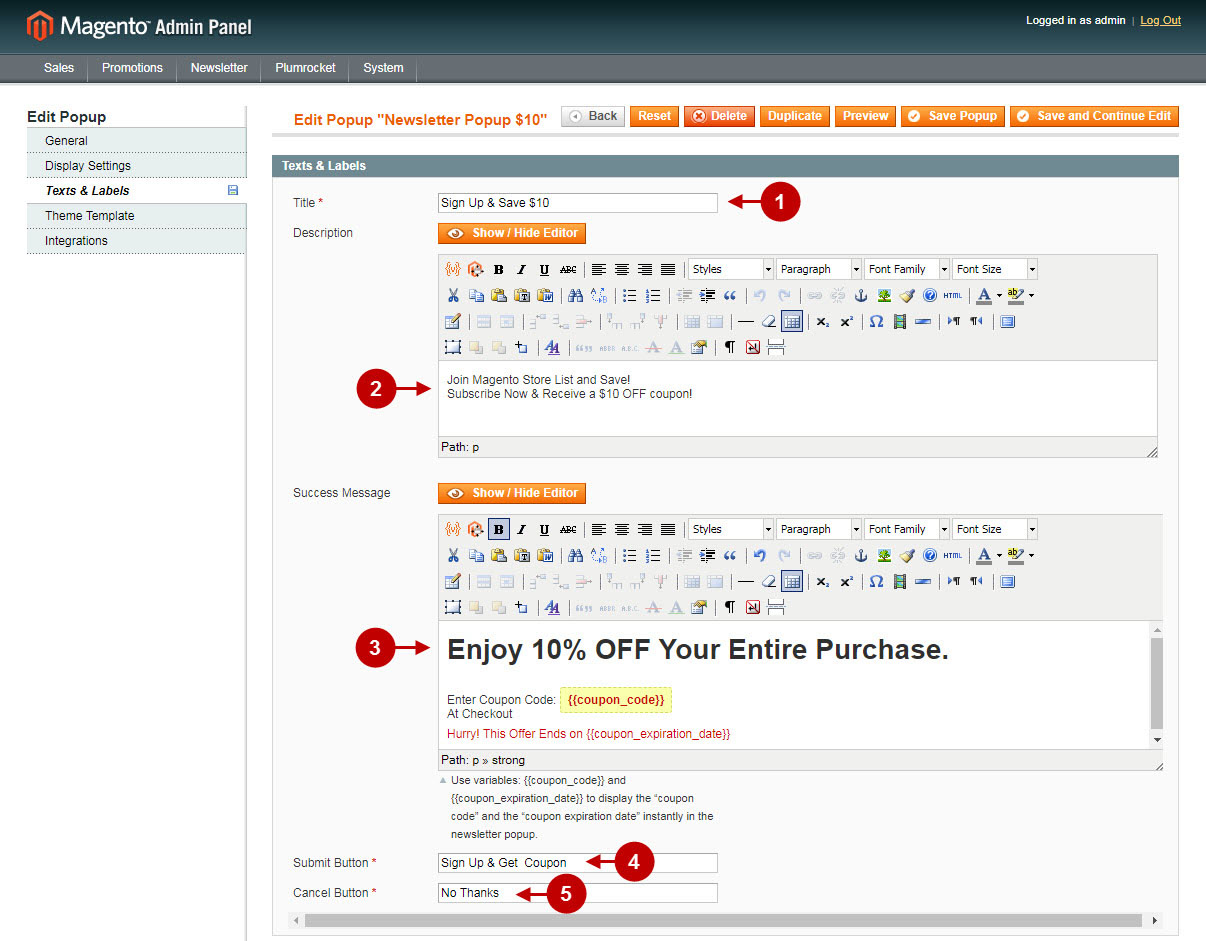
- Option “Title”: allows you to set the title which will be used for Newsletter Popup.
- Option “Description”: allows you to indicate some description for the Popup if needed.
- Option “Success Message”: lets you set the message that will show up after the successful subscription. You can use the {{coupon_code}} variable to auto generate a coupon code and the {{coupon_expiration_date}} variable to auto generate the time of the coupon code expiration.
- Option “Submit Button”: allows you to create a text for “Submit” button of the Popup.
- Option “Cancel Button”: lets you create a text for “Cancel” button of the Popup.
Step-by-Step action:
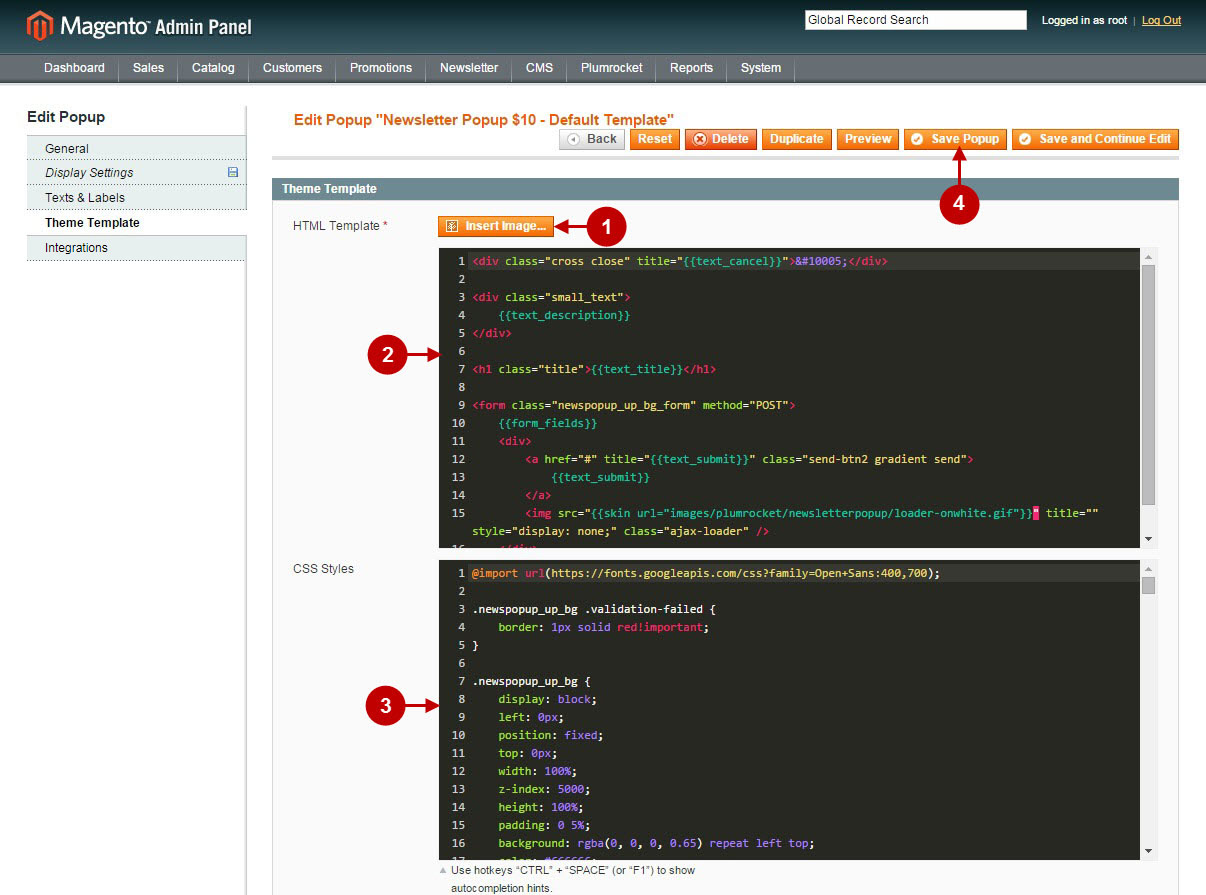
- “Insert Image” button: allows you to upload and insert images to your theme template.
- Option “HTML Template”: here you can edit the HTML code of the template.
- Option “CSS Styles”: here you can edit the CSS Styles code of the template.
- Press “Save Popup” button to save your Newsletter Popup.
Step-by-Step action:
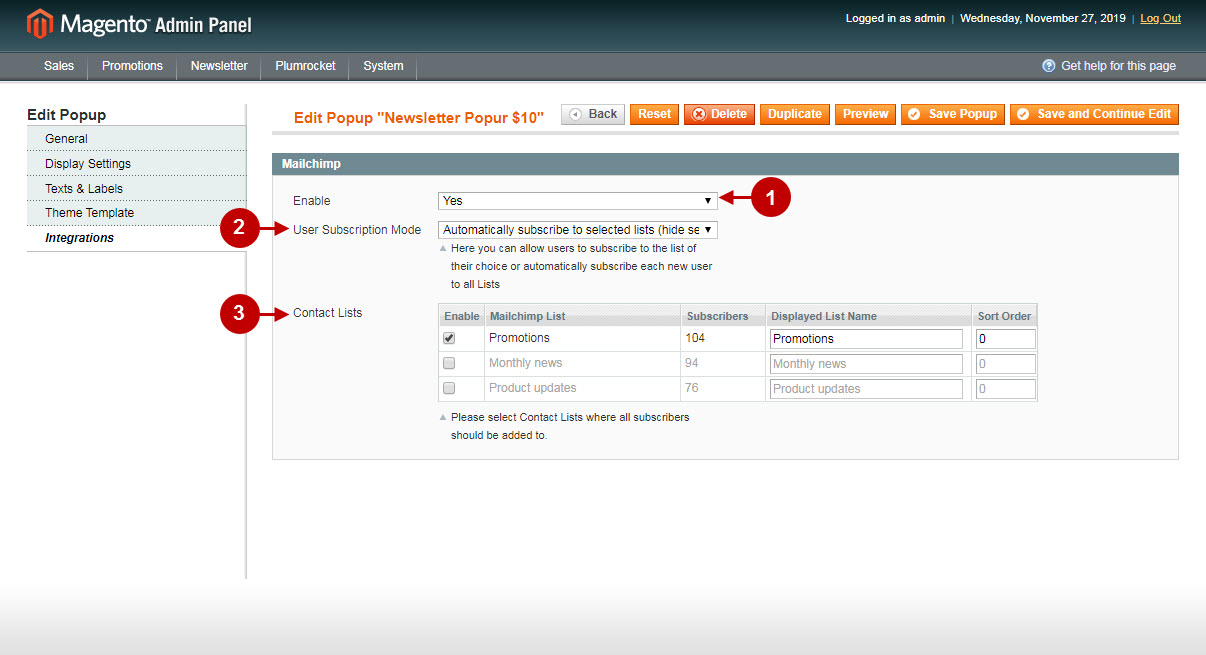
- Enable or disable Mailchimp integration.
- Option “User Subscription Mode”: lets you allow users to subscribe to the list of their choice or automatically subscribe each new user to all Mailchimp lists. Multiple options are available here.
- Option “Contact Lists”: allows you to choose the lists where the subscribers should be added to.
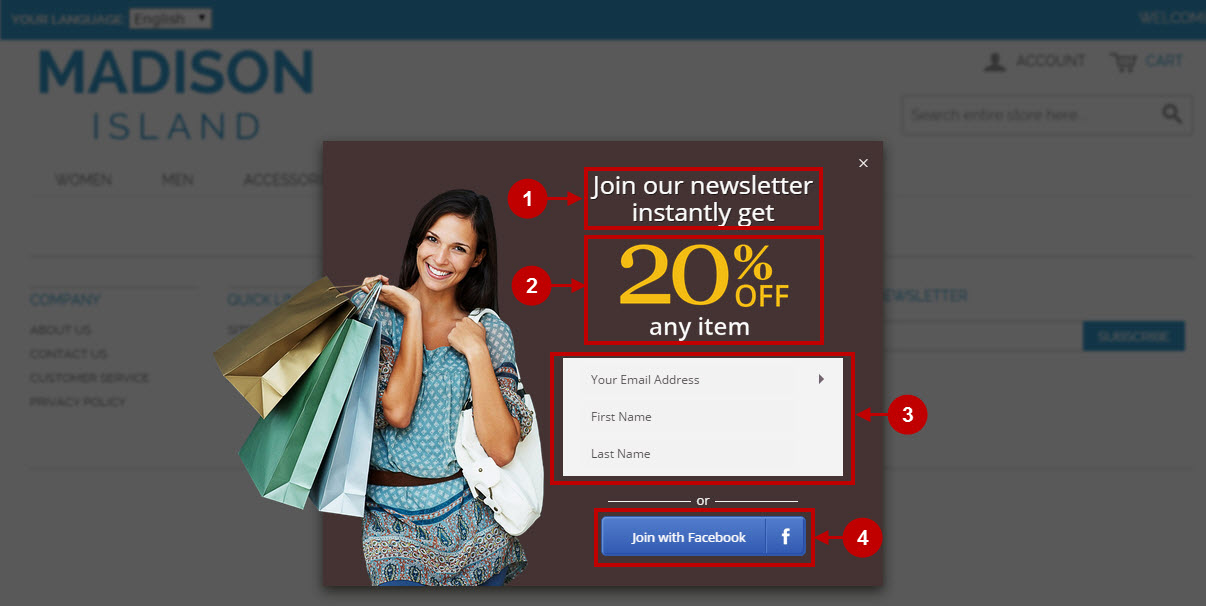
Here’s how the newsletter popup (with Chocolate theme) will look like on frontend once enabled.
Step-by-Step action:
- This is how your title section will look like.
- Here’s how the description text section will be displayed.
- This is the sign-up section of newsletter popup.
- This is how the social media login button will be displayed. Note that Newsletter Popup Extension has built-in support of twitter & facebook login extension.
This is how the newsletter popup (with Right Slide Out theme) will look like on frontend once enabled.
Step-by-Step action:
- The title text section of this popup theme is also a button that customers can press to show or hide the popup.
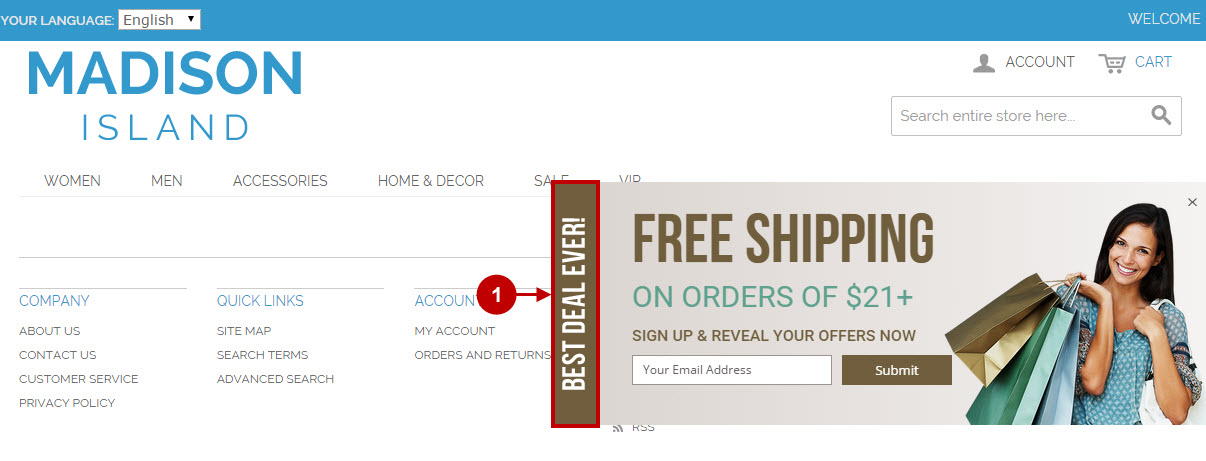
Managing Newsletter Popup Themes
This tab allows you to create, preview and edit Popup Themes. In order to access this management page, follow the steps as described below.
Step-by-Step action:
- Press the “Plumrocket” tab in the menu.
- Select “Newsletter Popup”.
- Select “Manage Themes”.

Step-by-Step action:
- You can add new theme by pressing “Add New Theme” button.
- “Thumbnail” column: allows you to see the thumbnail image of the newsletter popup theme.
- “Theme Name” column: allows you to see and search by the theme name.
- “Updated At” column: indicates when the popup theme was updated.
- “Created At” column: indicates when the popup theme was created.
- You can duplicate or delete the selected popup theme(s) by selecting the according action from “Actions” dropdown.
- By pressing “Submit” button you will confirm the needed action.
- “Preview” button: opens the popup in the separate window where you can preview the popup theme.
- “Edit” link: by clicking on this link you can edit your popup theme. Please note that default themes cannot be edited. Instead you can duplicate the default theme and then edit it.
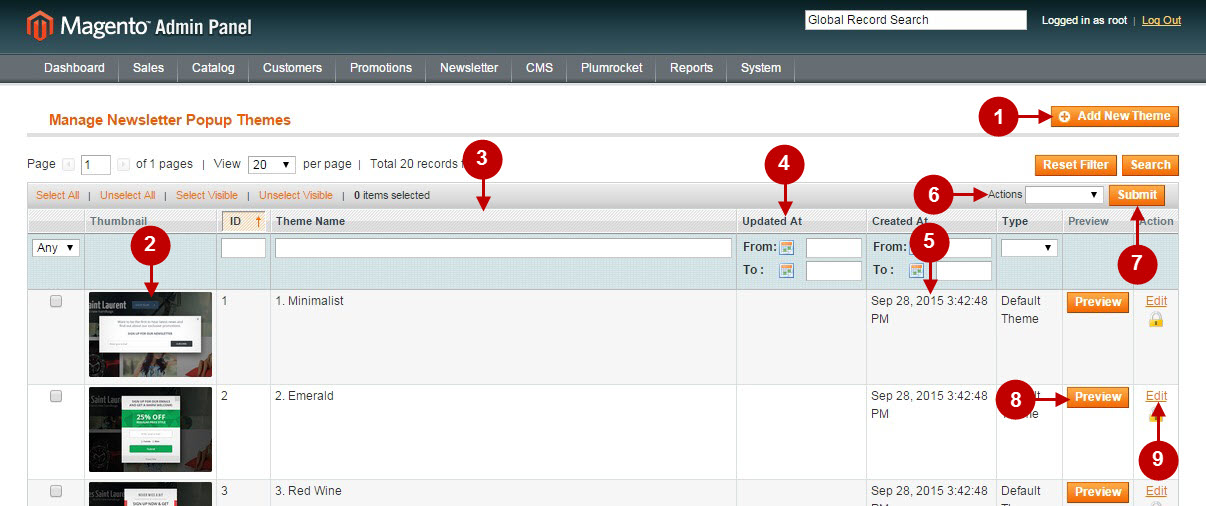
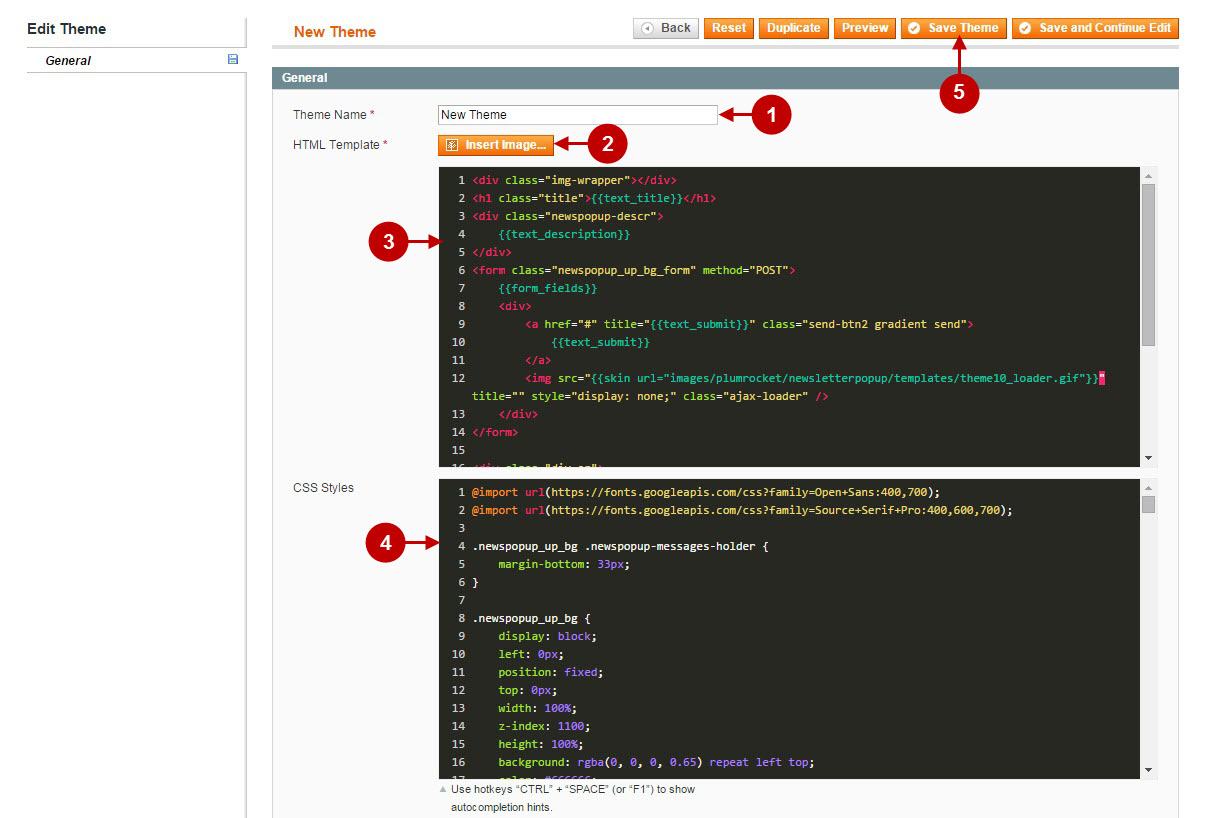
In order to configure your new Magento Newsletter Popup Theme please follow the step-by-step instructions below.
Step-by-Step action:
- Option “Theme Name”: allows you to indicate the name for your new theme.
- “Insert Image” button: allows you to upload and insert images to your new theme.
- Option “HTML Template”: here you can add and edit the HTML code.
- Option “CSS Styles”: allows you to add and edit the CSS Styles code.
- Press “Save Theme” button to save your theme.
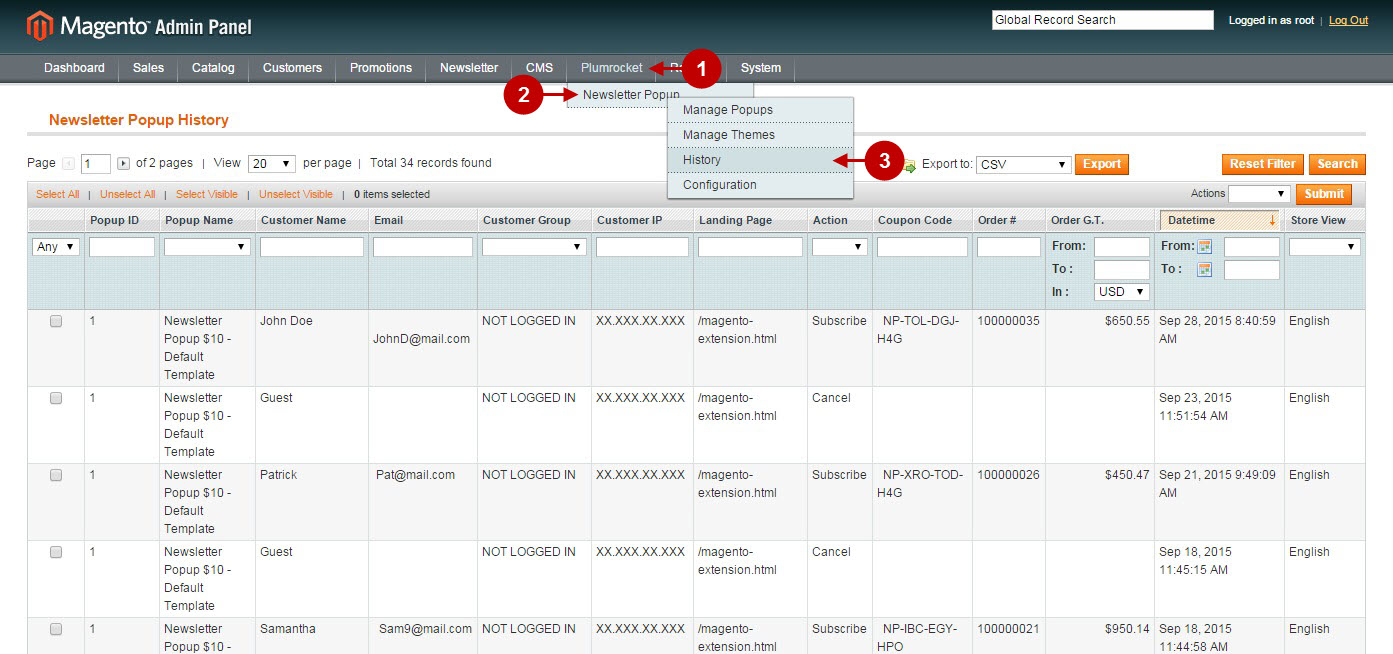
Newsletter Popup History
This tab allows you to preview the Newsletter Popup History.
Step-by-Step action:
- Press the “Plumrocket” tab in the menu.
- Select “Newsletter Popup”.
- Select “History”.
Changing default theme images manually
In this part you will learn how to change default theme images manually. Follow the steps below.
1. By default images are located here:
/skin/frontend/base/default/images/plumrocket/newsletterpopup/templatesIn order to change any image (that is used for all popups) from the folder above, you need to copy the image you want to change, to the following folder:
/skin/frontend/YOUR_THEME/default/images/plumrocket/newsletterpopup/templateswhere YOUR_THEME is the name of your theme.
For example, if you need to overwrite the image “newbg1.jpg”- you need to move it to:
/skin/frontend/YOUR_THEME/default/images/plumrocket/newsletterpopup/templates/newbg1.jpgOnce the image is moved, you can start editing it.
2. If you need to replace the image for one popup only:
Note: Images can be written via both HTML or CSS. You just need to find the image in the code and indicate the new path and name for it.
The path can be indicated the same way as you do for the CMS pages, for example:
{{skin url="images/plumrocket/newsletterpopup/templates/theme2_logo.jpg"}}The path can be indicated according to the skin folder or media folder, you can check this by clicking the F1 button in the template editor.


