Display Newsletter Popup Manually
In order to display Newsletter Popup manually you will have to perform the following steps:
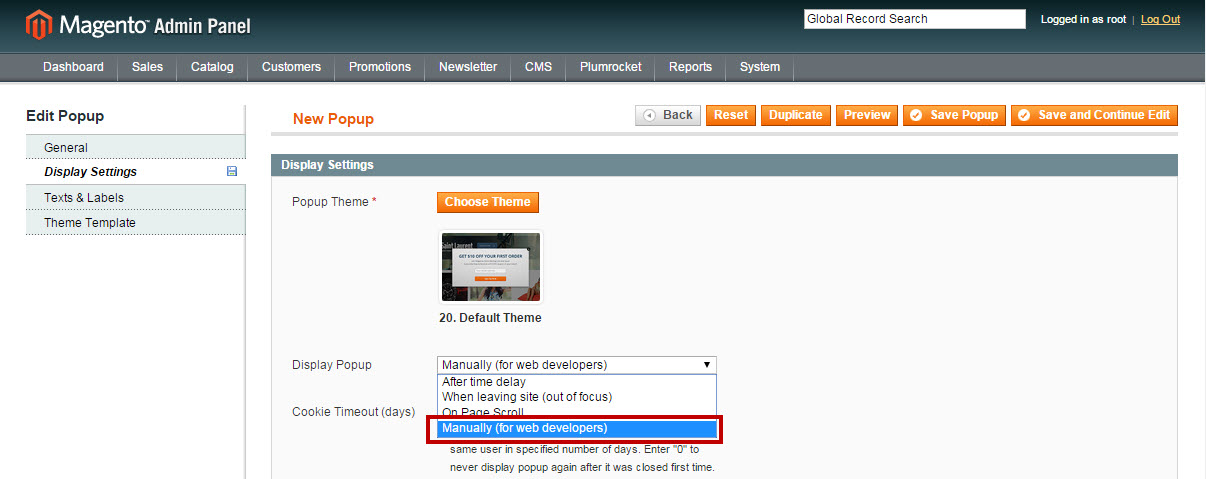
Select “Display Popup Method” = “Manually” in your Magento back-end as shown below:

“Load” and “Show” newsletter popups using the following JavaScript methods below:
There are two available methods: .load() and .show(). “Load” allows to load newsletter popup content from server in background without displaying it. Then “Show” method will display the popup once its loaded.
.load()Load popup without any arguments. This method is executed automatically when the extension is initialized.
.load([id][, callback ])Load popup by specified newsletter popup ID. There is no need to check if the popup was already loaded. This method will not load the same popup twice. You can find popup ID by going to your magento back-end, then Plumrocket -> Newsletter Popup -> Manage Newsletter Popups -> column “ID”.
If supplied, the callback is fired once the newsletter popup is loaded. The callback passed to .load() is guaranteed to be executed after the DOM is ready, so this is usually the best place to attach all other events and run other JavaScript code. It is hard to predict the overall load time of the newsletter popup from server and therefore we strongly suggest to use callback function. If the popup is already loaded on page then the callback will be executed immediately
callback: function([bool status][, bool just_loaded])
Parameters
status — returns “true”, if the popup is available to be displayed, otherwise returns “false”.
just_loaded — returns “true”, if the popup was just loaded during this function call, otherwise returns “false” if it was previously loaded on page.
.show()Display popup on page after it was loaded with .load() method. It’s an easy way to display popup without providing any arguments. If on the same page two popups are loaded – one using automatic “Display Popup Method” (such as “after the time delay” or “when leaving the site”) and the second one using the “manual” display method, then the automatically loaded popup will be displayed. If you have loaded two or more popups using “manual” display popup method, then the first loaded popup will be displayed.
.show([id][, callback ])Display popup by specified newsletter popup ID. This newsletter popup must be previously loaded using .load() method. If popup with different “ID” is currently displayed on page while the .show([id]) is being executed, then the previous popup will be hidden and the requested popup is displayed instead. There is no need to check for overlapping popups.
callback: function([bool status])
Parameters
status — returns “true”, if the popup exists and displayed on page, otherwise returns “false”.
EXAMPLES:
Example 1:
Let’s load & display newsletter popup with ID=5 and output a message to the Web Console using our callback function:
<script type="text/javascript">
        newsletterPopup.load(5, function(status, just_loaded) {
            if (just_loaded) {
                console.log('Well done, Sir. The popup was just loaded.');
                // alert('This is another successful newsletter load message!');
                newsletterPopup.show(5);
            }
        }
    </script>
Example 2:
Load and display any available newsletter popup. Please note that “.load()” method without arguments is not required, it is executed automatically when the extension is initialized.
<script type="text/javascript">
        newsletterPopup.show();
    </script>
Example 3:
Load and display newsletter popup with ID=5 on link click
<script type="text/javascript">
        newsletterPopup.load(5);
    </script>

    <a href="javascript:void(0);" onclick="return newsletterPopup.show(5)">
        See Newsletter Popup
    </a>
Example 4:
In this example we are trying to display any default newsletter popup on page (no matter what ID). If this attempt was unsuccessful, then we will try to load and show popup ID=3.
<script type="text/javascript">
        newsletterPopup.show(function(status) {
            if (status == false) {
                newsletterPopup.load(3, function(status) {
                    newsletterPopup.show();
                });
            }
        });
    </script>
Display Multi-step Newsletter Popup
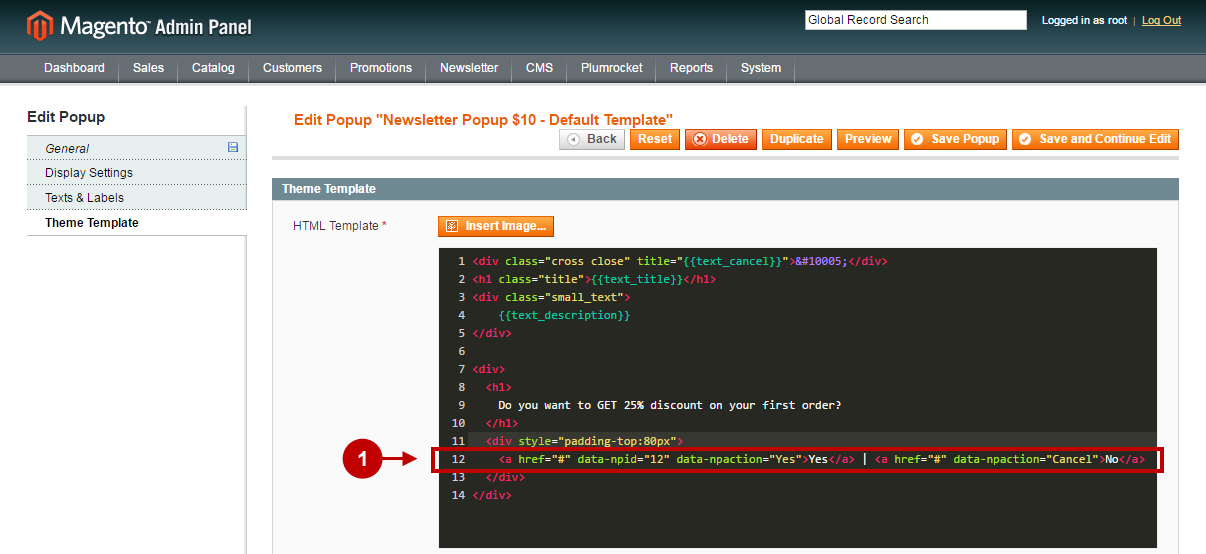
In order to display multi-step popups you need to select any popup you’ve created before, and specify another popup that will be displayed after clicking on the element in its HTML code. In order to perform this, add an attribute with popup ID that needs to be displayed to the element (e.g. button or link) required.
Code Example
data-npid="_POPUP_ID_"You can also use an attribute that records custom subscribers’ actions in the History section.
Code Example
data-npaction="_DESCRIPTION_TO_HISTORY_"Use this attribute with “Cancel” value in order to close the popup and write records to the History section.
Code Example
data-npaction="Cancel"Detailed description:
- This is an example of the html code in the template of the popup.

Disable Newsletter Popup Manually
To disable Newsletter popup manually you need to add this code to XML layout:
<reference name="newsletter.popup">
    <action method="disable" />
</reference>
Code Example
<catalog_category_default translate="label">
        <reference name="newsletter.popup">
            <action method="disable" />
        </reference>
        ....
    </catalog_category_default>
In order to disable Newsletter Popup Extension using controller class, please use the following code:
$newsletterBlock = $this->loadLayout()->getLayout()->getBlock('newsletter.popup');
if ($newsletterBlock) { $newsletterBlock->disable(); }
Code Example
public function indexAction()
    {
        $this->loadLayout();
        $this->getLayout()->getBlock('contactForm')->setFormAction( Mage::getUrl('*/*/post'));
        $newsletterBlock = $this->loadLayout()->getLayout()->getBlock('newsletter.popup');
        if ($newsletterBlock) {
            $newsletterBlock->disable();
        }

        $this->_initLayoutMessages('customer/session');
        $this->_initLayoutMessages('catalog/session');
        $this->renderLayout();
    }