
The Magento 2 AI Review Manager extension by Plumrocket uses AI to draft replies to customer reviews in your brand voice and turns existing reviews into a short summary on the product page, with the overall sentiment plus the main pros and cons shoppers mention. It works with OpenAI (GPT), Anthropic (Claude), Google (Gemini), OpenRouter, or Hugging Face, and you can use a different provider for replies and for summaries.
In this article, you will find step-by-step instructions on how to properly configure the Magento 2 AI Review Manager extension. Please follow this guide after installing the plugin.
In the main Magento menu, go to the Plumrocket tab > select AI Review Manager > Configuration.
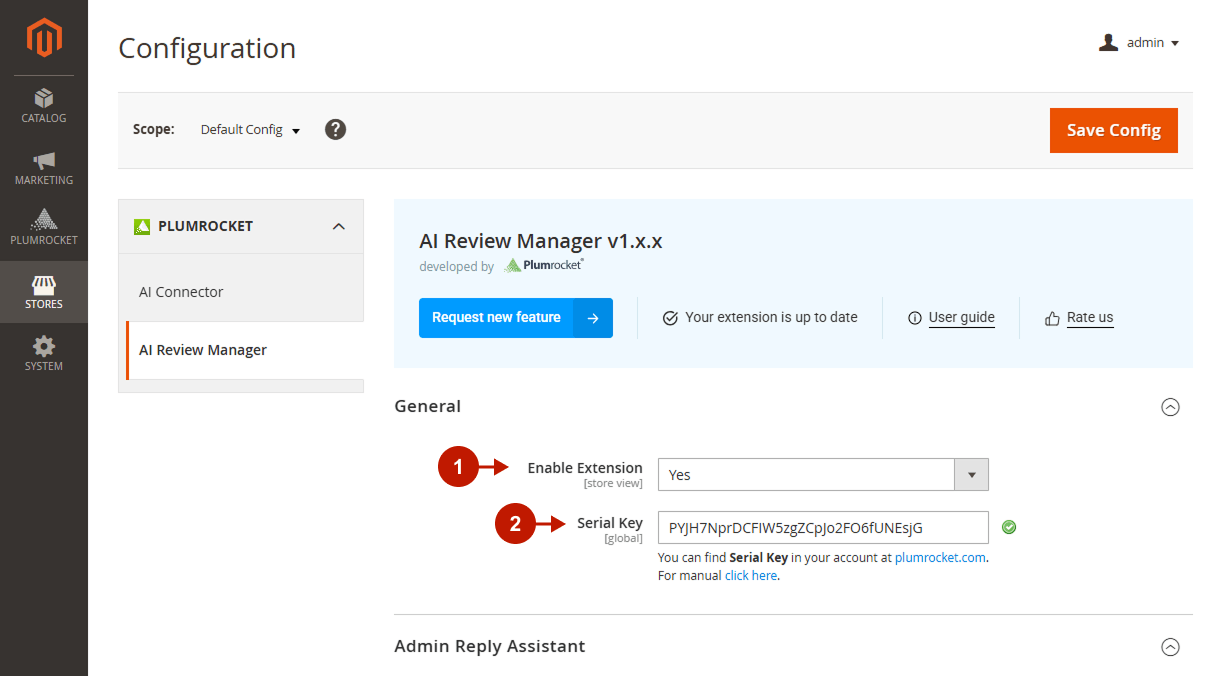
General
Step-by-step guide:
- “Enable Extension“: set the option to Yes to enable the AI Review Manager extension on your Magento 2 store.
- “Serial Key“: enter the unique serial key provided to you after purchasing the extension. Please note: in most cases, this field will be pre-filled with a serial key automatically, and the green checkmark will be displayed. To find and paste your serial key manually, read the Serial Key Activation article.
Admin Reply Assistant
Step-by-step guide:
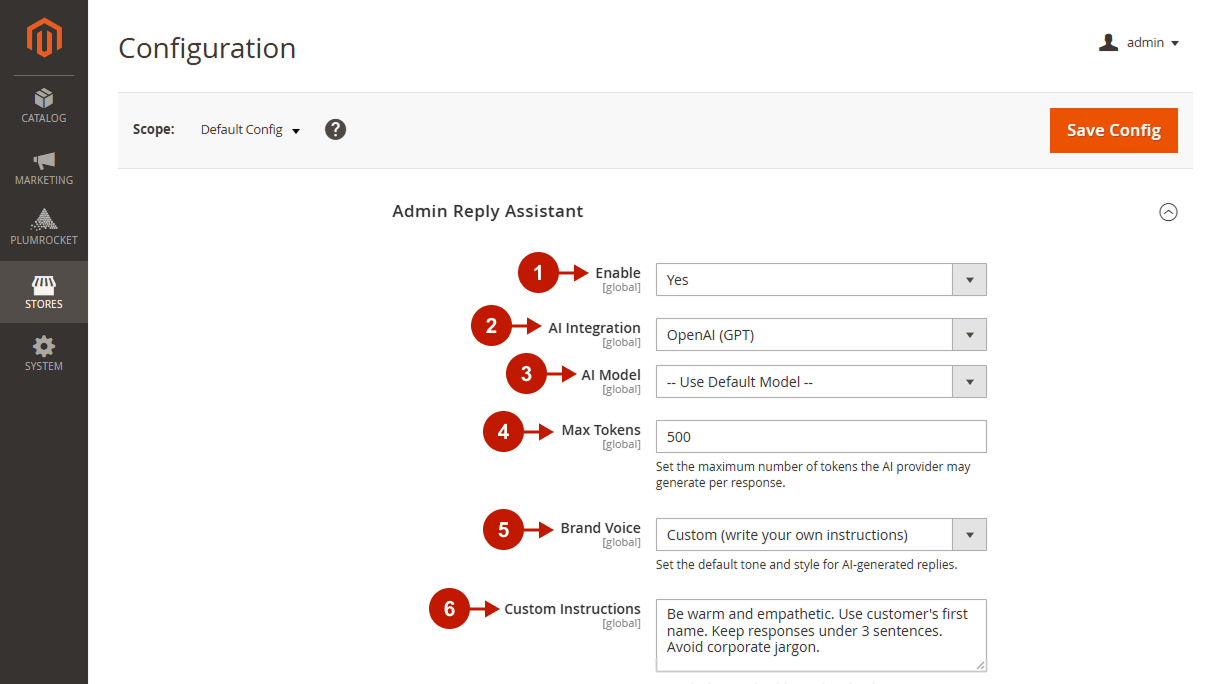
- “Enable“: set the option to Yes to let AI generate replies to your customer reviews.
- “AI Integration“: select which AI provider will process reply requests: OpenAI (GPT), Anthropic (Claude), Google (Gemini), OpenRouter, or Hugging Face.
- “AI Model“: select a specific model from your chosen provider (e.g., anthropic/claude-haiku-4.5). You can find the list of supported AI model families on the AI Connector extension page.
- Max Tokens: Set the maximum number of tokens the AI provider may generate per response.
- “Brand Voice“: set the default tone and style for AI-generated replies. The available options are:
- Professional: polished, business-like replies.
- Friendly: warm and approachable replies.
- Playful: light and informal replies.
- Auto-learn from past replies: AI analyzes the replies you have already published and matches their tone.
- Custom (write your own instructions): describe the tone yourself in the Custom Instructions field below.
- “Custom Instructions“: describe how AI should sound in plain language. Focus on style principles: tone, word choice, and what to avoid.
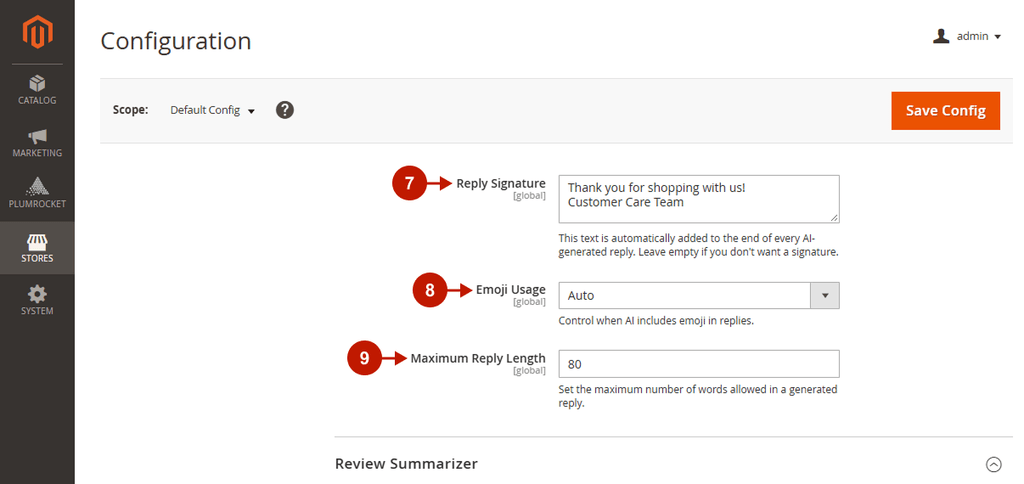
- “Reply Signature“: enter the text that is automatically added to the end of every AI-generated reply. Leave the field empty if you don’t want a signature.
- “Emoji Usage“: control when AI includes emoji in replies: Auto (default), Always, or Never.
- “Maximum Reply Length“: set the maximum number of words allowed in a generated reply.
Review Summarizer
Step-by-step guide:
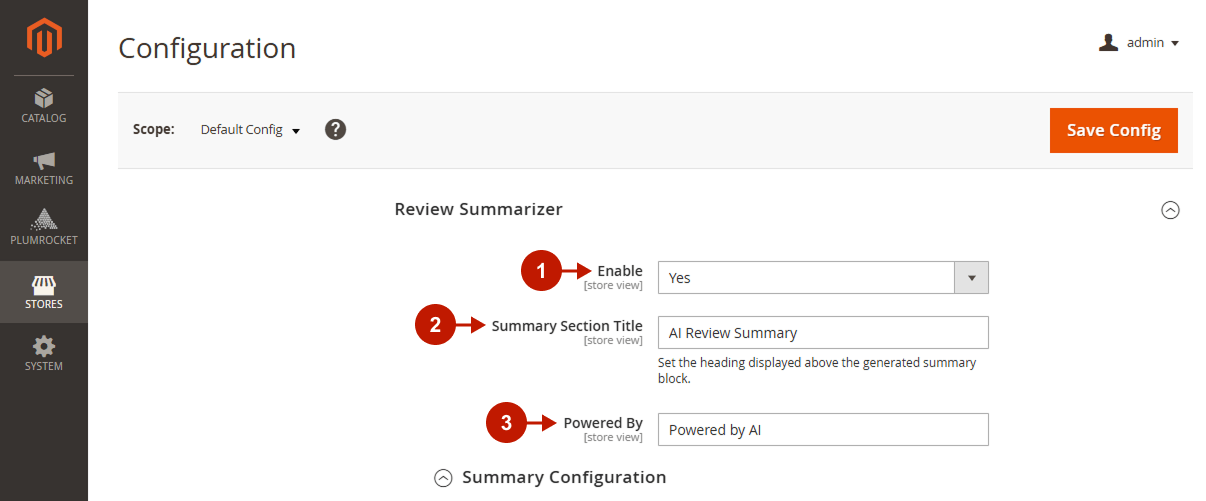
- “Enable“: set the option to Yes to generate AI summaries of customer reviews and display them on the product page.
- “Summary Section Title“: set the heading displayed above the generated summary block on the product page (e.g., AI Review Summary).
- “Powered By“: set the small label shown with the summary block (e.g., Powered by AI). Leave blank if you don’t want this label displayed.
Summary Configuration
Step-by-step guide:
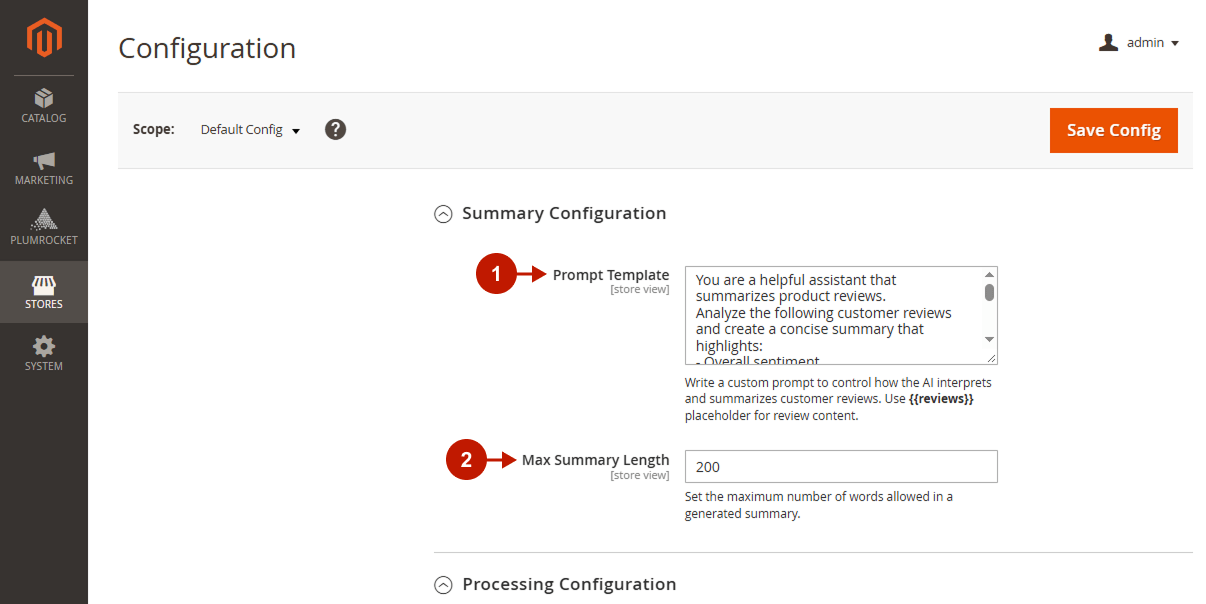
- “Prompt Template“: write a custom prompt to control how the AI interprets and summarizes customer reviews. Use the {{reviews}} placeholder where the review content should be inserted. By default, the field contains a ready-made prompt that asks the AI to highlight the overall sentiment (positive, negative, or mixed), the key pros, and the key cons mentioned by customers.
- “Max Summary Length“: set the maximum number of words allowed in a generated summary. The default value is 200.
Processing Configuration
Step-by-step guide:
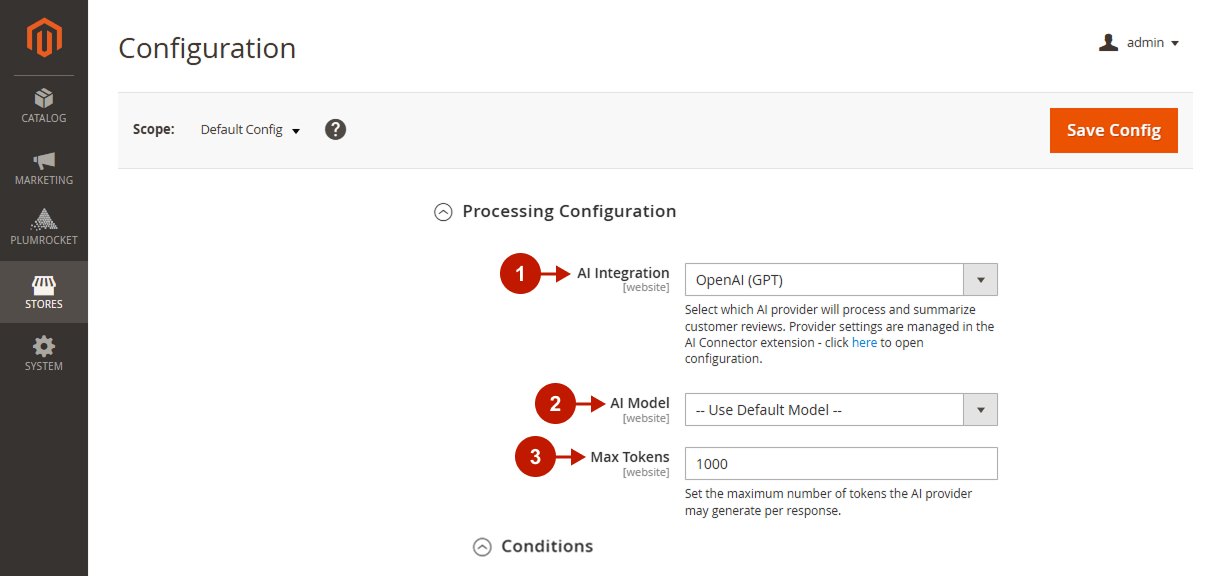
- “AI Integration“: select which AI provider will process and summarize customer reviews: OpenAI (GPT), Anthropic (Claude), Google (Gemini), OpenRouter, or Hugging Face. This setting is independent of the Admin Reply Assistant, so summaries and replies can use different providers.
- “AI Model“: select a specific model from your chosen provider (e.g., anthropic/claude-haiku-4.5). You can find the list of supported AI model families on the AI Connector extension page.
Conditions
Step-by-step guide:
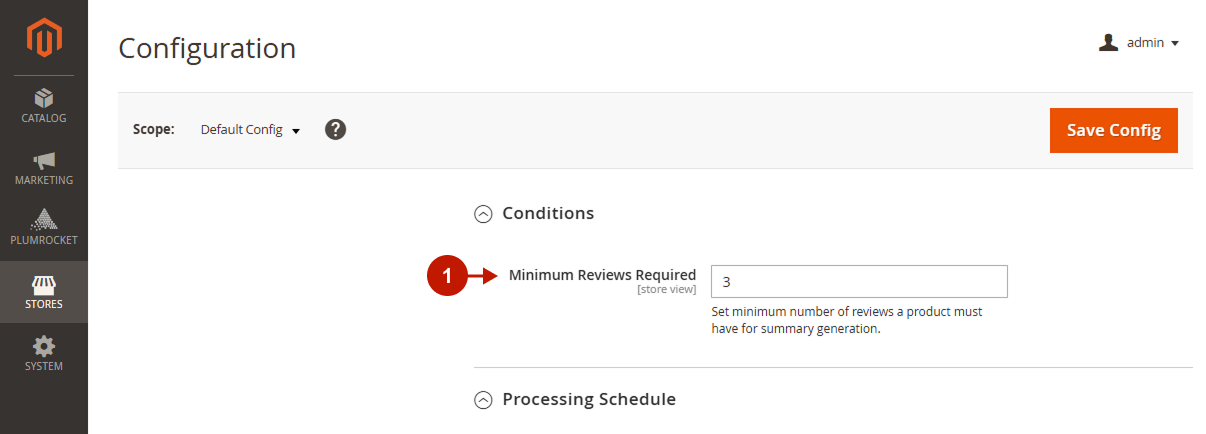
- “Minimum Reviews Required“: set the minimum number of reviews a product must have before a summary is generated (e.g., 6). A higher value prevents summaries from being generated based on a single opinion and prevents pointless credit usage.
Processing Schedule
Step-by-step guide:
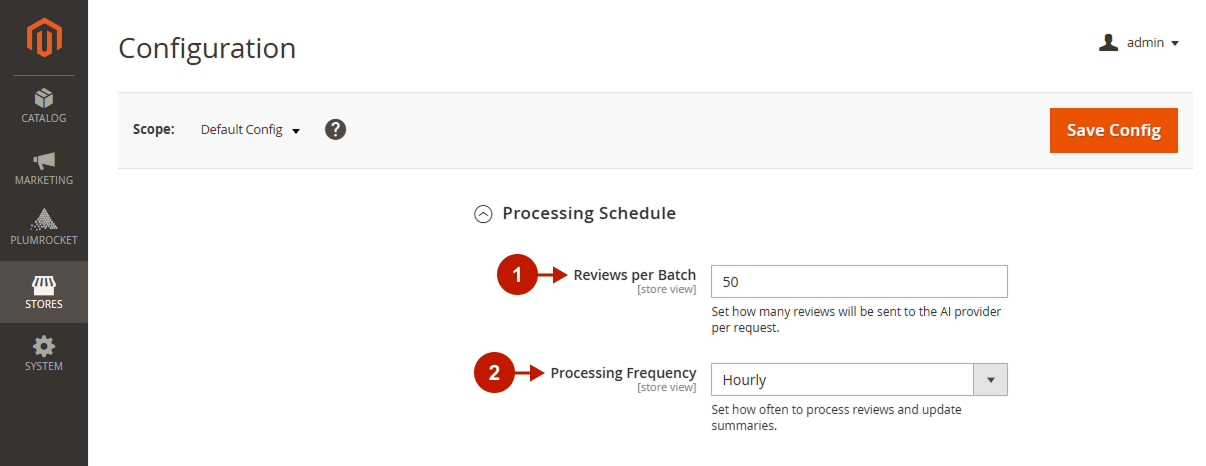
- “Reviews per Batch“: set how many reviews will be sent to the AI provider per request. The default value is 50. Instead of sending all reviews of a product in one large request, the extension splits them into batches of this size. For example, a product with 200 reviews is processed in 4 requests of 50 reviews each. This keeps token usage per request predictable, so products with many reviews don’t trigger one oversized, expensive request. Use a lower value if your AI model has a small context limit or requests fail on products with many reviews; use a higher value to process reviews in fewer requests.
- “Processing Frequency“: set how often reviews are processed and summaries updated: Hourly, Daily, or Weekly. If your store receives reviews infrequently, choose a longer interval to reduce unnecessary AI requests. When Daily or Weekly is selected, additional fields appear:
- “Days of the Week“ (only for Weekly): select the day on which reviews are processed (e.g., Sunday).
- “Scheduled Time“ (for Daily and Weekly): choose the time (hours, minutes, seconds) to run processing for the selected frequency.
- Save your changes by clicking the Save Config button in the top-right corner.
All settings on this page apply to your entire store (all products at once), not to individual products. To review the AI output generated for a specific product, use the grid described below.
Review Summaries
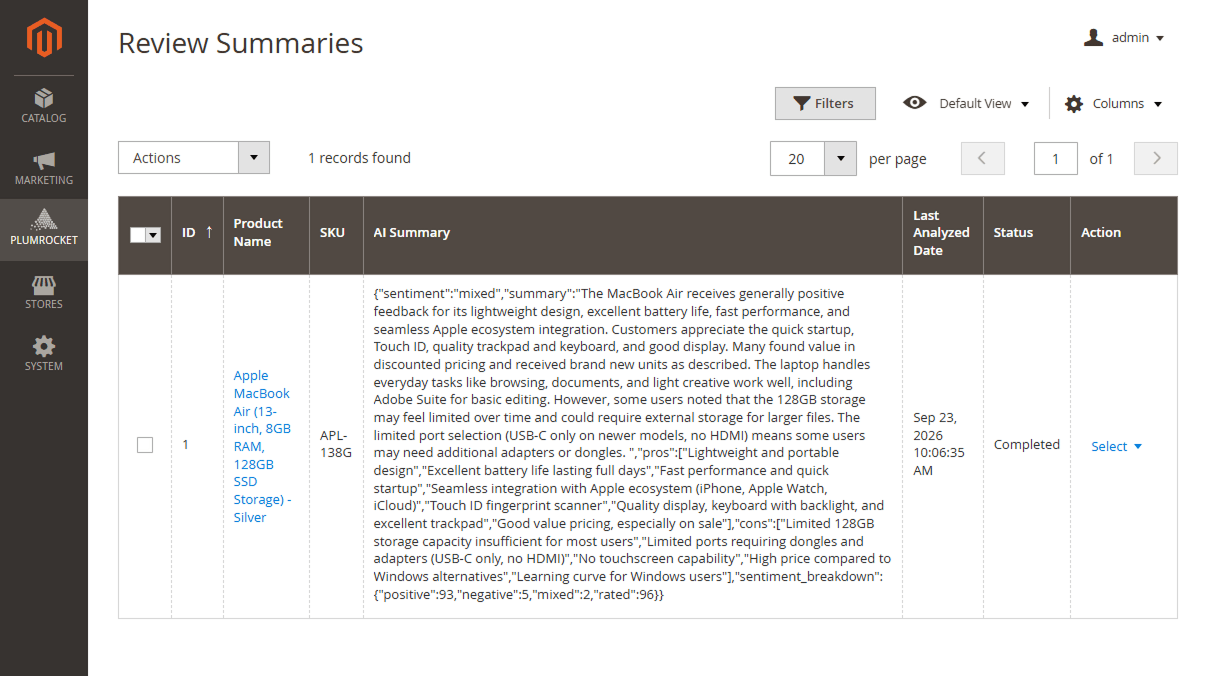
The Review Summaries grid lets you check the AI output generated for every product, confirm its status, and see when it was last analyzed.
In the main Magento menu, go to the Plumrocket tab > select AI Review Manager > Review Summaries.
The grid includes the following columns:
- ID: the internal record ID of the entry.
- Product Name: the name of the product the AI output belongs to.
- SKU: the product SKU.
- AI Summary: the generated summary, including overall sentiment and the key pros and cons mentioned by customers.
- Last Analyzed Date: the date and time the summary was last generated or updated.
- Status: indicates whether the summary was generated successfully.
- Action: click Select and choose Process to run AI processing for this product, or Delete to remove the summary entry.
Reply to Reviews with AI
Once the Admin Reply Assistant is enabled, you can generate a reply to any customer review in one click, right from the review details page. AI drafts the reply using the Brand Voice, Reply Signature, Emoji Usage, and Maximum Reply Length you set in the Admin Reply Assistant section.
In the main Magento menu, go to the Marketing tab > User Content > Pending Reviews. You can also open a review from Marketing > User Content > All Reviews if you want to respond to an already approved customer review.
Step-by-step guide:
- Find the review you want to reply to and click Edit next to it. The review details page opens, showing the product, author, rating, and review text.
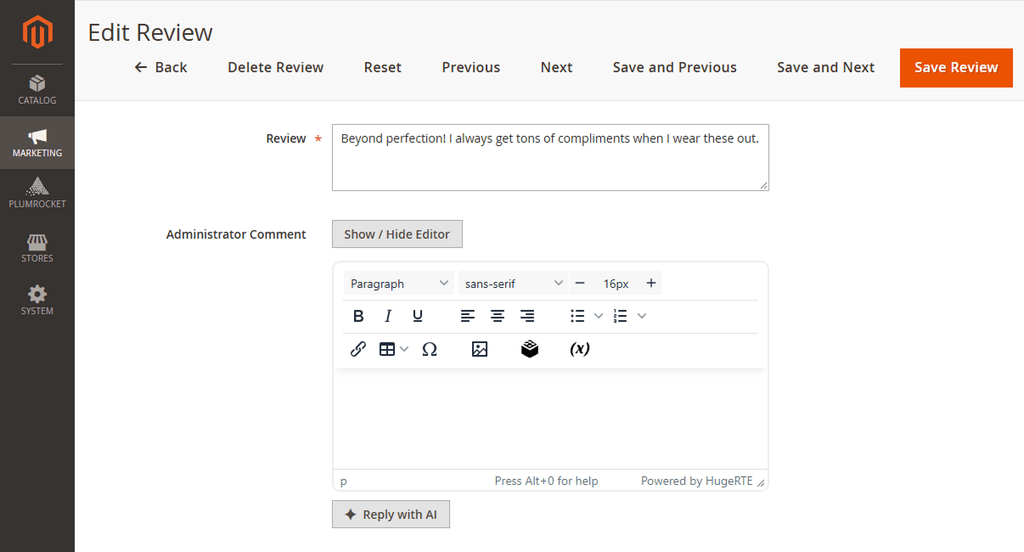
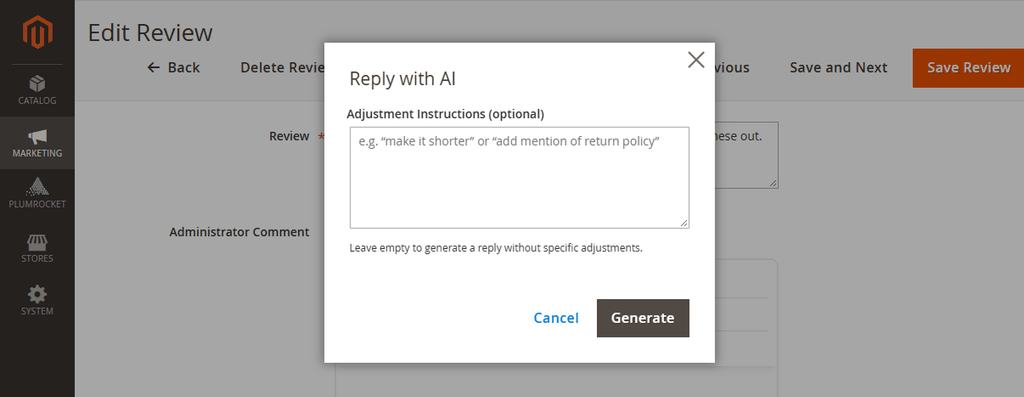
- Scroll down to the Administrator Comment field and click the Reply with AI button below the editor. The Reply with AI popup opens.
- “Adjustment Instructions (optional)“: tell AI how to adjust this particular reply (e.g., make it shorter or add mention of return policy). Leave the field empty to generate a reply without specific adjustments. Click Generate to create the reply, or Cancel to close the popup. These instructions apply only to the current reply and don’t change your Admin Reply Assistant settings. The generated reply appears in the Administrator Comment field.
- Read the draft and edit it if needed. You can switch the editor on or off with the Show / Hide Editor button.
- Click Save Review in the top-right corner.
AI Connector
Please follow the AI Connector configuration instructions to configure the extension correctly.
- Connect one or more AI providers: OpenAI (GPT), Anthropic (Claude), Google (Gemini), OpenRouter, or Hugging Face. Each provider has its own API key, default model, temperature, and max tokens settings.
- Check that your API keys work with the Test Connection tool before you generate replies or summaries.
- Enable logging to track AI requests in the AI Requests Log, which helps with debugging and monitoring usage.