The Magento 2 AI Connector extension by Plumrocket is designed to simplify the process of integrating AI providers into your Magento store. With this extension, you can connect multiple AI services — including OpenAI (GPT), Anthropic (Claude), and Google (Gemini) — and use them to generate product descriptions, meta tags, review summaries, and other store content directly from the Magento admin panel or via Magento API.
In this article, you will find step-by-step instructions on how to properly configure the Magento 2 AI Connector extension. Please follow this guide after installing the plugin.
In the main Magento menu, go to the Plumrocket tab > select AI Connector > Configuration.
General
Step-by-step guide:
- “Enable“: set the option to Yes to enable the AI Connector extension on your Magento 2 store.
- “Serial Key“: enter the unique serial key provided to you after purchasing the extension. Please note: in most cases, this field will be pre-filled with a serial key automatically, and the green checkmark will be displayed. To find and paste your serial key manually, read the Serial Key Activation article.

AI Providers
This section allows you to connect and configure one or more AI providers (Claude, Gemini, ChatGPT, OpenRouter). Each provider can be enabled or disabled independently, giving you the flexibility to use multiple AI services simultaneously.
Before configuring a provider, make sure you have its API key ready. For step-by-step instructions on obtaining an API key for each provider, see the How to Get API Keys guide.
Anthropic (Claude)
Step-by-step guide:
- “Enable”: set to Yes to activate the Anthropic (Claude) integration for your store.
- “API Key”: enter the API key from your Anthropic account. You can find it in the Anthropic Console under API Keys.
- “Default Model”: select the Claude model you want to use by default for AI requests.
- “Temperature”: use the slider to control the creativity of AI-generated responses. Lower values produce more focused and deterministic output; higher values result in more varied and creative text.
- “Max Tokens”: specify the maximum number of tokens the model can generate in a single response. The default value is 1000.

Google (Gemini)
Step-by-step guide:
- “Enable”: set to Yes to activate the Google Gemini integration for your store.
- “API Key”: enter the API key from your Google AI Studio or Google Cloud account.
- “Default Model”: select the Gemini model you want to use by default.
- “Reload Models“: Click to refresh the list of available models.
- “Temperature”: use the slider to adjust the output creativity level.
- “Max Tokens”: specify the maximum number of tokens allowed per response. The default value is 1000.

OpenAI (GPT)
Step-by-step guide:
- “Enable”: set to Yes to activate the OpenAI (GPT) integration for your store.
- “API Key”: enter the API key from your OpenAI account. You can find it in the OpenAI Platform under API Keys.
- “Default Model”: select the GPT model you want to use by default.
- “Reload Models“: Click to refresh the list of available models.
- “Temperature”: use the slider to control response creativity and variability.
- “Max Tokens”: specify the maximum number of tokens the model can generate per response. The default value is 1000.

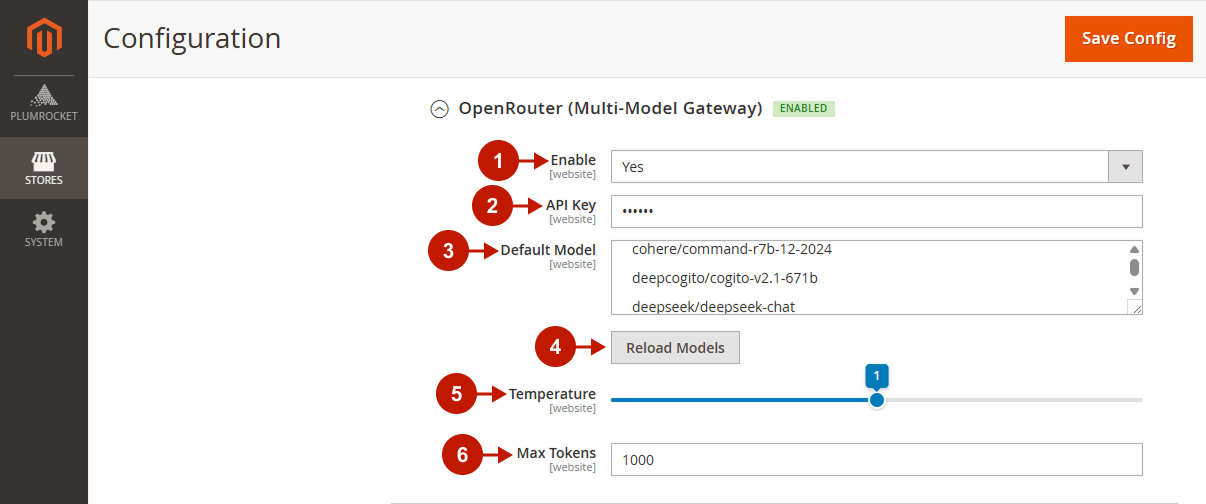
OpenRouter (Multi-Model Gateway)
OpenRouter is a unified gateway that gives you access to hundreds of AI models from different providers through a single API key.
Step-by-step guide:
- “Enable”: set to Yes to activate the OpenRouter integration for your store.
- “API Key”: enter the API key from your OpenRouter account.
- “Default Model”: select the model you want to use by default from the list of available OpenRouter models.
- “Reload Models”: click to refresh the list of available models from OpenRouter.
- “Temperature”: use the slider to control the creativity and variability of AI-generated responses.
- “Max Tokens”: specify the maximum number of tokens the model can generate per response. The default value is 1000.
Hugging Face (Multi-Model Gateway)
Hugging Face acts as a multi-model gateway, giving you access to a wide range of open-source models from multiple providers through a single token.
Step-by-step guide:
- “Enable”: set to Yes to activate the Hugging Face integration for your store.
- “API Token”: enter the access token from your Hugging Face account.
- “Default Model”: select the Hugging Face model you want to use by default for AI requests.
- “Reload Models”: click to refresh the list of available models.
- “Temperature”: use the slider to control the creativity of AI-generated responses. Lower values produce more focused and deterministic output; higher values result in more varied and creative text.
- “Max Tokens”: specify the maximum number of tokens the model can generate in a single response. The default value is 1000.

Test Connection
This section allows you to verify that your AI provider credentials are valid and the connection is working correctly before using the extension in production.
Step-by-step guide:
- “Integration”: select the AI provider you want to test (e.g., OpenAI (GPT), Anthropic (Claude), or Google (Gemini)).
- “Model”: choose a specific model to use for the test, or leave it set to — Use Default Model — to use the model configured in the AI Providers section.
- “Test Prompt”: enter any sample text prompt you want to send to the selected AI provider.
- “Action”: click the Test Connection button to send the request. You will see a generated responses if you have successfully connected providers.

Logging
By enabling this setting, you can track all AI requests made through the extension in the dedicated AI Requests Log, which is useful for debugging and monitoring usage.
Step-by-step guide:
- “Enable Logging”: set to Yes to activate logging of all AI requests and responses.
- “Retention (days)”: specify how many days the logs should be stored. Leave the field empty to keep logs indefinitely.
- Save your changes by clicking the Save Config button in the top-right corner.

AI Requests Log
The AI Requests Log provides a detailed history of all AI requests sent through the extension. This log is useful for monitoring usage, reviewing generated content, and troubleshooting errors.
In the main Magento menu, go to the Plumrocket tab > select AI Connector > AI Requests Log.
The log table includes the following columns:
- Integration: displays the AI provider used for the request (e.g., OpenAI (GPT), Anthropic (Claude), Google (Gemini)).
- Model: shows the specific model that was used to generate the response (e.g., gpt-4o-mini, claude-sonnet-4-6, gemini-pro-latest).
- Status: indicates whether the request was completed successfully (SUCCESS) or failed (ERROR).
- Prompt: displays the text prompt that was sent to the AI provider.
- Response: shows the AI-generated response returned for the given prompt.
- Sent at: displays the date and time when the request was made.
- Action: click View to open the full details of a specific log entry.
