In this article, you will learn how to configure the Magento 2 Layered Navigation Pro extension from Plumrocket.
General
Step-by-step guide:
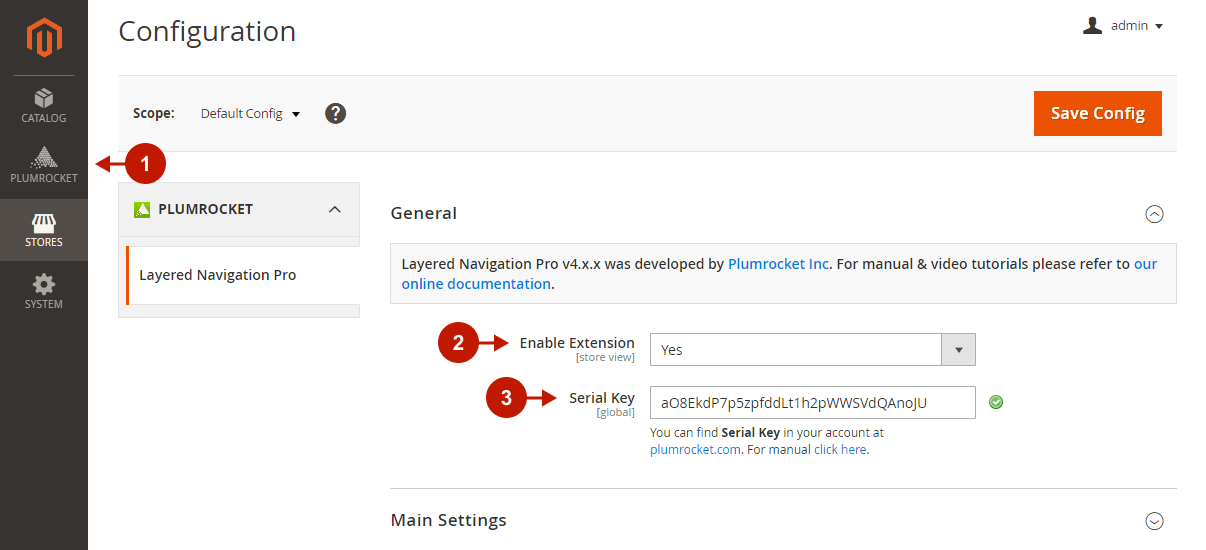
- In the main Magento menu, go to the Plumrocket tab -> Layered Navigation Pro -> Configuration.
- “Enable extension“: activate the Magento 2 Layered Navigation Extension.
- “Serial Key“: enter the unique serial key provided to you after purchasing the extension. Note: in most cases, this field will be pre-filled with a serial key automatically, and the green checkmark will be displayed. To find and paste your serial key manually, read the Serial Key Activation article.
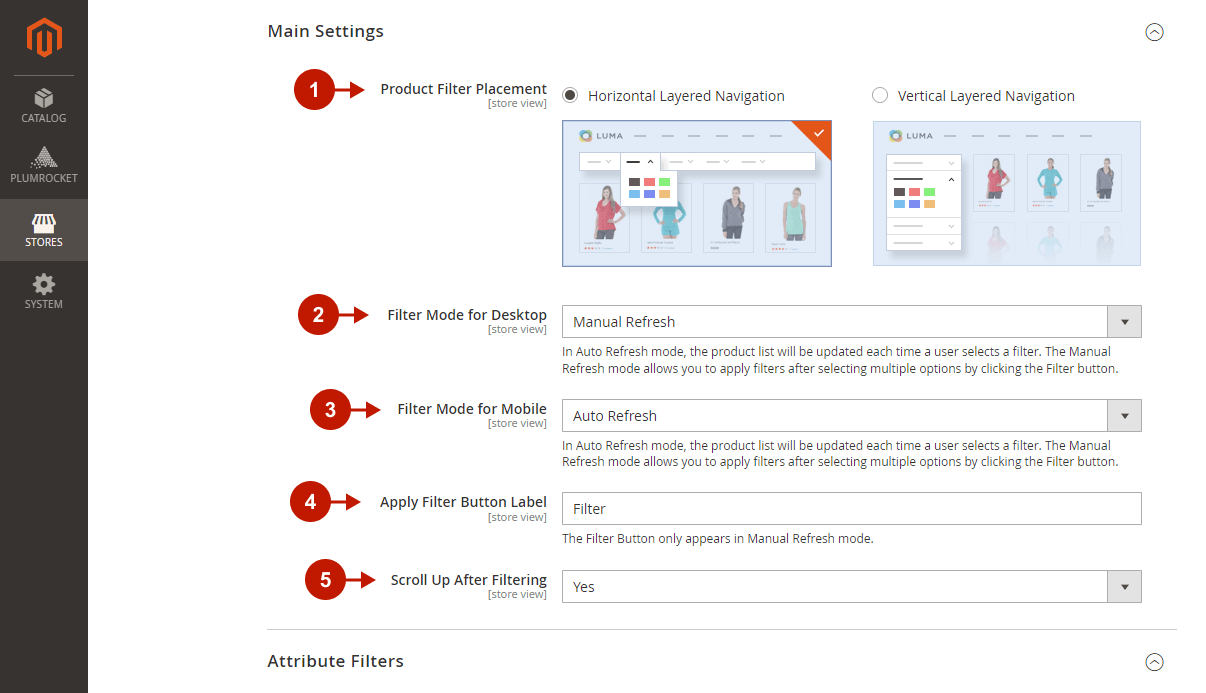
Main Settings
Step-by-step guide:
- “Product Filter Placement“: choose from Horizontal or Vertical layered navigation for your online store.
- “Filter Mode for Desktop“: please select the filter mode to be used for desktop devices:
- In the Auto Refresh mode, the product list will be refreshed each time a user selects a filter option.
- The Manual Refresh mode allows selecting multiple options and then clicking the Filter button to apply filters and refresh the product list.
- “Filter Mode for Mobile“: please select the filter mode to be used for mobile devices:
- In the Auto Refresh mode, the product list will be refreshed each time a user selects a filter.
- The Manual Refresh mode allows selecting multiple options and then clicking the Filter button to apply filters and refresh the product list.
- “Apply Filter Button Label“: change the label for the “Filter” button used in the Manual Refresh filter mode.
- “Scroll Up After Filtering“: set it to Yes to jump to the top of the filter results list when the filter options are applied.
Attribute Filters
Step-by-step guide:
- Conveniently enable the filter attributes for layered navigation and sort them on the frontend. Just drag and drop them from the list of all available attributes to the “Attributes Used in Layered Navigation” column. NOTE: this functionality was designed to visualize and speed up the process of enabling filter attributes for layered navigation. It automatically changes the “Use in Layered Navigation” option to Filterable (with results) in the Stores -> Attributes -> Product -> [selected attribute] -> Storefront Properties.
- Easily combine selected attributes into attribute groups by moving the needed attribute on top of another attribute. You can give the group a unique name and add more attributes to it. Multiple groups can be created for filtering.
- “Show Empty Filter Options“: set it to No to hide the product filter options with “0” results from the list of available options.

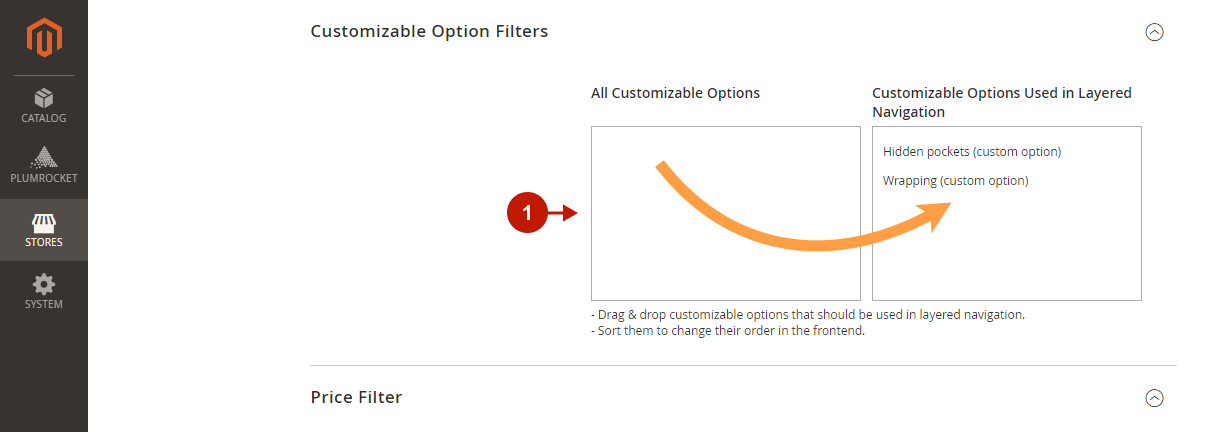
Customizable Options
Step-by-step guide:
- Conveniently enable custom options for layered navigation and sort them on the frontend. Just drag and drop them from the list of all available custom options to the “Customizable Options Used in Layered Navigation” column.
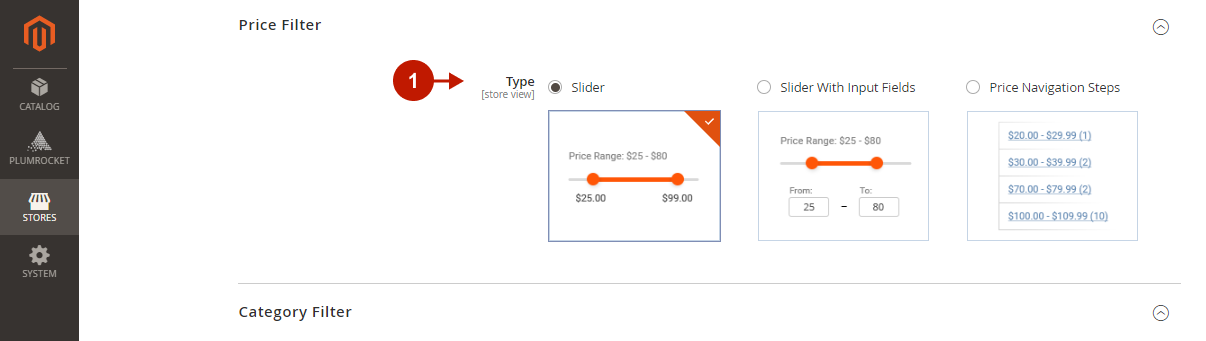
Price Filter
Step-by-step guide:
- “Type“: choose the format for displaying the price filter: Slider, Slider With Input Fields, or Price Navigation Steps.
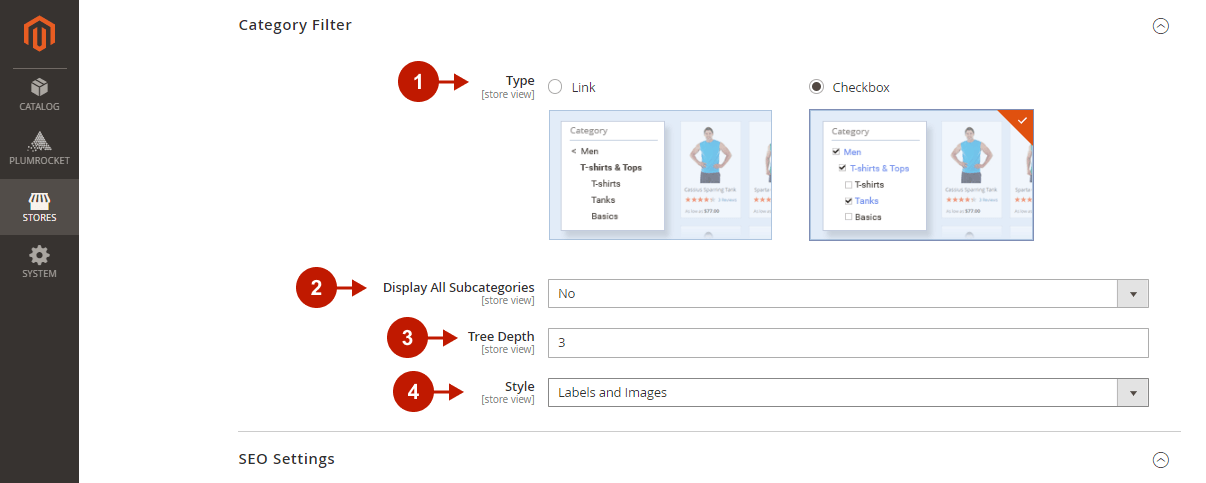
Category Filter
Step-by-step guide:
- “Type“: select the display style of the category filter: Link or Checkbox.
- The Link filter type navigates users to a specific category.
- The Checkbox type allows users to filter by multiple categories at once. Additionally, admins can set the category tree depth.
- “Display All Subcategories“: with the Checkbox filer type selected, you can choose whether to display all subcategories or limit the category tree.
- “Tree Depth“: if the previous option is set to No, you can specify the category tree depth that would be displayed in layered navigation.
- “Style“: with the Checkbox filer type selected, you can customize its style by choosing to display only category labels, images, or both.
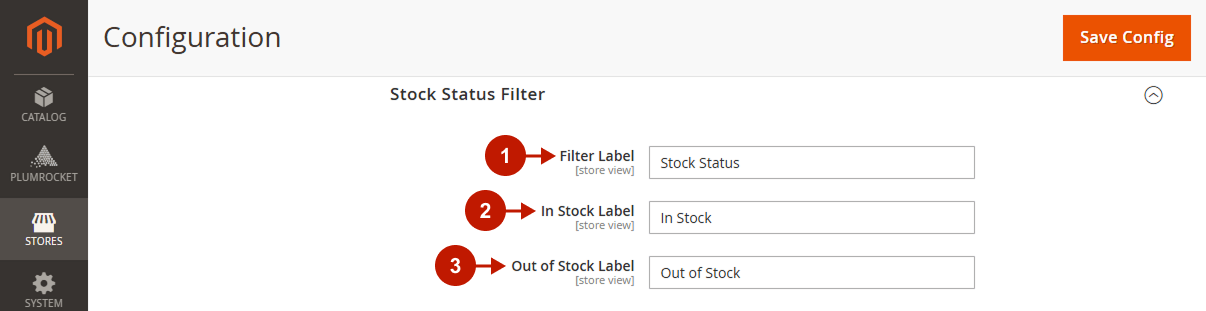
Stock Status Filter
Step-by-step guide:
- Insert the Filter Label.
- Specify the In Stock Label.
- Specify the Out of Stock Label.
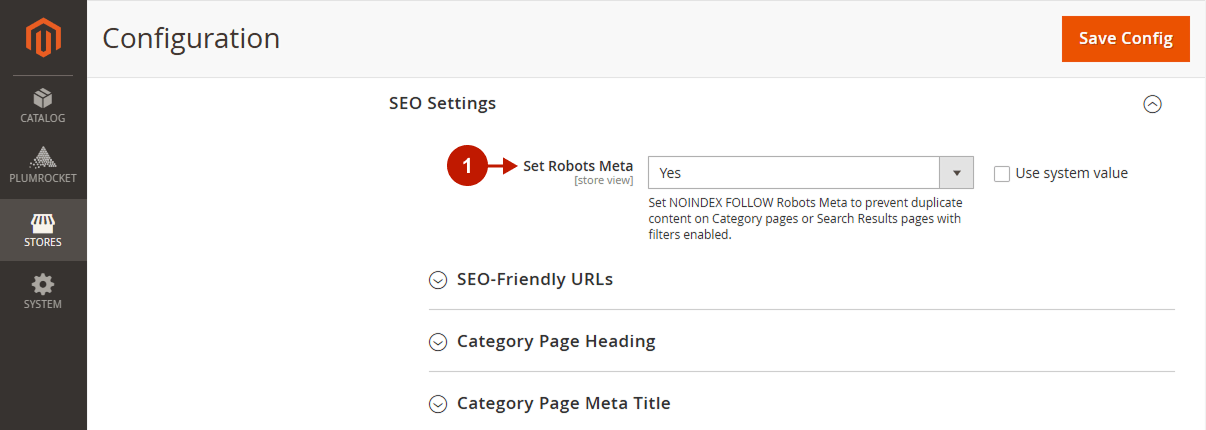
SEO Settings
Step-by-step guide:
- “Set Robots Meta“: prevent duplicate content on Category pages and Search Results pages by setting this option to Yes. The NOINDEX and NOFOLLOW robots meta will be added to pages with filtered results to prevent search engines from indexing them.
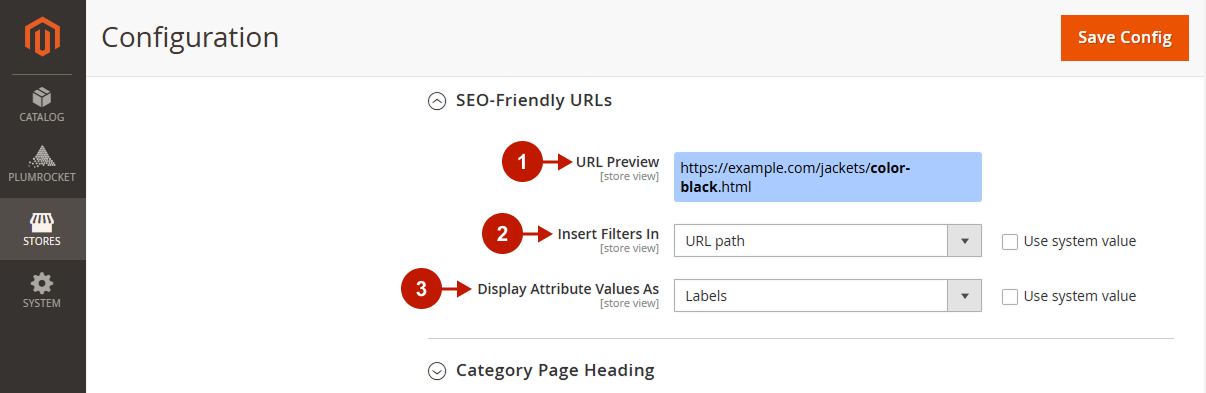
SEO-Friendly URLs
Enable dynamic SEO-friendly URLs. Applied filter options will be dynamically added to the URL, improving your website’s SEO and making it easier for search engines to index pages with specific parameters.
Step-by-step guide:
- Preview the URL.
- “Insert Filters In”: choose whether the filters should be inserted in the URL path or GET parameters.
- “Display Attribute Values As”: choose whether the attribute values should be displayed as Labels or IDs.
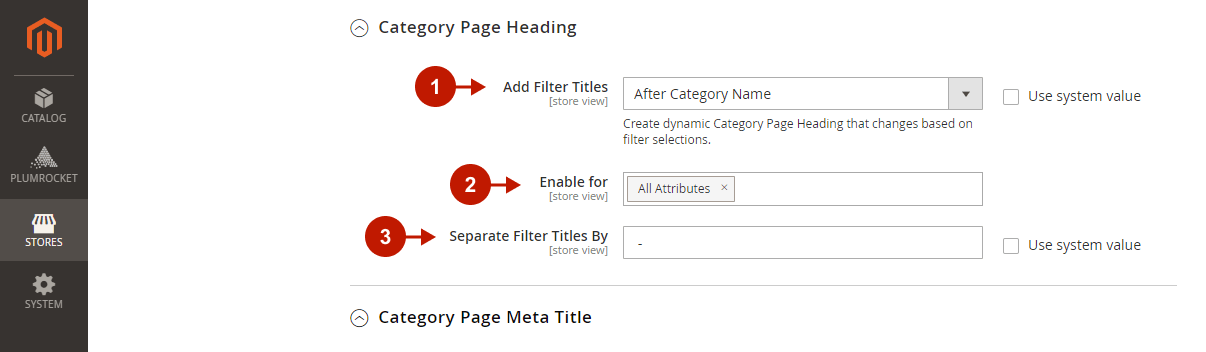
Category Page Heading
Create a dynamic Category page heading to improve your website’s SEO. The applied filter options will be dynamically added to the page heading to make it easier to find products with the specific parameters from the search engine search.
Step-by-step guide:
- “Add Filter Titles“: choose where to place the filter titles in the Category page Heading (After Category Name or Before Category Name), or set the option to No to disable it.
- “Enable for“: select the attributes whose options are to be added to the dynamic heading.
- “Separate Filter Titles By“: specify a separator for the filter options in the Category page heading.
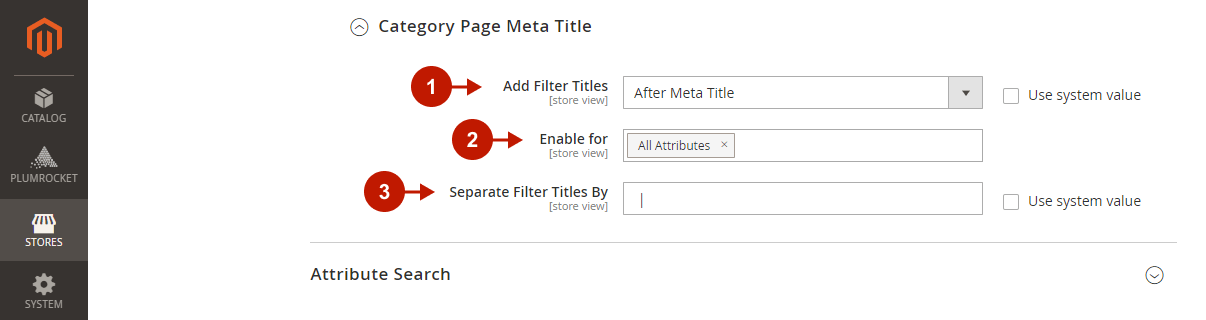
Category Page Meta Title
Enable dynamic meta titles for the Category page and filter results pages. The applied filter options will be dynamically added to the page meta title to improve your website’s visibility in search.
Step-by-step guide:
- “Add Filter Titles“: choose where to place the filter names in the Category page meta titles (After Meta Title or Before Meta Title), or set the option to No to disable it.
- “Enable for“: select the attributes whose options are to be added to the page meta title.
- “Separate Filter Titles By“: specify a separator for the filter options in the Category page meta title.
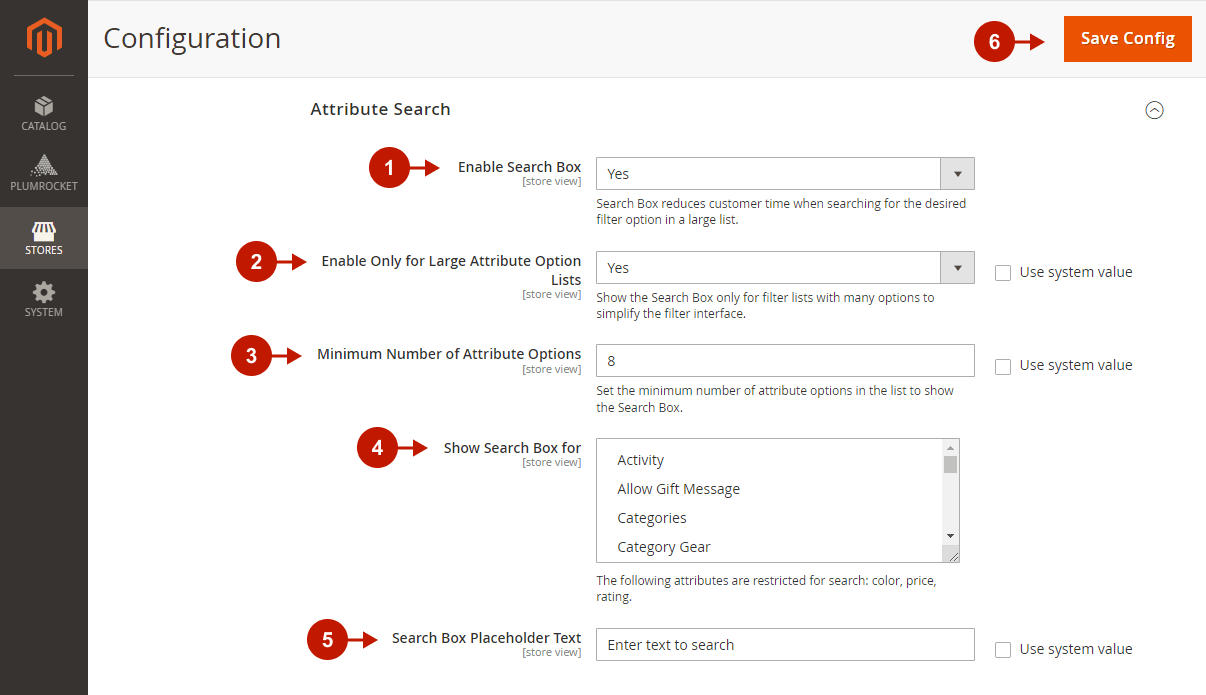
Attribute Search
Step-by-step guide:
- “Enable Search Box“: if enabled, this option allows customers to use a convenient search box to narrow down options search within filter attributes. Useful for large lists of filter options.
- “Enable Only for Large Attribute Option Lists“: set it to Yes to enable the Search Box only for filter lists with many options to simplify the filter interface.
- “Minimum Number of Attribute Options“: enter the minimum quantity of filter options that will trigger the search box display. If the number of options is greater than or equal to the number you entered in this field, then the Search input field will appear above the list of filter options.
- “Show Search for“: select the attributes for which you want to display the search box.
- “Search Box Placeholder Text“: specify the placeholder text to be displayed by default as a prompt to start typing in the search box field.
- Click the Save Config button to save your settings.