Configuring Checkout Success Page Extension
Please, follow the instructions below to learn how to properly configure the Checkout Success Page for Magento 2.
General
Step-by-step guide:
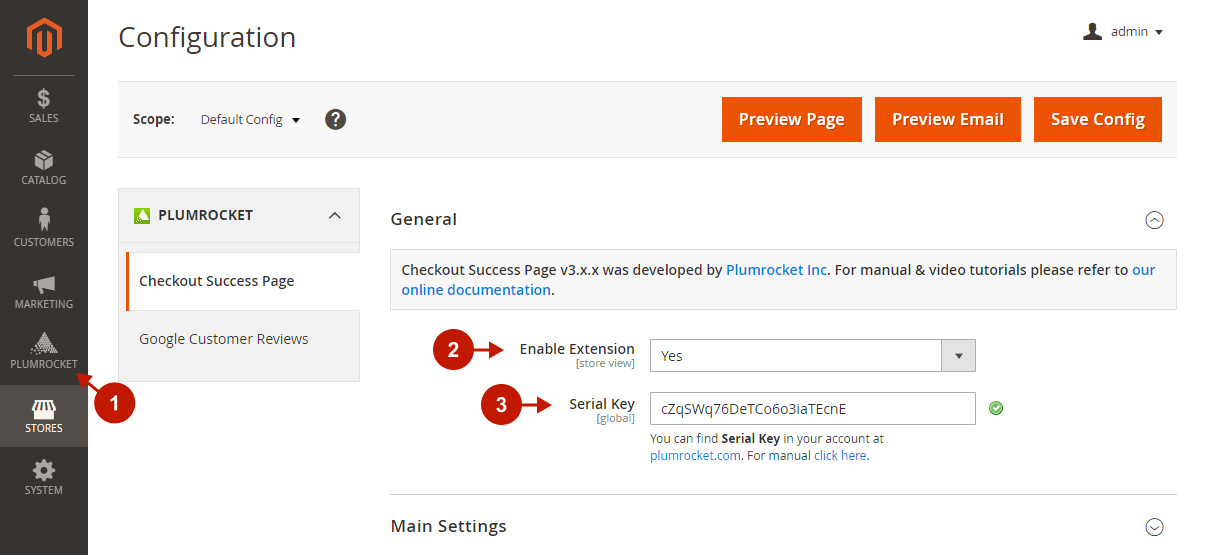
- Go to the Plumrocket tab in the main menu > navigate to the Checkout Success Page tab > Configuration.
- The “Enable Extension” option allows you to enable or disable this Checkout Success Page Extension.
- Please, enter the unique Serial Key received after the purchase of this extension in this field. Note: In most cases, Serial Key will be filled in automatically, and a green checkmark will be displayed. If there is no key entered, please, read the Serial Key Activation article to get more information on how to insert the key manually.
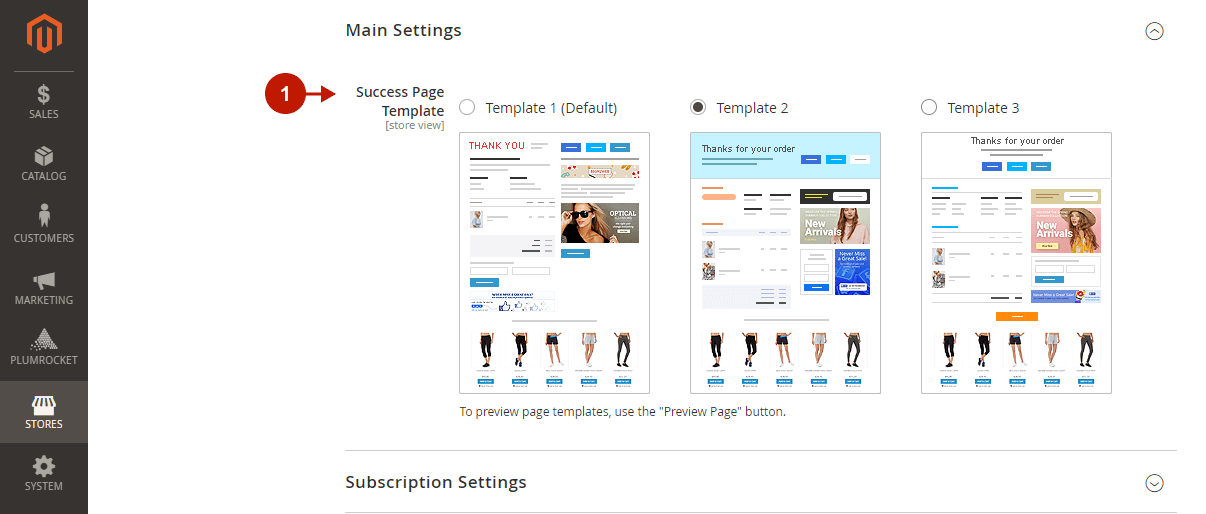
Main Settings
Step-by-step guide:
- The “Success Page Template” option allows you to choose the template for your checkout success page.
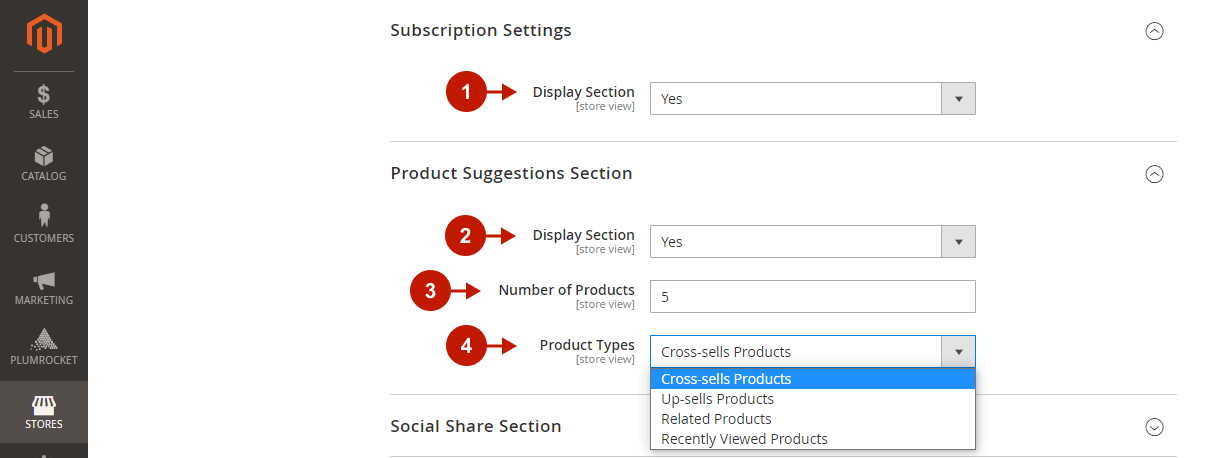
Subscription Settings & Product Suggestions Section
Step-by-step guide:
- Enable the “Display section” to let your customers sign up for newsletters. The activation of this option allows your guest customers to create their accounts at your store.
- Enable or disable the displaying of the “Product Suggestions Section”.
- In the “Number of Products” section, choose the number of suggested products to be displayed on your Magento 2 Checkout Success Page.
- In the “Product Types” section, select the product type for the products that will be displayed as suggested. It can be Cross-sells , Up-sells, Related Products, and Recently Viewed Products. Note: In order to display your Related Products, Cross-sells, Up-sells in the “Product Suggestions Section”, they should be pre-configured for a specific product that has been purchased. To do this, please read the Configuring Cross-sells in Magento 2 article.
Social Share Section
Step-by-step guide:
- Enable or disable the Social share option by setting the “Display Section” field to Yes or No accordingly.
- In the “Message” field, specify the text of a message your customers will see while sharing your page.
- Please enter your Facebook App ID to display the Social Share Section if you have already created Facebook application. Otherwise, please set up Facebook API first to get your Facebook App ID.

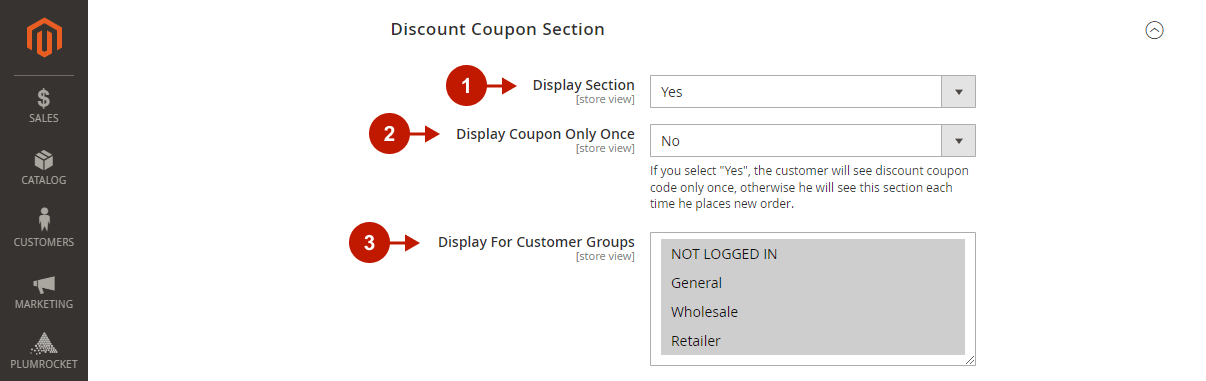
Discount Coupon Section
Step-by-step guide:
- This option allows you to enable or disable the Discount coupon section, where your customers will be offered automatically generated coupons or static codes for their next purchases at your Magento 2 store. In order to create automatically generated coupons, please read the Creating Shopping Cart Price Rules In Magento 2 article.
- Choose how often you need the discount coupon to be displayed by selecting Yes or No in the “Display Coupon Only Once” section. If you select Yes, the customer will see the discount coupon only once. Otherwise, they will see this section each time they place new order.
- Select customer groups who will be able to see your discount offer in the “Display for Customer Groups” section.
Step-by-step guide:
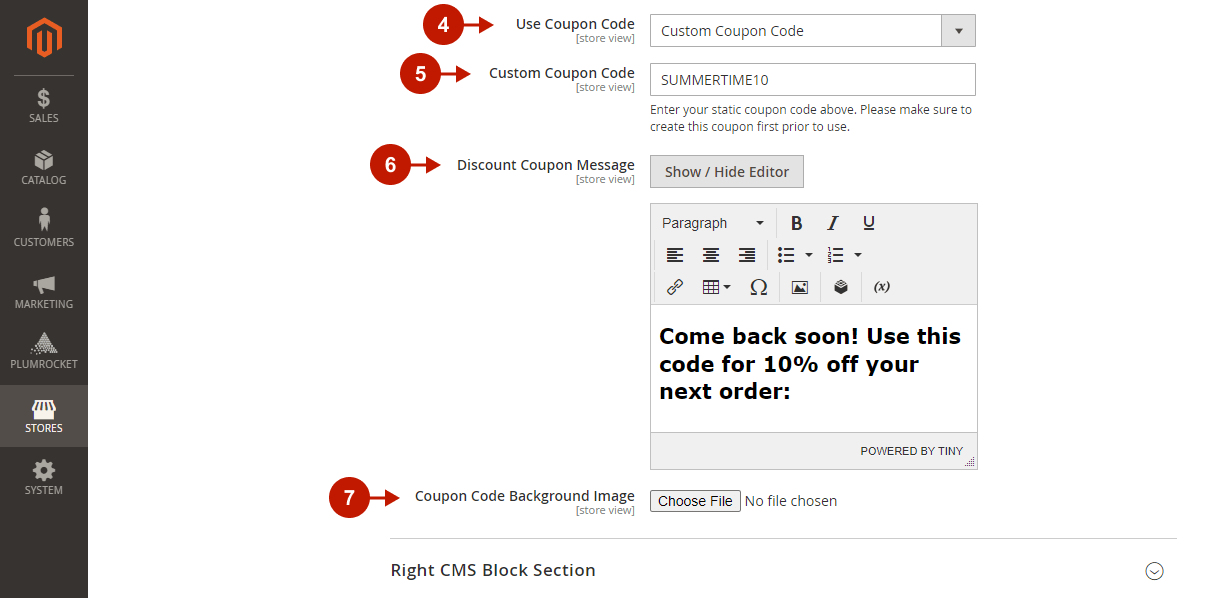
- In the “Use Coupon Code” section, you can configure what type of discount your customers will get. It can be a static coupon or coupon based on Shopping Cart Price Rule (see above). If you select the Custom coupon code option, it will be valid only for the coupon codes generated by the third-party extensions.
- In the “Custom Coupon Code”, specify the name of the code created by a third party extension. This field will show up only if in the “Use Coupon Code” section you choose the Custom coupon code option.
- Enter the message displayed in the discount coupon code in the “Discount Coupon Message” section.
- In this section, select the background image of the discount coupon.
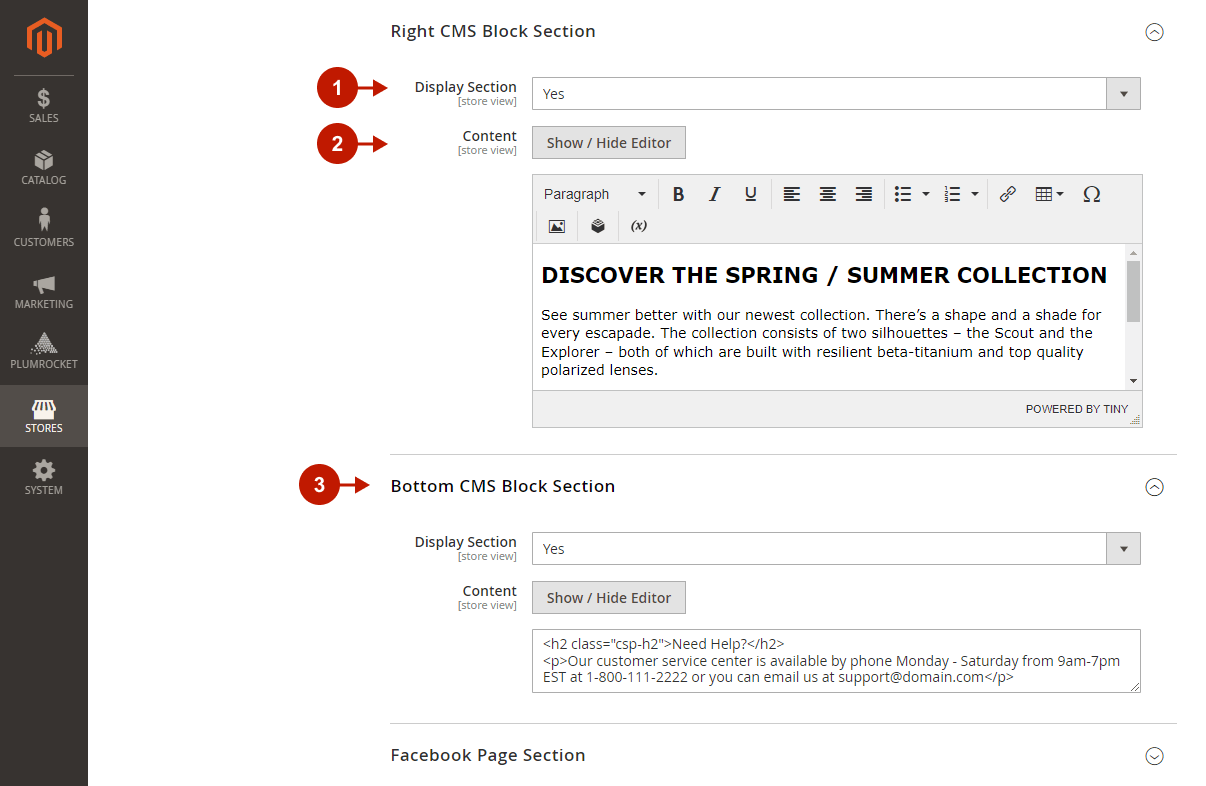
Right CMS Block Section & Bottom CMS Block Section
Step-by-step guide:
- The CMS Block section allows you to display right CMS block, where you can advertise your other special deals for customers.
- Enter the content of your CMS block in the “Content” section.
- “Bottom CMS Block Section” allows you to display advertisement block at the bottom of the page.
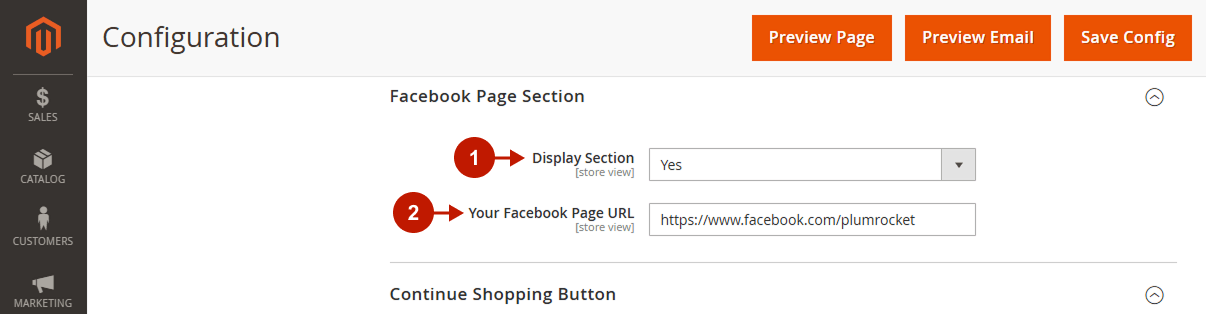
Facebook Page Section
Step-by-step guide:
- Enable or disable the “Display section” for your Facebook section on the Order Success Page by selecting Yes or No from the drop-down menu.
- In this field, specify your Facebook URL.
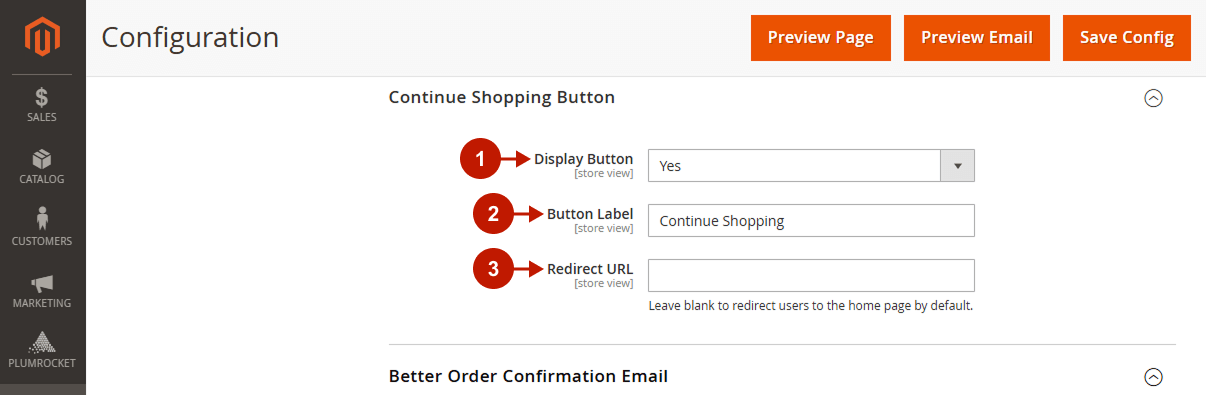
Continue Shopping Button
Step-by-step guide:
- Choose whether the Continue Shopping Button should be displayed.
- Type the Button Label.
- Specify the Redirect URL. If this field is blank, users will be redirected to the home page.
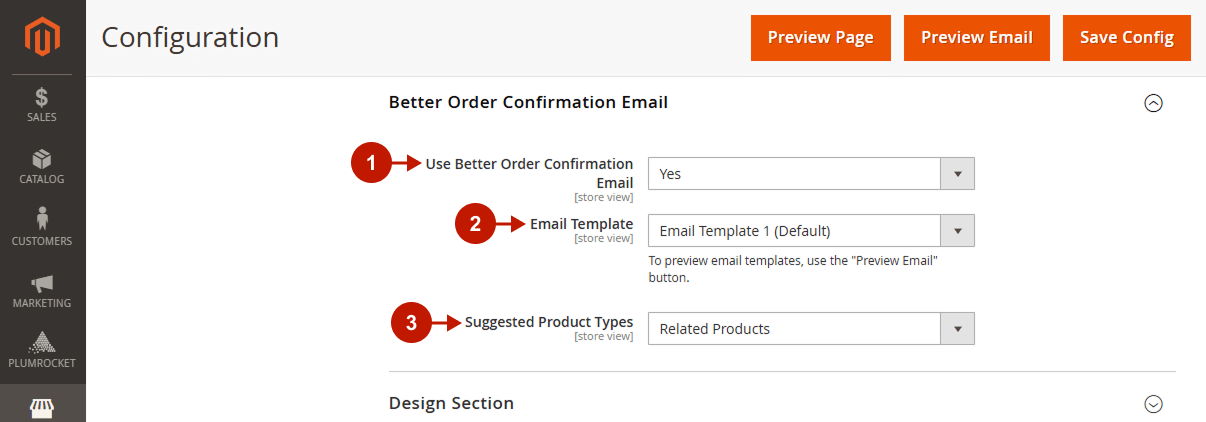
Better Order Confirmation Email Section
Step-by-step guide:
- Enable or disable the “Use Better Confirmation Email” option.
- Select the template of the confirmation email in the “Email template” section.
- In the ” Suggested Product Types” section, select the products to be included in the Better Confirmation Email.
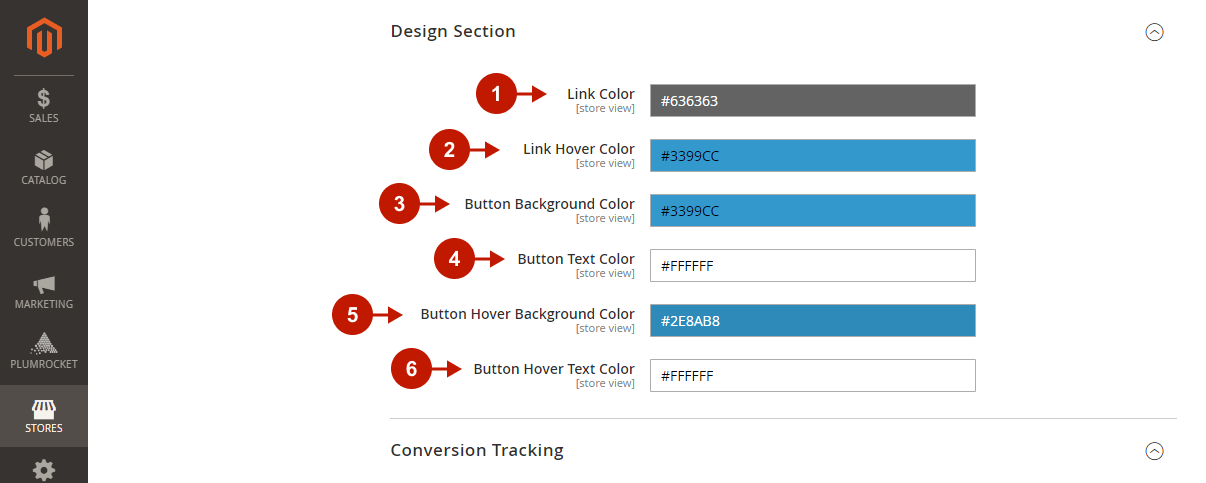
Design Section
Step-by-step guide:
- “Link Color” option: allows you to select the color of the links on the Checkout Success Page.
- “Link Hover Color” lets you choose the hover color of the links displayed on the Checkout Success Page.
- “Button Background Color” option: allows you to select the background color of buttons on your Checkout Success Page.
- “Button Text Color” option: lets you select the text color on the buttons of the Checkout Success Page.
- “Button Hover Background Color” option: lets you select buttons background hover color on the Checkout Success Page.
- “Button Hover Text Color” option: allows you to select button text hover color on the Checkout Success Page.
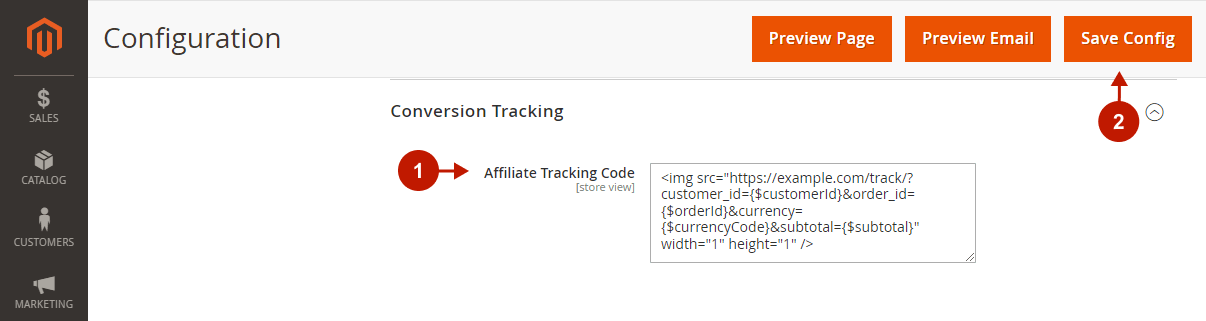
Conversion Tracking
Step-by-step guide:
- “Affiliate Tracking Code”: paste the tracking code for your Affiliate network in this field to be automatically added to the Checkout Success page. Depending on what you need to track, you can use the following variables:
- {$orderId} – order increment id
- {$postCode} – post code from order
- {$region} – region from order
- {$city} – city from order
- {$country} – country from order
- {$totalQty} – total qty of order
- {$discountAmount} – discount amount
- {$shippingAmount} – shipping amount
- {$tax} – tax
- {$itemList} – list of items in string format
- {$currencyCode} – currency code
- {$customerName} – customer name
- {$customerEmail} – customer email
- {$customerId} – customer id
- {$subtotal} – subtotal of order
- Click Save Config to save all settings.
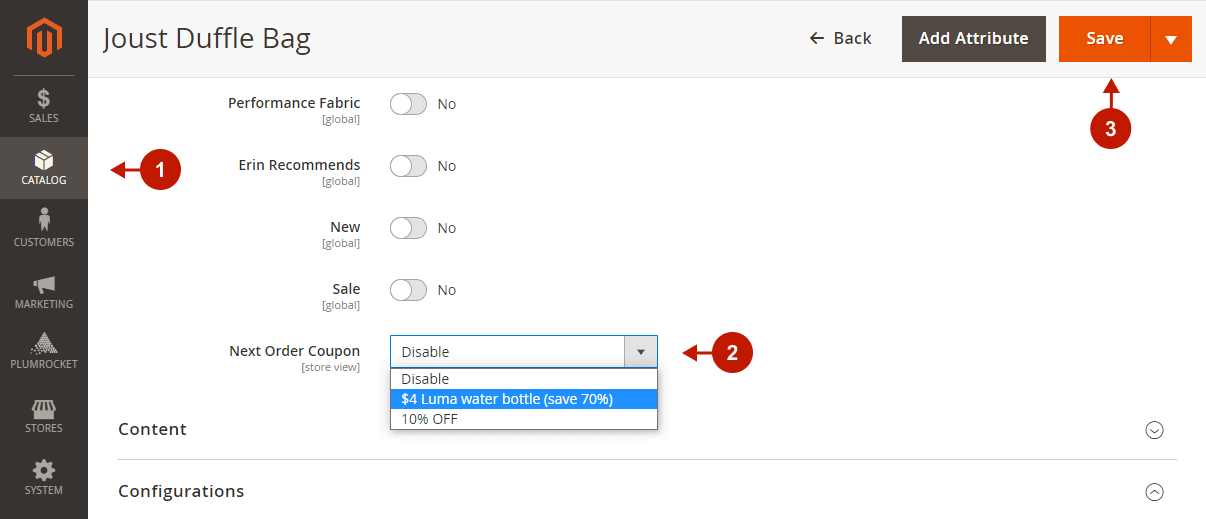
Setting Next Order Coupon for a Product
If you need to have the ability to generate different coupon codes for the next purchases based on the products included in the order – please follow the steps below.
Step-by-step guide:
- Go to Catalog > Inventory > Products, and select the required product to set the coupon for.
- Navigate to the “Next Order Coupon” option and set the needed coupon to be generated for the next purchase. Note: If there are multiple products with different shopping cart price rules coupons, the coupon with the highest rule priority will be applied. In case you leave this option blank, then the coupon that was set up in the extension configuration will be applied.
- Save your changes by pressing the “Save” button.
Testing Checkout Success Page for Magento 2
Step-by-step guide:
- To test your changes, you can preview your Checkout Success Page and Better Order Email by pressing the Preview Page and Preview Email buttons accordingly.
- Once all the changes have been done, press the Save Config button.

Preview of the Checkout Success Page
Step-by-step guide:
When clicking the Preview Page button, you can preview all the templates available for the Checkout Success page.
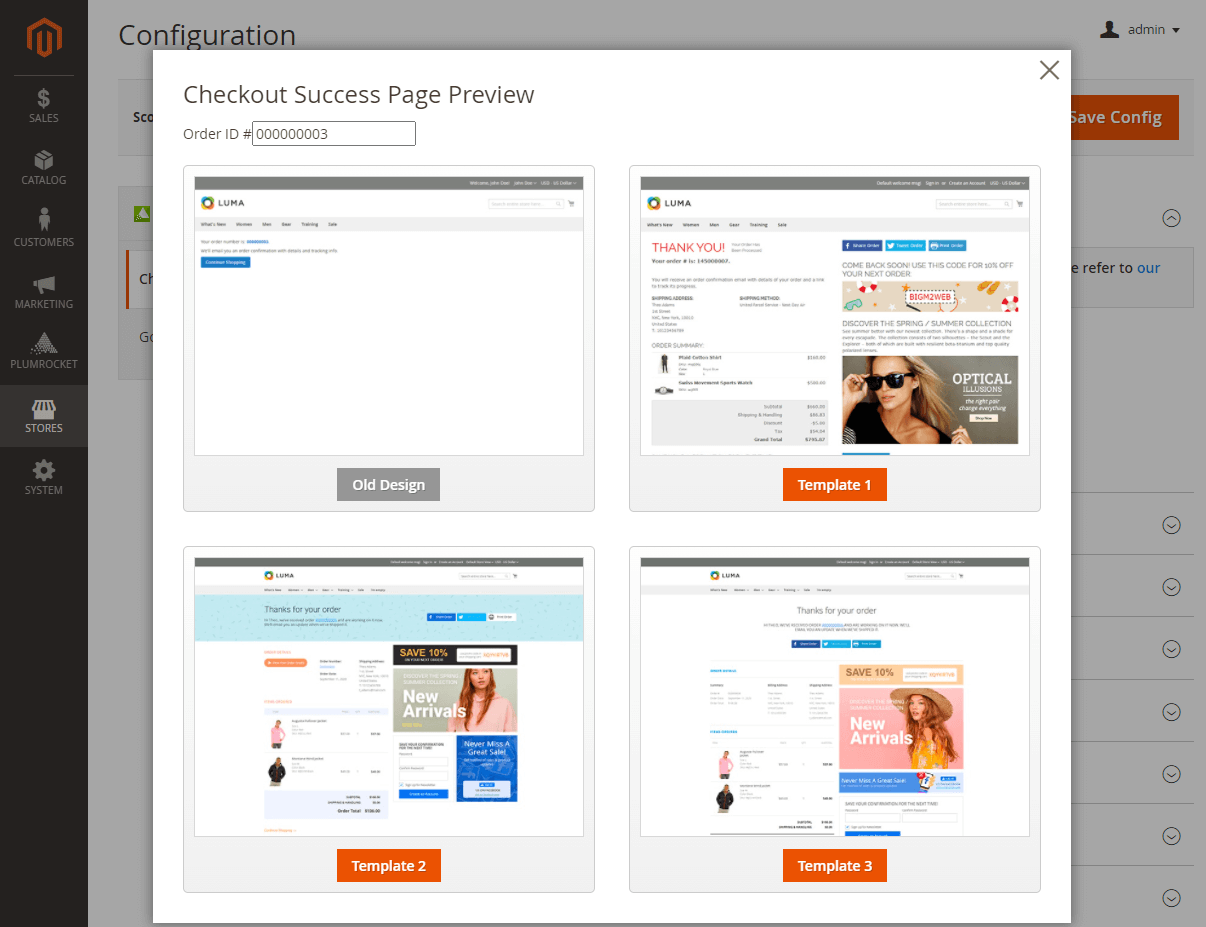
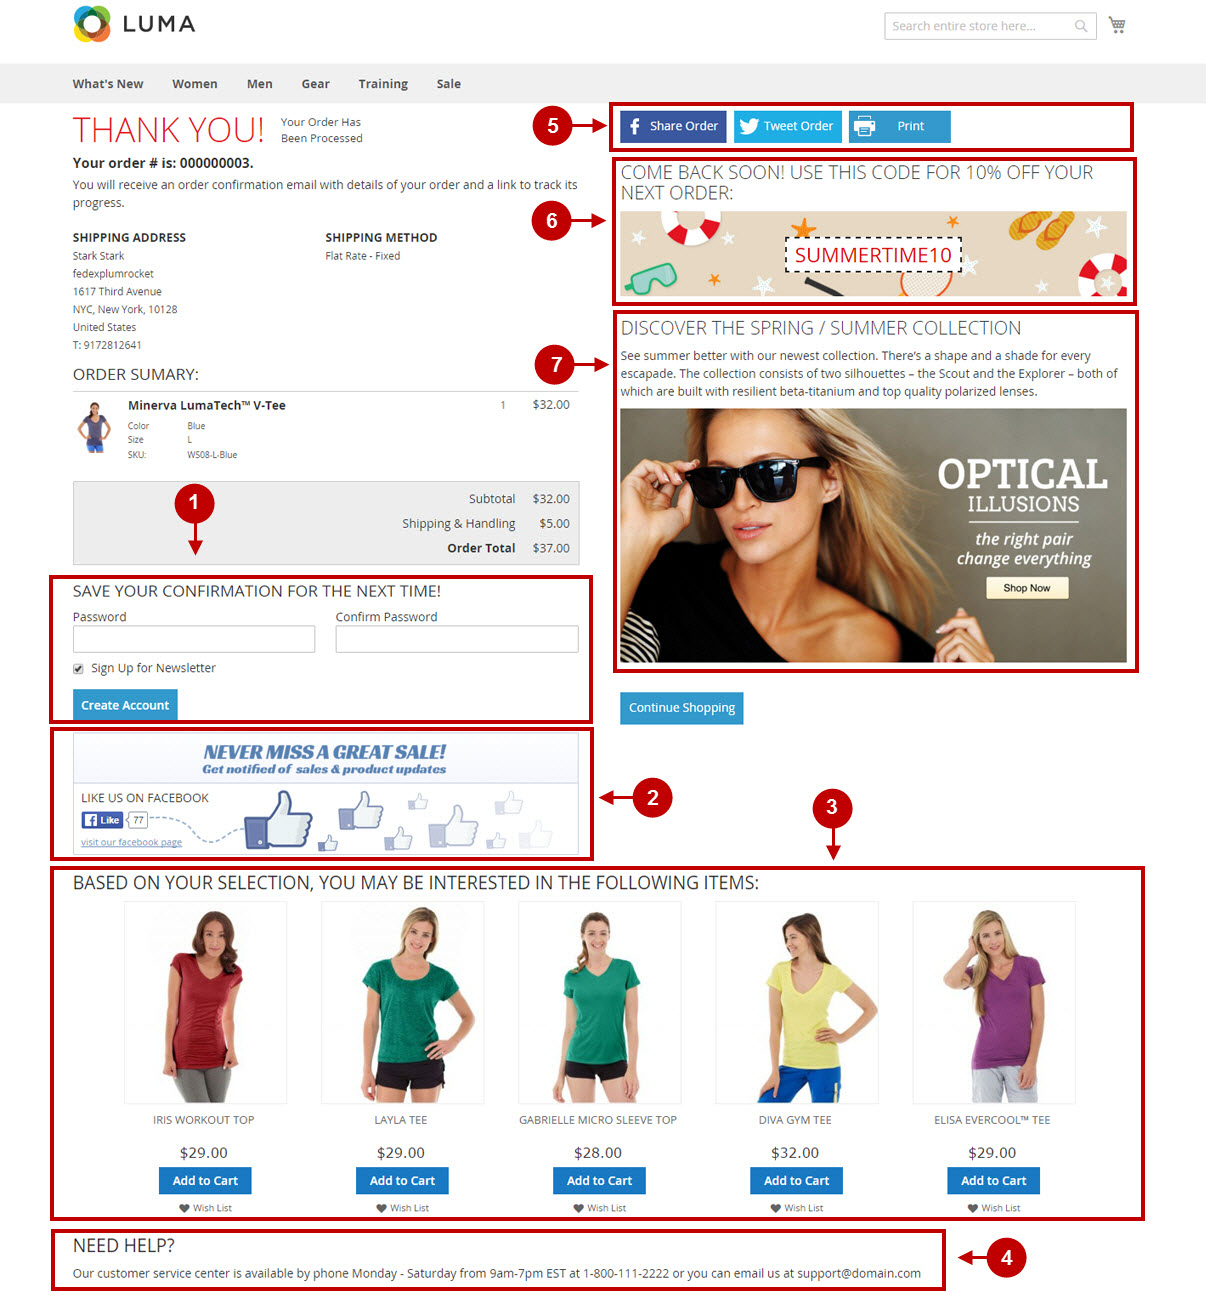
Let’s take a closer look at Template 1.
Step-by-step guide:
- Here is how your Subscription and guest registration section will look like.
- In this section, your customers can like your page on Facebook.
- This section displays previously selected types of products to be suggested.
- In the Bottom CMS Block section, you can advertise custom marketing messages to your customers.
- In the Social Share section, users can share their order details on social networks.
- This section displays the Discount Coupons for your customers.
- Right CMS Block section allows you to display special offers for your customers.
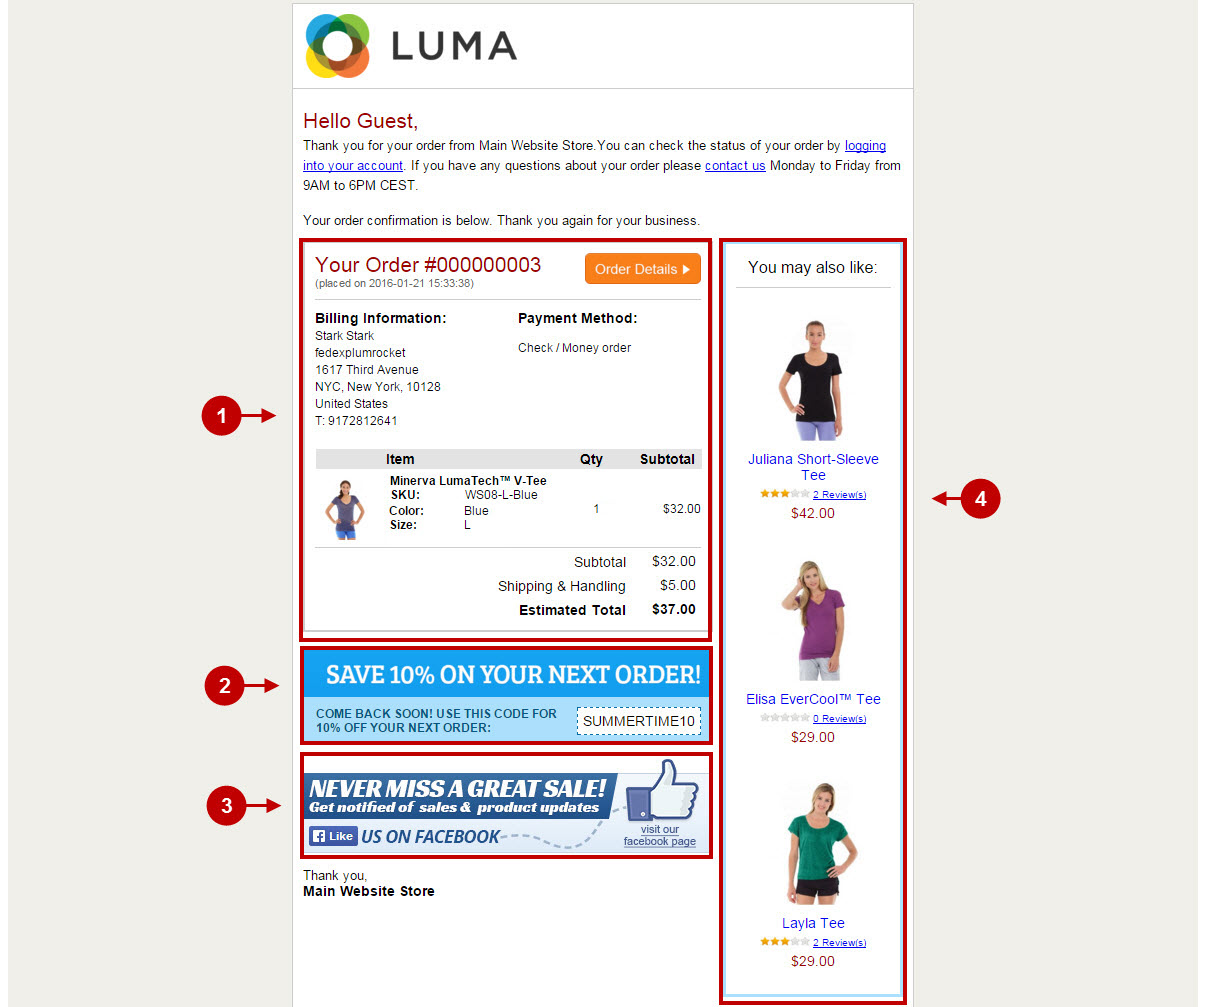
Preview of the Better Order Email
Step-by-step guide:
When clicking the Preview Email button, you can preview all the templates available for the Better Order Email.
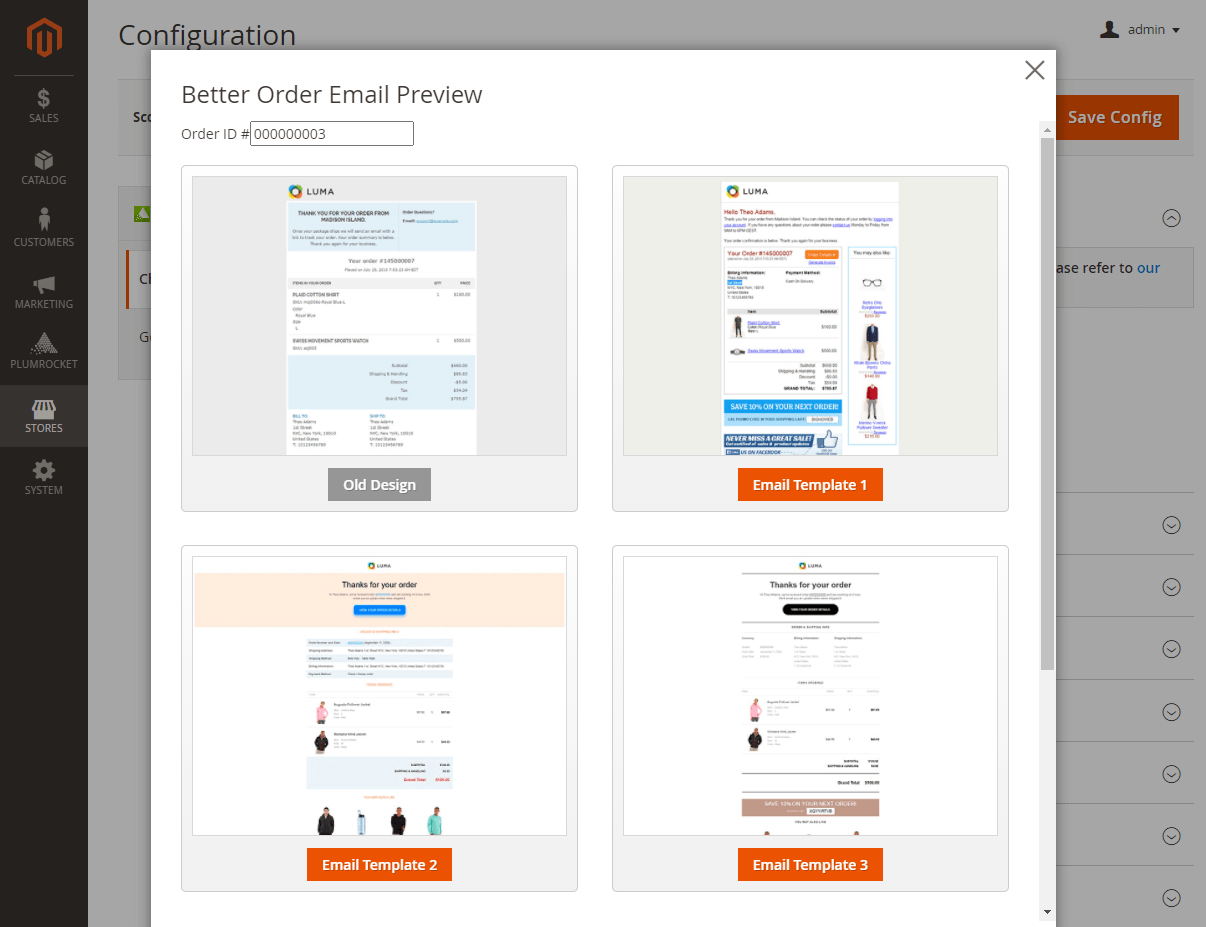
Let’s take a closer look at Email Template 1:
Step-by-step guide:
- Here is the block with your customer’s order details.
- Here is the discount your customer may use after the purchase. If the discount coupon section is enabled for Checkout Success Page, it will be shown in your order confirmation email.
- This section allows your customer to like your page on Facebook. If the Facebook Page section is enabled for Checkout Success Page, it will be shown in your order confirmation email.
- This block displays suggested products your customer will see in their Better Order Confirmation email.
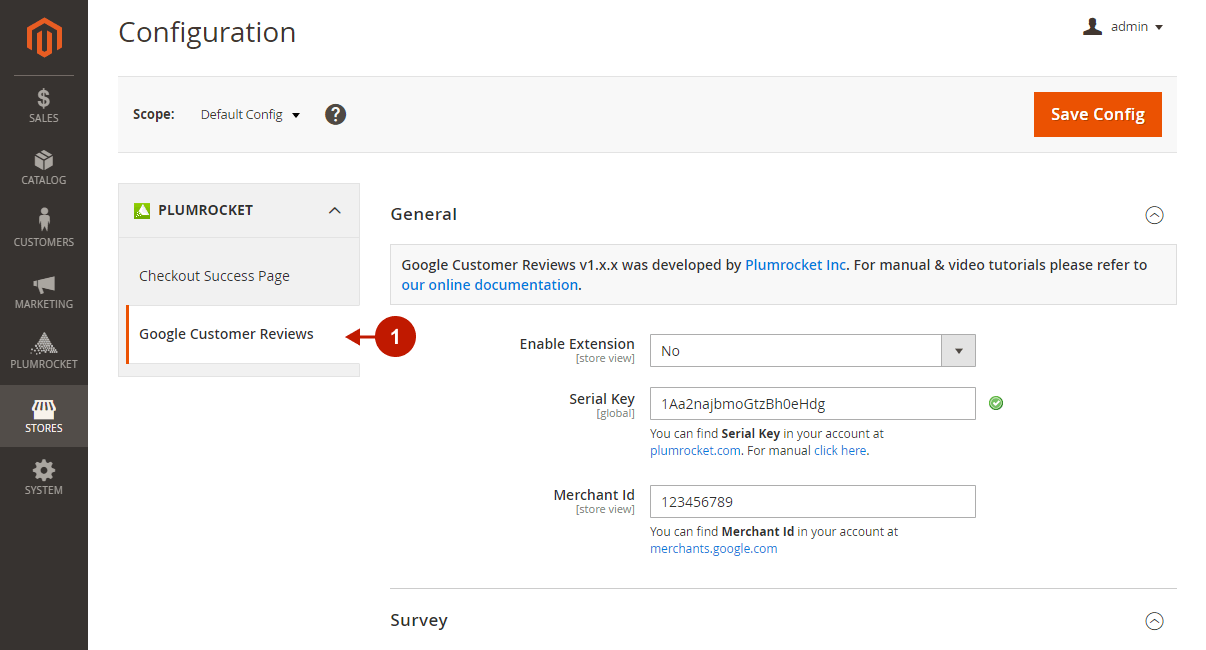
Configuring Google Customer Reviews Extension
The Checkout Success Page plugin comes bundled with a free Magento 2 Google Customer Reviews extension so that you can easily collect Google Reviews. The extension displays a Survey Opt-In popup on the checkout Success page, asking customers to take part in a one-minute survey. If a buyer agrees, they will receive an email from Google asking them to rate their shopping experience and optionally share a brief comment.
To configure Google Customer Reviews, go to the “Google Customer Reviews” tab in the left menu bar. Then, follow the Google Customer Reviews Configuration article to set it up properly.