Configuring Newsletter Popup Extension
Here you will learn how to correctly configure our Magento Newsletter Popup Extension. To do this, follow the instructions below.
Step-by-Step action:
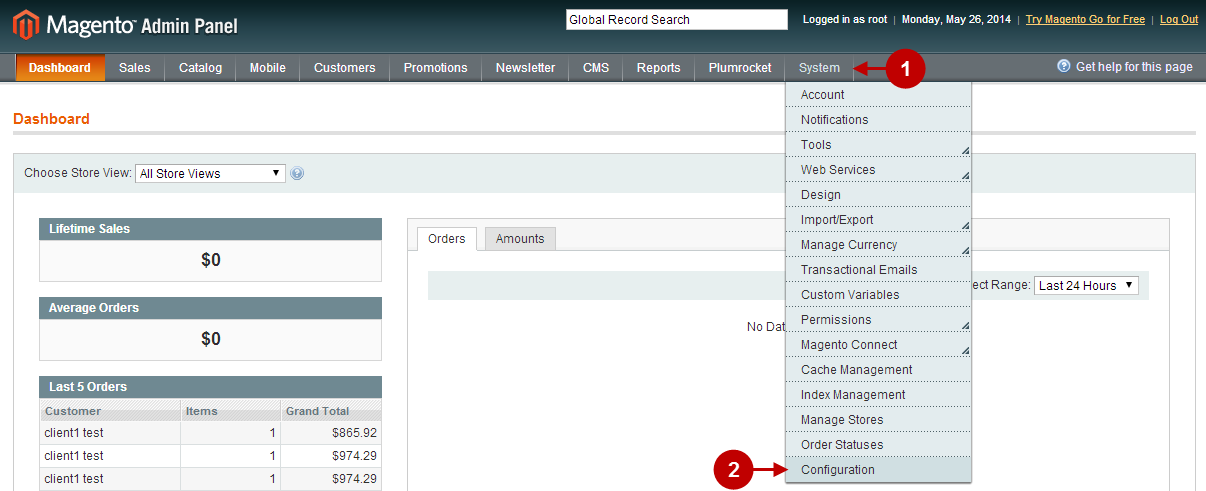
- Press the “System” tab in the menu.
- Select “Configuration”.
Step-by-Step action:
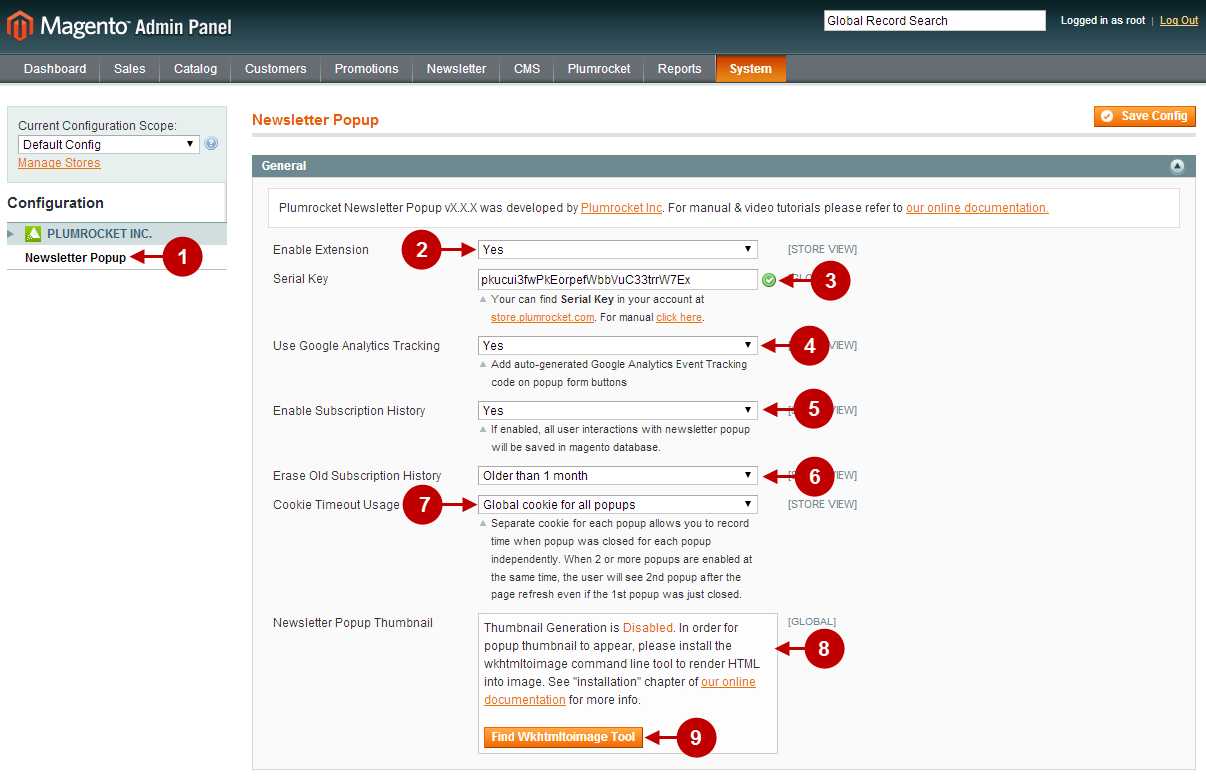
- Select “Plumrocket Newsletter Popup” in the menu Configuration.
- Enable Extension: allows you to enable or disable this Newsletter Popup extension.
- Option “Serial Key”: enter unique serial key provided after the purchase for legitimate and proper functioning of your extension. Note: In most cases this field will be pre-filled with serial key automatically and the green check mark will be displayed. Otherwise please read article Serial Key Activation in order to find and paste your serial key manually.
- Use Google Analytics Tracking: allows you to select whether or not Google Analytics Tracking will be used for your Popups.
- Enable Subscription History: if enabled, this option allows to save all user’s interactions with Popups in magento database.
- Erase Old Subscription History: allows to select the period of time after which the Subscription History will be erased.
- Cookie Timeout Usage: allows you to use two different types of cookies: “Global cookie for all popups” and “Separate cookie for each popup”. This way admin will be able to record time when popup was closed for each popup independently. When 2 or more popups are enabled at the same time, the user will see 2nd popup after the page refresh even if the 1st popup was just closed.
- Newsletter Popup Thumbnail: indicates if “Thumbnail Generation” option for the popup is enabled or disabled.
- Find Wkhtmltoimage Tool: allows you to locate this tool after installation on the server, or find it in case it was moved within the file system.
Important Information:
In order to enable Newsletter Popup Thumbnail – you will need to have the wkhtmltoimage command line tool installed as outlined here.
Step-by-Step action:
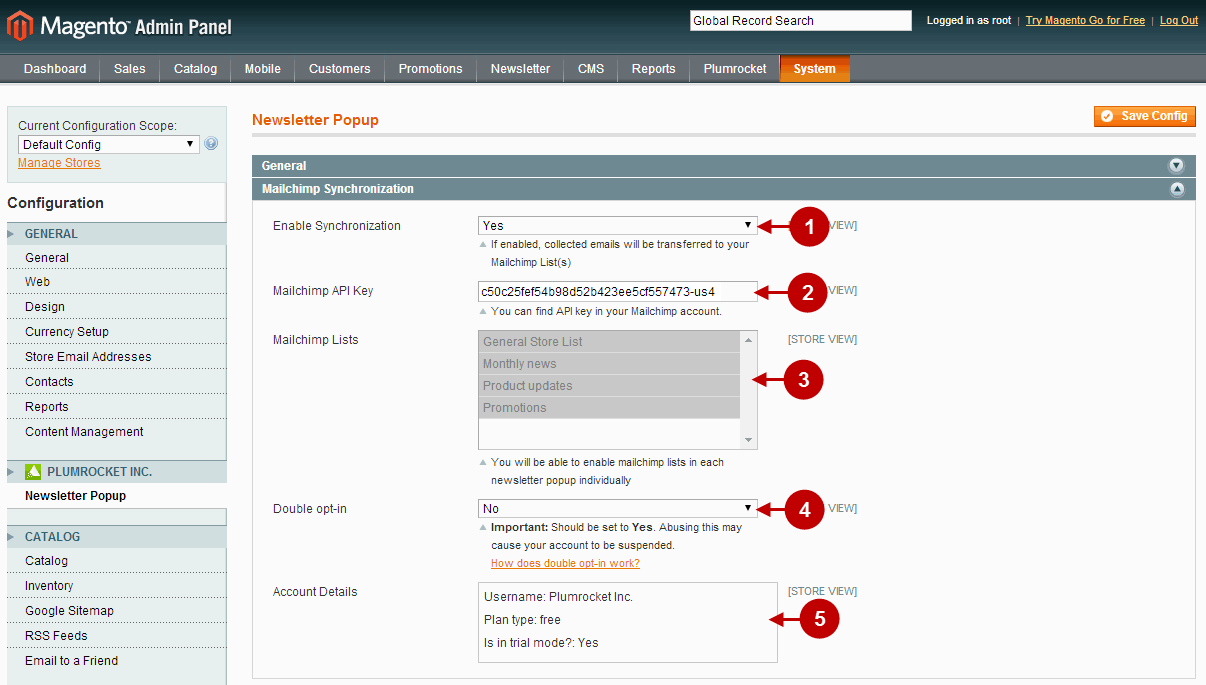
- Enable Synchronization: if enabled, this option allows you to transfer collected emails to your Mailchimp List(s).
- Mailchimp API Key: allows you to indicate your MailChimp API key. This is an API key which you can retrieve from your MailChimp account. (For more information about Mailchimp API key please read this article)
- Mailchimp Lists: allows to select the Mailchimp Email List(s) where the collected emails will be saved to. (List(s) will appear after you indicate your Mailchimp API Key)
- Double opt-in: allows to activate Double opt-in. Note: For more information about double opt-in process in MailChimp please read this article.
- Account Details: show your MailChimp Account details. (They will appear after you indicate your Mailchimp API Key)
Step-by-Step action:
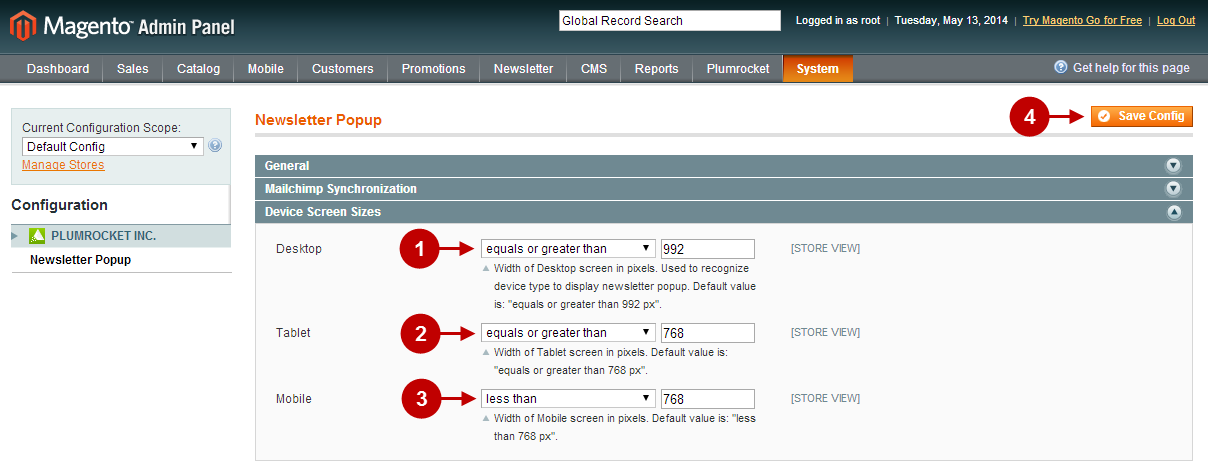
- Desktop: allows you to set the width of Desktop screen for proper display of Newsletter Popup. By default it is 992 pixels or greater.
- Tablet: allows to set the width of Tablet screen. By default it is 768 pixels or greater.
- Mobile: allows to set the width of Mobile device screen. By default it is less than 768 pixels.
- Click “Save Config” to save your settings.
Important Information:
In order to improve your conversion rates and for positive user’s experience it is preferable to indicate the exact width of the screen on different devices (Desktop, Tablet, Mobile device).
Manage Newsletter Popups
This tab allows you to preview and edit Popups. In order to access this management page, follow the steps as described below.
Step-by-Step action:
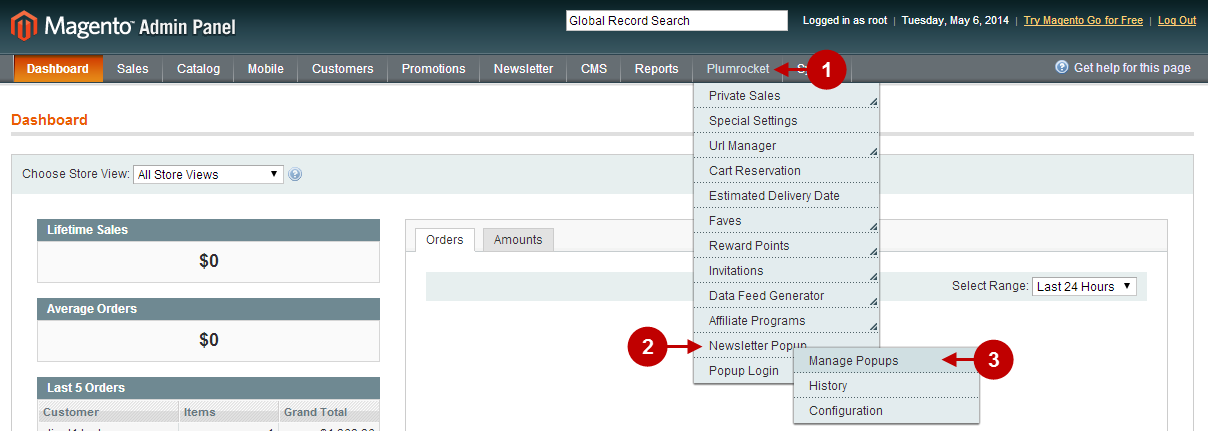
- Press the “Plumrocket” tab in the menu.
- Select “Newsletter Popup”.
- Select “Manage Popups”.
Step-by-Step action:
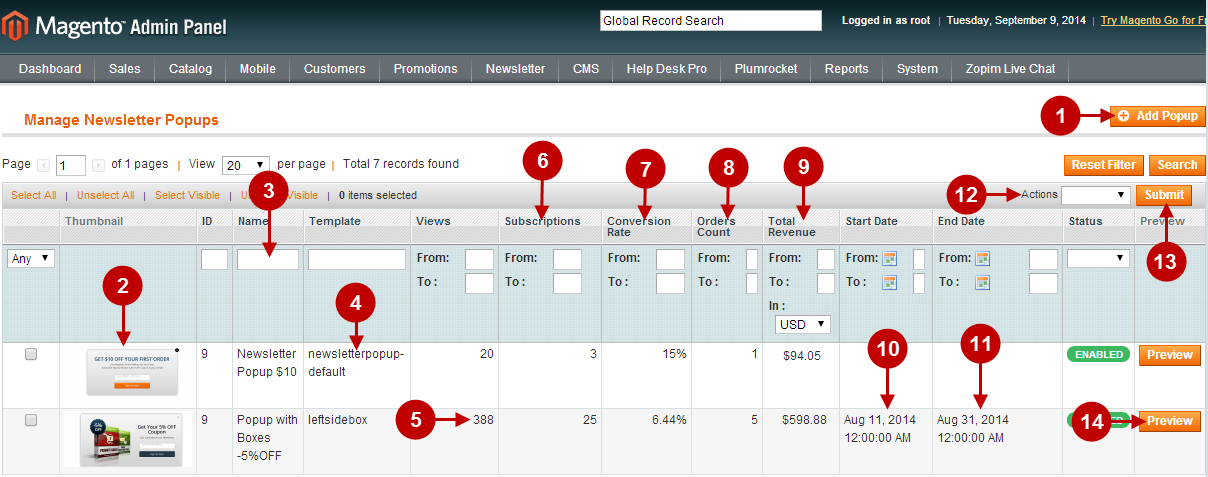
- You can add new popup by clicking on “Add Popup” button.
- “Thumbnail” column allows you to see the thumbnail image of the popup.
- “Name” column indicates the name of the popup.
- “Template” column indicates the name of the template used for popup.
- “Views” column allows you to see the amount of users’ views of the popup.
- “Subscriptions” column allows you to see the amount of users’ that were subscribed using specific popup.
- “Conversion Rate” column shows the conversion rate of the popup.
- “Orders Count” column allows you to see the amount of orders made with this popup.
- “Total Revenue” column shows the total revenue gained with this popup.
- “Start Date” column indicates the Start Date of the Newsletter Popup.
- “End Date” column indicates the End Date of the Newsletter Popup.
- You can duplicate, enable, disable or delete the selected popup(s) by selecting the according action from “Actions” dropdown.
- By pressing “Submit” button you will confirm the needed action.
- “Preview” button opens the popup in the separate window for your review.
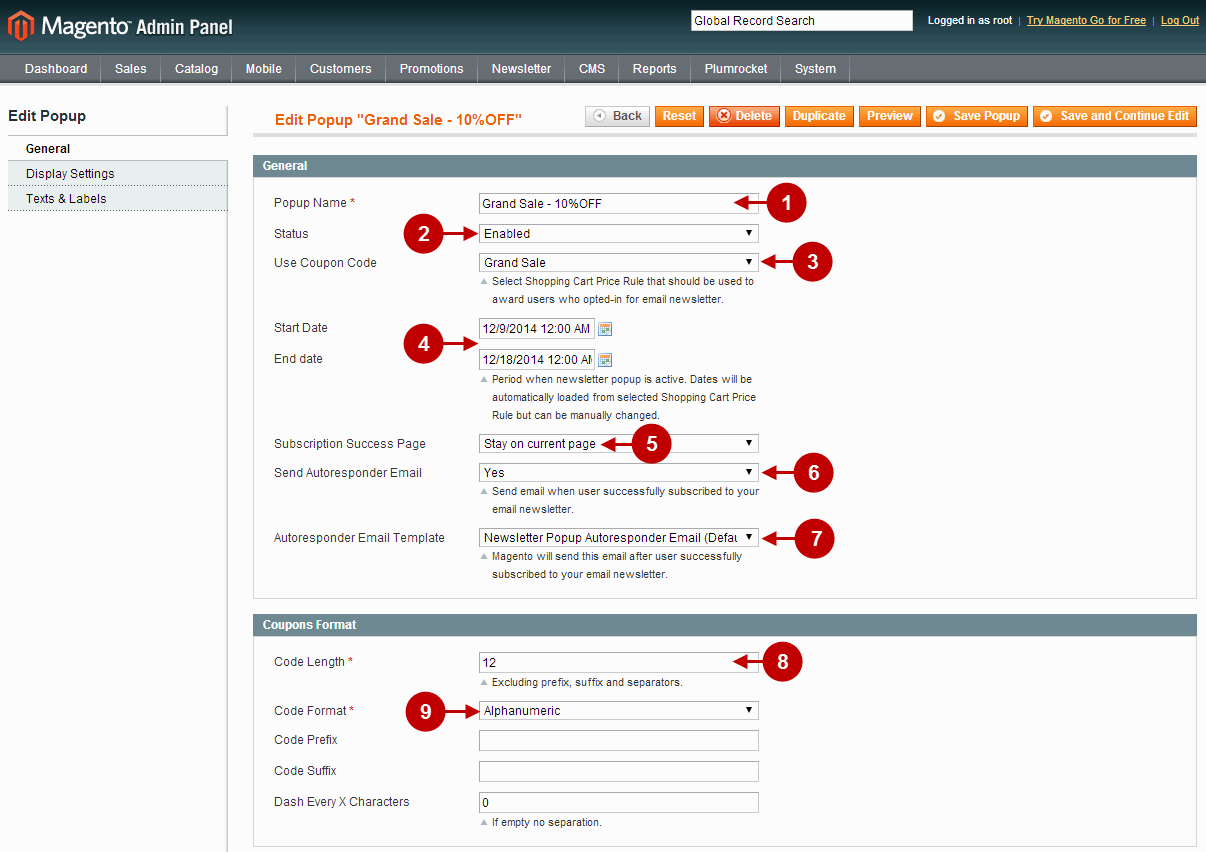
In order to configure your new Magento Newsletter Popup please follow the step-by step instructions below.
Step-by-Step action:
- Popup Name: allows you to indicate Newsletter Popup name.
- Status: allows you to enable or disable this extension.
- Use Coupon Code: allows you to select the Shopping Cart Price Rule with coupon (if any). For more information about the rules please read Creating Shopping Cart Price Rules In Magento.
- Start Date, End Date: allows you to set the Start Date and End Date of the Newsletter Popup.
- Subscription Success Page: allows you to select the page where the subscriber will be transferred to after successful subscription.
- Send Autoresponder Email: allows you to choose whether or not the notification email about successful subscription will be sent to a client.
- Autoresponder Email Template: allows you to choose the template that will generate notification email about successful subscription.
- Code Length: allows you to set the Discount Coupon Code length.
- Code Format: allows you to choose the Discount Coupon Code format (Alphanumeric, Alphabetical or Numeric).
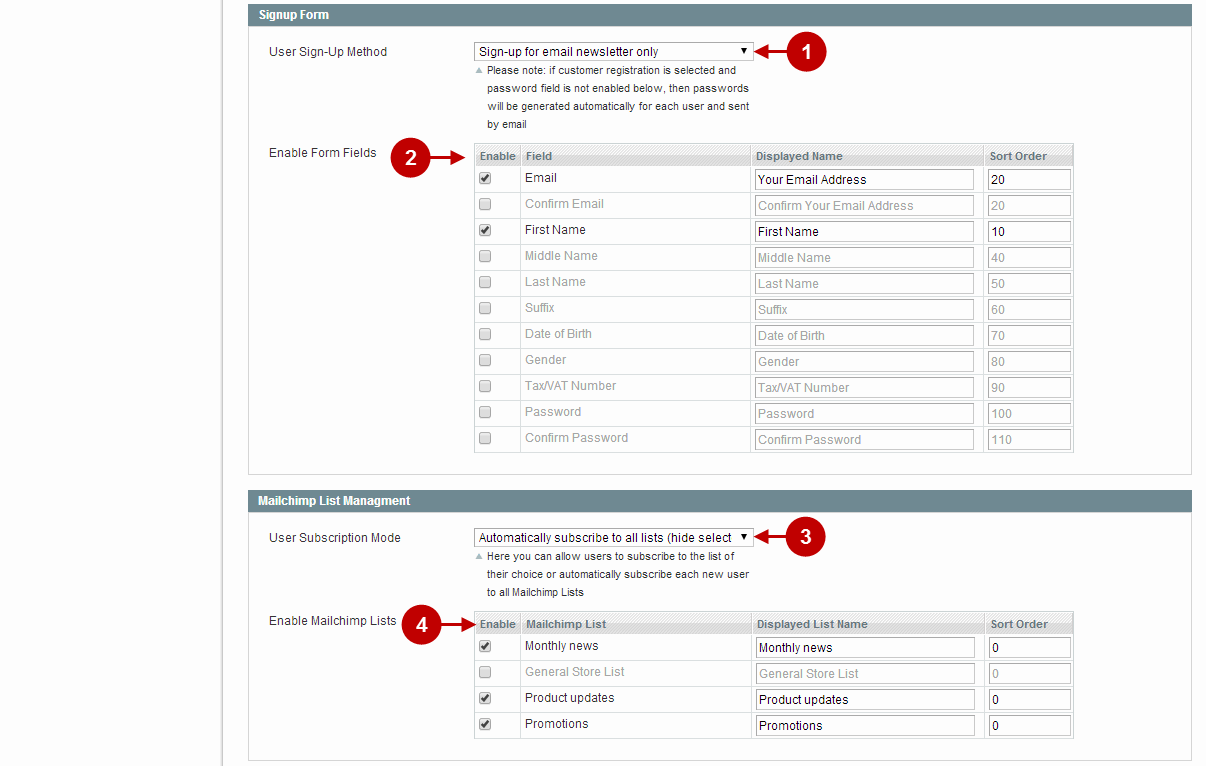
Step-by-Step action:
- User Sign-Up Method: allows you to select the way for customer sign-up process. Possible options are “Sign-up for email newsletter only” and “Register customer account & sign-up for newsletter”.
- Enable form fields: allows you to select, enable, rename and define sort order for the additional fields on users sign-up form.
- User Subscription Mode: lets you allow users to subscribe to the list of their choice or automatically subscribe each new user to all Mailchimp lists. Multiple options are available here.
- Enable Mailchimp Lists: allows you to choose the lists in MailChimp that you customers will be able to subscribe to.
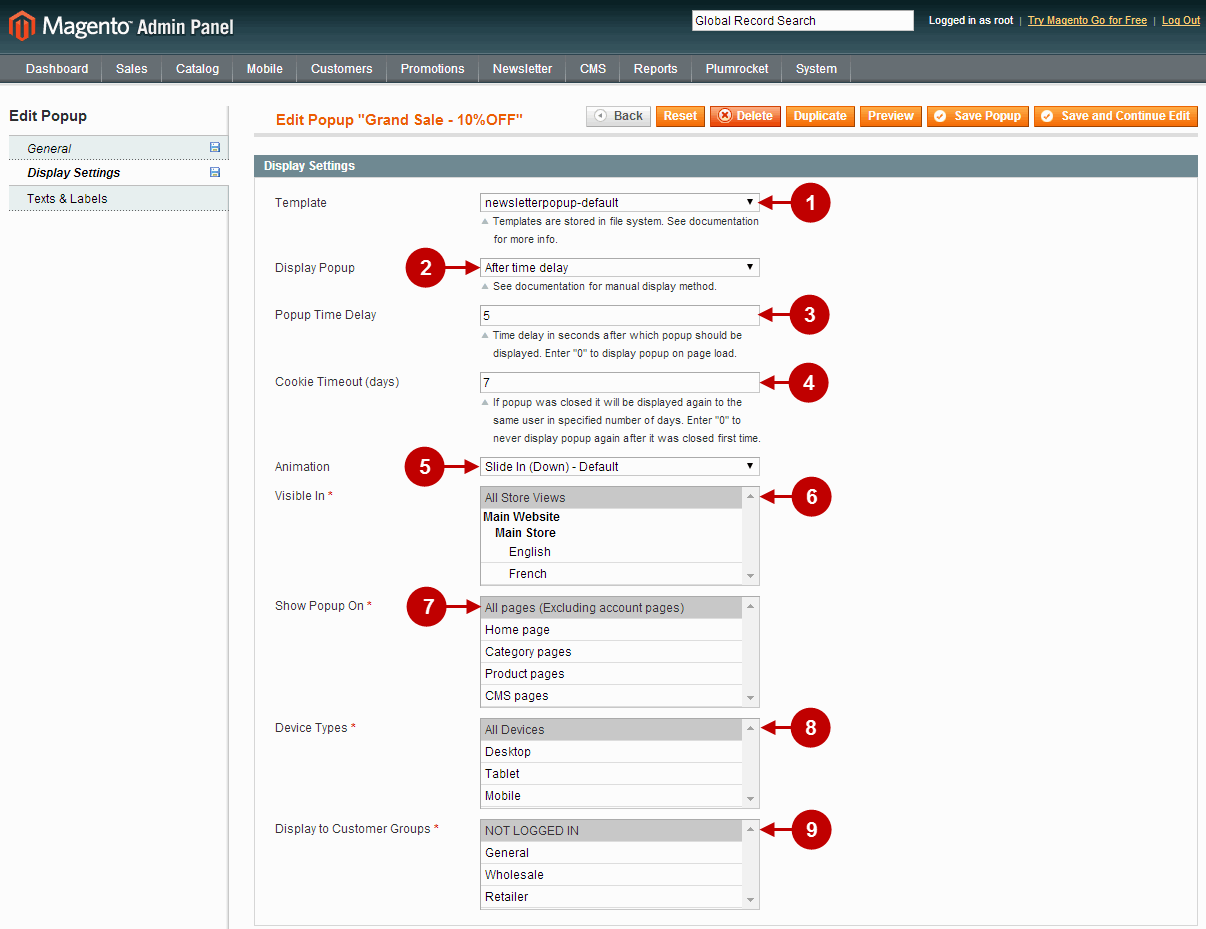
Step-by-Step action:
- Template: allows you to select the template which will be used for Newsletter Popup. (For more information on how to create and edit Newsletter Popup Templates please read below.)
- Display Popup: allows you to select the option where the Popup will be displayed. Possible options are: “After time delay” , “When leaving site (out of focus)” , “Manually” . For the “Manually” option please refer to Magento Newsletter Popup v1.x Developers Guide and API Reference section for more information.
- Popup Time Delay: allows you to indicate the delay time after which the Popup displays.
- Cookie Time Frame: allows you to set the time frame for the cookies in days. Cookies are used to track whether user clicked on “subscribe” or “cancel” button. If the user choose to cancel the subscription, then the popup will be displayed again only in specified amount of days. Enter ‘0’ in this field to never display the newsletter popup again after it was closed for the first time.
- Animation: allows you to select from different animation effects for popup.
- Visible In: allows you to choose for which Store view(s) the Popup will be visible.
- Show Popup On: allows you to select the page(s) on which the Popup will show up.
- Device Types: allows you to indicate the device types on which the Popup will appear.
- Display to Customer Groups: allows to choose the Customer Group(s) for which the Popup will display.
Important Information:
How to calculate when is the right time to display newsletter popup? Good starting point would be your site statistics. In Google Analytics you can go to Audience -> Behavior -> Engagement and see when most visitors leave your site. The default suggested value is 5 seconds . However we always suggest to test and compare different time delays vs number of email signups as every website is different.
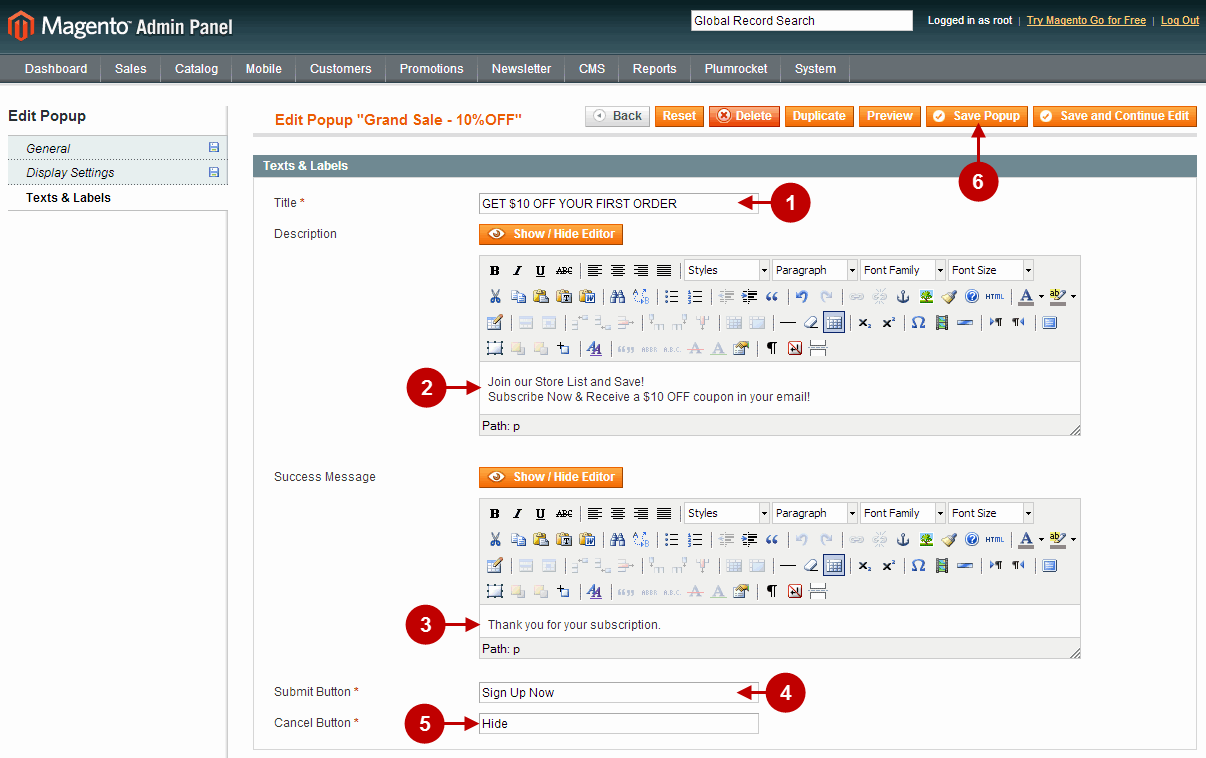
Step-by-Step action:
- Title: allows you to set the title which will be used for Newsletter Popup.
- Description: allows you to indicate some description for the Popup if needed.
- Success Message: allows to set the message that will show up after the successful subscription.
- Submit Button: allows you to create a text for “Submit” button of the Popup.
- Cancel Button: allows you to create a text for “Cancel” button of the Popup.
- Press “Save Popup” to save your Newsletter Popup.
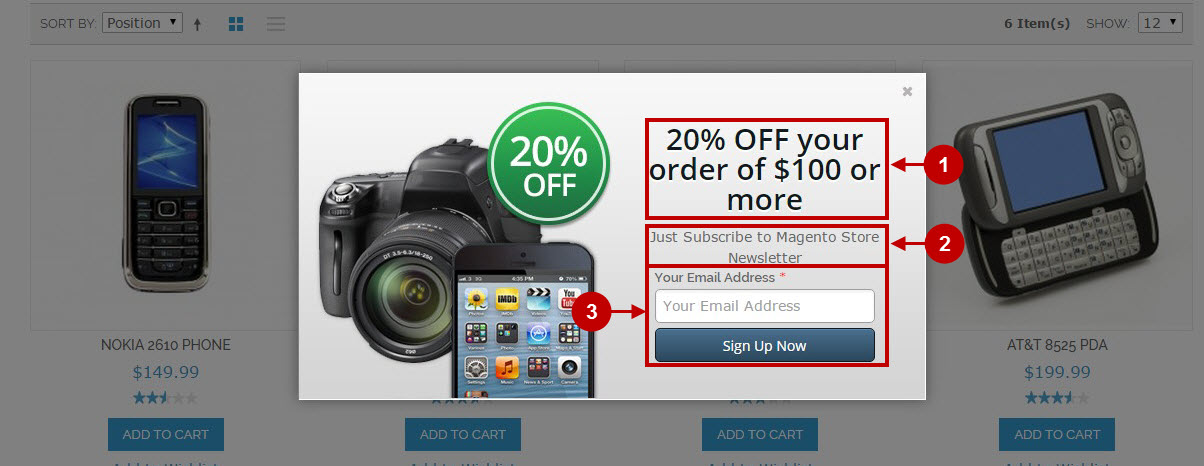
Here’s how the newsletter popup will look like on frontend once enabled.
Detailed description:
- This is how your title text section will look like.
- Here’s how the description text section will be displayed.
- This is the sign-up section of newsletter popup.
Newsletter Popup History
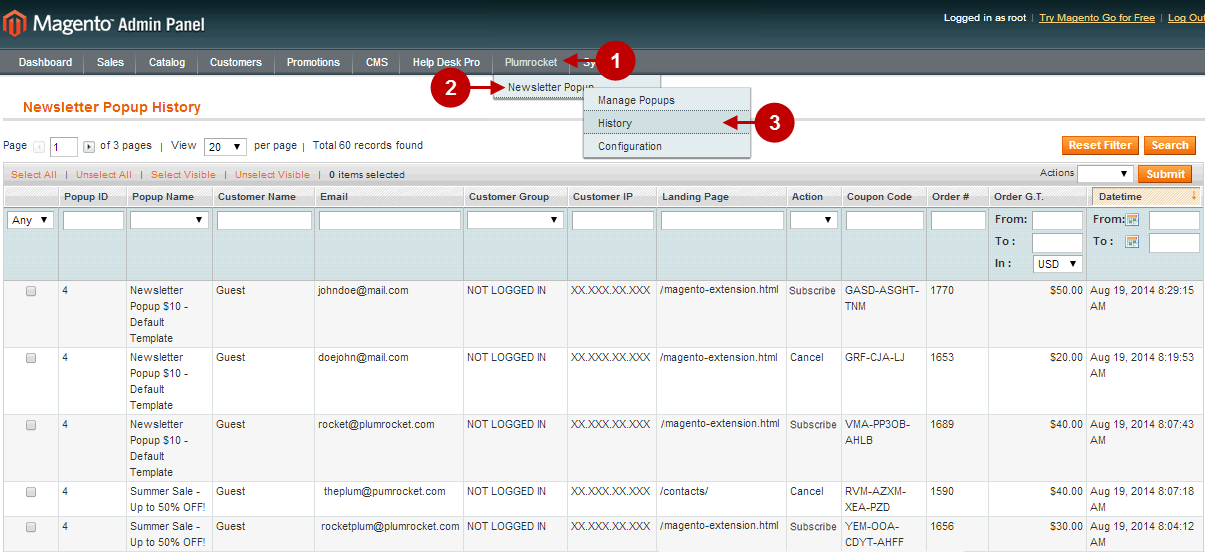
This tab allows you to preview the Newsletter Popup History.
Step-by-Step action:
- Press the “Plumrocket” tab in the menu.
- Select “Newsletter Popup”.
- Select “History”.
Creating and Editing Newsletter Popup Templates
In order to create a new template for Magento Newsletter Popup Extension you need to copy some of the existing working system templates in the folder:
/app/design/frontend/base/default/template/newsletterpopup/templatesedit it as you need, give it a unique name and then upload it to the following folder on your server:
/app/design/frontend/YOUR_THEME/default/template/newsletterpopup/templates(where “YOUR_THEME” is the name of your theme) using any FTP-client (e.g. FileZilla.). This way Magento will be able to obtain your new template and add it to the list of templates you can use with Newsletter Popup Extension.
