It is important always to keep your Facebook Catalog up-to-date. With Magento 2 Data Feed Generator Extension, you can automatically bulk upload your Magento 2 store products to Facebook Catalog. You only have to configure it once - Facebook and Plumrocket extension will do the rest.
How to Upload a Data Feed File to Facebook
There are three ways of uploading a data feed to Facebook:
- File upload - a simple manual drag and drop process
- Scheduled feed - use a file hosted on a website to automatically update your inventory by entering the URL
- Google Sheets - upload a data feed file to the Google sheets, get its link (make sure the Sharing option is set to Anyone with the link, not to Restricted), and paste the link to a corresponding field
In this tutorial, we will use the first and second methods to upload data feed to Facebook. Note that the data feed file size must be less than 100 MB for a manual upload and less than 8 GB for a scheduled upload. Please follow the instructions below to set automatic updates for the Facebook data feed.
How to Schedule Automatic Updates for Facebook Data Feed in Magento 2
Step 1. Create a data feed file in a CSV or XML format
First of all, you have to generate a data feed file to be later uploaded to Facebook and make sure that it contains all the necessary information and meets the Specifications. To do this, go to Plumrocket -> Data Feed Generator -> Manage Data Feed List -> Add New Data Feed in the Magento admin panel.
You can use a Facebook Data Feed Template already available in the extension or create a new data feed from scratch.
Step 2. Validate Magento 2 data feed file
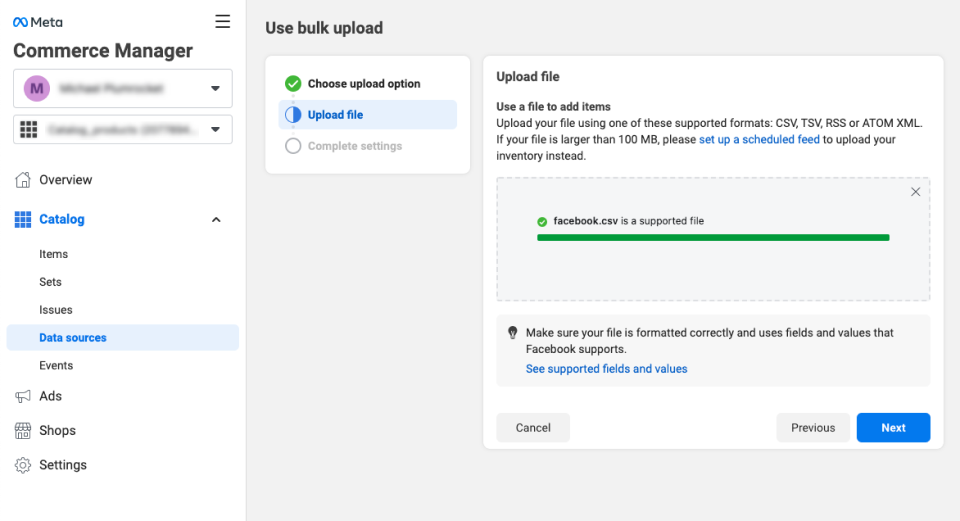
An important step is to test the data feed you created by validating it. All you need to do is to upload it to Facebook manually:
- Go to Facebook Commerce Manager and click Add Catalog
- Navigate to Data Sources under the Catalog tab and choose Data Feed
- Choose the File Upload option to manually upload a data feed, and click Next
- Drag and drop the file and complete the upload

Step 3. Schedule automatic updates for Facebook Data Feed in Magento
You can set up automatic data feed updates by following the below steps:
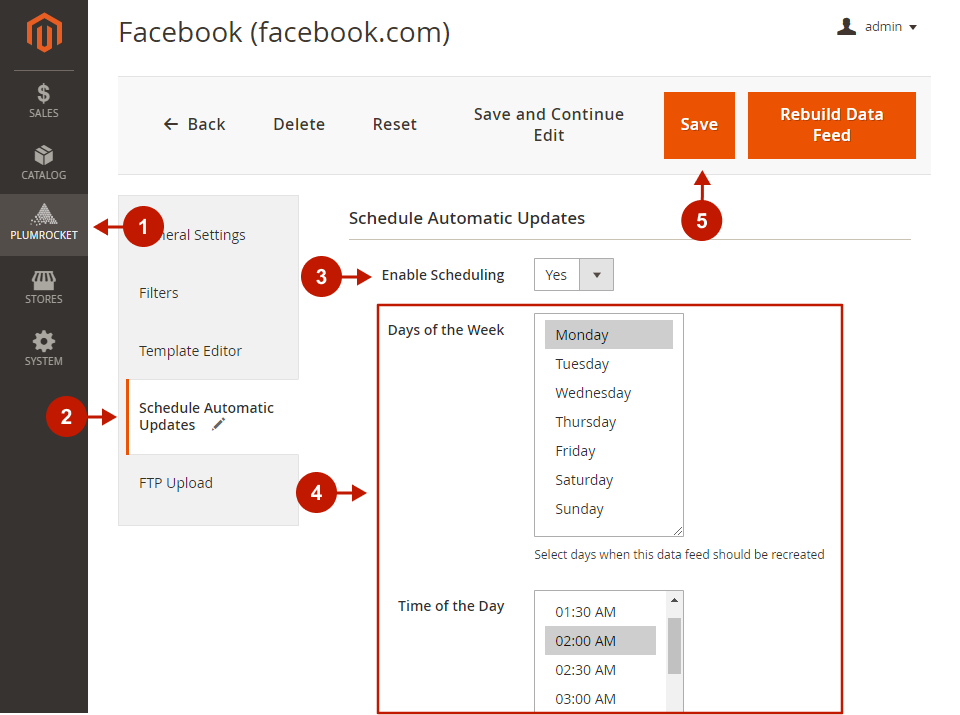
- In the Magento admin panel, navigate to Plumrocket -> Data Feed Generator -> Manage Data Feed List and choose the Facebook data feed
- Go to the Schedule Automatic Updates tab
- Set the Enable Scheduling to Yes
- Set Days of the Week and Time of the Day when the data feed must be rebuilt
- Click Save

Note: If you constantly change your products, it is recommended to schedule daily updates and choose the time when the user activity on your website is low, e.g., 2:00 - 5:00 a.m. This will decrease the server load. Schedule the time taking into account your server time.
If you rarely change your products, you can schedule weekly updates and set the time in the same way described above.
Step 4. Set up scheduled data feed updates on Facebook
- Go to Facebook Commerce Manager and click Add Catalog
- Navigate to Data sources under Catalog tab and choose Data Feed
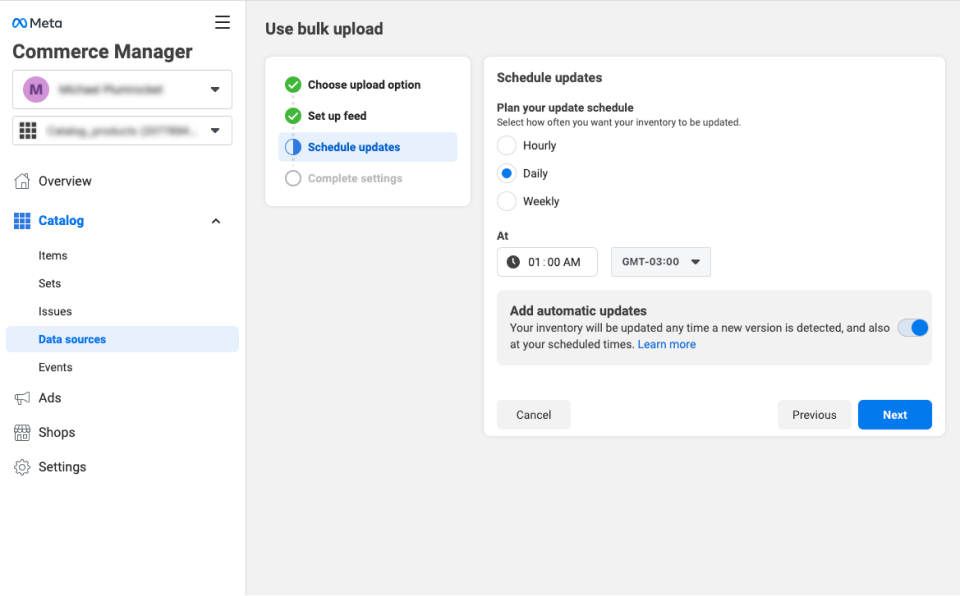
- Choose Scheduled feed (a file hosted on a website) to automatically update your inventory, and click Next
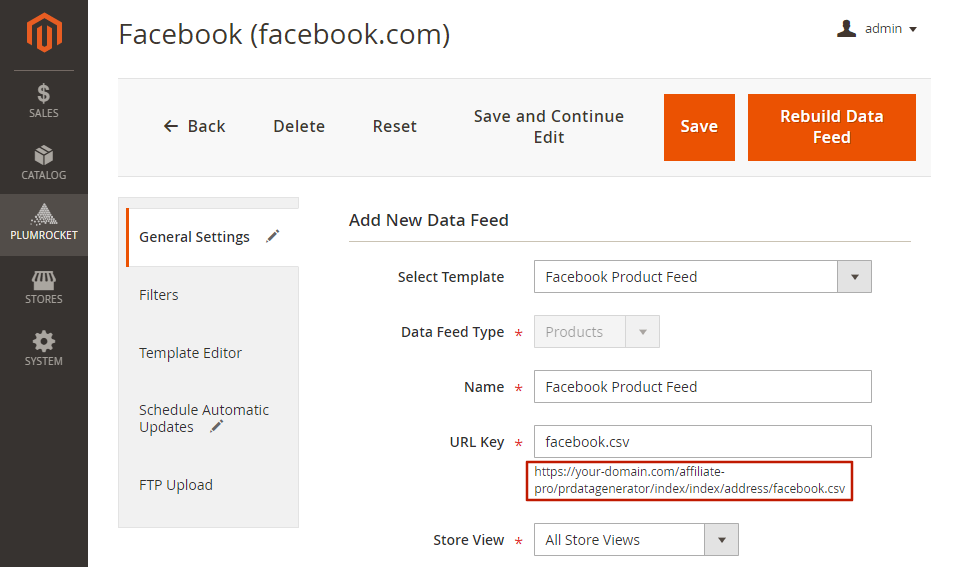
- Setting up a feed, copy the URL mentioned below the URL key field in the Data Feed General Setting on your Magento backend, and enter it into the corresponding field
- Schedule daily updates based on the scheduled data field rebuild you set on the Magento backend
- Complete the settings by naming your data feed source and choosing a default currency


That’s it! You have configured automatic Facebook Data Feed upload from your Magento 2 Store.
If you have any other questions, feel free to contact our customer support.
|
