Here you will learn how to correctly install the Magento 2 LGPD extension using two methods – Installation via the FTP or Composer.
Important Information:
- First of all make sure your system meets all the requirements necessary for the correct functioning of our LGPD Extension for Magento 2. For more details on system requirements, please read Magento 2 system requirements.
You can choose one of the following two methods to install the extension on your Magento 2 store:
Important Note for Hyvä Theme Users:

If you are planning to use the Magento 2 LGPD extension on the Hyvä theme, please be aware that only the Composer installation method is compatible. Please follow our Hyvä Theme Compatibility Module Installation guide .
Extension Installation via the Composer
In order to install your Magento 2 LGPD extension extension via Composer, open the console (SSH terminal) and follow the steps:
Step 1. Switch to your Magento 2 root directory in the terminal
cd /FULL_PATH_TO_YOUR_MAGENTO2where “FULL_PATH_TO_YOUR_MAGENTO2” is the path to your Magento 2 folder on your server.
Step 2. Add the Plumrocket repository to your Composer configurations
composer config repositories.plumrocket composer https://plumrocket.com/repo/Step 3. Download Plumrocket extension files
composer require plumrocket/lgpd-metapackageAfter running this command, you may be prompted to enter the username and password (see the How to Get Plumrocket Composer Repository Keys user guide).
Step 4. Install database and static resources
php bin/magento cache:flush
php bin/magento setup:upgrade
php bin/magento setup:di:compile
php bin/magento setup:static-content:deploy
After running these commands, the extension should be installed successfully. Similar message should be displayed in your console as shown below:

Step 5. Set the serial key
Step-by-step guide:
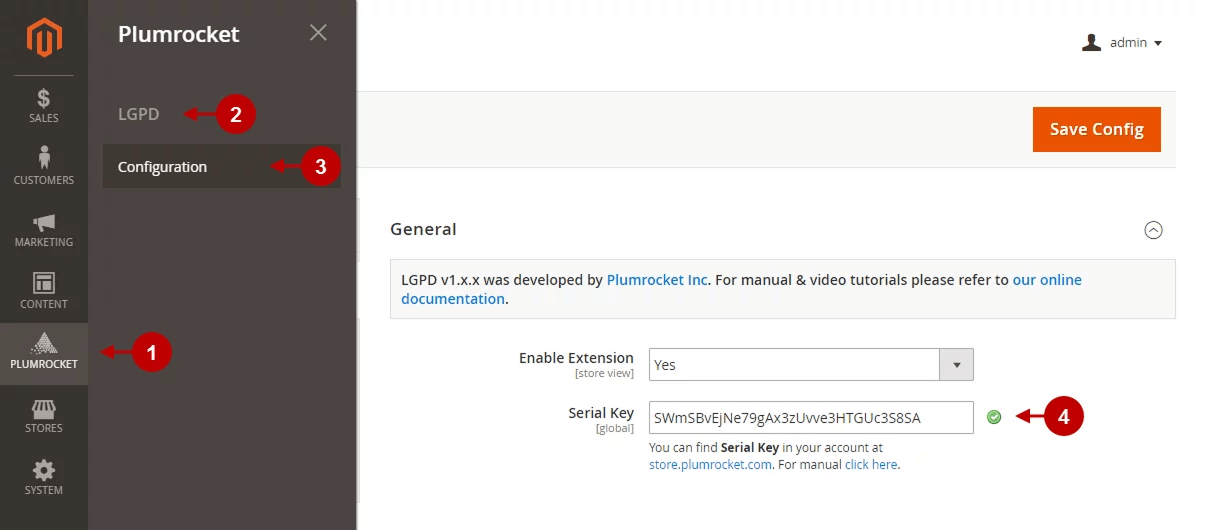
- Navigate to your Magento 2 Admin Panel and click on the “Plumrocket” tab.
- If there is a “LGPD” tab in the list, it means that the extension has been successfully installed.
- Navigate to the “LGPD” -> select the “Configuration” option.
- Your Serial Key field should be auto-filled with the green check mark displayed. This means that the Serial Key has been successfully activated, and the extension can be enabled. However, if the green check mark is not there – you will need to enter your product Serial Key manually. Please follow the License Installation for Magento 2 instructions for more information.
Next Step > Magento 2 LGPD Configuration
Extension Installation via FTP
Step 1. Download and unzip the extension files
Step-by-step guide:
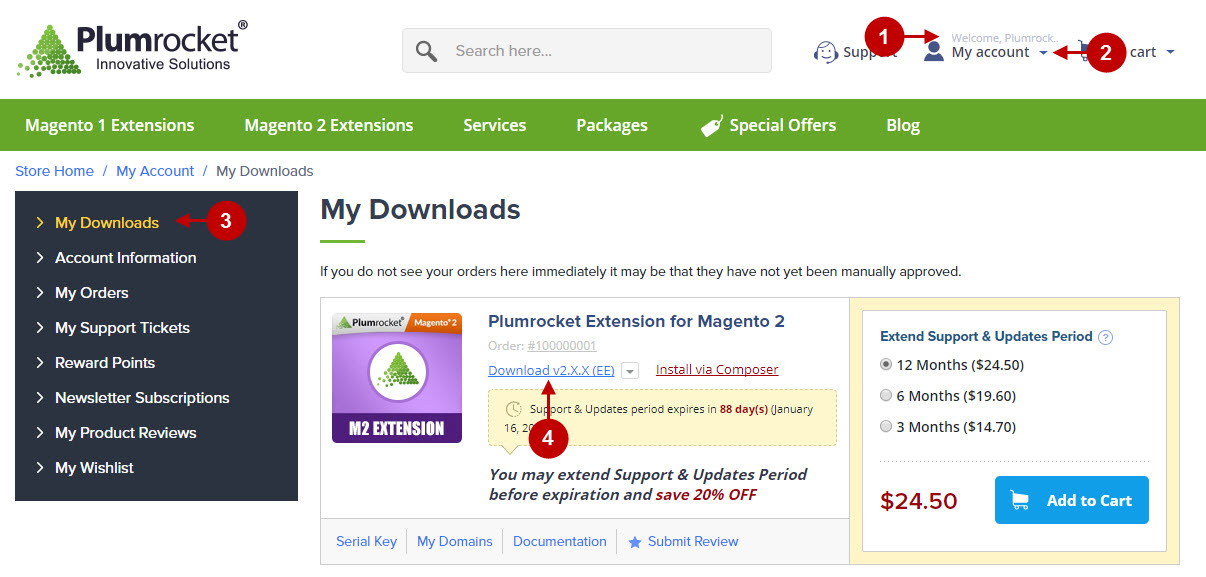
- Log into your account at https://plumrocket.com.
- Select “My Account” in the menu. (To open this page you have to log in first)
- Navigate to “My Downloads” in the menu.
- Press on the “Download” link to download the latest version of your Plumrocket Magento 2 extension.
Step 2. Upload files to the server
Step-by-step guide:
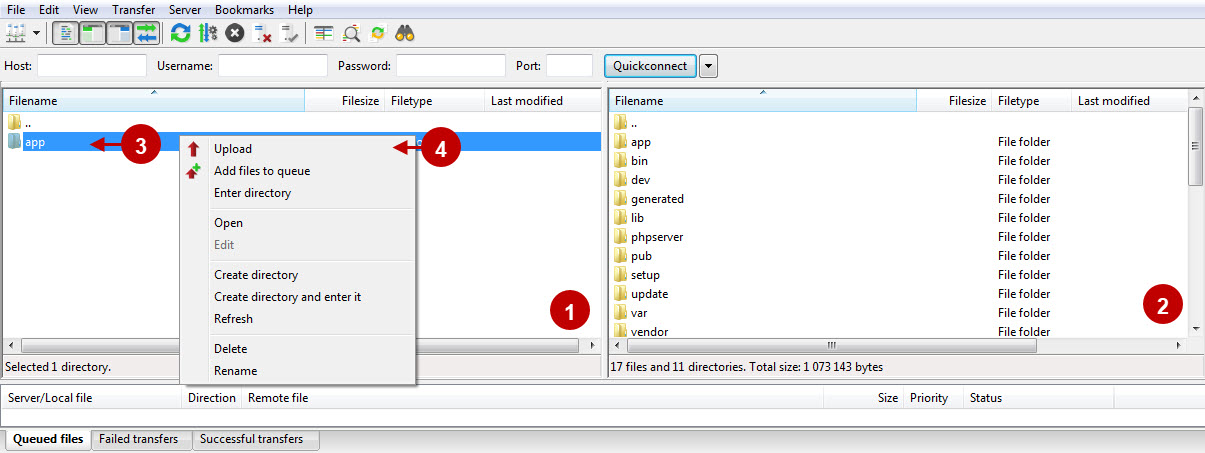
- This is your client side. You will see the unpacked catalog containing the LGPD Extension.
- This is your root directory on the server side. This is where the files should be uploaded.
- All the files have to be uploaded to the server. Select the files and press right mouse button.
- Select the “Upload” option for these files.
Step 3. SSH Installation
1. In terminal, switch to your Magento 2 root directory using command:
cd /FULL_PATH_TO_YOUR_MAGENTO2where “FULL_PATH_TO_YOUR_MAGENTO2” is the path to your Magento 2 folder on your server.
2. Run the next four Magento 2 commands:
php bin/magento cache:flush
php bin/magento setup:upgrade
php bin/magento setup:di:compile
php bin/magento setup:static-content:deploy
After running these commands, the extension should be installed successfully. Similar message should be displayed in your console as displayed below:

Step 4. Set the serial key
Step-by-step guide:
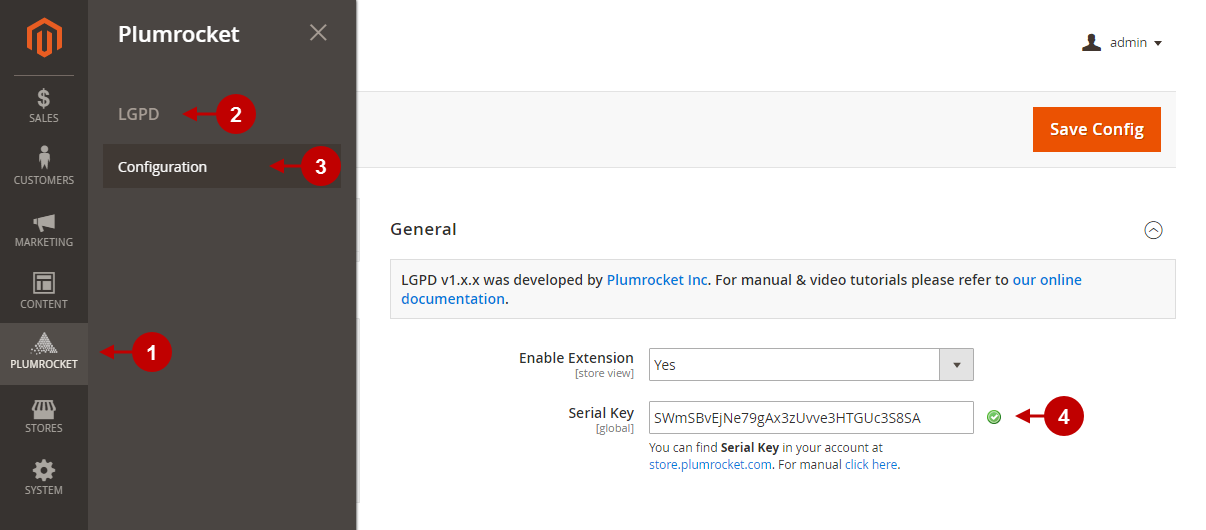
- Navigate to your Magento 2 Admin Panel and click on the “Plumrocket” tab.
- If there is the “LGPD” tab in the list, it means that the extension has been successfully installed.
- Navigate to the “LGPD” -> select the “Configuration” option.
- Your Serial Key field should be auto-filled with the green check mark displayed. This means that the Serial Key has been successfully activated and the extension can be enabled. However, if the green check mark is not there – you will need to enter your product Serial Key manually. Please follow the License Installation for Magento 2 instructions for more information.
Next Step > Magento 2 LGPD Configuration