Here you will learn how to correctly configure our Magento Cart Reservation Extension. To do this, follow the instructions below.
Configuring Cart Reservation Extension
In order the access this shopping cart extension configuration page you will have to log in first and follow these instructions:
Step-by-Step action:
- Press the “SYSTEM” tab in the menu.
- Select “Configuration”.

This page allows you to change settings of this Magento Cart Extension. The new settings will be activated after you press the “Save config” button.
Detailed description:
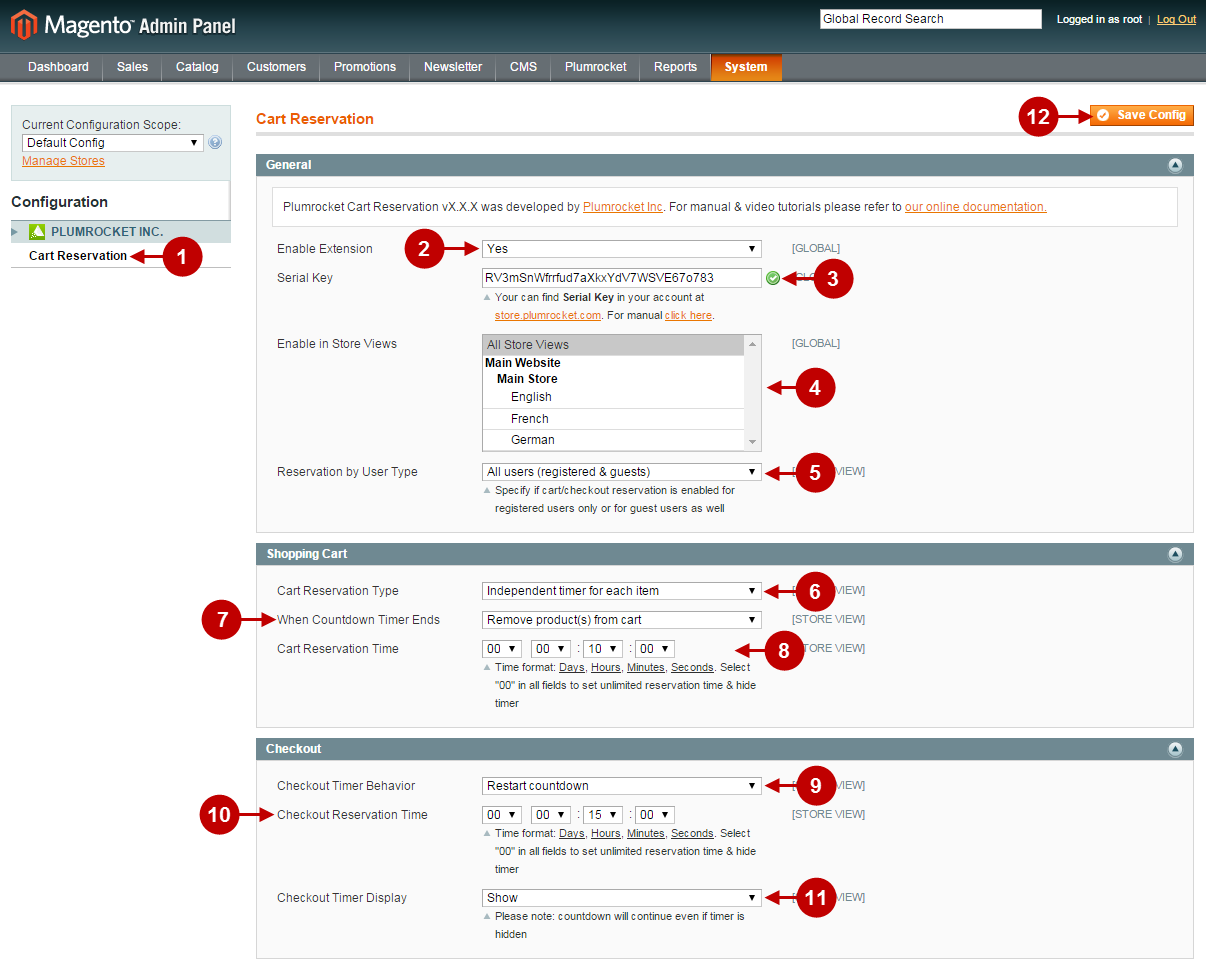
- Select “Plumrocket Cart Reservation” in the menu Configuration.
- Enable Cart Reservation: allows you to enable or disable this shopping cart extension.
- Option “Serial Key”: enter unique serial key provided after the purchase for legitimate and proper functioning of your extension. Note: In most cases this field will be pre-filled with serial key automatically and the green check mark will be displayed. Otherwise please read article Serial Key Activation in order to find and paste your serial key manually.
- Enable on Store Views: allows you to choose on which Store Views Cart Reservation will be enabled.
- Reservation by user type: allows you to determine the type of users allowed to reserve items. You can allow both registered users and guests to reserve items, or you can limit the number of users by choosing only registered customers here.
- Cart Reservation Type: allows you to choose the type of timer. You can have either a single timer for all elements, or a separate timer for each element.
- When Countdown Timer Ends: allows you to suggest two options after the reservation time expires – to leave the reserved products in the cart, or to delete them.
- Cart Reservation Time: allows you to choose the time of product reservation (days,hours, minutes, seconds) for Cart Reservation.
- Checkout Timer Behavior: “checkout timer” can continue countdown from the same moment where shopping cart page was left, or restart “checkout timer” each time user arrives on checkout page.
- Checkout Reservation Time: allows you to choose the time of product reservation (hours, minutes, seconds) for Checkout Reservation.
- Checkout Timer Display: determines whether the checkout timer will be displayed or not.
- Press “Save config” to save the settings.
Detailed description:
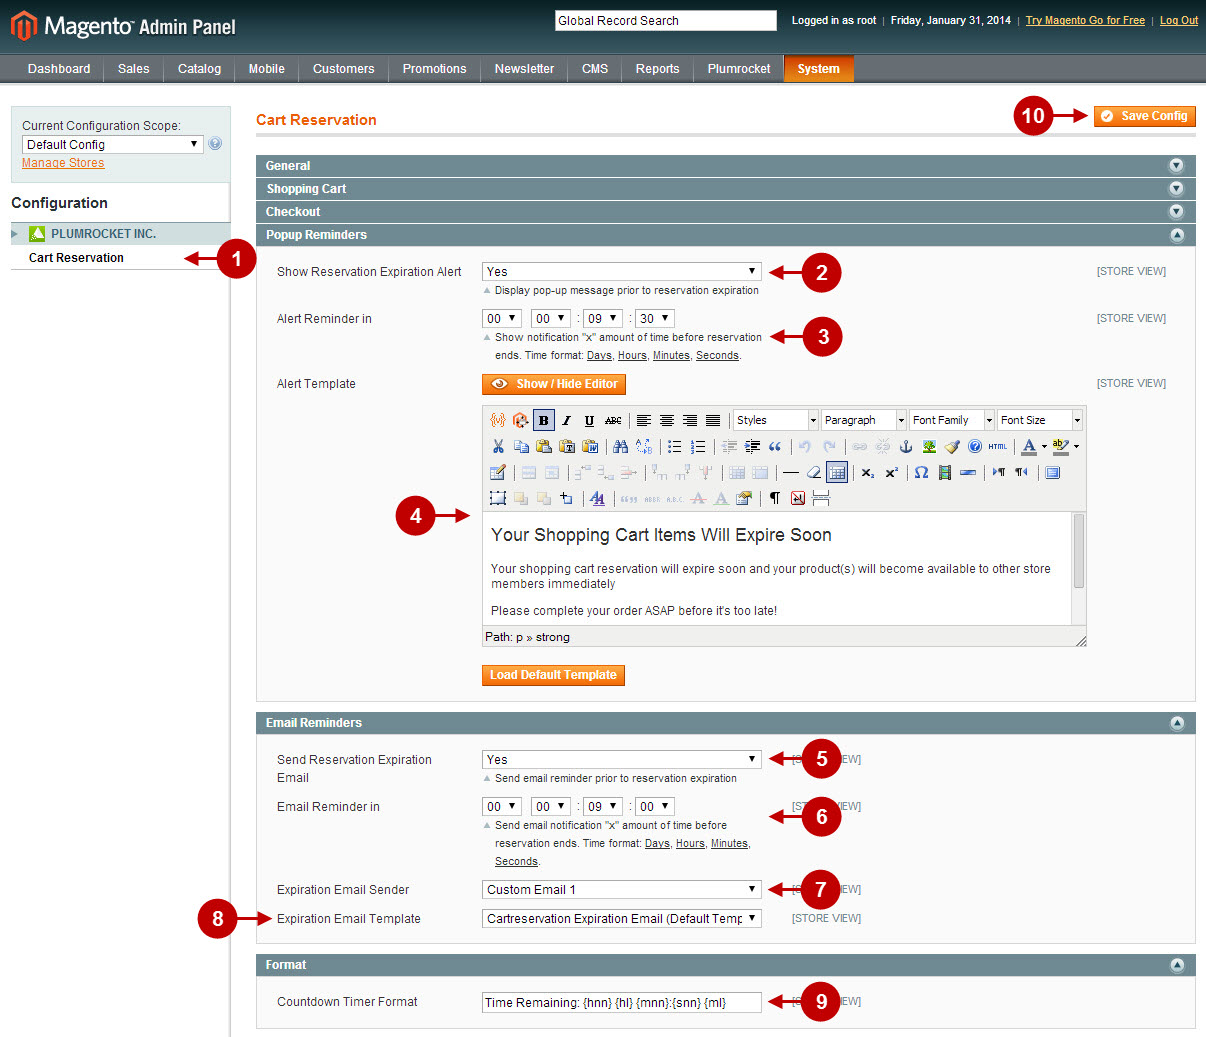
- Select “Plumrocket Cart Reservation” in the menu Configuration.
- Show Reservation Expiration Alert allows you to enable or disable reservation expiration alert.
- Alert Reminder in allows you to choose the time when reservation expiration popup should be displayed (time format: days,hours, minutes, seconds).
- Alert Template allows you to edit reservation expiration popup alert text.
- Send Reservation Expiration Email allows you to enable or disable reservation expiration email.
- Email Reminder in allows you to choose the time when reservation expiration email should be sent (time format: days,hours, minutes, seconds).
- Expiration Email Sender select email “From” address.
- Expiration Email Template allows you to edit reservation expiration email text.
- Countdown Timer Format: determines the format of shopping cart and checkout page timer.
- Press “Save config” to save the settings.
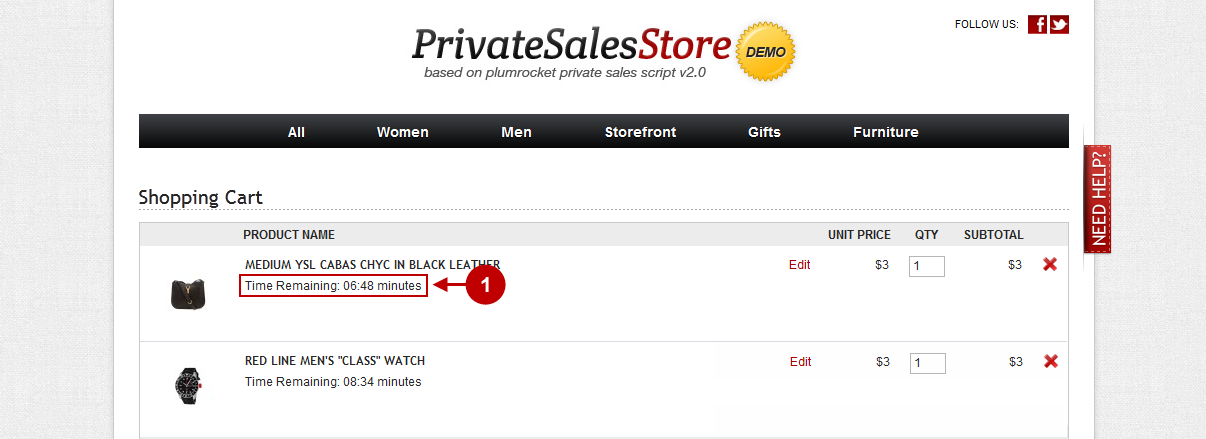
Below you will see how Cart Reservation is displayed in the front-end. You can see the timer. According to our “Cart Reservation Type” settings, each product has its own timer.
Detailed description:
- Cart Reservation Module Timer: shows how much time is left for product reservation.
Enabling Cart Reservation for separate products
Here you will learn how to set cart reservation for separate products. Please follow the steps below.
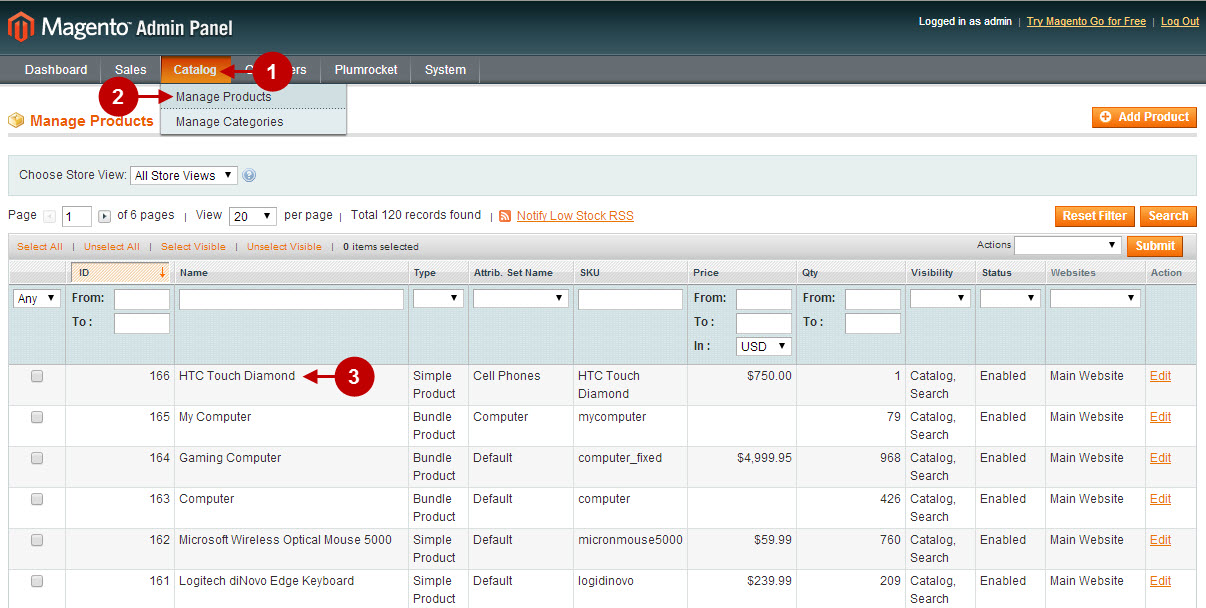
Step-by-Step action:
- Press the “Catalog” tab in the menu.
- Select “Manage Products”.
- Click on any product to edit it.
Step-by-Step action:
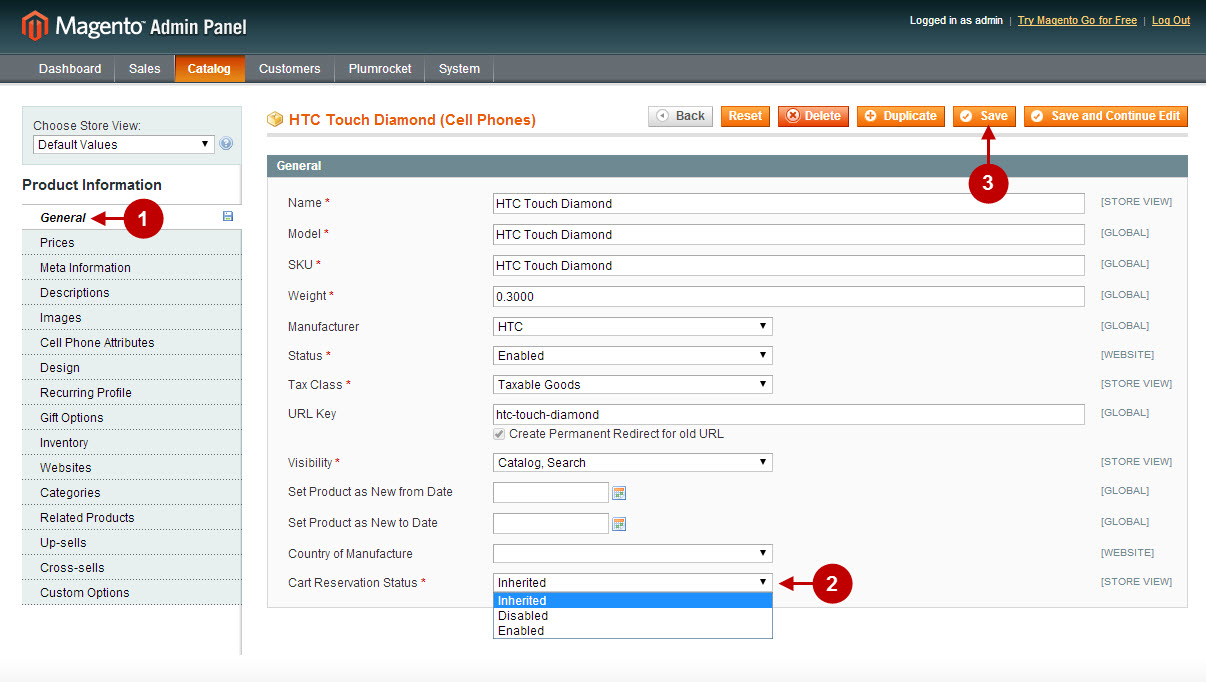
- Press the “General” tab in the product menu.
- Select the option you need from “Cart Reservation Status” dropdown. Possible options are: “Enabled”, “Disabled”, “Inherited”. The “Inherited” option means that cart reservation status for the product can be inherited from this product’s parent category.
- After you’ve selected the needed option – don’t forget to save your changes by pressing “Save” button.
Enabling Cart Reservation for separate categories
Here you will learn how to set cart reservation for separate categoriess. Please follow the steps below.
Step-by-Step action:
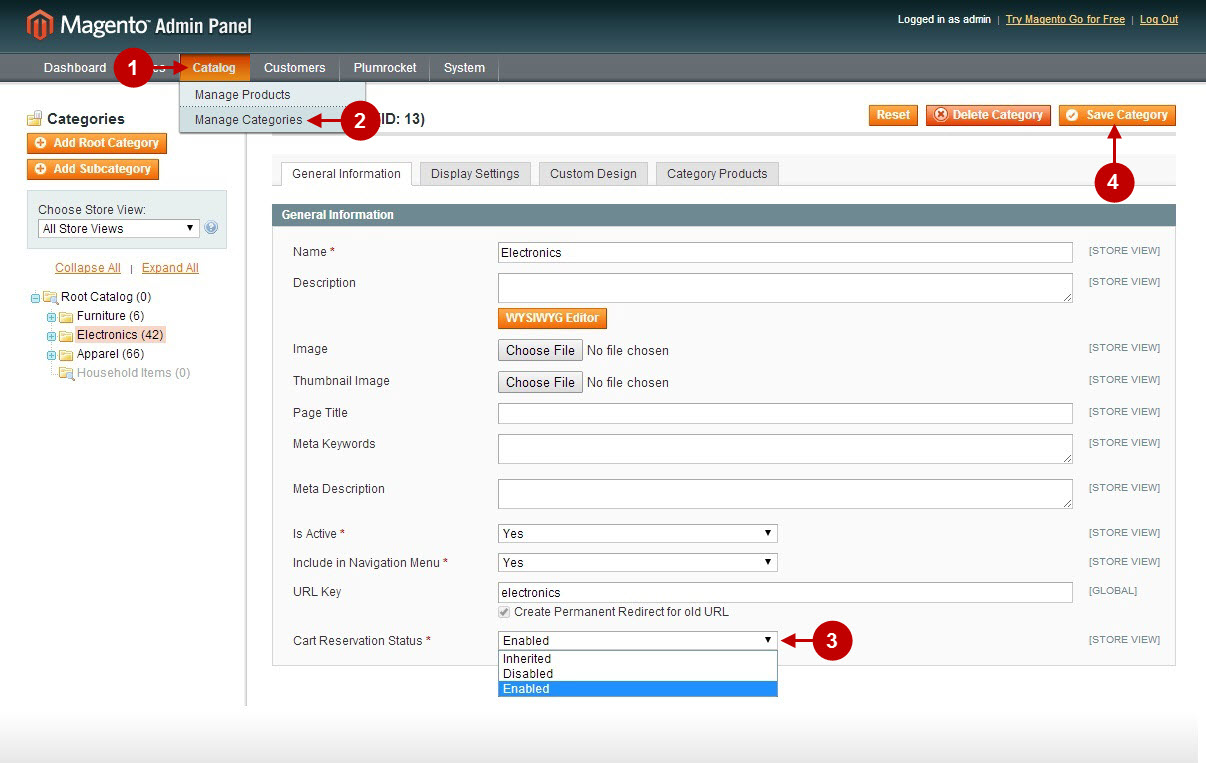
- Press the “Catalog” tab in the menu.
- Select “Manage Categories”.
- Select the option you need from “Cart Reservation Status” dropdown. Possible options are: “Enabled”, “Disabled”, “Inherited”. The “Inherited” option means that cart reservation status can be inherited from this category’s parent – root category.
- After you’ve selected the needed option – don’t forget to save your changes by pressing “Save Category” button.
Adding and reserving products in shopping carts via the “Create New Order” interface
Here you will learn how you can add and reserve products for customers in their shopping carts via Magento backend. Please follow the steps below.
Step-by-Step action:
- Press the “Customers” tab in the menu.
- Select “Manage Customers”.
- Click on the needed customer from the list.

Step-by-Step action:
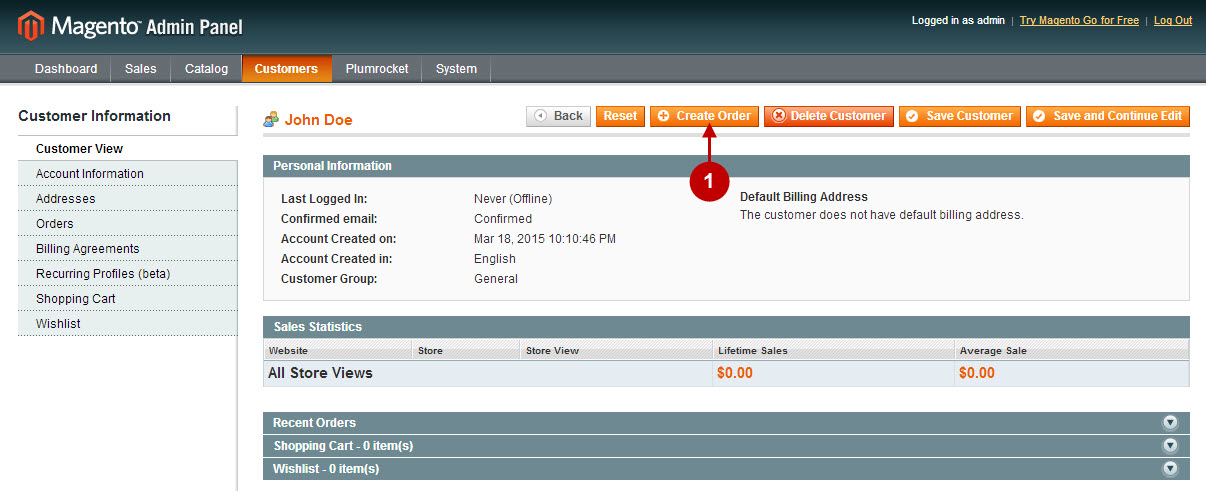
- Once on the customer’s information page – click on “Create Order” button.
Step-by-Step action:
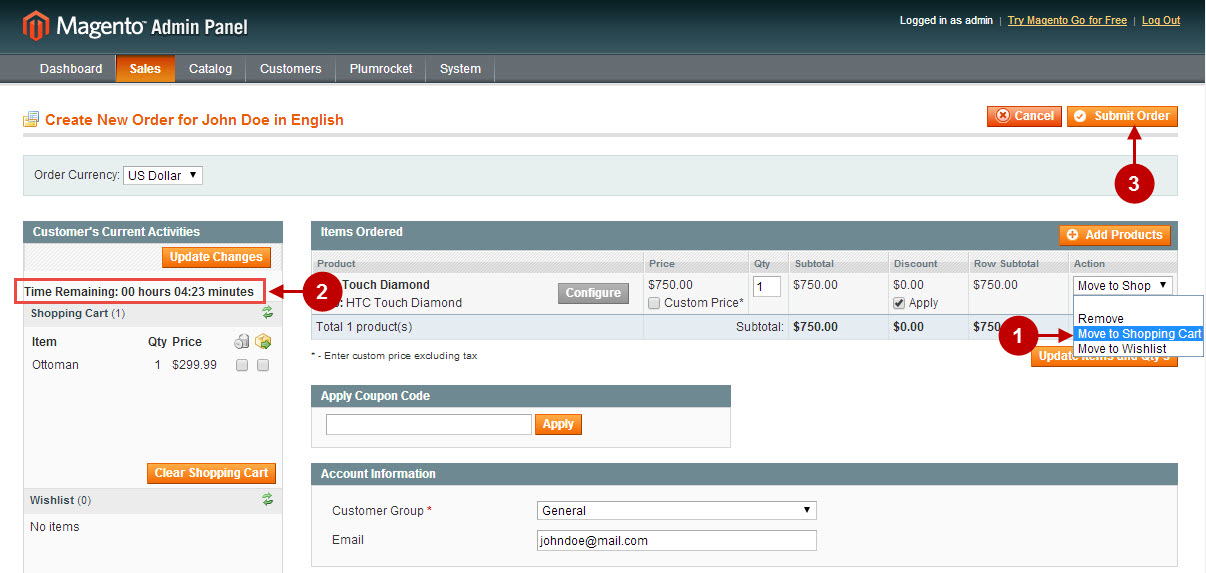
- At this point you will need to select the product from the grid, and then move the product to shopping cart.
- You will see that cart reservation timer will appear in “Customer’s Current Activities” section.
- Press “Submit Order” button if you need to place the order for customer.
Plumrocket Reservation after Checkout
In order to configure the “Reservation after Checkout” option please follow the instructions below.
Step-by-Step action:
- Press the “SYSTEM” tab in the menu.
- Select “Configuration”.

Detailed description:
Reservation after Checkout Feature provides an ability to make a purchase using offline payment methods (such as Cash On Delivery). When a customer buys some item(s) the order status will change to “Pending” at store backend. After the order has been placed, the system reserves the ordered item(s) for an interval of time set in the “Reservation after Checkout” section in backend. If the payment was successful, the website admin changes the order status to “Complete” (by clicking “Ship” on Invoice page).If the order was not paid during the reservation period, the system will automatically change the order status to “Cancelled” and return the item(s) back to stock.
Step-by-Step action:
- On the left-hand side under Plumrocket extensions locate the “Reservation after Checkout” option.
- Enable the extension by choosing “Yes” in dropdown.
- Set up the time of reservation.
- Click the “Save Config” button to save your changes.

