Configuring Magento Returns and Exchanges (RMA)
In this article you will learn how to configure and manage Plumrocket Magento 2 Returns and Exchanges (RMA) Extension.
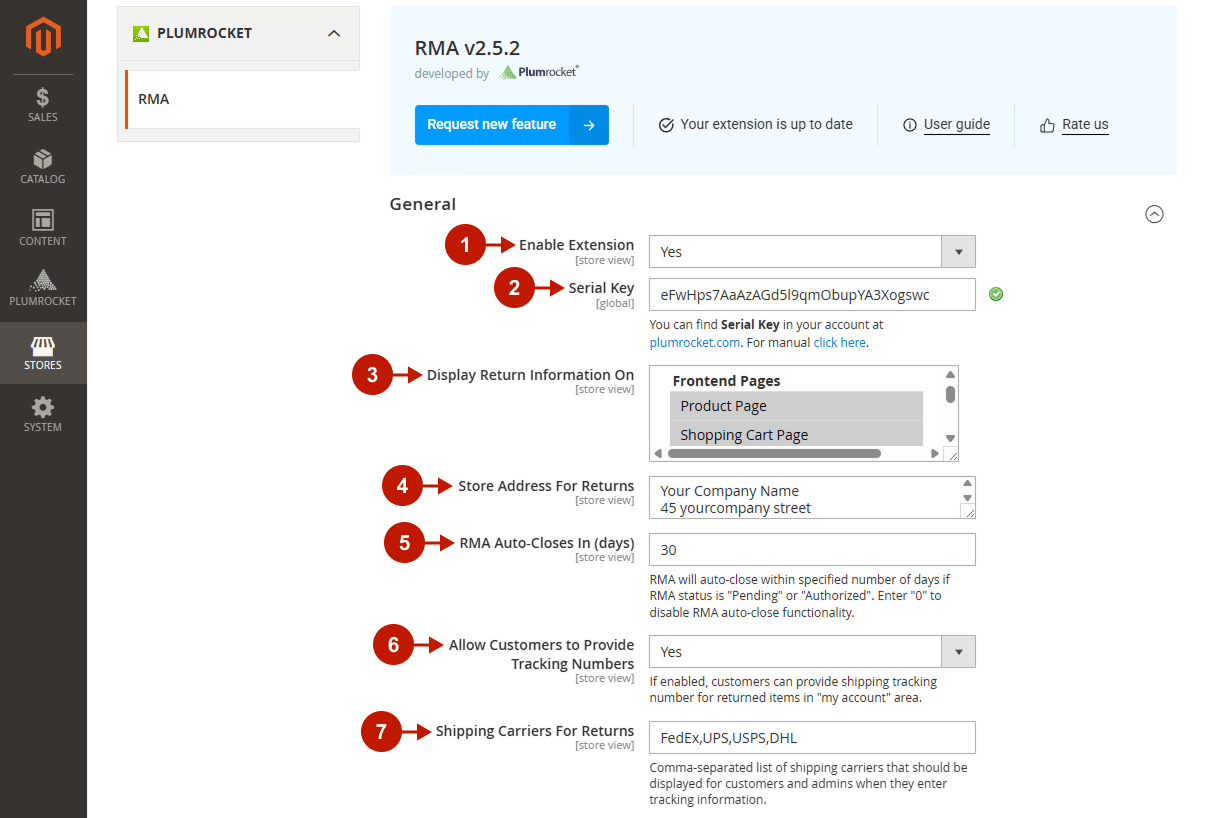
Go to Plumrocket tab in the main menu > select the “Returns and Exchanges (RMA)” extension > go to the “Configuration” tab.
Detailed description:
- Enable Extension: Select “Yes” to enable the extension or “No” to disable it.
- Option “Serial Key”: enter unique serial key provided after the purchase for legitimate and proper functioning of your extension. Note: In most cases this field will be pre-filled with serial key automatically and the green check mark will be displayed. Otherwise please read article Serial Key Activation in order to find and paste your serial key manually.
- Option “Display Return Information On”: allows you to select the pages where the return information will be displayed on. Choose between Frontend Pages (i.e. Product Page, Shopping Cart Page, Checkout Page etc), Emails (i.e. Order Confirmation, Invoice, Shipment), Admin Panel.
- Option “Store Address For Returns”: allows admin to specify the address of the store the returns will be sent to. This field is not mandatory to fill in, unless you have a few store locations. If you leave the field blank, the information will be taken from General Configuration of your store.
- Option “RMA Auto-Closes In (days)”: set the number of days the RMA requests with “Pending” or “Authorized” status will be closed automatically.
- Option “Allow Customers to Provide Tracking Numbers”: if enabled, it allows customers to provide shipping tracking number for returned items in the “My account” area.
- Shipping Carriers for Returns”: set the comma-separated list of shipping carriers that should be displayed for customers and admins when they enter tracking information.
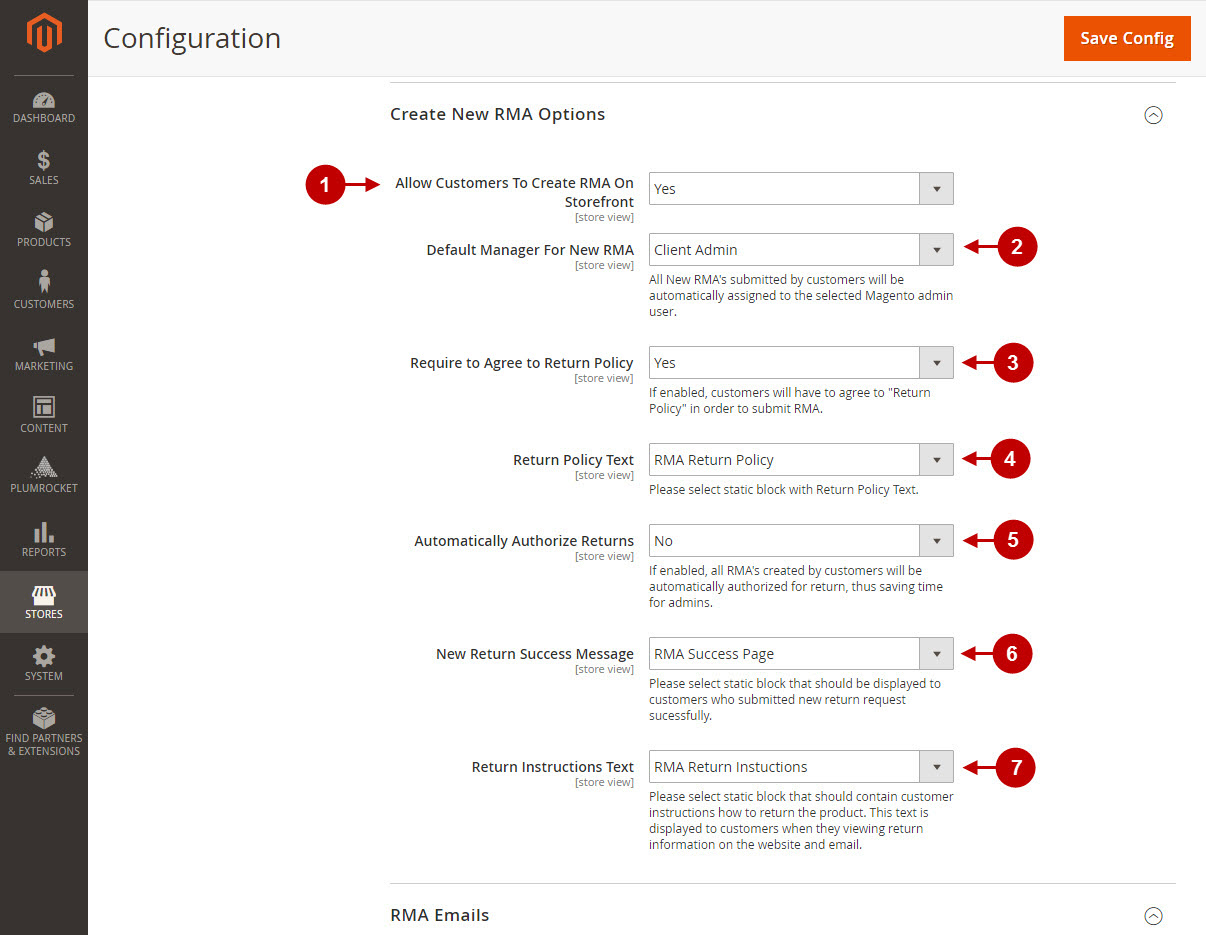
Detailed description:
- Option “Allow Customer To Create RMA on Storefront”: if enabled, this option will allow your customers to create RMA requests at their account on the frontend.
- Option “Default Manager For New RMA”: allows assigning the RMA requests to a particular Magento admin user.
- Option “Require to Agree to Return Policy”: if enabled, customers will have to agree to “Return Policy” in order to submit their RMA.
- Option “Return Policy Text”: allows admin to select static block with Return Policy Text.
- Option “Automatically Authorize Returns”: if enabled, all RMA requests created on the Frontend will be automatically authorized for return, which will save time for admins.
- New Return Success Message”: allows admin to select the static block which should be displayed to customers who submitted new return request successfully.
- Return Instructions Text”: allows Magento admin to select static block that should contain customer instructions on how to return the product. The text will be displayed to customers when they are viewing the return information on the website and email.
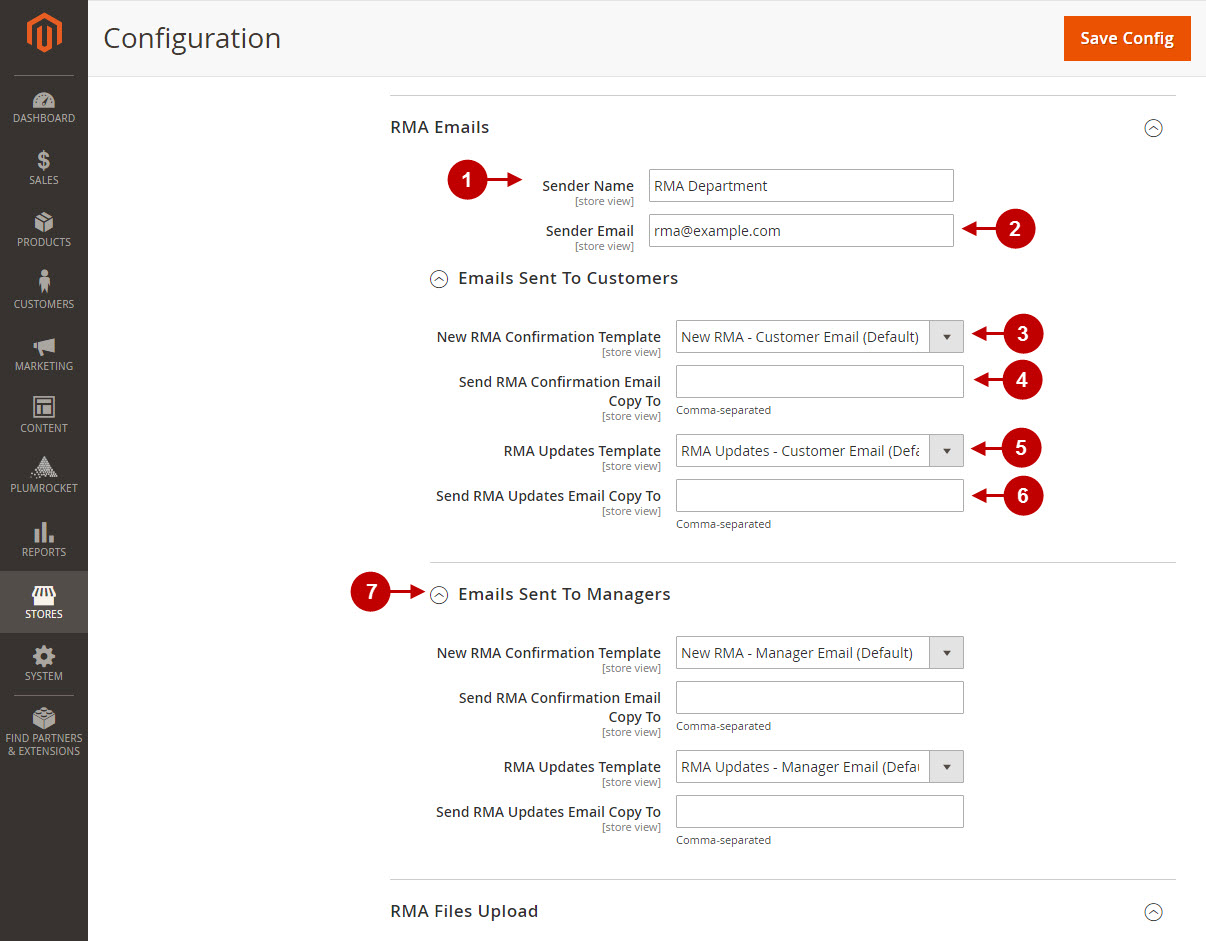
This section allows Magento admin to configure RMA Emails.
Detailed description:
- “Sender Name”: specify the sender name which will be displayed in the email.
- “Sender Email”: enter the sender email which will be displayed in the email.
- “New RMA Confirmation Template”: select the template of the RMA Confirmation Email. Will be sent to Customer.
- “Send RMA Confirmation Email Copy To”: enter the email(s) you need the copy of RMA Confirmation Email to be sent to.
- “RMA Updates Template”: select the template that will be used for sending the customer the update emails on his RMA request.
- “Send RMA Updates Email Copy To”: identify the email address(es) the copy of the RMA updates emails will be sent to.
- “Emails Sent to Managers”: enter all the required information as in the “Emails Sent to Customers” section above.
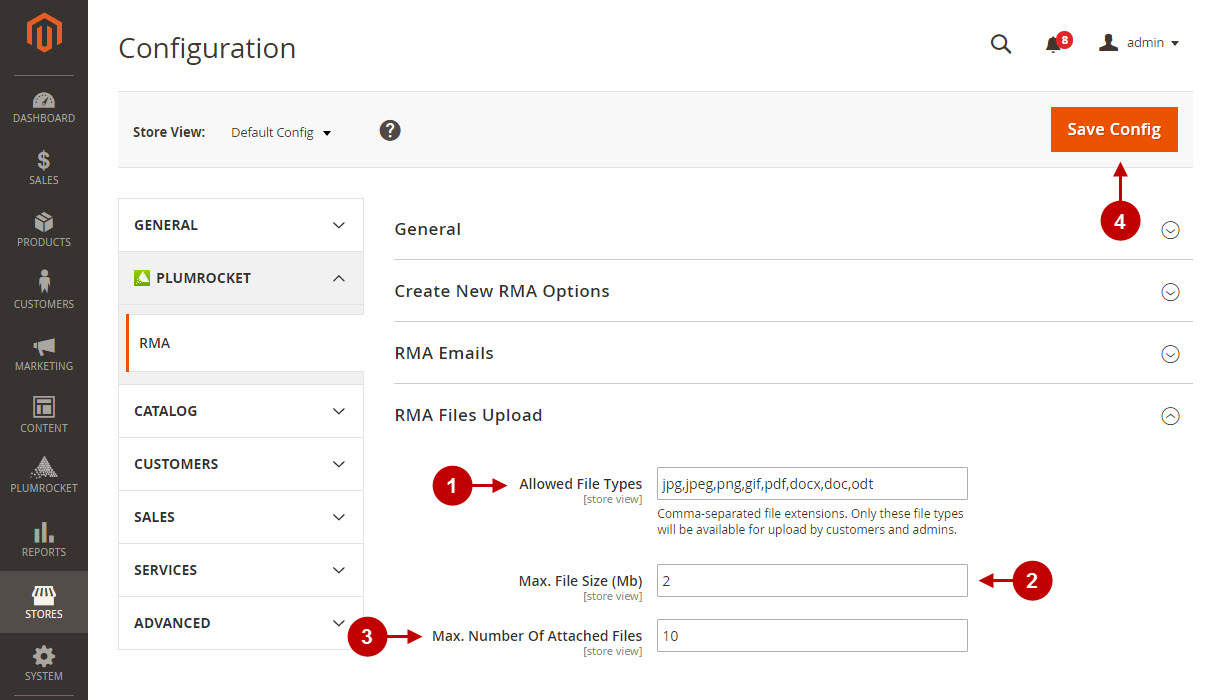
Detailed description:
- “Allowed Files Upload”: enter the file types that will be available for upload by both customers and admins.
- “Max. File Size (Mb)”: enter the max file size allowed to be uploaded by customers.
- “Max. Number of Attached File”: specify the number of files available to be attached to an email.
- Press the “Save Config” button to save your settings.
Configuring and Managing Return Rules
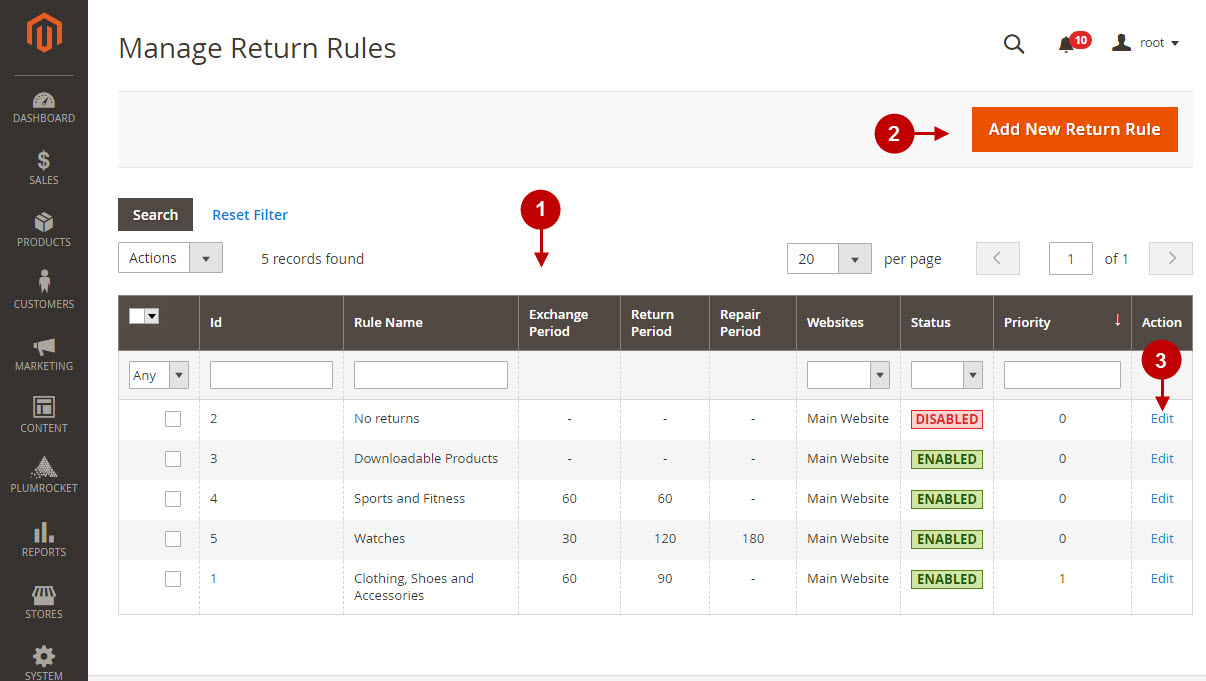
In this section you can create the return rules by specifying the time period and resolutions for different product types, based on customer groups and product attributes. In order to manage the Return Rules, go to the main menu, select Plumrocket > RMA > Return Rules.
Detailed description:
- This grid allows admin to view and manage all the Return Rules that have been created.
- In order to add new Return Rule, press the “Add New Return Rule” button.
- Admin can edit the existing Return Rule.
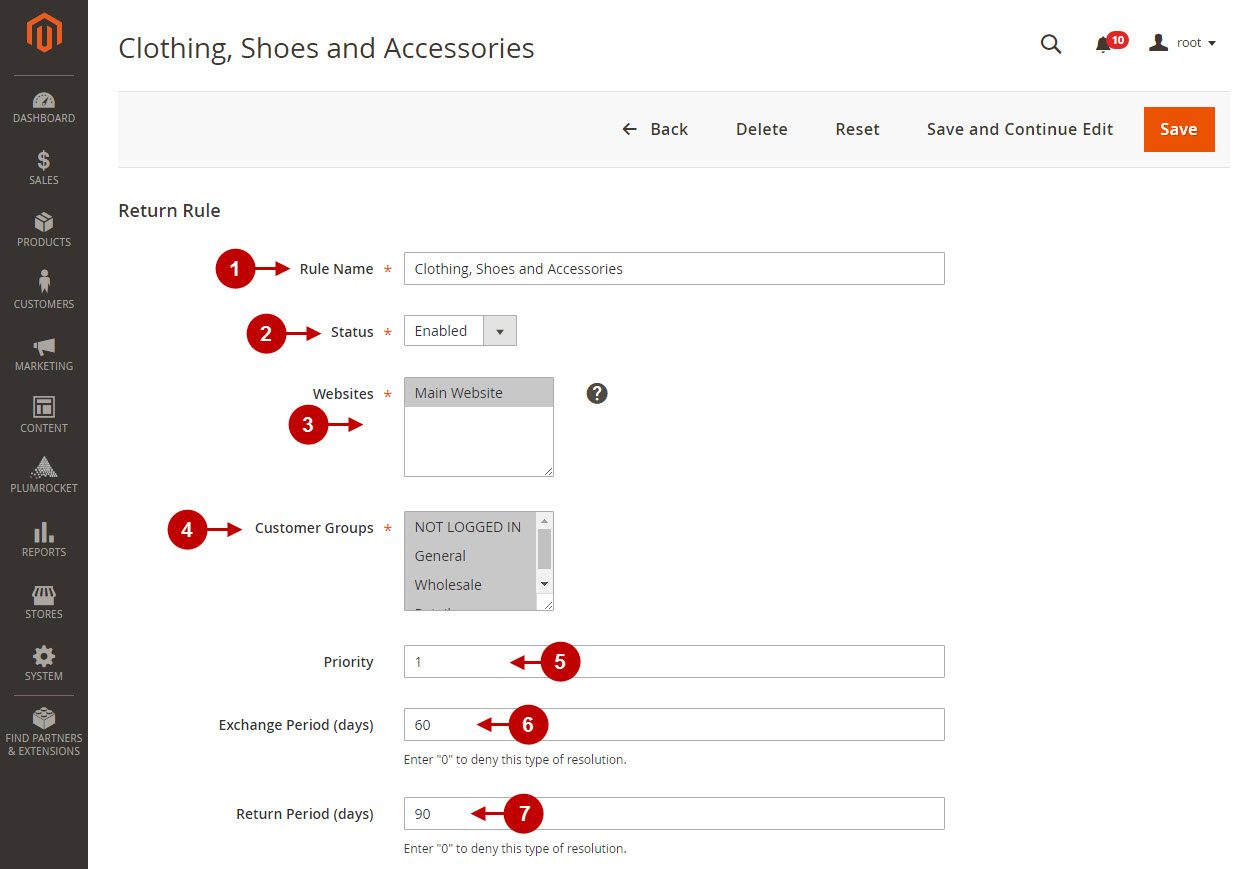
Detailed description:
- Specify the “Rule Name” in this field.
- Enable or disable the Rule using the “Status” option.
- Select the Websites to which the Return Rule will be applied.
- Select the “Customer groups” the rule will be applied to.
- Set the “Priority” of the Rule.
- Enter the “Exchange Period(days)” that will be displayed on the Product Page.
- Enter the “Return Period(days)” which will be displayed on the Product Page. Same is for the “Repair Period” below (if applicable).
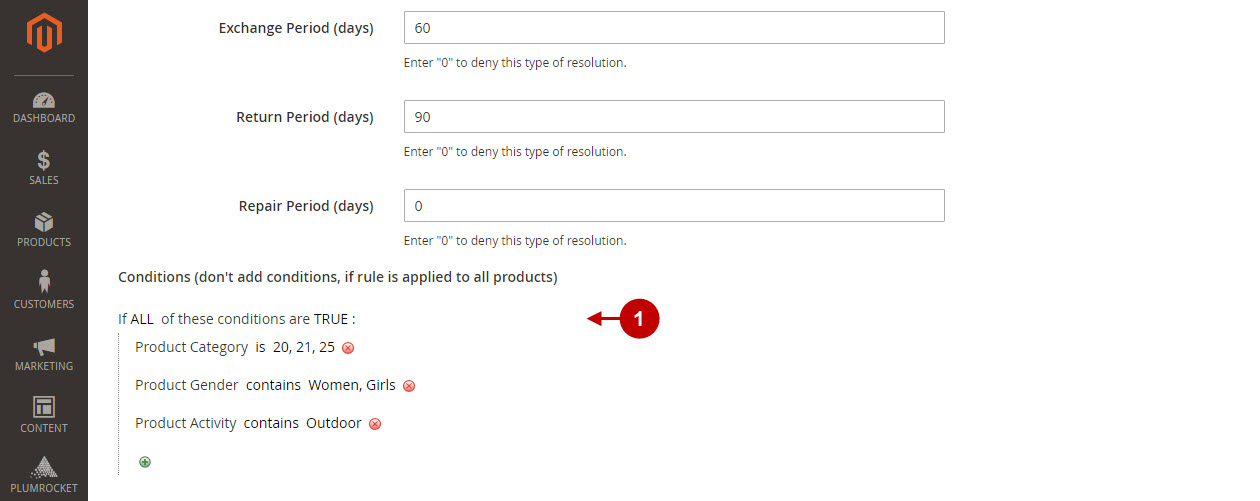
Detailed description:
- In this section you can set the conditions to apply the Return Rule to the specific products or categories. In the below example, the rule is applied to 3 categories of products with “Gender” attribute that contains “Women”, “Girls”, and “Product Activity” attribute that contains “Outdoor” option. Leave “Conditions” section empty if you want to apply the same rule to all your products.
Configuring and Managing Return Reasons
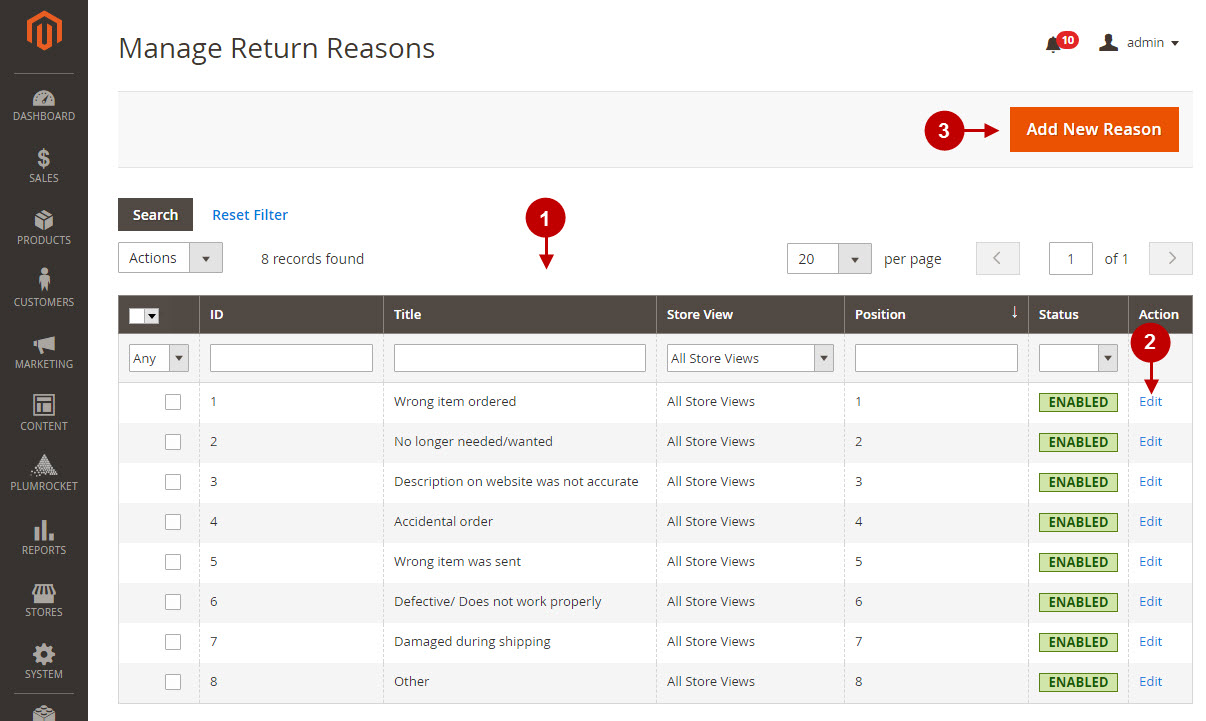
Here you can create the number of reasons for return, that customer can select from. In order to manage the Return Reasons, go to the main menu, select Plumrocket > RMA > Return Reasons.
Detailed description:
- Admin can view and manage created Return Reasons in this grid.
- You can edit the existing Reasons by pressing “Edit” button.
- Press “Add New Reason” to create new Resolution.
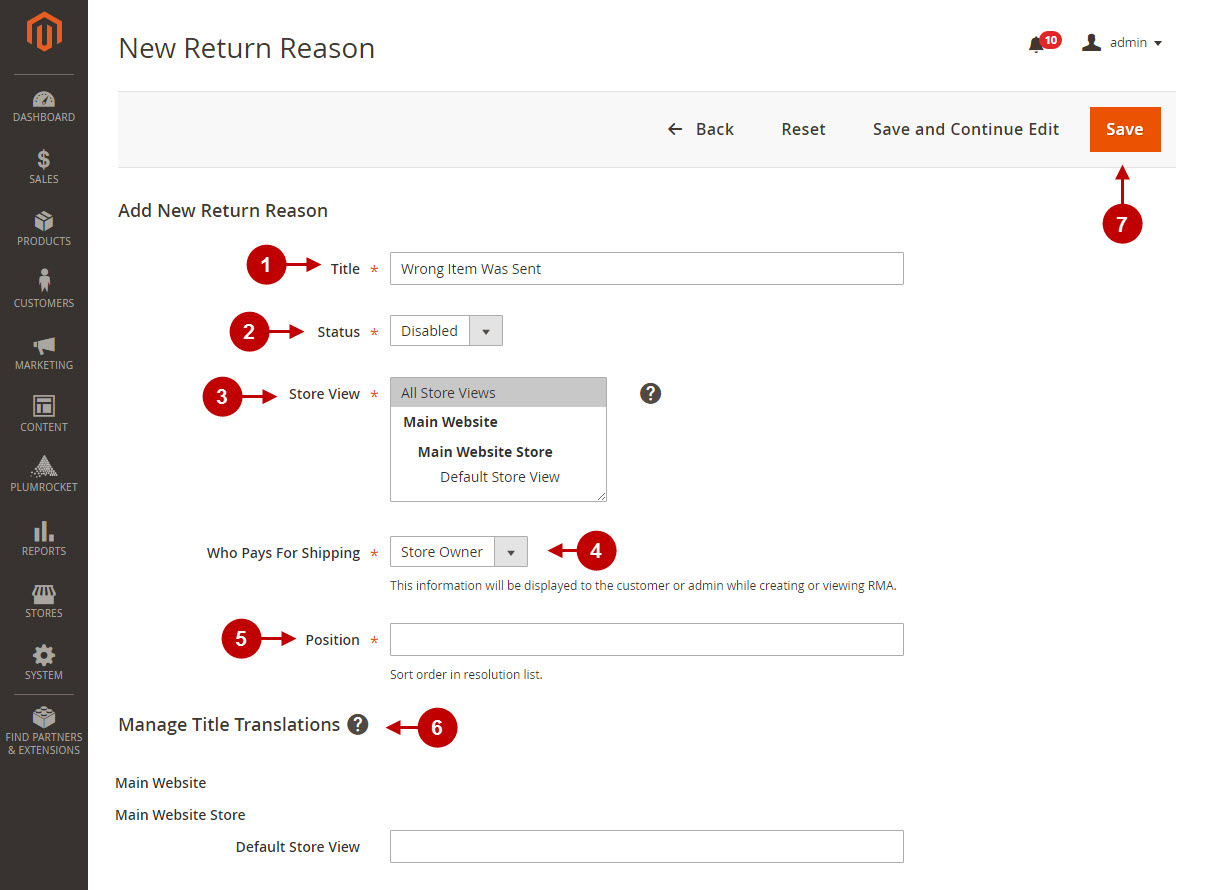
Detailed description:
- Add the title of the Return Reason.
- Enable or disable the Resolution using the “Status” option.
- Select the Store View the Return Reason will be available on.
- Specify who pays for shipping in this section. This information will be displayed to the customer or admin while creating or viewing RMA.
- Enter the “Position” of the Return Reason.
- In the “Manage Title Translations” section you can enter the translation of the Return Reason for you other store view(s).
- Press “Save” button to save your changes.
Configuring and Managing Resolutions
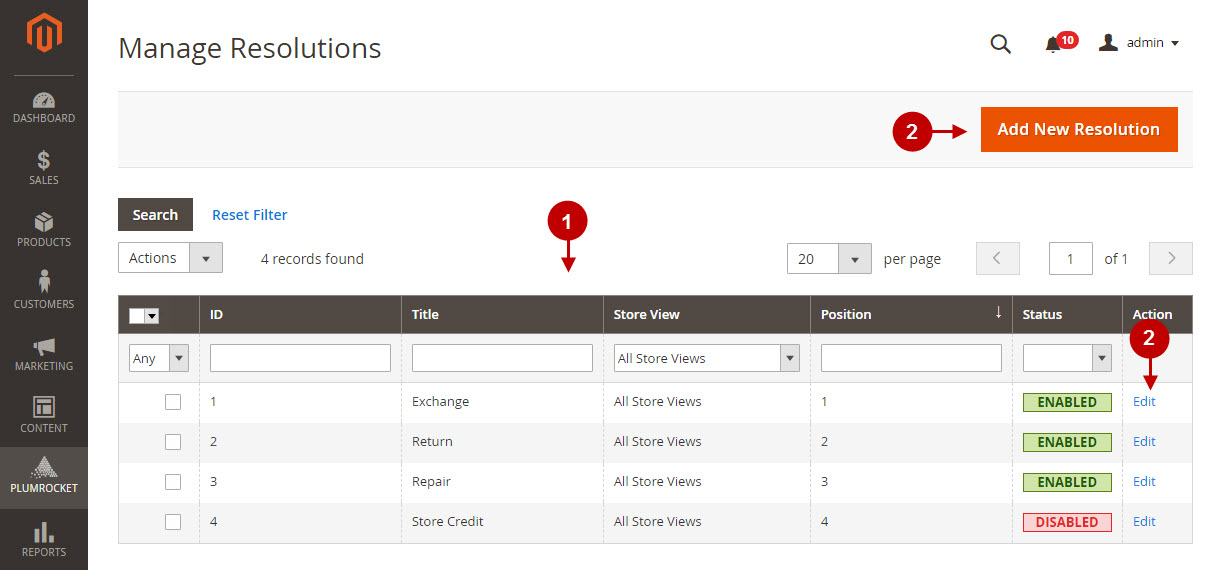
In order to create and manage the return resolutions – go to the main menu, select Plumrocket > RMA > Resolutions.
Detailed description:
- Admin can view and manage the created Resolutions in this grid.
- You can edit the existing Resolutions by pressing “Edit” button.
- Press “Add New Resolution” to create new Resolution.
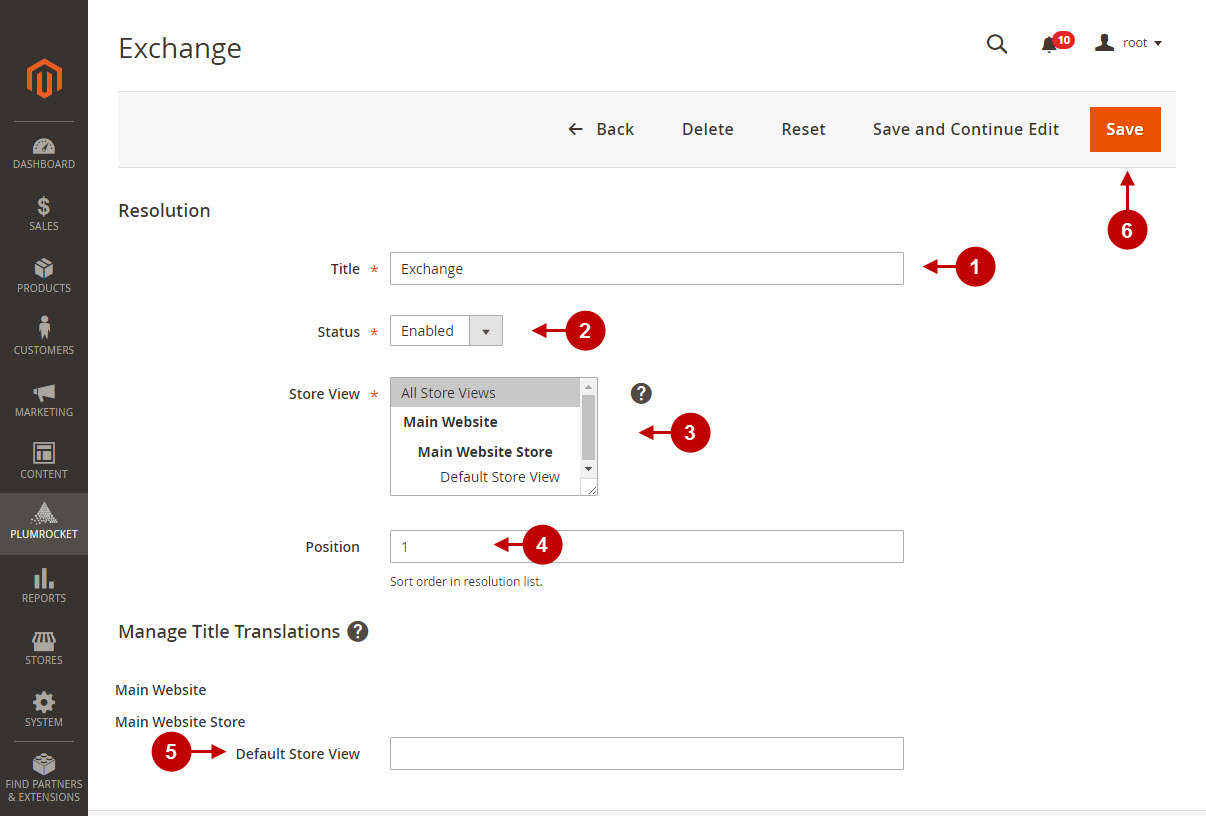
Detailed description:
- Add new title of the Resolution.
- Enable or disable the Resolution using the “Status” option.
- Select the Store View the Resolution will be available on.
- Enter the “Position” of the Resolution.
- In the “Manage Title Translations” section you can enter the translation of the Resolution for your other store view(s).
- Press the “Save” button to save your settings.
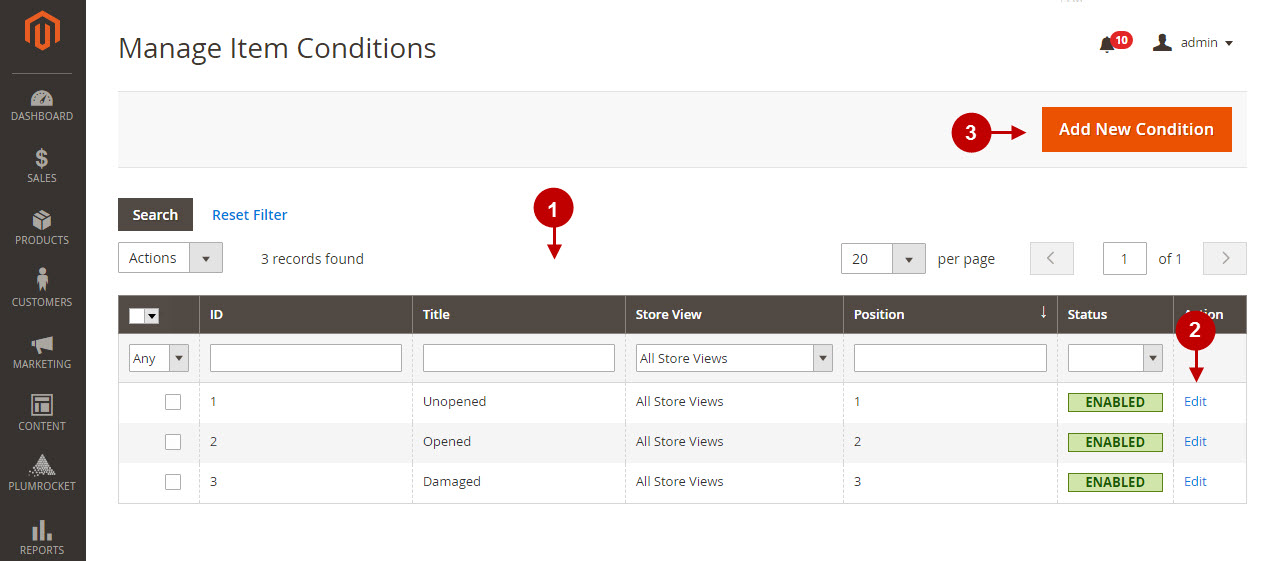
Configuring and Managing Item Conditions
In order to configure and manage the Item Conditions, go to the main menu, select Plumrocket > RMA > Item Conditions.
Detailed description:
- Admin can view and manage the created Item Conditions in this grid.
- You can edit the existing Item Conditions by pressing “Edit” button.
- Press “Add New Condition” to create new Item Condition.
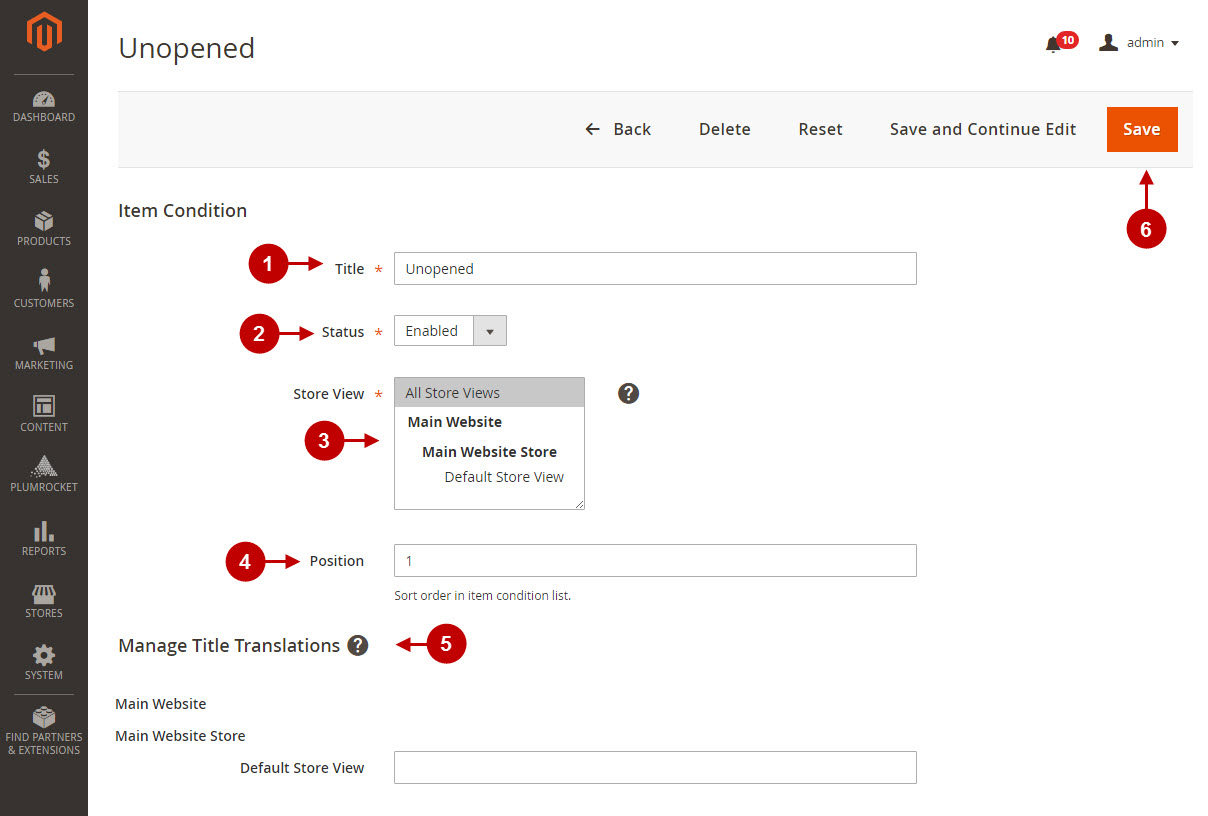
Detailed description:
- Add new title of the Item Condition.
- Enable or disable the Item Condition using the “Status” option.
- Select the Store View the Item Condition will be available on.
- Enter the “Position” of the Resolution.
- In the “Manage Title Translations” section you can enter the translation of the Item Condition for your other store view(s).
- Press the “Save” button to save the changes.
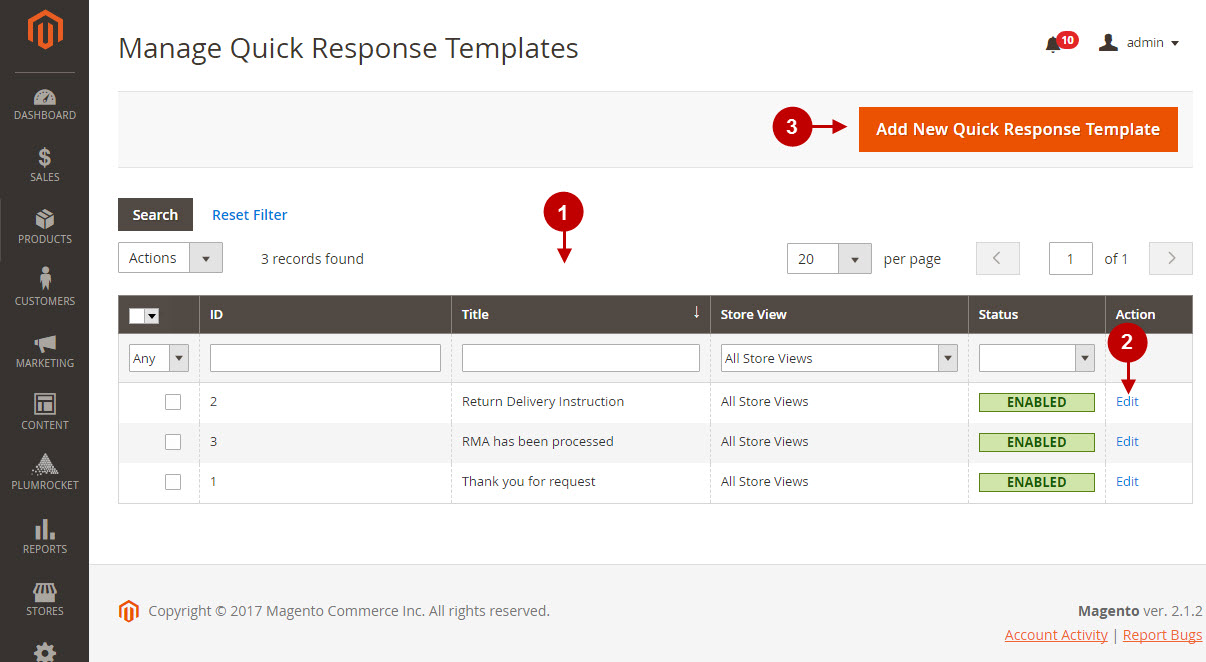
Managing Quick Response Templates
In order to configure and manage the Quick Response Templates, go to the main menu, select Plumrocket > RMA > Quick Response Templates .
Detailed description:
- Admin can view and manage the created Item Conditions in this grid.
- You can edit the existing Response Template by pressing “Edit” button.
- Press “Add New Quick Response Template” to create new Item Condition.
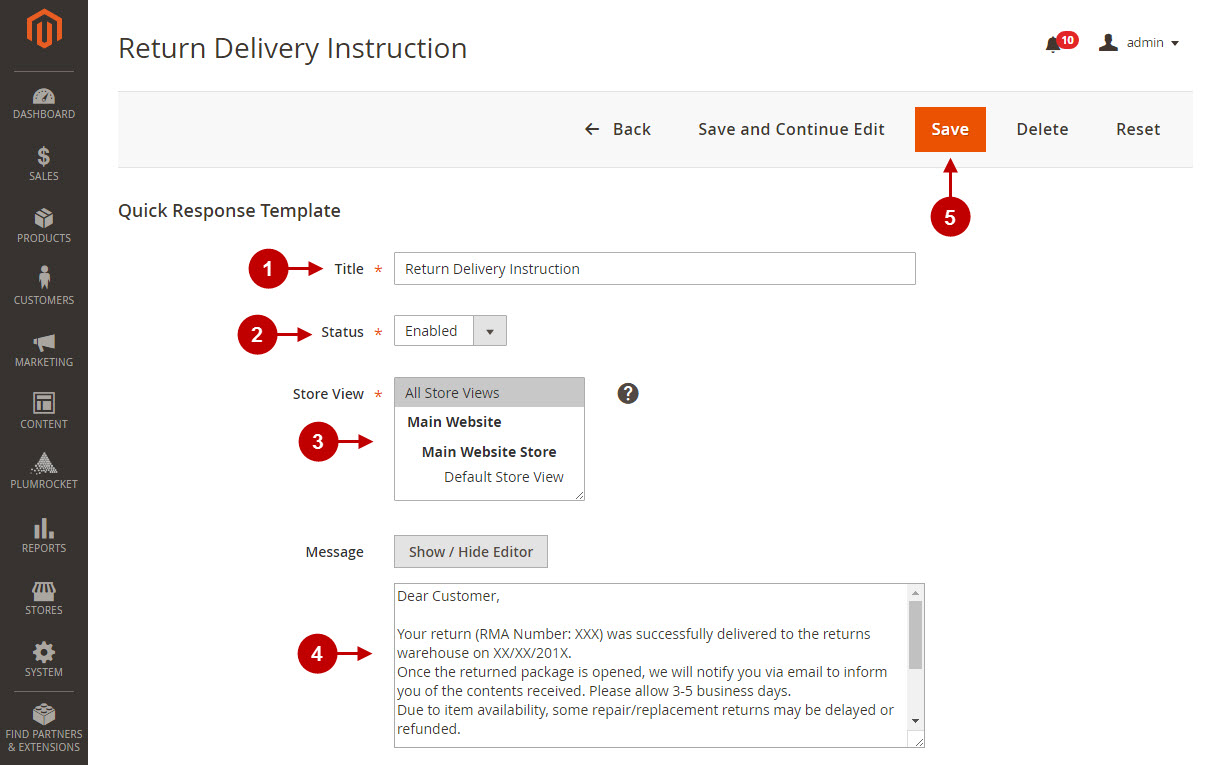
Detailed description:
- Add new title of the Quick Response Template.
- Enable or disable the Quick Response Template using the “Status” option.
- Select the “Store View” the Quick Response Template will be available for.
- Enter the “Message” of the Quick Response Template in this field.
- Press the “Save” button to save the changes.
Managing RMA requests
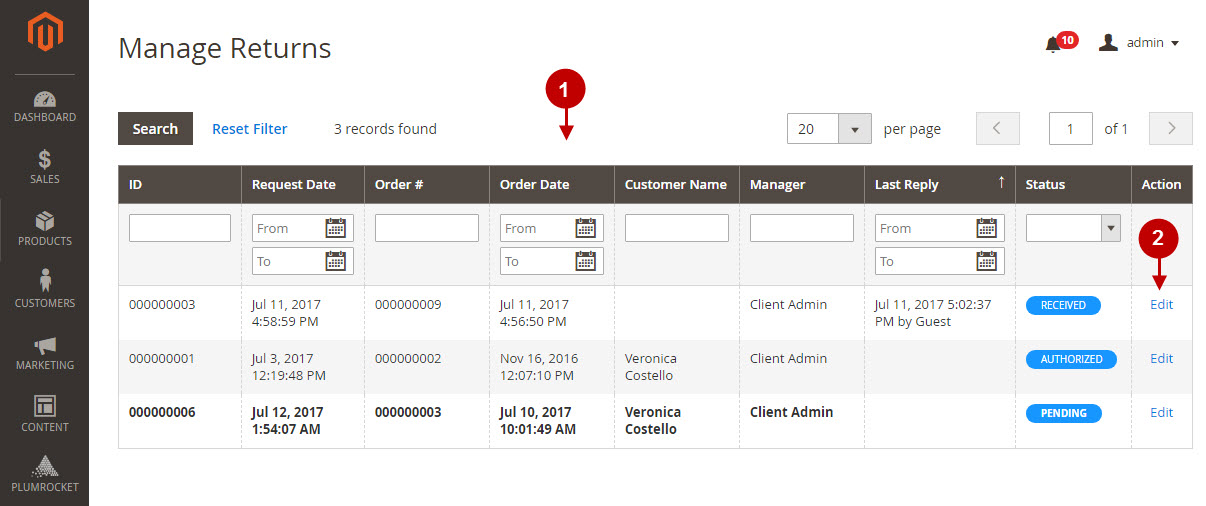
After the RMA requests are submitted by customers, store administrator can conveniently manage all the RMA requests in the Magento backend. Navigate to the main menu, select Plumrocket > RMA > Pending Returns.
Detailed description:
- Admin can view and manage all the customer returns in one grid.
- Press the “Edit” button to view and manage the Return Request.
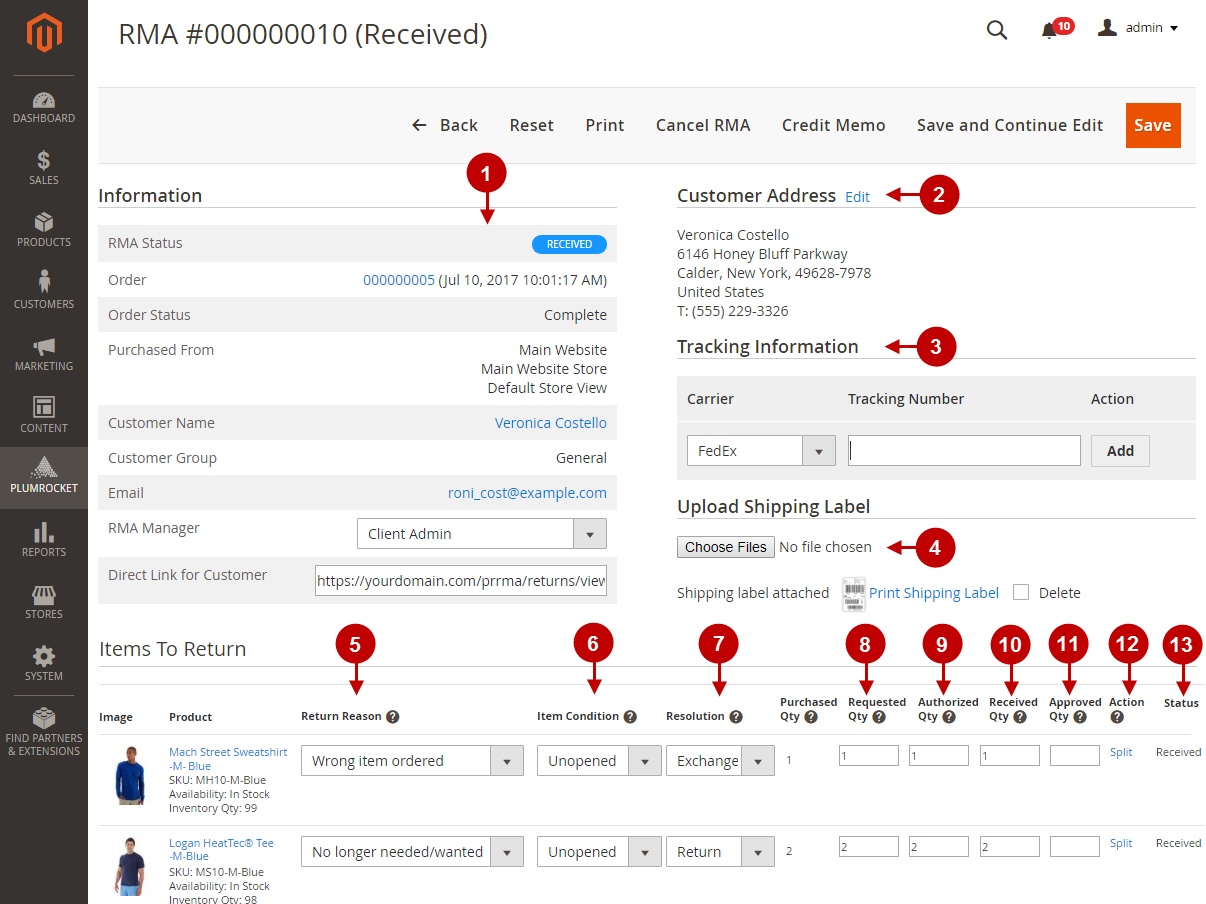
Detailed description:
- Admin can review the “Information” of the order that includes: RMA Status, Order ID, Order Status, Customer Name and Group, Email etc.
- Admin can view and edit “Customer Address” in this section.
- “Tracking Information” can be added in this section.
- Admin can upload the “Shipping Label” which the customer will download and print out later.
- Admin can review and adjust the “Return Reason” using this drop-down.
- Admin can check and change the “Item Condition” using this drop-down.
- Admin can modify the “Resolution” using this drop-down.
- The “Requested Qty” field allows admin to view and change the status of RMA request by setting the quantity of the items, once the Return request is submitted
- The “Authorized Qty” field allows admin to change the status of the RMA request by setting the quantity of the items, if the request is authorized
- The “Received Qty” ‘field allows admin to change the status of the RMA request by setting the quantity of the items, if the items are received.
- The “Approved Qty” ‘field allows admin to change the status of the RMA request by setting the quantity of the items, if the Return Request is approved.
- The “Split” option allows admin to divide and manage the ordered items as two separate lines in the “Items To Return” section, if there is more than 1 item ordered.
- The “Status” option allows admin to check the status of the item in the RMA request.
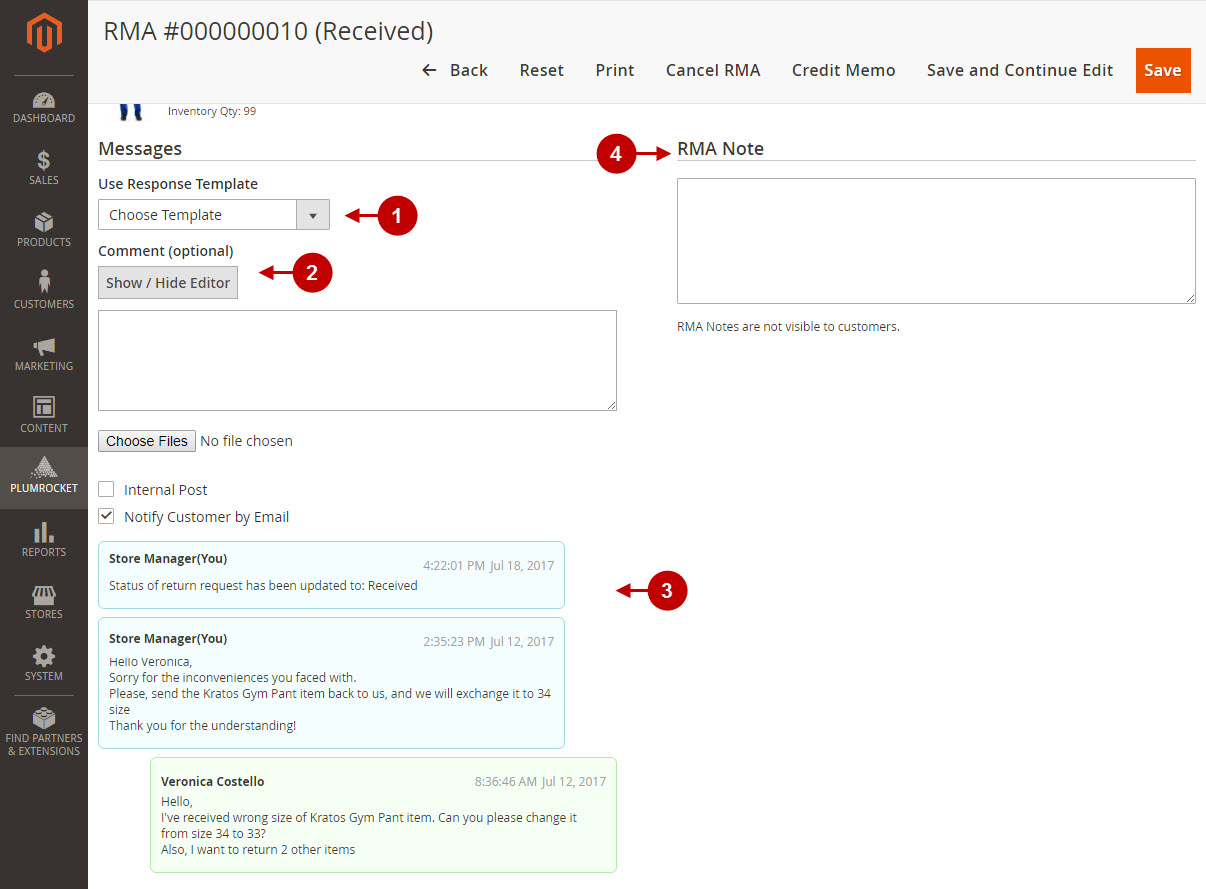
Detailed description:
- For communicating with the customer, admin can use one of the “Response Templates” which have been created to simplify the process.
- Admin can add “Comments” to respond to the customer. Note: the comment will be posted once you “Save” the current RMA.
- Conversation thread is conveniently displayed on the same page.
- “RMA Note” is an internal note store administrator can submit to this RMA request return.
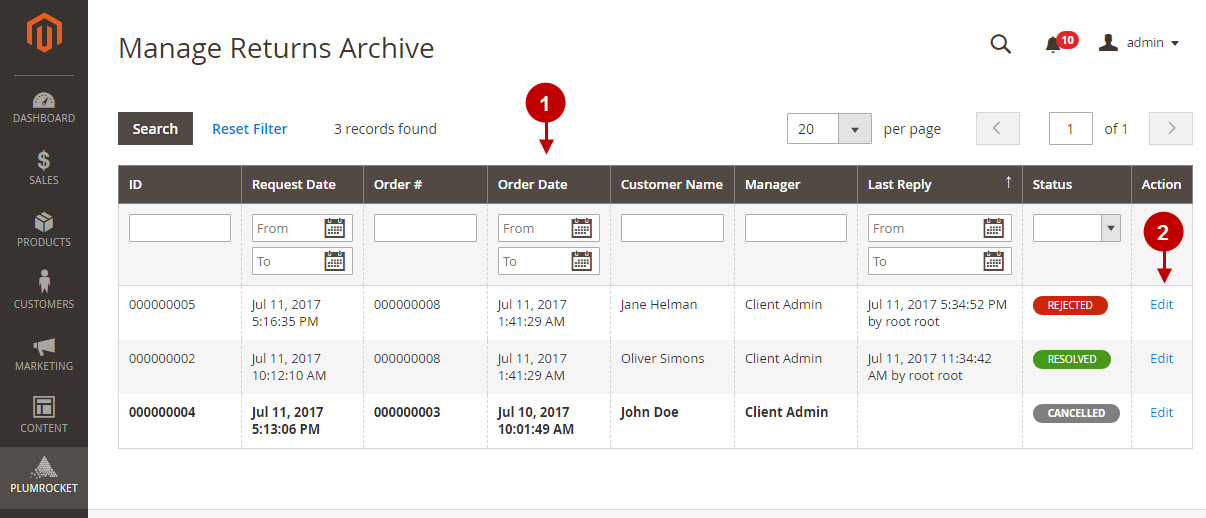
In order to view the closed Return Requests, navigate to the main menu, select Plumrocket > RMA > Archive.
Detailed description:
- Store administrator can view and search closed return requests in the “Manage Returns Archive” .
- In order to Edit one of the closed Returns, press the “Edit” button.