After installing and enabling the Magento 2 AMP extension, you can use the default AMP Theme One for your AMP pages. However, you may want to create your custom AMP theme with different templates and styles. This article provides a step-by-step guide on how to create your custom AMP theme by inheriting the default AMP Theme One, and apply it to the storefront.
Prerequisites
For the sake of compatibility, upgradability, and easy maintenance, do not modify AMP Theme One. To customize the design of your Magento store, create a new custom AMP theme inheriting the default AMP theme.
The Magento mode influences the way static files are cached by Magento. In this article, we provide recommendations about theme development for developer/default mode.
We recommend enabling maintenance mode during the AMP theme creation. You can do this by running the following command:
php bin/magento maintenance:enable [--ip=<ip address> ... --ip=<ip address>] | [ip=none]Alternatively, you can set your Magento to the Developer mode as it speeds up development. Run the following command:
php bin/magento deploy:mode:set developerCreate AMP Storefront Theme: Walkthrough
The high-level steps required to add a new AMP theme in the Magento system are the following:
- Create a directory for the theme under
app/design/frontend/Plumrocket/<amp_custom_theme>. - Add a declaration file
theme.xml - Add
registration.php. - Create directories for images and fonts.
- Configure your theme in the Admin panel.
- Apply the theme for your store.
Create a Theme Directory
Take the following steps to create a directory for your theme:
Step-by-step guide:
- Go to
<magento_root>/app/design/frontend/Plumrocket. - Create an
<amp_custom_theme>directory named according to your theme. Note that the name of your theme must begin withamp_.
 app/design/frontend/
 ├── Plumrocket/
 │   │   ├──...<amp_custom_theme>/
 │   │   │   ├── ...
 │   │   │   ├── ...
Declare your theme
After creating a theme directory, you have to create theme.xml file in app/design/frontend/Plumrocket/<amp_custom_theme> folder. You need to specify your custom AMP theme name (<title> tag) and the parent theme name(<parent> tag) in the file. Use the following example of the theme.xml file:
<theme xmlns:xsi="http://www.w3.org/2001/XMLSchema-instance" xsi:noNamespaceSchemaLocation="urn:magento:framework:Config/etc/theme.xsd">
    	<title>[amp_custom_theme]</title>
    	<parent>Plumrocket/amp_one</parent>
</theme>
Important Information:
Your custom theme has to be inherited from the parent Amp Theme One theme. If you want to create your AMP theme with your custom styles and templates only, remove the <parent> tag.
Add registration.php
Create a registration.php file under the app/design/frontend/Plumrocket/<amp_custom_theme> directory to register your theme in the system. Add the following content to the file:
<?php
\Magento\Framework\Component\ComponentRegistrar::register(
	\Magento\Framework\Component\ComponentRegistrar::THEME,
	'frontend/Plumrocket/[amp_custom_theme]',
 	__DIR__
);
Run the following command to flush the Magento cache.
php bin/magento cache:flushConfigure images
You need to use a custom module to set image configurations for AMP themes. Please see the Plumrocket/AmpCatalog/etc/view.xml file for AMP image examples and standard dimensions.
Create Directories For Static Files
Your theme will contain several types of static files:
- Fonts
- Images
Each type should be stored in a separate sub-directory of web in your AMP theme folder:
app/design/frontend/Plumrocket/<amp_custom_theme>/
├── web/
│ ├── fonts/
│ ├── images/
In the .../<amp_custom_theme>/web/images directory, you store the general theme-related static files. For example, Homepage images are stored in ...<amp_custom_theme>/web/images.
CSS File Location
Unlike the regular Magento themes, CSS styles are stores in .phtml files, but not in the .css files. For example, the Header 1 CSS styles are stored in the Plumrocket_AmpTheme::html/header/1/css.phtml file.
Important Information:
When you change files stored here during theme development, you need to clear the pub/static and var/view_preprocessed directories, and then reload the pages. Otherwise, the old versions of files are displayed on the storefront.
To clear the pub/static directory:
rm -r <magento_root>/pub/static/*/*To clear the var/view_preprocessed directory:
rm -r <magento_root>/var/view_preprocessed/*Your Theme Directory Structure Now
At this point your theme file structure looks as follows:
app/design/frontend/Plumrocket/
├── <amp_custom_theme>/
│   ├── web/
│   │   ├── images
│   │   ├── fonts
│   ├── registration.php
│   ├── theme.xml
How to Apply AMP Theme
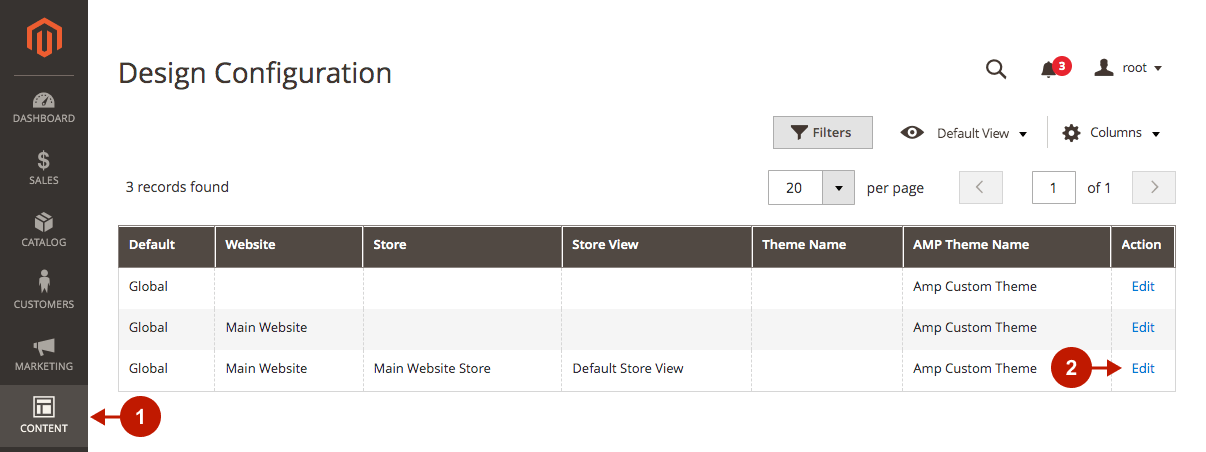
This section describes how to apply a theme for your store. This is a required step if you want a theme to be used on a storefront.
Step-by-step guide:
- In Admin, go to Content -> Design -> Configuration. The Design Configuration page contains a grid with the available configuration scopes.
- In the configuration record corresponding to your store view, click Edit.
- Under the AMP Default Theme, in the Applied Theme drop-down, select your newly created AMP theme.
- Click Save Configuration.
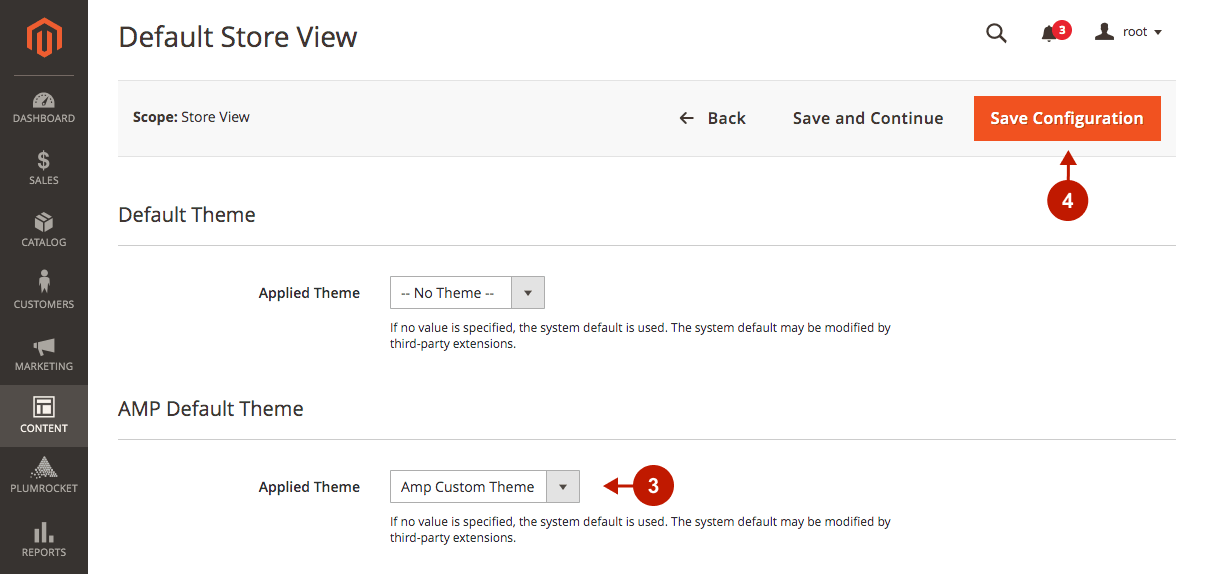
Run the php bin/magento cache:flush command to flush the Magento cache.
Important Information:
The ability to create multiple custom AMP themes allows you to apply them to different store views, and therefore display different AMP content there.
After all the changes have been made, disable the maintenance mode by running the following command:
bin/magento maintenance:disable [--ip=<ip address> ... --ip=<ip address>] | [ip=none]If you used Production mode before, switch it back to Production by running the following command:
php bin/magento deploy:mode:set production