Configuration
In this section, you will learn how to configure Magento 2 Private Sales and Flash Sales Extension correctly. Please, follow the instructions below.
General
Go to the “Plumrocket” tab in the main menu > select “Private Sales and Flash Sales” extension > navigate to the “Configuration” section.
Step-by-Step actions:
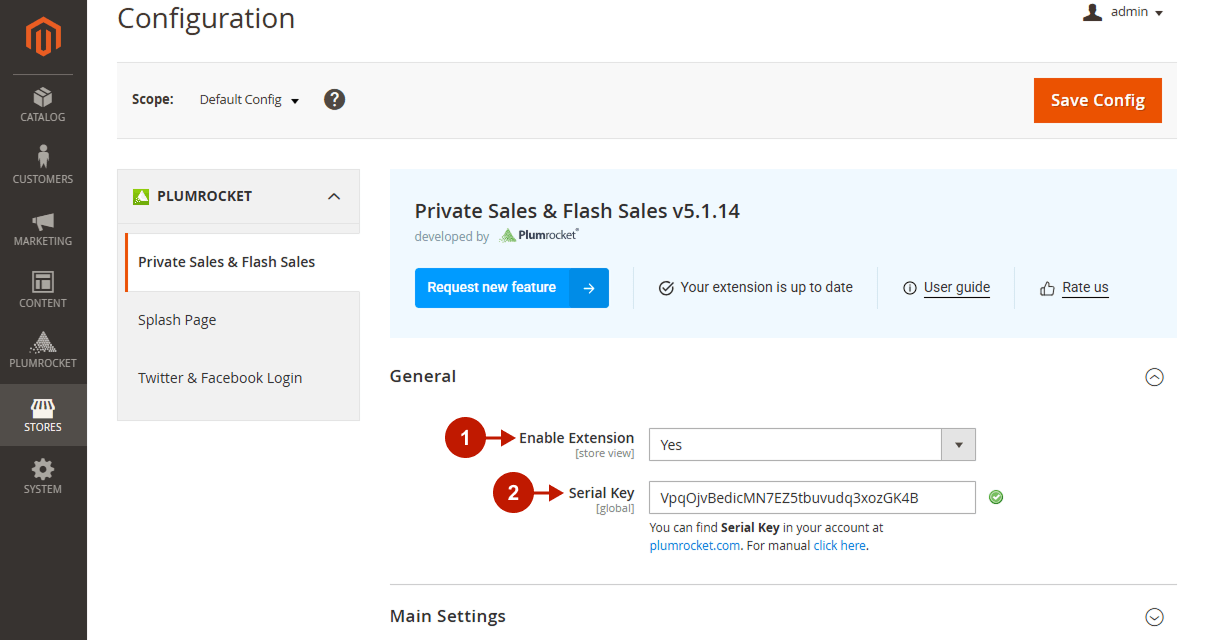
- “Enable Extension”: this option allows you to enable or disable the module.
- “Serial Key”: enter the unique serial key provided to you after purchasing the extension. Please, note: in most cases, this field will be pre-filled with a serial key automatically, and the green checkmark will be displayed. To find and paste your serial key manually, read the Serial Key Activation article.
Main Settings
Step-by-Step actions:
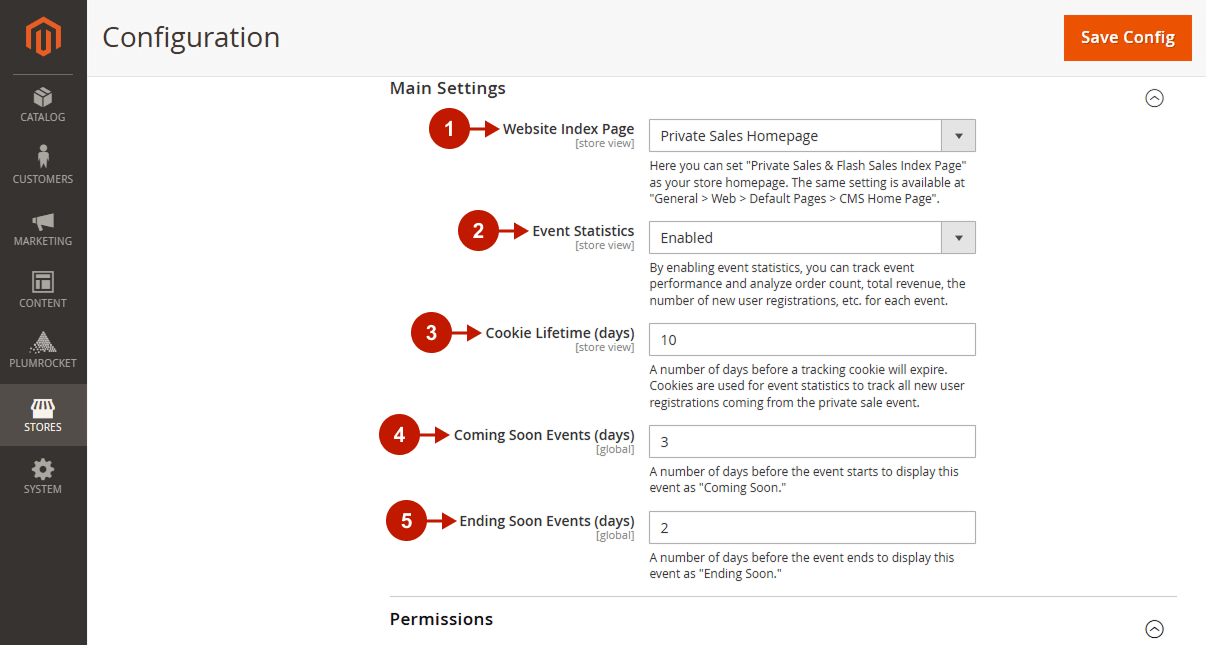
- “Website Index Page“: set Private Sales & Flash Sales page as your store homepage if necessary. The same setting is available at General > Web > Default Pages > CMS Home Page.
- “Event Statistics“: when enabled, you can track each event’s performance by analyzing order count, total revenue, new user registrations, and more. You can see the statistics in the Event Statistics Grid.
- “Cookie Lifetime (days)“: set the number of days before a tracking cookie expires. Cookies are necessary for event statistics to track the number of new account registrations resulting from the private sale event.
- “Coming Soon Events (days)“: set the number of days before the event starts to display this event as “Coming Soon”. The Coming Soon events section can be displayed on the Event Homepage or outputted as a widget. Also, you can manage Coming Soon events in the Event Timeline in the backend.
- “Ending Soon Events (days)“: set the number of days before the event ends to display this event as “Ending Soon”. The Ending Soon events section can be displayed on the Event Homepage or outputted as a widget. Also, you can manage Ending Soon events in the Event Timeline in the backend.
Permissions
In this section, you can set General and Private Sale Permissions as “Default Config Settings”. Later, when editing or creating new events, you can either use these default settings or configure permissions individually.
General Permissions (default)
Follow the steps below to configure general permissions for events. Please, note: the general permissions are applied to all customer groups.
Step-by-Step actions:
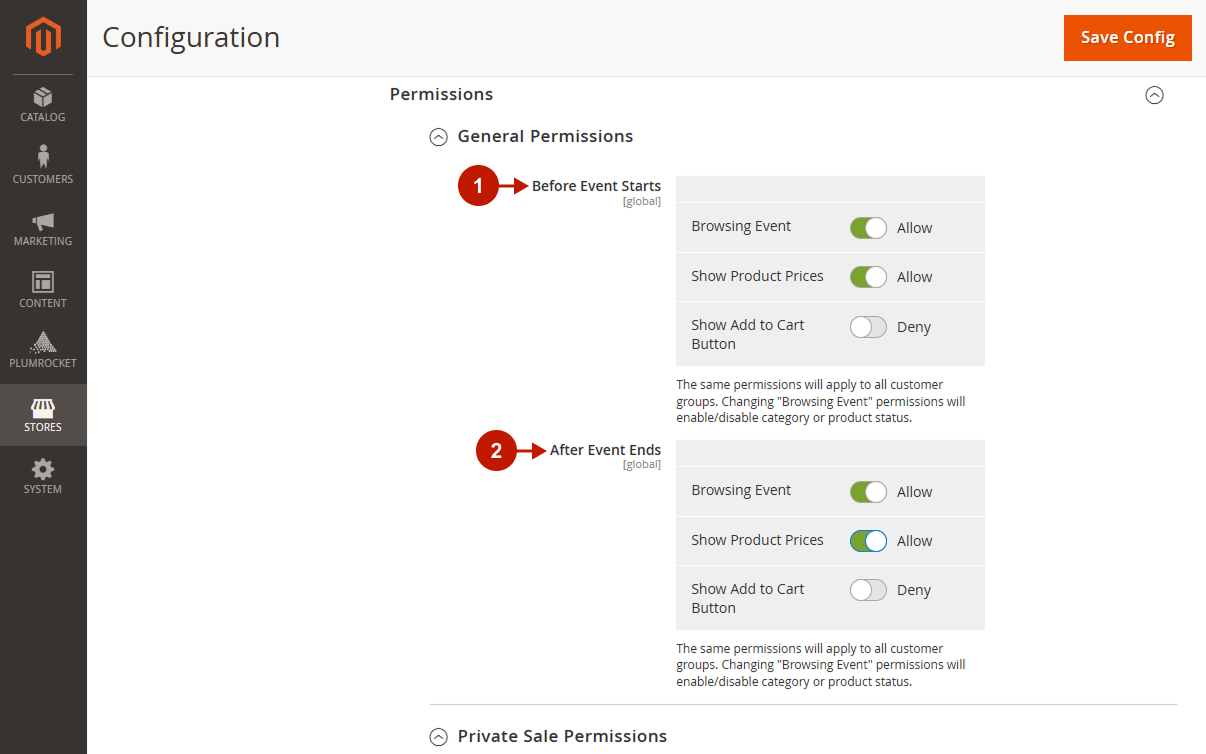
- “Before Event Starts“: configure event permissions before it starts:
- “Browsing Event“:
- When set to “Deny”, an event is not yet available for browsing by users. Hence, the event category or product status is disabled, and products are not visible to users on your store.
- Otherwise, set to “Allow” to enable the category or product status; therefore, customers will be able to browse an event and see products on your store.
- “Show Product Prices“: you can enable this option only if the “Browsing Event” option is enabled. It allows you to display product prices.
- “Show Add to Cart Button“: you can enable this option only if the “Show Product Prices” option is enabled. It allows customers to buy products at regular prices before an event starts.
- “Browsing Event“:
- “After Event Ends“: configure event permissions after it ends.
- “Browsing Event“:
- When set to “Deny”, an event is no longer available for browsing by users. Hence, the event category or product status is disabled, and products are not visible to users on your store.
- Otherwise, set to “Allow” to enable the category or product status; therefore, customers will be able to browse an event and see products on your store.
- “Show Product Prices“: you can enable this option only if the “Browsing Event” option is enabled. It allows you to display product prices.
- “Show Add to Cart Button“: you can enable this option only if the “Show Product Prices” option is enabled. It allows customers to buy products at regular prices after an event finishes.
- “Browsing Event“:
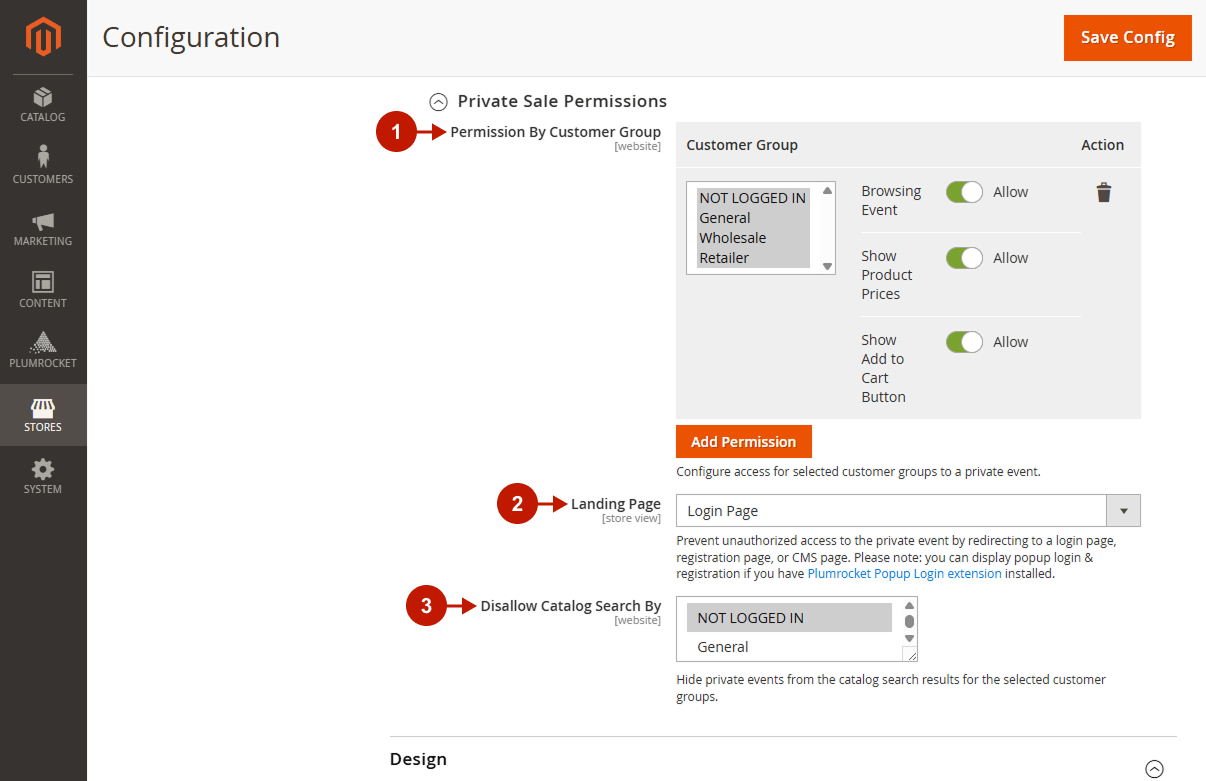
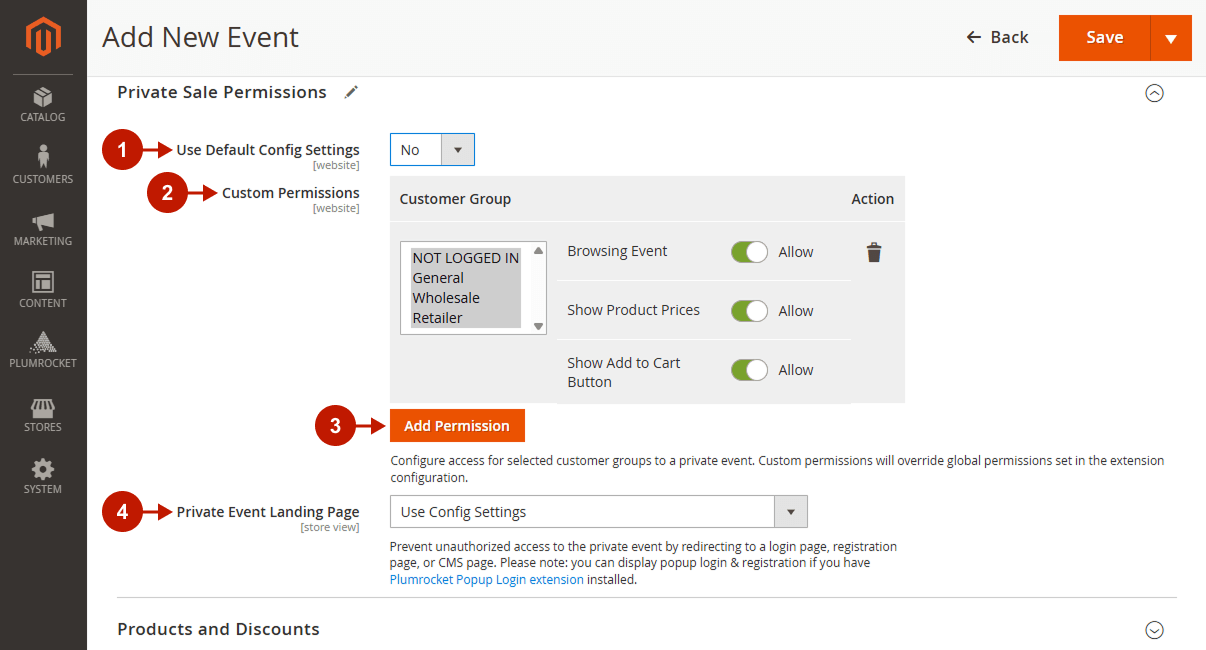
Private Sale Permissions (default)
Step-by-Step actions:
- “Permission By Customer Group“: select a customer group and configure access to a private event for the selected group. You can customize permissions for a different customer group by pressing the “Add Permission” button. For instance, you can restrict the NOT LOGGED IN customer group from browsing an event and allow other groups to browse it; or allow all customer groups to browse an event but hide prices for not logged-in users.
- “Browsing Event“: when set to “Deny”, a private sale is not available for the selected customer groups to browse. Otherwise, set to “Allow” to enable the category or product status; therefore, customers will be able to browse an event and see products.
- “Show Product Prices“: you can enable this option only if the “Browsing Event” option is enabled. It allows you to display product prices.
- “Show Add to Cart Button“: you can enable this option only if the “Show Product Prices” option is enabled. It allows the selected customer groups to buy products.
- “Landing Page”: prevent unauthorized access to the private event by redirecting to a login page, registration page, or CMS page. Please, note: you can display popup login & registration if you have installed the Plumrocket Popup Login extension.
- “Disallow Catalog Search By”: select customer groups to hide private event products from them in the catalog search results.
Design
Here you can learn how to configure the design of your event countdown timers and select the templates for your Product and Category Event Headers.
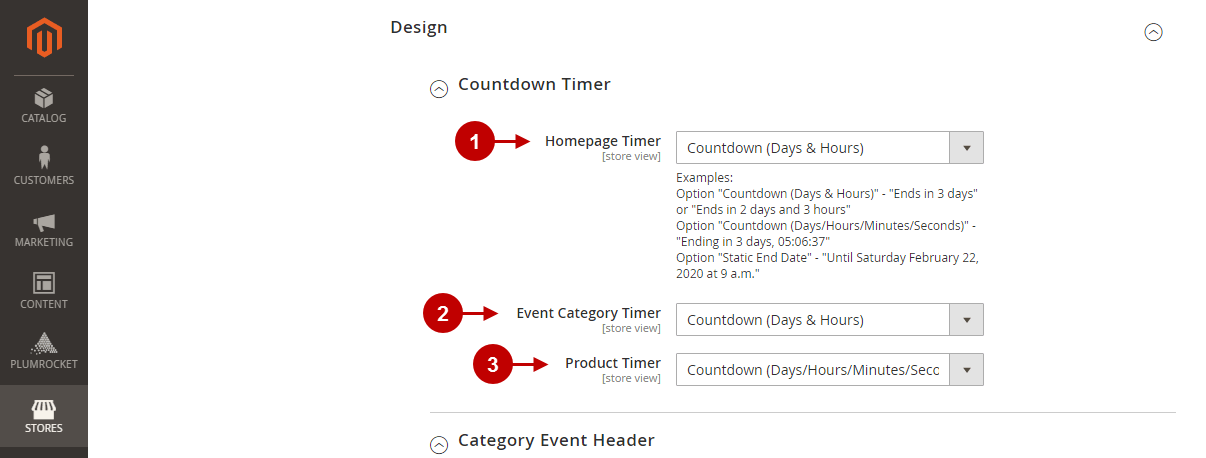
Countdown Timer
Step-by-Step actions:
- “Homepage Timer”: select the timer style displayed on a Website and Event Homepage, or disable it.
- “Event Category Timer”: select the timer style displayed on categories, or disable it.
- “Product Timer“: select the timer style displayed on a Product Page, or disable it.
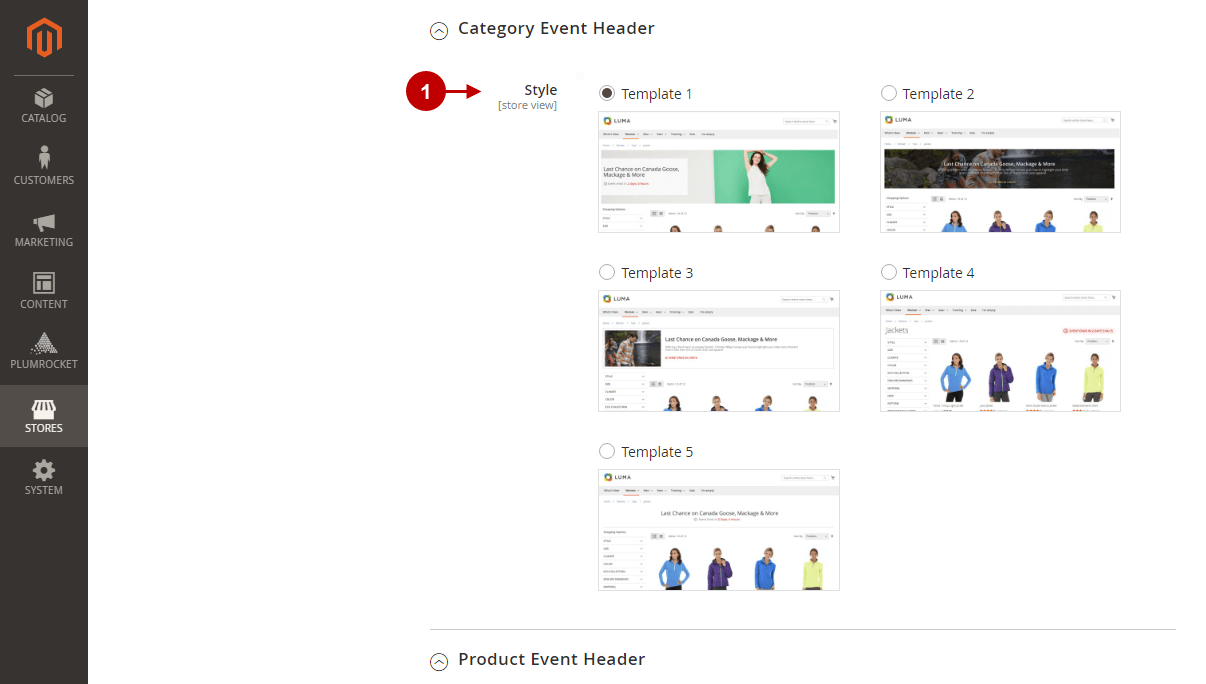
Category Event Header
Step-by-Step actions:
- “Style“: select one of the five available atyles of a Category Event Header styles.
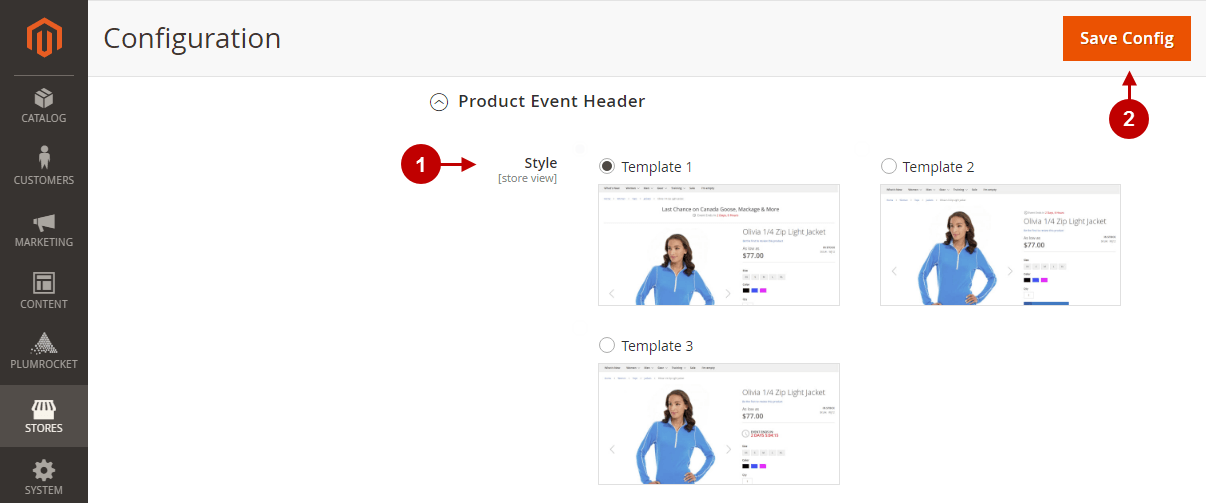
Product Event Header
Step-by-Step actions:
- “Style“: select one of the five available Product Event Header styles.
Manage Events
In this section, you will learn how to manage all events in a convenient timeline and statistics grid. They help you see an overall picture of all ended, active and upcoming events, analyze how effective an event was, and plan further marketing campaigns.
In the main menu go to the “Plumrocket” tab > select “Private Sales & Flash Sales” extension > navigate to the “Manage Event Homepages” section.
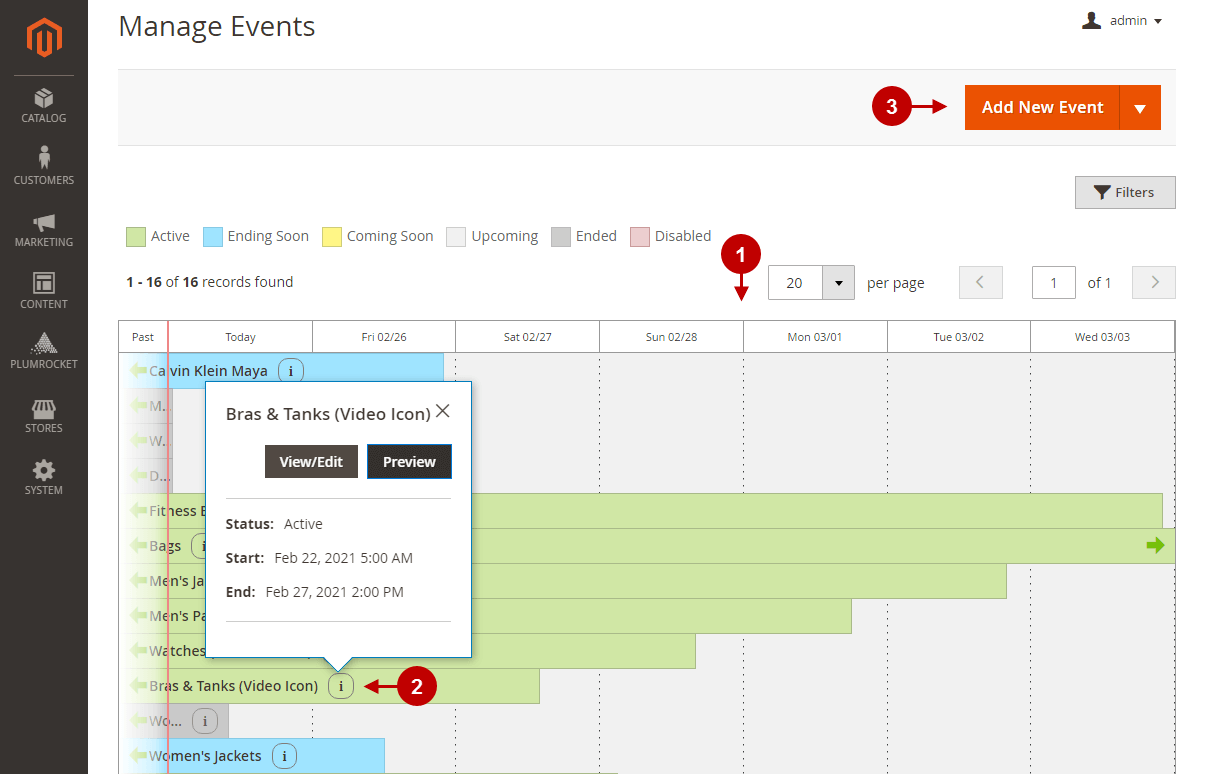
Event Timeline
Step-by-Step actions:
- Event Timeline allows you to view all events in one place, analyze their status and see details.
- By clicking on an Information icon of an event, you can see its details: status, start, and end date.
- “View/Edit“: press the button to view or edit an event.
- “Preview“: press the button to go to the preview mode, select the date, and see how a future event will look like on a specific day.
- “Add New Event“: press the button to add a new event.
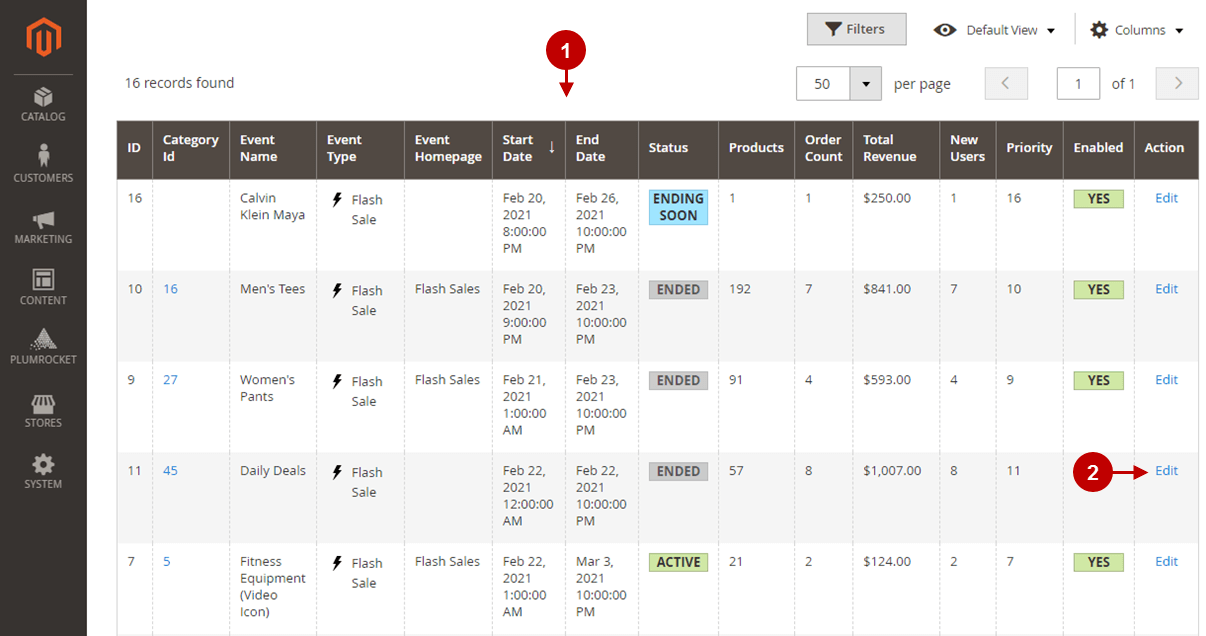
Event Statistics Grid
Step-by-Step actions:
- This grid allows you to see details of each event, as well as its statistics. Use the grid to analyze how effective an event was.
- “Products“: the number of products left in stock.
- “Order Count“: the number of orders made within the sale.
- “Total Revenue“: the total amount of sale revenue.
- “New Users“: the number of new accounts registered during an event.
- “Edit“: click on the button to edit an event.
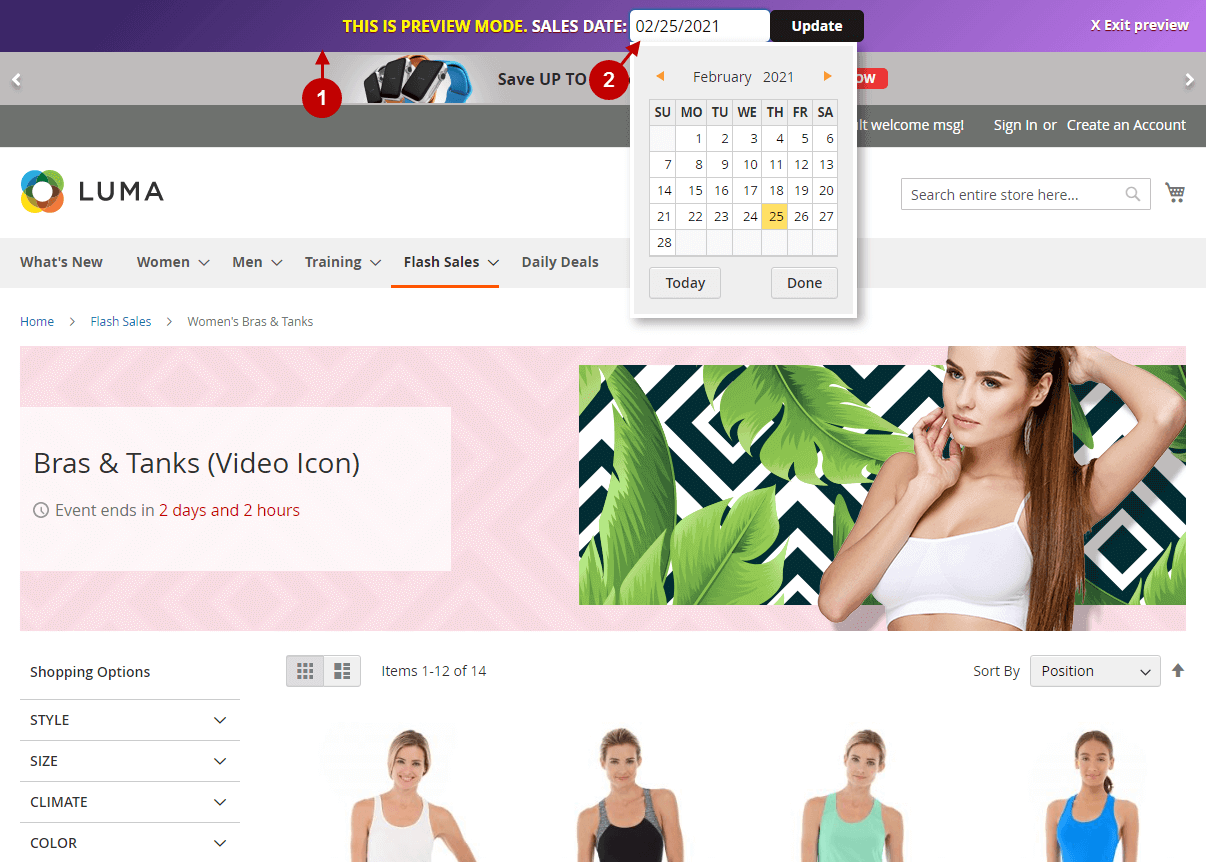
Event Preview Mode
Step-by-Step actions:
- This is the notification banner of the preview mode.
- If you select the date here and press the Update button, you will see how exactly the category will look like on that date.
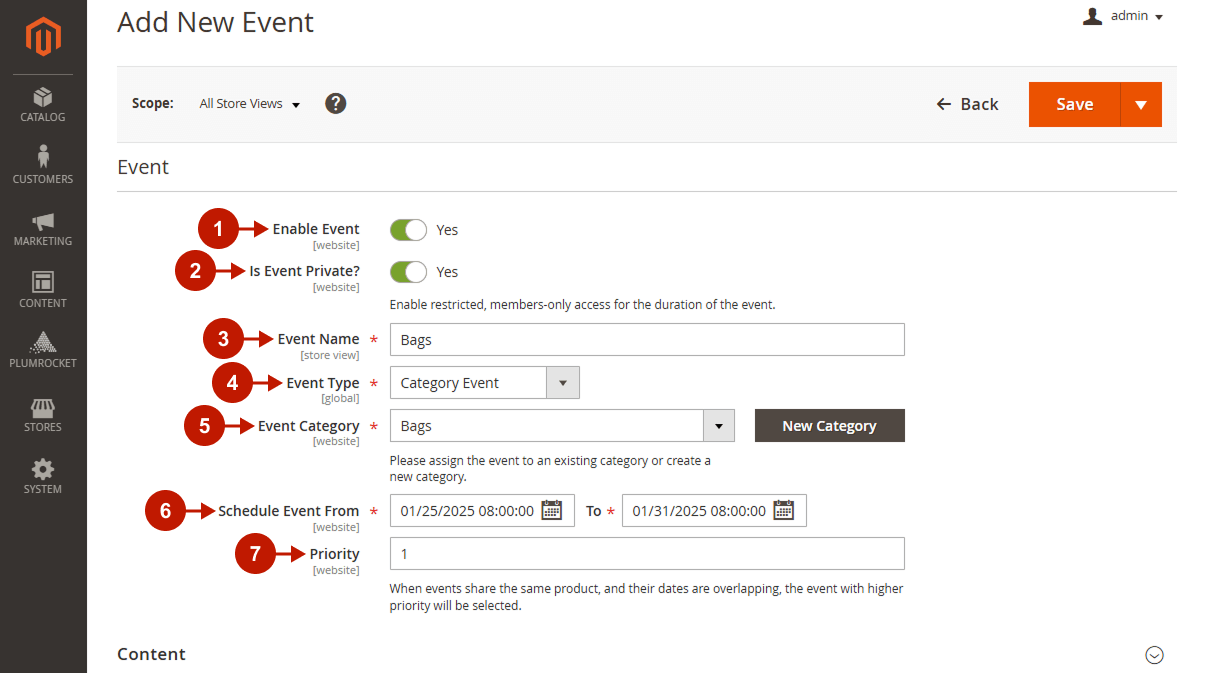
Add New Event / Edit Event
Step-by-Step actions:
- “Enable Event“: this option allows you to enable/disable an event.
- “Is Event Private?“: set to “Yes” to make an event private and therefore enable member-only access at the time of the event.
- “Event Name“: enter the name of an event in this field.
- “Event Type“: select the type of an event: a category event or a single product event.
- “Event Category“:
- If you selected a Category Event, assign the event to an existing category. Click the New Category button and create a new category by specifying its name and the parent category.
- If you selected a Single Product Event, assign the event to an existing product by clicking on the Choose Product Button.
- “Schedule Event From To“: set the start and end date of an event.
- “Priority“: set the priority of an event. When events share the same product and their dates overlap, the event with higher priority will be active.
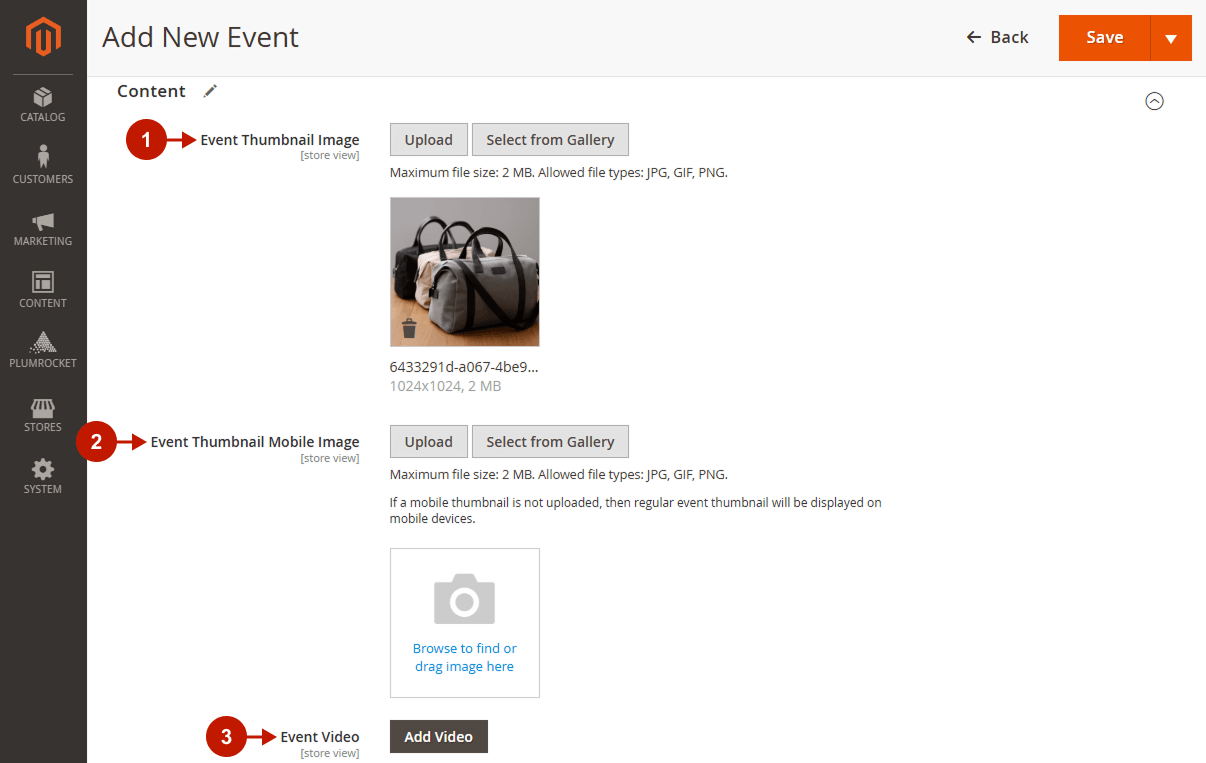
Content
Step-by-Step actions:
- “Event Thumbnail Image“: you can upload an image for the event that will be displayed on the Homepage.
- “Event Thumbnail Mobile Image“: for fast page loading on mobile devices, upload a small-size thumbnail image. If it is not uploaded, a regular event thumbnail will be displayed on mobile devices.
- “Event Video“: press the Add Video button and add a URL from YouTube and Vimeo services.
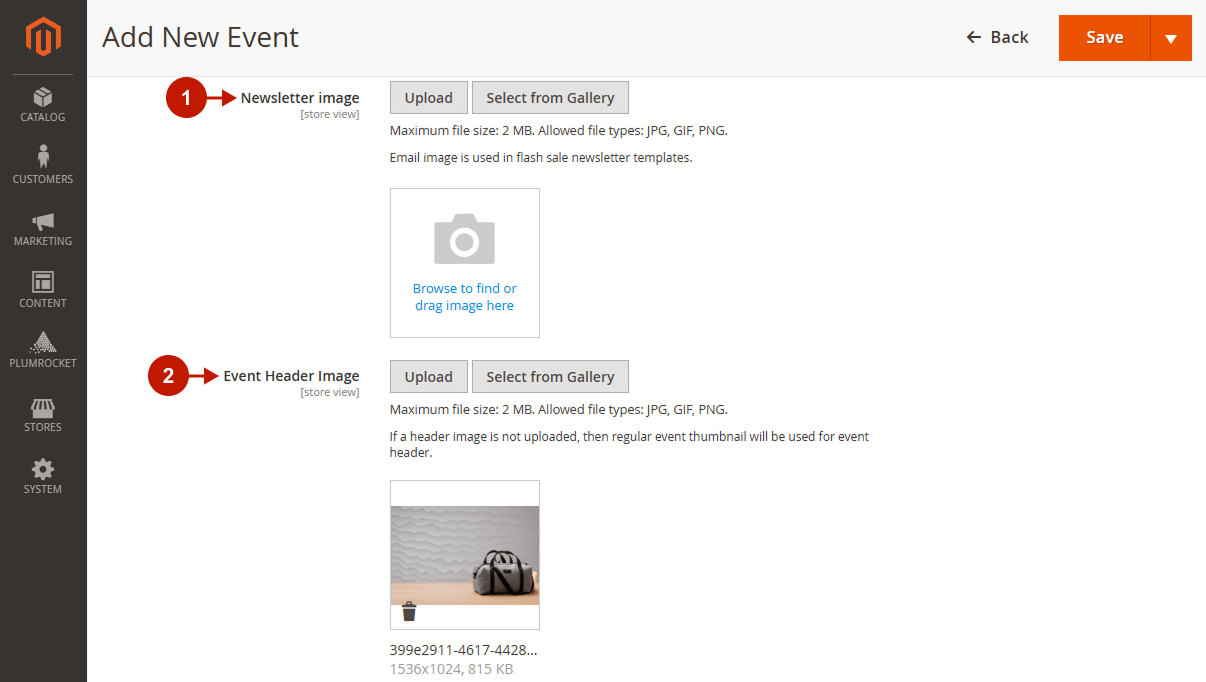
Step-by-Step actions:”Newsletter image“:
- “Newsletter image“: upload a newsletter image that will be used in flash sale newsletter templates.
- “Event Header Image“: upload an event header image that will be visible on the Category Event Header.
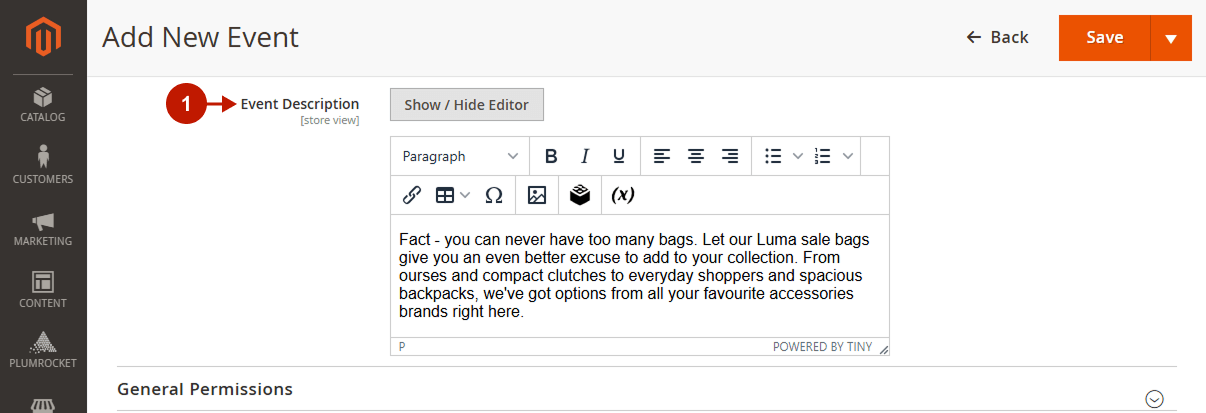
Step-by-Step actions:
- “Event Description“: enter an event description that will be visible on the Category Event Header on certain templates.
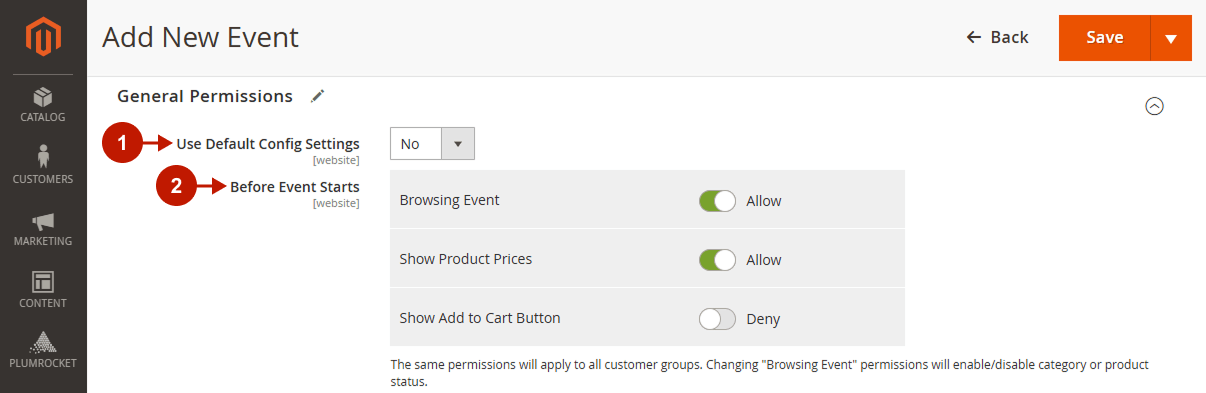
General Permissions
Step-by-Step actions:
- “Use Default Config Settings“: set to “Yes” if you want to use the default configuration settings made earlier in the default General Permissions section. Otherwise, set it to “No” and go to the next step to configure it individually.
- “Before Event Starts“: configure permissions that apply to the event before it starts.
- “Browsing Event“:
- When set to “Deny”, an event is not yet available for browsing by users. Hence, the event category or product status is disabled, and products are not visible to users on your store.
- Otherwise, set to “Allow” to enable the category or product status; therefore, customers will be able to browse an event and see products on your store.
- “Show Product Prices“: you can enable this option only if the “Browsing Event” option is enabled. It allows you to display product prices.
- “Show Add to Cart Button“: you can enable this option only if the “Show Product Prices” option is enabled. It allows customers to buy products at regular prices before an event starts.
- “Browsing Event“:
Private Sale Permissions
Step-by-Step actions:
- “Use Default Config Settings“: set to “Yes” if you want to use the default configuration settings made earlier in the default Private Sale Permissions section. Otherwise, go to the next step to configure it differently.
- “Custom Permissions“:
- “Browsing Event“:
- When set to “Deny”, a private sale is not available for the selected customer groups to browse.
- Otherwise, set to “Allow” to enable the category or product status; therefore, customers will be able to browse an event and view products.
- “Show Product Prices“: you can enable this option only if the “Browsing Event” option is enabled. It allows you to display product prices.
- “Show Add to Cart Button“: you can enable this option only if the “Show Product Prices” option is enabled. It allows the selected customer groups to buy products.
- “Browsing Event“:
- “Add Permission“: press the Add Permission button to customize permissions for different customer groups.
Products and Discounts
Step-by-Step actions:
- Products and Discounts grid allows you to manage products on sale, set the discount amount, track in-stock quantity, set flash sale limit, and more.
- “Name“: the name of the product. You can click on it, view or edit its attributes.
- “SKU“: products’ SKU.
- “Price“: products’ regular price.
- “Discount Amount“: product’s percentage discount.
- “Flash Sale Price“: product’s flash sale price.
- “Qty“: products’ stock quantity.
- “Flash Sale QTY Limit“: product quantity that can be sold within a flash sale.
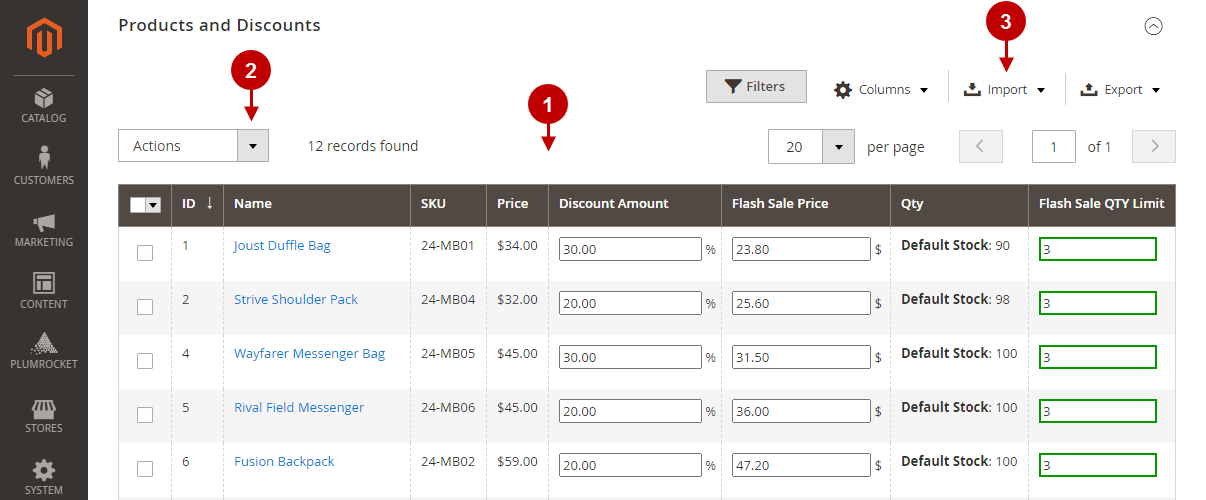
Step-by-Step actions:
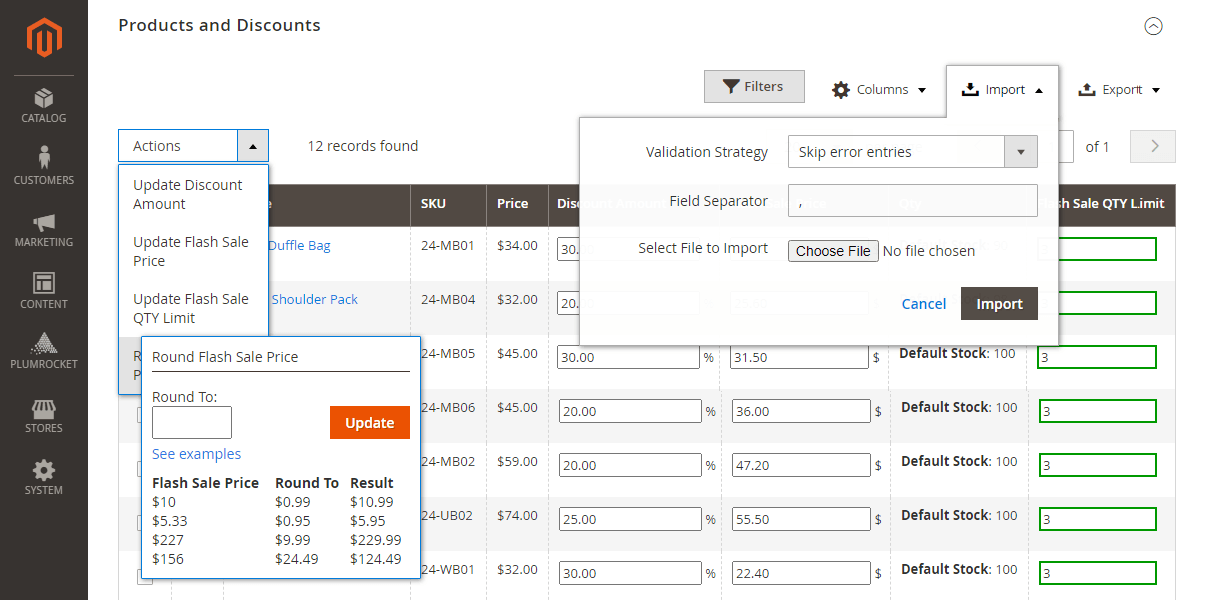
- “Actions“: you can conveniently make changes to the grid with multiple products at once. Select products by checking the boxes and choose the action you want to do:
- “Update Discount Amount“: enter the percentage discount amount you want to apply to products.
- “Update Flash Sale Price“: enter the price in currency, e.g., sell multiple products for 19.99$.
- “Update Flash Sale QTY Limit“: limit the number of products you want to sell at a discount. Once the limit is reached, the status of the product changes to out of stock.
- “Round Flash Sale Price“: round up the price to one that is attractive from a marketing point of view and sell more.
- “Import“: choose the validation strategy, field separator, and conveniently import flash sale products.
Promo Banner
Step-by-Step actions:
- “Enable Banner“: this option allows you to enable or disable the promo banner.
- “Banner position“: select the top or bottom position of the banner.
- “Banner template“: select one of the three banner templates. Go to Content > Elements > Blocks to enable, disable or edit the existing banner, and add new ones.

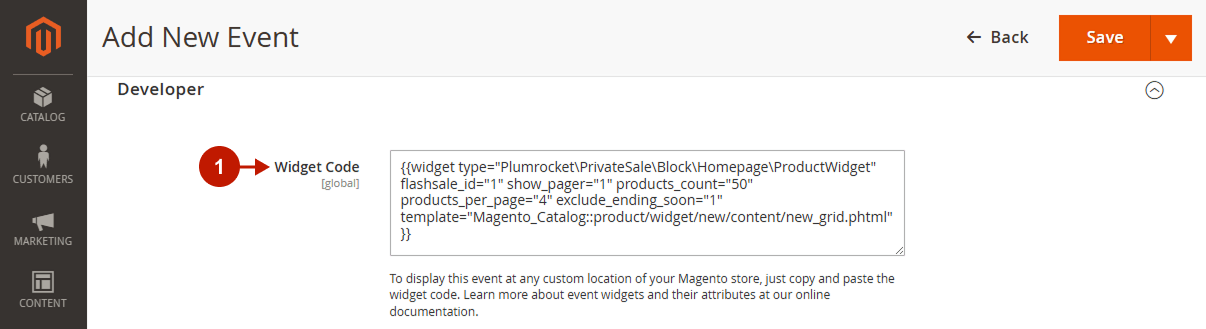
Developer
Step-by-Step actions:
- “Widget Code“: to display this event at any custom location of your Magento store, just copy and paste the widget code into a CMS page or CMS block. If necessary, change some values in the widget to customize it.
You can also use the default Magento functionality to insert the widget.
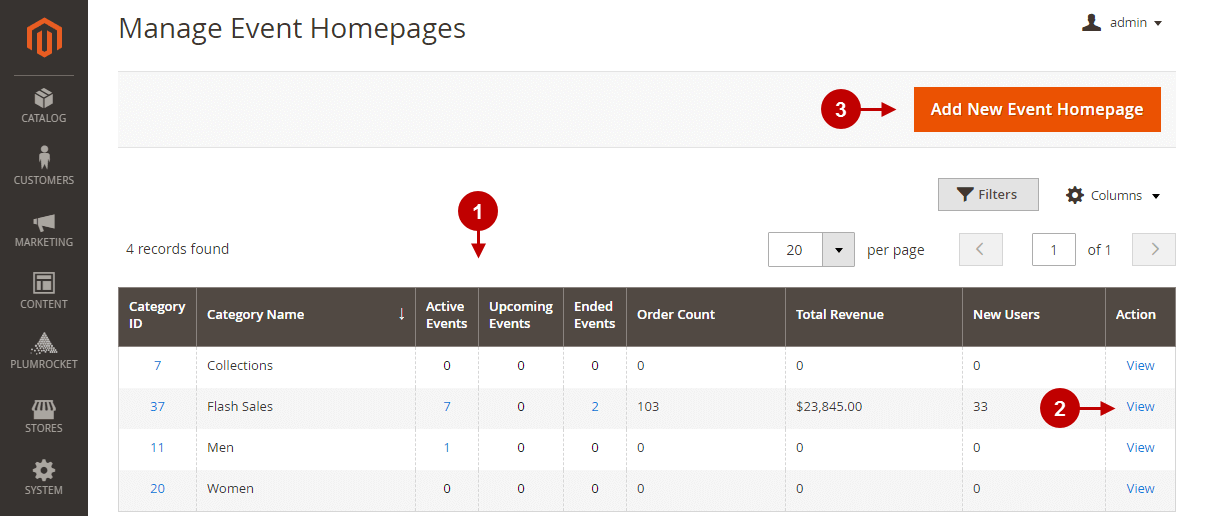
Manage Event Homapages
In the main menu go to the “Plumrocket” tab > select “Private Sales & Flash Sales” extension > navigate to the “Manage Event Homepages” section.
Step-by-Step actions:
- Manage Event Homepages grid allows you to see and analyze events in one place:
- “Category ID“: a category ID is displayed in this column. It is clickable and directs you to the category edit page.
- “Category Name“: the name of the category.
- “Active Events“: the number of events that are currently running. You can also click on the number and go to the Manage Events settings.
- “Upcoming Events“: the number of scheduled events for the future. You can also click on the number and go to the Manage Events settings.
- “Ended Events“: the number of ended events. You can also click on the number and go to the Manage Events settings.
- “Order Count“: the total number of orders made during an event.
- “Total Revenue“: the total revenue of an event.
- “New Users“: the total number of users who have registered for a private event.
- “Action“: click and view the category settings in this column.
- “View“: you can click on this button and go to a category edit page to view or make changes to the category.
- “Add New Event Homepage“: press this button to start adding a new event homepage. Choose an existing parent category or create a new category for the event homepage. The selected parent category (an event homepage) will display all child categories (events).
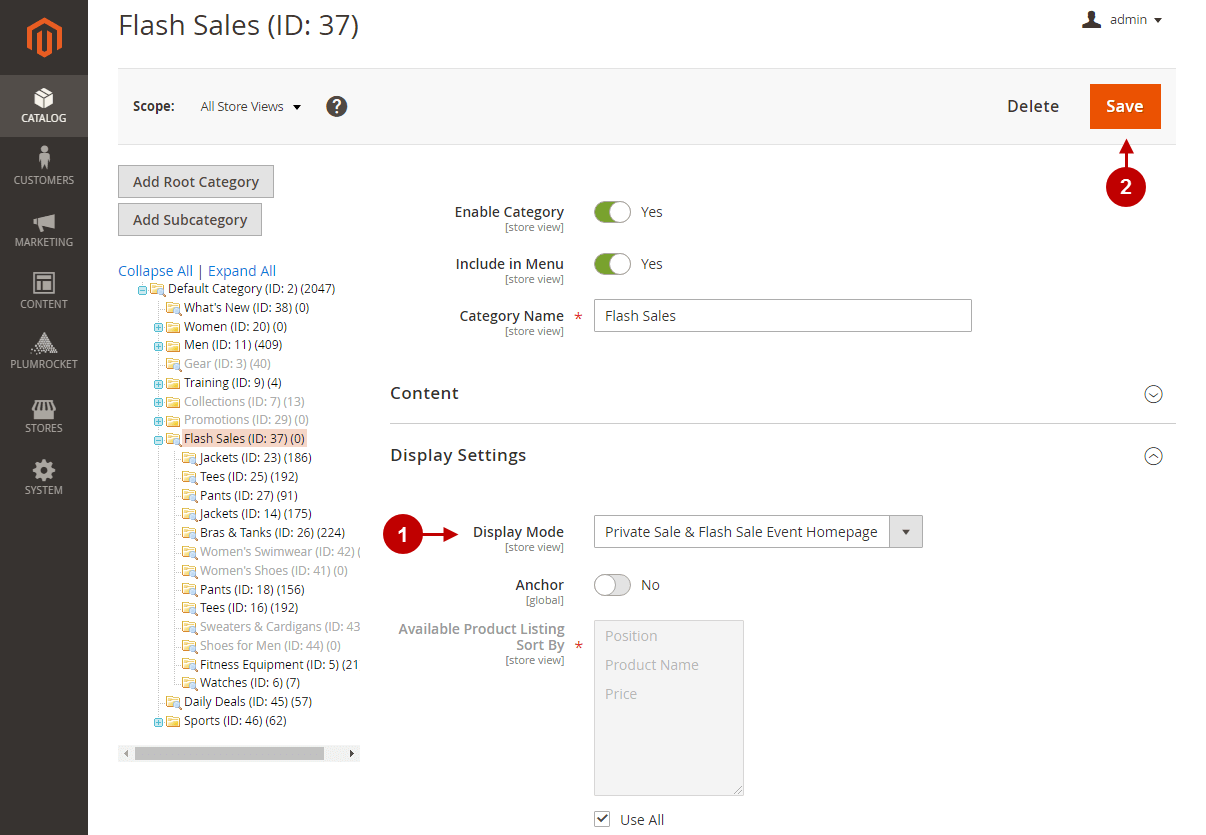
Category Edit Page
Here you will learn how to turn a category into a Private Sales and Flash Sales Homepage. For instance, a Flash Sales Homepage is a category that will reflect all the Flash Sales events within it.
In the main menu, go to the “Catalog” tab > navigate to “Inventory” > “Categories” section.
Step-by-Step actions:
- “Display Mode“: select the required category and select “Private Sale & Flash Sale Event Homepage” as a display mode.
- “Save“: press the Save button to apply the changes.
Website Splash Page
In the main menu go to the “Plumrocket” tab > select “Private Sales & Flash Sales” extension > navigate to the “Website Splash Page” section.
Please, follow the Slash Page extension instructions to configure the Splash Page correclty.
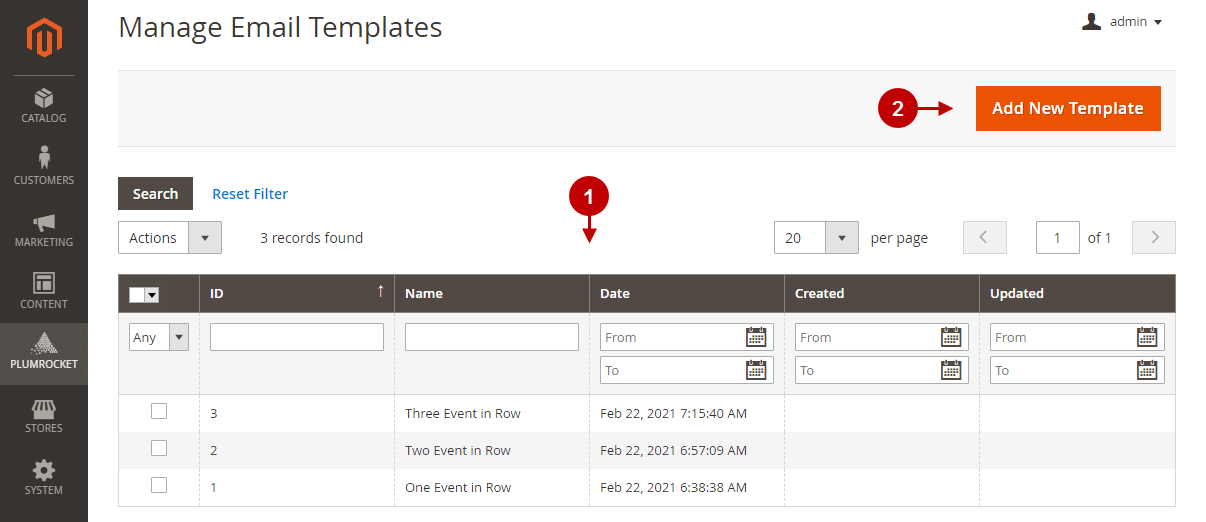
Newsletter Templates
In this section, learn how to schedule newsletter templates and thus inform your customers about new flash sales and private events. Follow the instructions below to manage the existing templates and schedule new ones.
In the main menu go to the “Plumrocket” tab > select “Private Sales & Flash Sales” extension > navigate to the “Newsletter Templates” section.
Manage Email Templates
Step-by-Step actions:
- Manage Email Templates grid includes the list of created email templates along with their details. Click on a template to view its details and edit.
- “Add New Template“: click on this button to add a new email template.
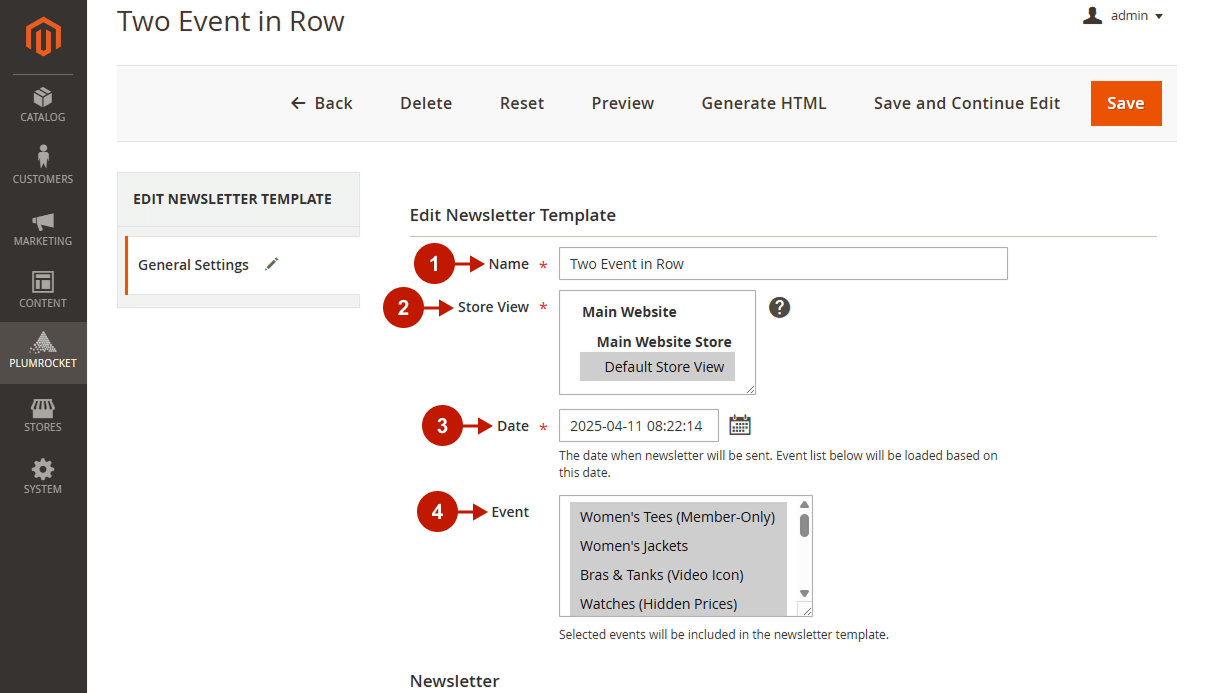
Add New Newsletter Template / Edit Newsletter Template
Follow the steps below to learn how to add or edit Newsletter Templates.
Add New / Edit Newsletter Template
Step-by-Step actions:
- “Name“: enter the name of the template. It is not visible to customers, but only in the backend in the Manage Email Templates grid.
- “Store View“: select the website and store view to which you want to apply the template.
- “Date“: specify the date for sending the newsletter.
- “Event“: select the events to be included in the newsletter template. The list of events in this section corresponds to the scheduled events on the above date.
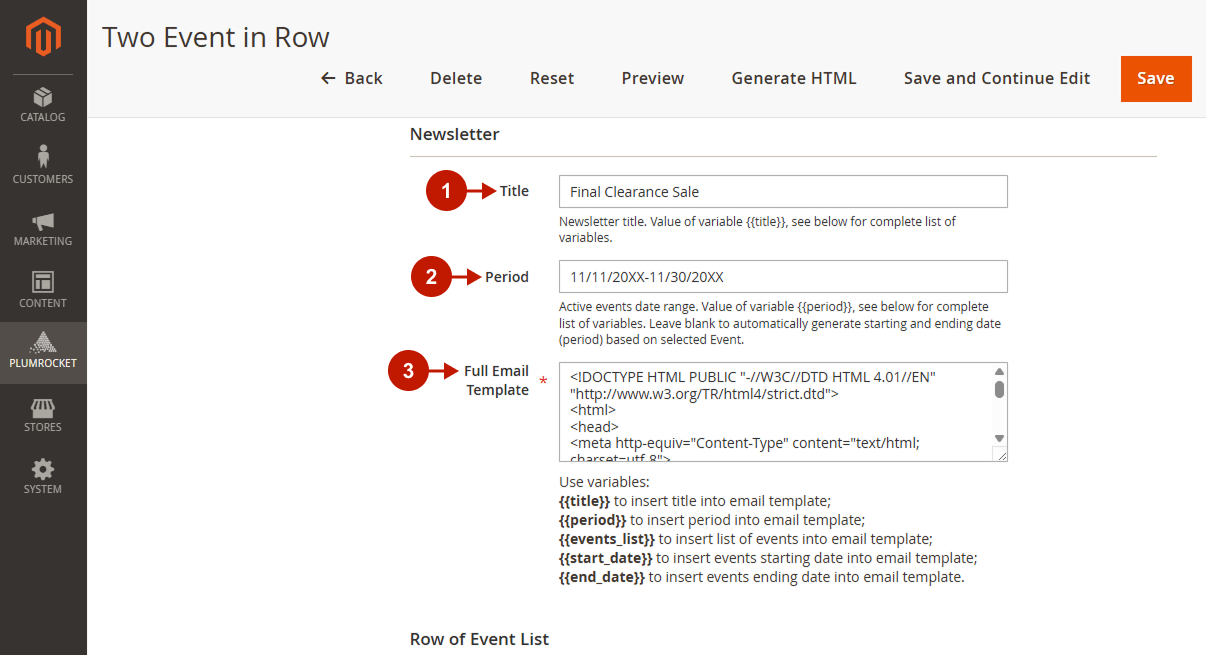
Newsletter
Step-by-Step actions:
- “Title“: enter the newsletter title. The entered title is a value of variable {{title}} in the email.
- “Period“: specify the date range of active events. The date is a value of variable {{period}} in the email. Leave blank to automatically generate starting and ending dates based on selected events.
- “Full Email Template“: use the list of variables below and create the template for a promotinal email including a header, content section, and footer.
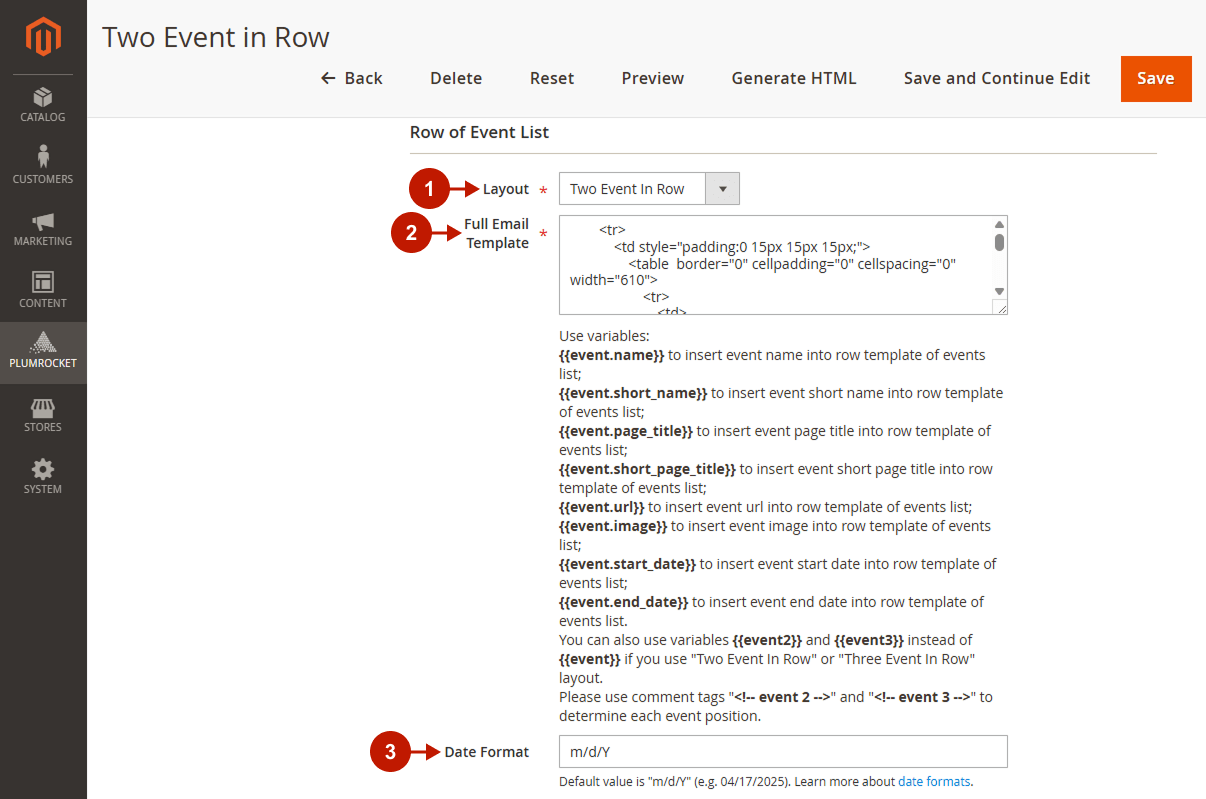
Row of Event List
Step-by-Step actions:
- “Layout“: select the layout of events in the email: display one, two, or three event icons in a row as customers scroll through the email.
- “Full Email Template“: use the listed variables and create a template for a promotional email.
- “Date Format“: specify the date format to display events correctly. The default date format is “m/d/Y” (e.g. 03/01/2021). Learn more about date formats.