Configuration
In this section, you will learn how to configure Magento 2 Data Privacy extension correctly. Please, follow the instructions below.
In the main menu, go to the “Plumrocket” tab > select “Data Privacy” extension > navigate to the “Configuration” section.
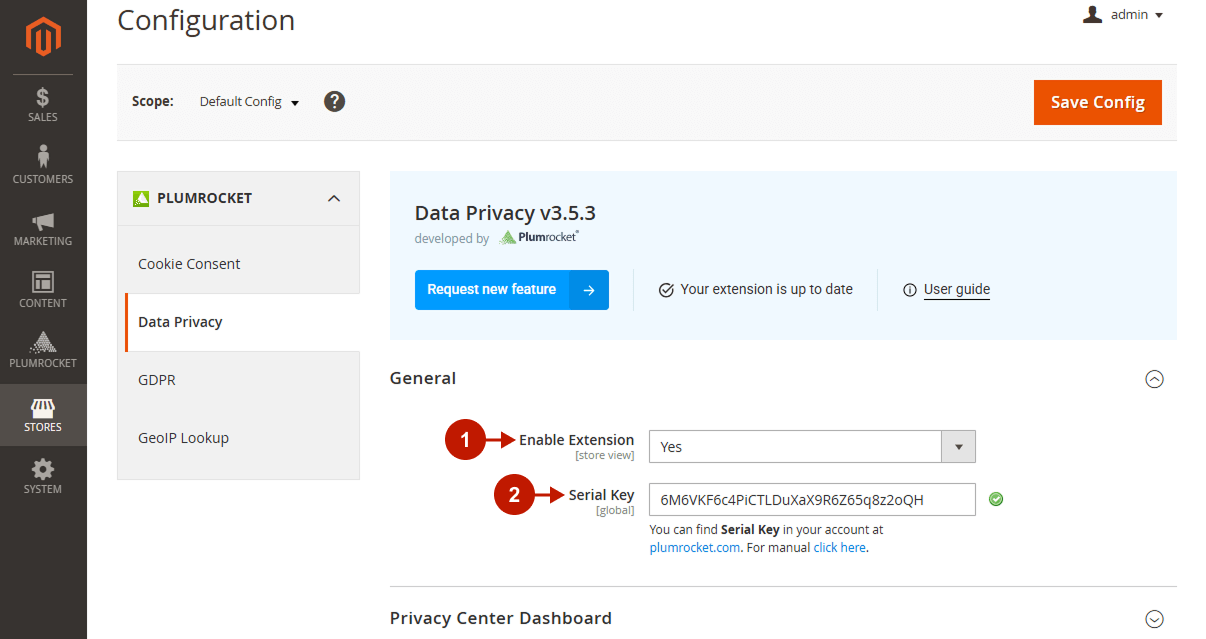
General
Step-by-Step actions:
- “Enable Extension”: this option allows you to enable or disable the module.
- “Serial Key”: enter the unique serial key provided to you after purchasing the extension. Please, note: in most cases, this field will be pre-filled with a serial key automatically, and the green checkmark will be displayed. To find and paste your serial key manually, read the Serial Key Activation article.
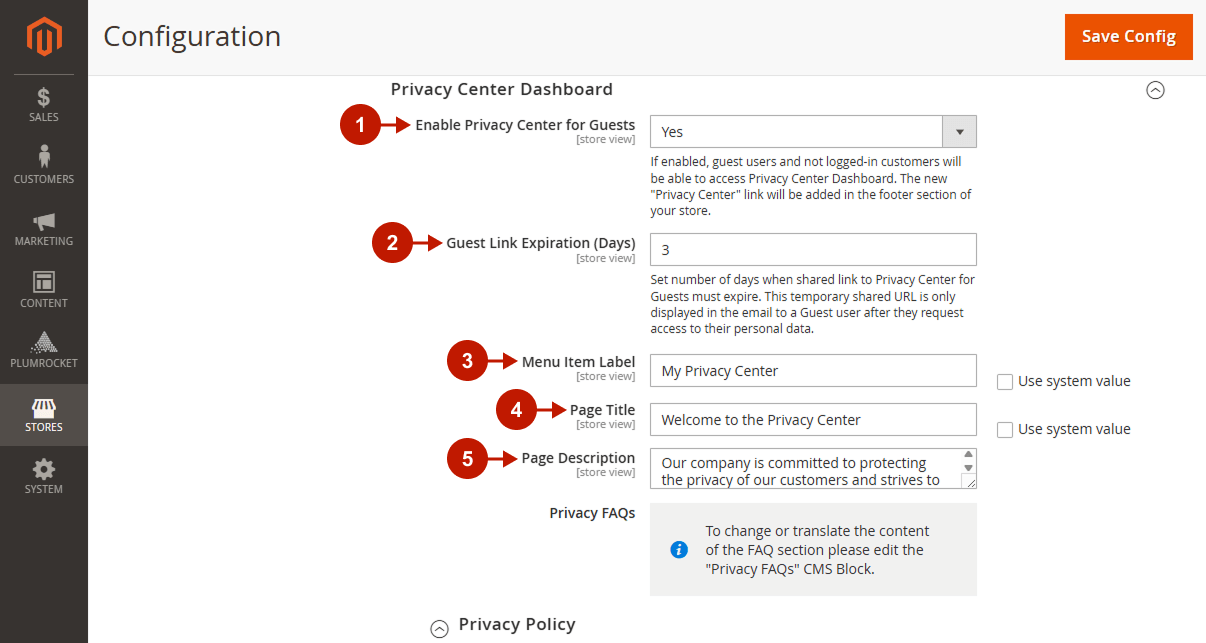
Privacy Center Dashboard
Please, follow the steps below to configure the Privacy Center Dashboard. It allows store visitors to use all options in one place: to download personal data, get acquainted with Privacy and Cookie Policy, contact the GDPR Data Protection Officer, and more.
Step-by-Step actions:
- “Enable Privacy Center for Guests“: when enabled, the “Privacy Center” link will be available to guests in the footer of your store. Guests will be asked to provide their email addresses there in order to request access to their personal data. If provided, they will receive an email with a link to access the Privacy Center Dashboard.
Important Information:
If your Magento 2 store is a Hyva instance, please follow the How to Insert Privacy Center link into CMS block or CMS page guide to add the link to the footer. In all other cases, enabling this configuration is enough to display a link.
- “Guest Link Expiration (Days)“: specify the number of days the Privacy Center Dashboard access link will be active. This temporary shared URL is only displayed in the email to guests after they request access to their personal data on the Privacy Center page.
- “Menu Item Label“: type the label of the menu item responsible for the Privacy Center Dashboard.
- “Page Title“: type the title of the Privacy Center Dashboard page.
- “Page Description“: type the description of the Privacy Center Dashboard page.
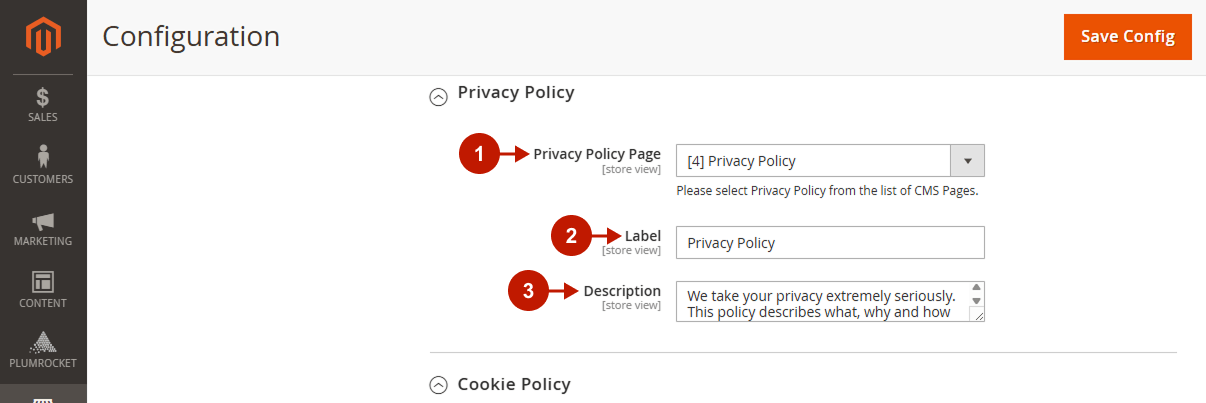
Privacy Policy
Step-by-step guide:
- “Privacy Policy Page“: select the Privacy Policy CMS page from the list of all CMS pages.
- “Label“: specify the Privacy Policy label displayed on the Privacy Center Dashboard.
- “Description“: type the Privacy Policy description displayed on the Privacy Center Dashboard.
Cookie Policy
Step-by-step guide:
- “Cookie Policy Page“: select the Cookie Policy CMS page from the list of all CMS pages.
- “Label“: specify the Cookie Policy label displayed on the Privacy Center Dashboard.
- “Description“: type the Cookie Policy description displayed on the Privacy Center Dashboard.
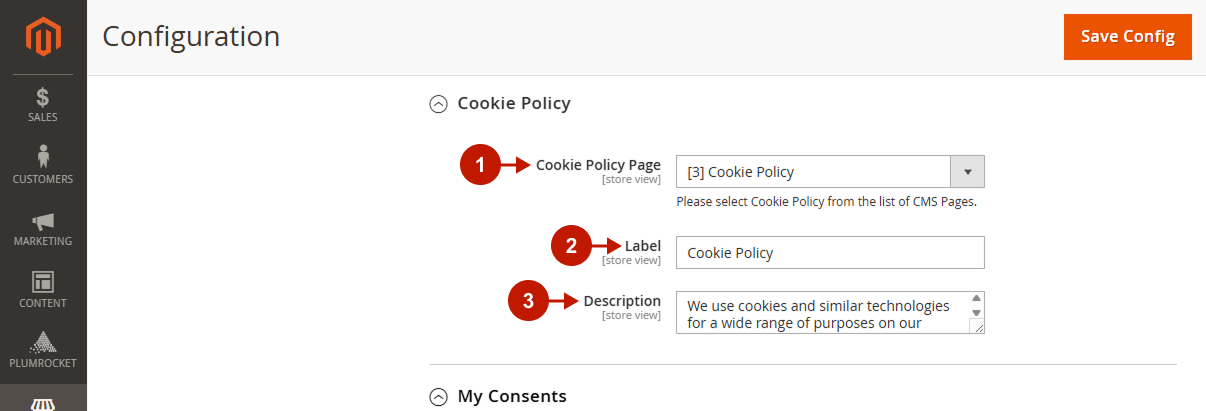
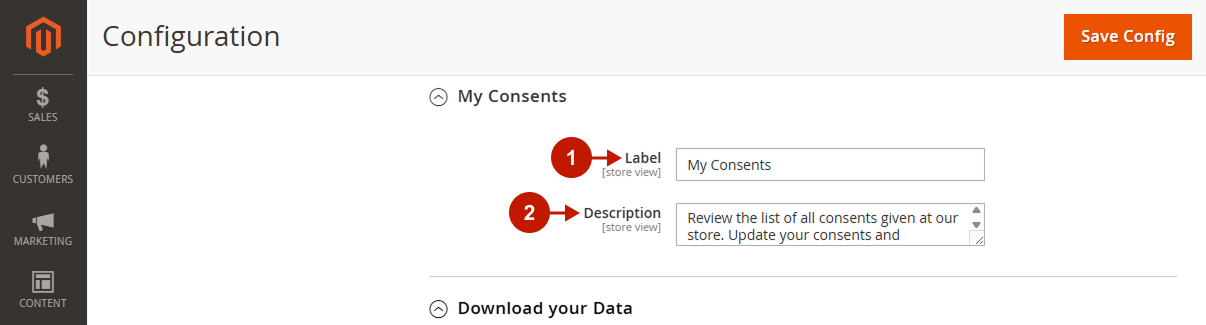
My Consents
Step-by-step guide:
- “Label“: specify the My Consents label displayed on the Privacy Center Dashboard.
- “Description“: type the My Consents description displayed on the Privacy Center Dashboard.
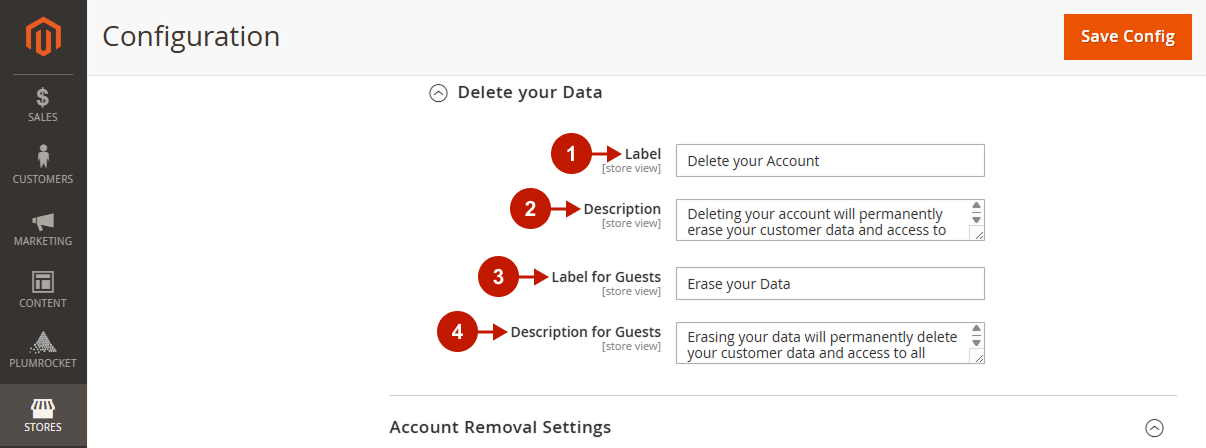
Delete your Data
Step-by-step guide:
- “Label“: specify the Delete your Data label displayed on the Privacy Center Dashboard.
- “Description“: type the Delete your Data description displayed on the Privacy Center Dashboard.
- “Label for Guests“: specify the Delete your Data displayed for the guest users on the Privacy Center Dashboard.
- “Description for Guests“: type the Delete your Data description displayed for the guest users on the Privacy Center Dashboard.
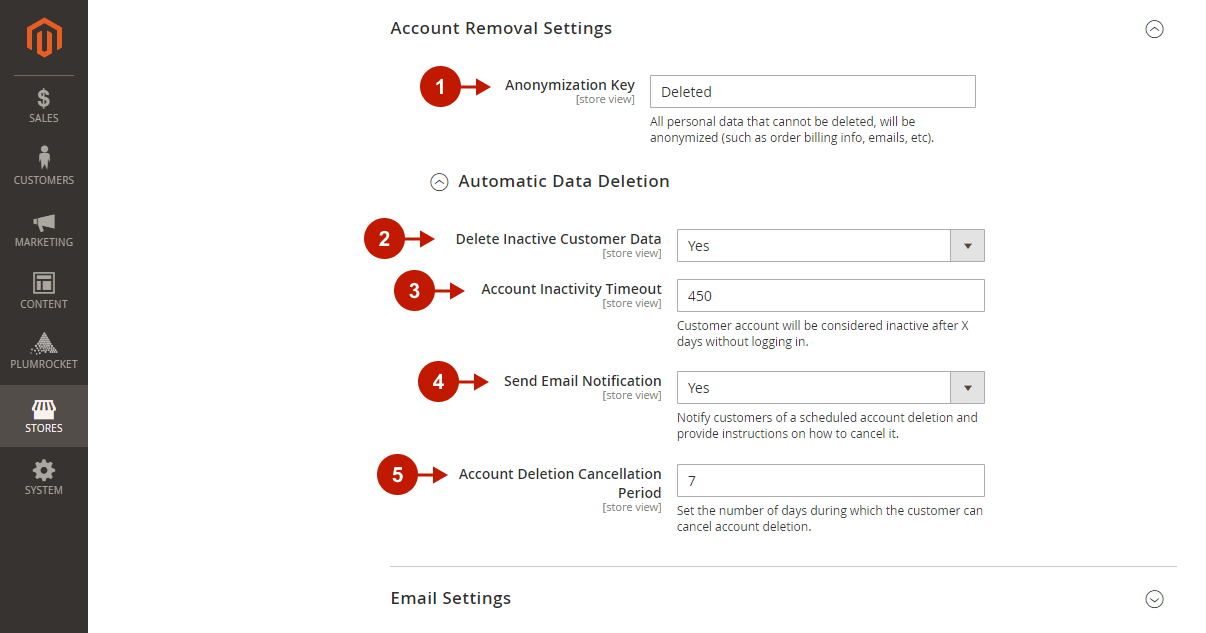
Account Removal Settings
Step-by-Step actions:
- “Anonymization Key“: enter the key for anonymized data. When a customer requests to delete an account and therefore all personal information, certain data (such as order billing info, emails, etc.) is anonymized, as it cannot be deleted to comply with local laws.
- “Delete Inactive Customer Data“: set the option to Yes to automatically delete customer accounts that are inactive.
- “Account Inactivity Timeout“: set the number of days since the last login for an account to be considered inactive.
- “Send Email Notification“: send customers an email notification about scheduled account deletion with the option to cancel it.
- “Account Deletion Cancellation Period“: set the number of days after email notification that users can cancel account deletion.
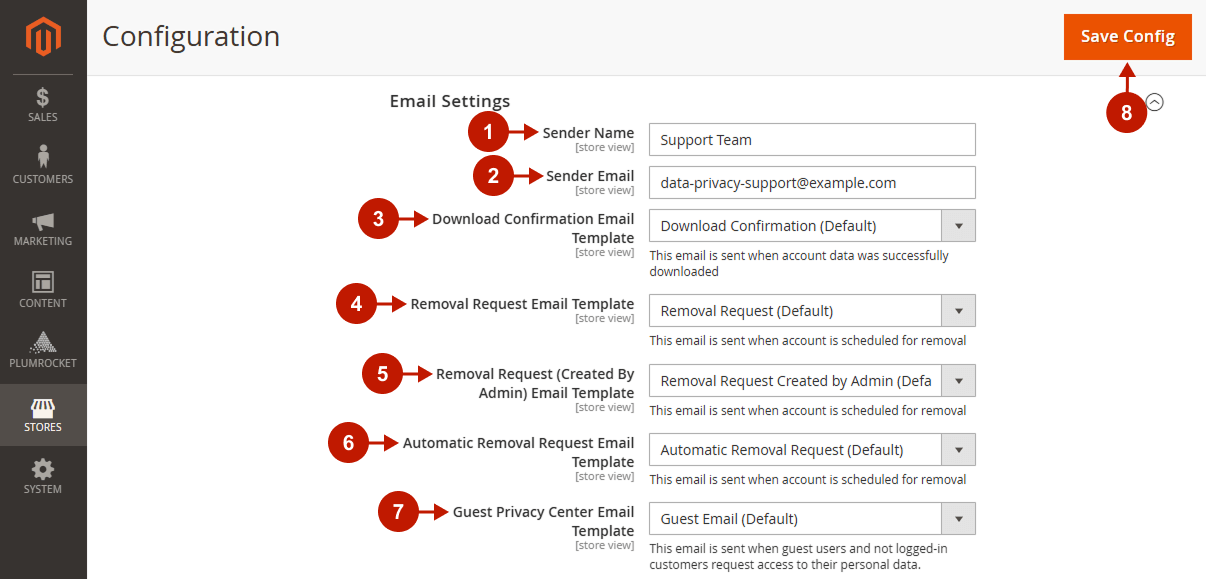
Email Settings
Follow the steps below and configure the email, from which all data privacy correspondence will be handled. You can also set email templates here that are used when sending confirmation emails, account removal request emails, and more to a customer.
Step-by-Step actions:
- “Sender Name“: enter the sender name of the emails.
- “Sender Email“: enter the email address from which all emails should be sent.
- “Download Confirmation Email Template“: choose the email template to use when a customer’s account data was successfully downloaded.
- “Removal Requested Email Template“: the selected email template will be used when a customer’s account is scheduled for removal.
- “Removal Request (Created By Admin) Email Template“: the selected email template will be sent when a customer’s account is scheduled for removal by admin.
- “Automatic Removal Request Email Template“: the selected email template will be sent when a customer’s account is automatically scheduled for removal.
- “Guest Privacy Center Email Template“: choose the email template to use when guest users request access to their personal data on the Privacy Center page.
- “Save Config“: press the Save Config button to save and apply changes.
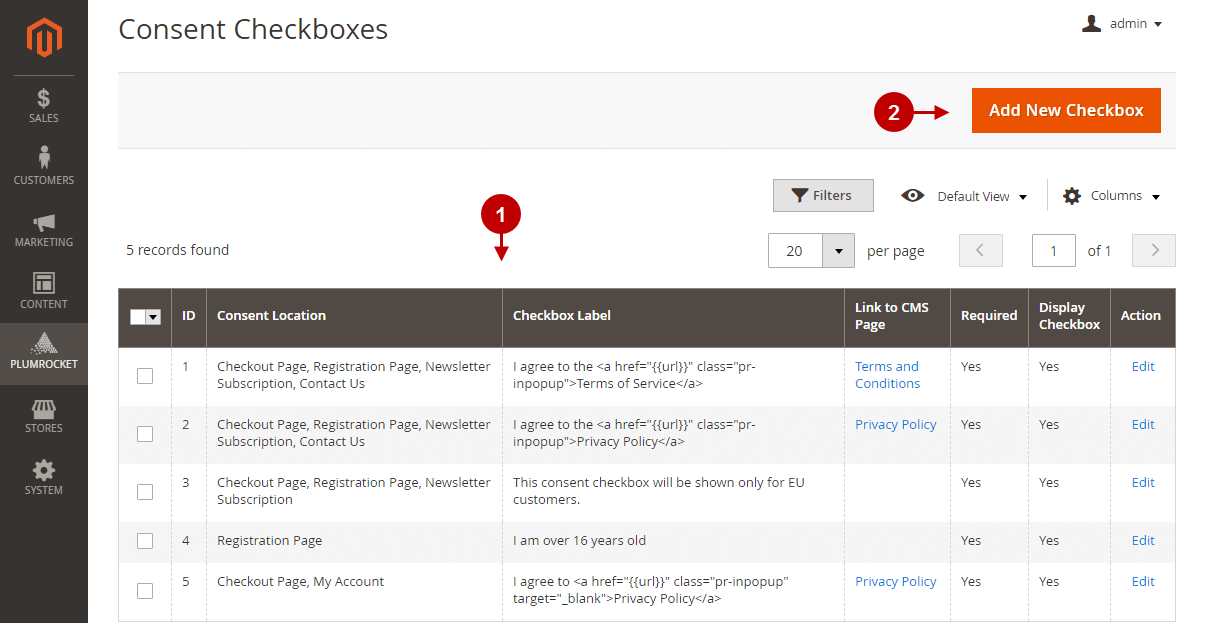
Consent Checkboxes
Please, follow the steps below to configure the consent checkboxes display across your store.
In the main menu, go to the “Plumrocket” tab > select “Data Privacy” extension > navigate to the “Consent Checkboxes” section.
Step-by-Step actions:
- Consent Checkboxes grid contains all necessary information about customer’s consents that is required by the GDPR law:
- “ID“: a customer’s ID.
- “Consent Location“: locations on your store where the checkbox is displayed.
- “Checkbox Label“: the text displayed next to the checkbox informing users what they need to give their consent to.
- “Link to CMS Page“: click on the CMS page link provided on the checkbox label to view or edit its settings.
- “Required“: the “Yes” mark in this field indicates that the consent checkbox is required and must be checked in order to submit a form; the “No” mark indicates that it is optional.
- “Display Checkboxes“: when “Yes” is displayed, the checkbox is active and shown next to the form.
- “Action“: click on the “Edit” link to edit the checkbox. Click here to learn how to do it correctly.
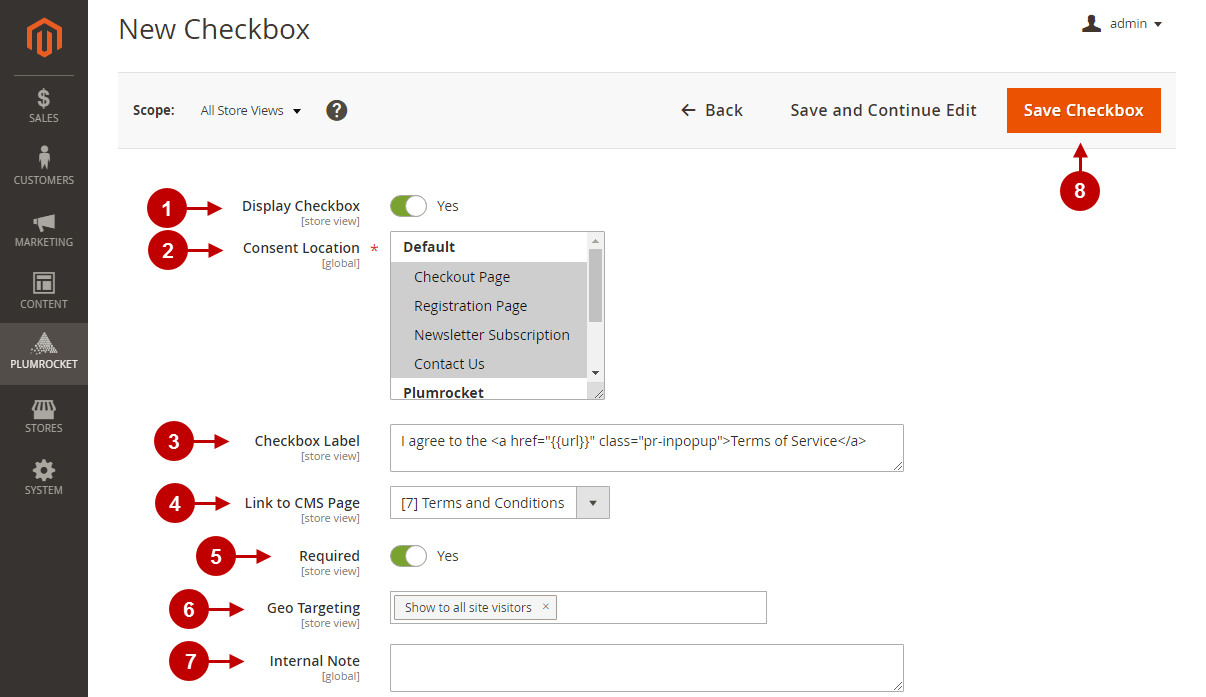
New Checkbox
The extension allows you to create multiple independent checkboxes on a form. Follow the steps below to learn how to create them correctly:
Step-by-Step actions:
- “Display Checkbox“: switch to “Yes” in order to display the checkbox when submitting a form. Otherwise, switch to “No” to disable the box.
- “Consent Location“: choose one or more locations where the consent checkbox must be displayed. Showing checkbox in a custom location will require code modifications.
- “Checkbox Label“: enter the label of the checkbox. You can also add the “pr-inpopup” CMS class to display the CMS page content in a popup so that users can learn more about consent before giving it.
- “Link to CMS Page“: choose the CMS page associated with this checkbox. Linked CMS page content will be displayed in a popup so that customers can read detailed information about the consent before giving it. Leave empty if you do not want to display any CMS content.
- “Required“: indicate whether this checkbox must be checked in order to submit a form, or it can be optional.
- “Geo Targeting“: if your data privacy law allows so, select countries to show the consent checkbox only to visitors from that countries.
- “Internal Note“: use this optional field for Admins only to describe custom checkbox location (such as “New Year’s promo landing page”) or add some internal notes.
- “Save Checkbox“: press the button to apply changes.
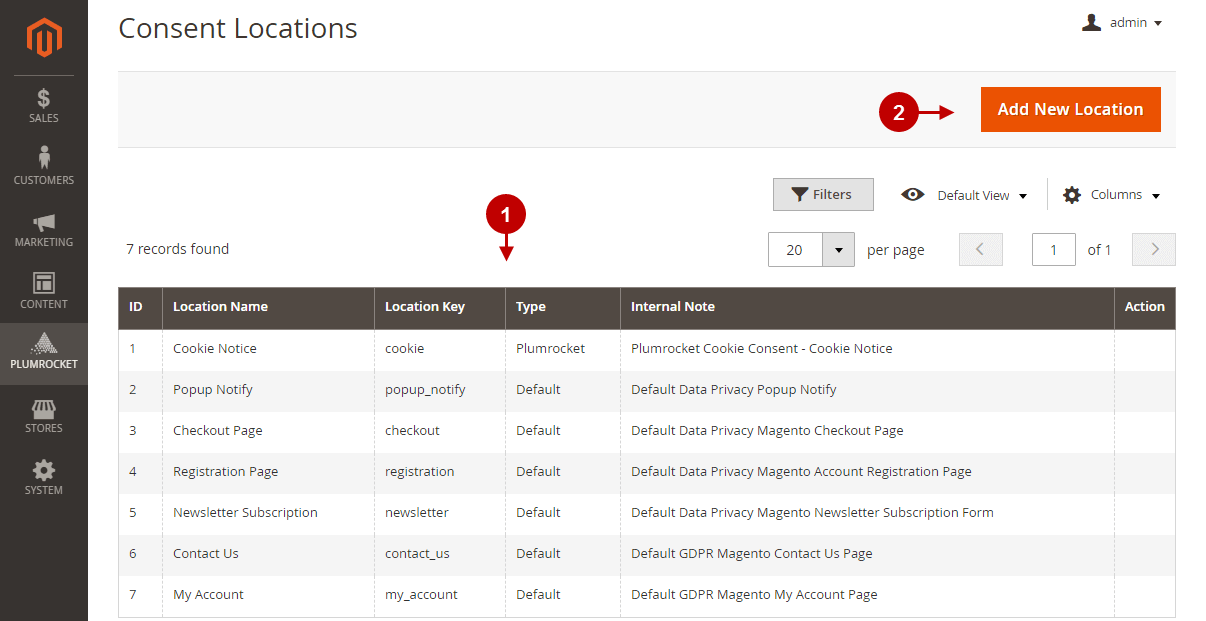
Consent Locations
Please, follow the steps below to configure locations on store, where a consent requests are placed.
In the main menu, go to the “Plumrocket” tab > select “Data Privacy” extension > navigate to the “Consent Locations” section.
Step-by-Step actions:
- In a Consent Locations grid, you can view all the information about consent locations:
- “Location Name“: the name of the location where the consent checkbox is displayed.
- “Location Key“: a unique identifier of your custom consent location, useful when displaying consent checkboxes manually.
- “Type“: the type of consent location. The “Default” consent location is built-in and comes with the Data Privacy extension; the “Plumrocket” location is integrated from other Plumrocket extensions; the “Custom” location is the one created manually.
- “Internal Note“: internal notes for custom checkbox location information. This field is optional and visible to admins only.
- “Action“: if it is a custom consent location, click the “Edit” button and edit the location. Please, follow the New Consent Location instructions to learn how to edit a location correctly.
- “Add New Location“: press the button to add a new location. Please, follow the New Consent Location section to learn how to get it right.
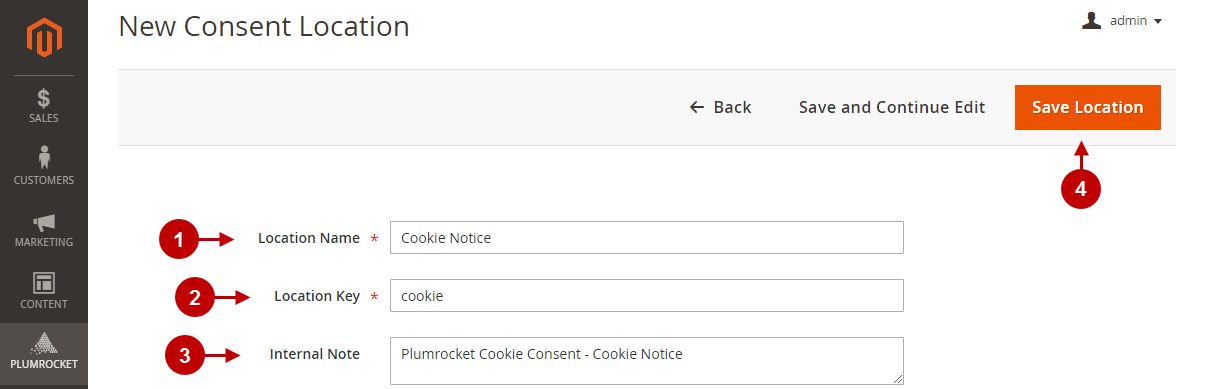
New Consent Location
Step-by-Step actions:
- “Location Name“: the name of your custom consent location.
- “Location Key“: a unique identifier of your custom consent location. You will need this key when displaying consent checkboxes manually. Examples: “promo_page”, “myPopupForm”, “login_form”.
- “Internal Note“: this field is optional and visible to admins only. It is useful when you need to add some internal notes or describe a custom checkbox location (such as “New Year’s promo landing page”).
Data Removal Requests
According to many data protection laws, you need to store all collected and processed personal data of your store visitors. In this section, you will how to manage customers’ requests to permanently erase all their personal data from your store.
In the main menu, go to the “Plumrocket” tab > select “Data Privacy” extension > navigate to the “Data Removal Requests” section.
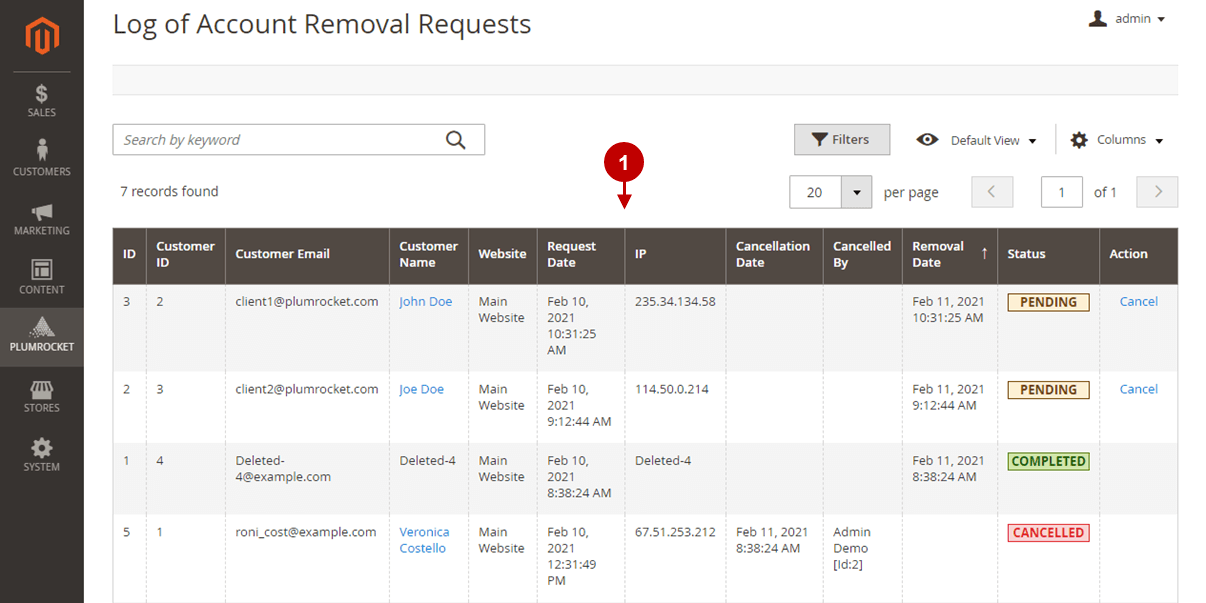
Log of Account Removal Requests
Customers may request to erase all personal information from your store permanently. Customer requests are submitted and displayed in the log as soon as they request their account removal from your store. After the request submission, an account will be deleted within 24 hours automatically. All customers can cancel their removal requests by logging in before the account is permanently deleted. Please, follow the instructions below to learn more about the Account Removal Requests log.
Step-by-Step actions:
- The Account Removal Requests log contains the records of each user’s request to delete one’s account along with all details. An anonymization key is used when an account is already deleted.
- “Request Date“: the date when a customer requested the account deletion.
- “IP“: an IP address from which the account removal was requested.
- “Cancellation Date“: the date when the customer’s account was permanently deleted.
- “Cancelled By“: the name of the user who has canceled the account removal request.
- “Removal Date“: the date when the customer’s account was permanently deleted.
- “Status: the status of the request. The available statuses are: pending, completed, canceled.
- “Action“: if the account removal request’s status is”Pending”, press the “Cancel” button to disapprove the request.
Downloads Log
Customers can download all their personal data collected, stored, and processed on the store. Since many data protection laws require the storage of all collected and processed personal data, the customer account data downloads are recorded in the log. Follow the instruction below to learn more about the Log of Account Data Downloads.
In the main menu, go to the “Plumrocket” tab > select “Data Privacy” extension > navigate to the “Downloads Log” section.
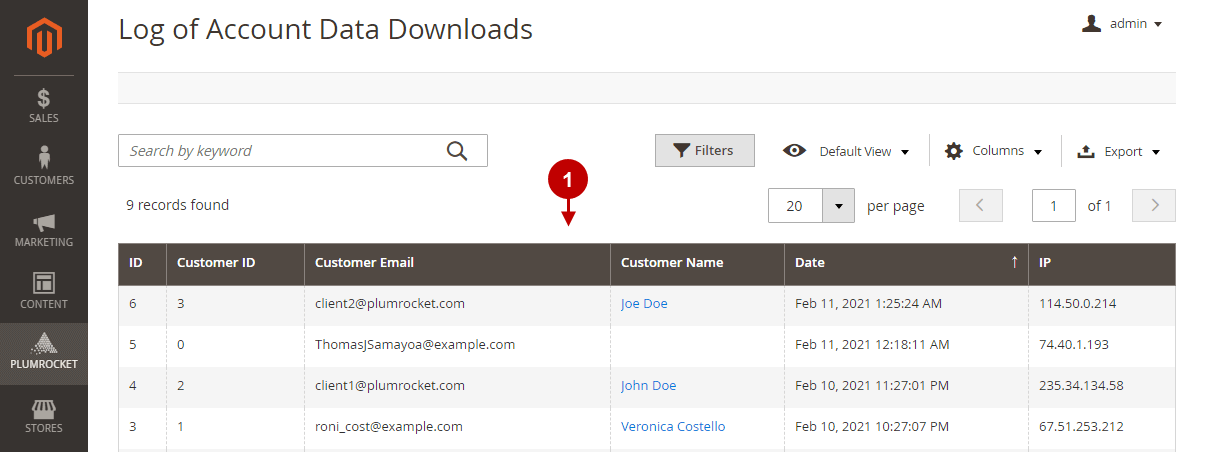
Log of Account Data Downloads
Step-by-Step actions:
- The Log of Account Data Downloads grid contains detailed information about customer account data downloads, namely the customer ID, email, and name, as well as the date and the IP address from which data was downloaded.
Consent Log
Major data protection regulations require the storage of personal data that you collect and process on your store, as well as all consents customers gave. Follow the instructions below to learn more about the Log of Customer Consents.
In the main menu, go to the “Plumrocket” tab > select “Data Privacy” extension > navigate to the “Consent Log” section.
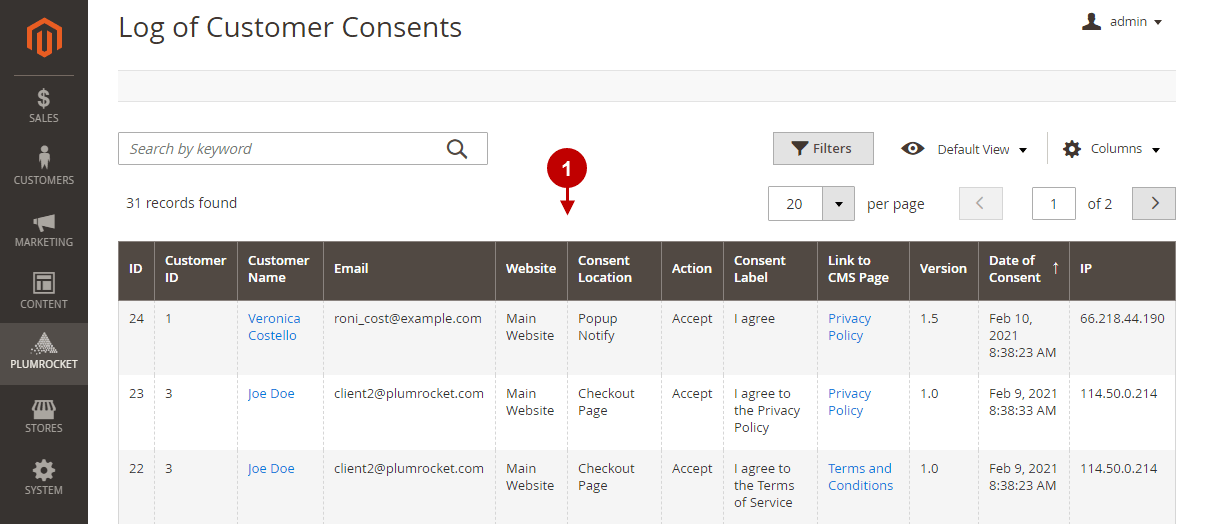
Log of Customer Consents
Step-by-Step actions:
- The Log of Customer Consents grid represents all customer consents, as well as the following data in columns:
- “Consent Location“: the location on your store where a customer gave consent.
- “Action“: the action that a customer took to consent.
- “Version“: the version of the policy or terms agreed by a customer.
How to Display Update Notices for Legal Agreement Changes & Require Customer Consent
In order to comply with local privacy laws, you should notify your website users about changes to any legal agreements on the store, be it a Privacy Policy or TOS, and ask for their consent. An update notice gives users a chance to opt-out or submit an account removal request if they disagree with the changes.
CMS Pages
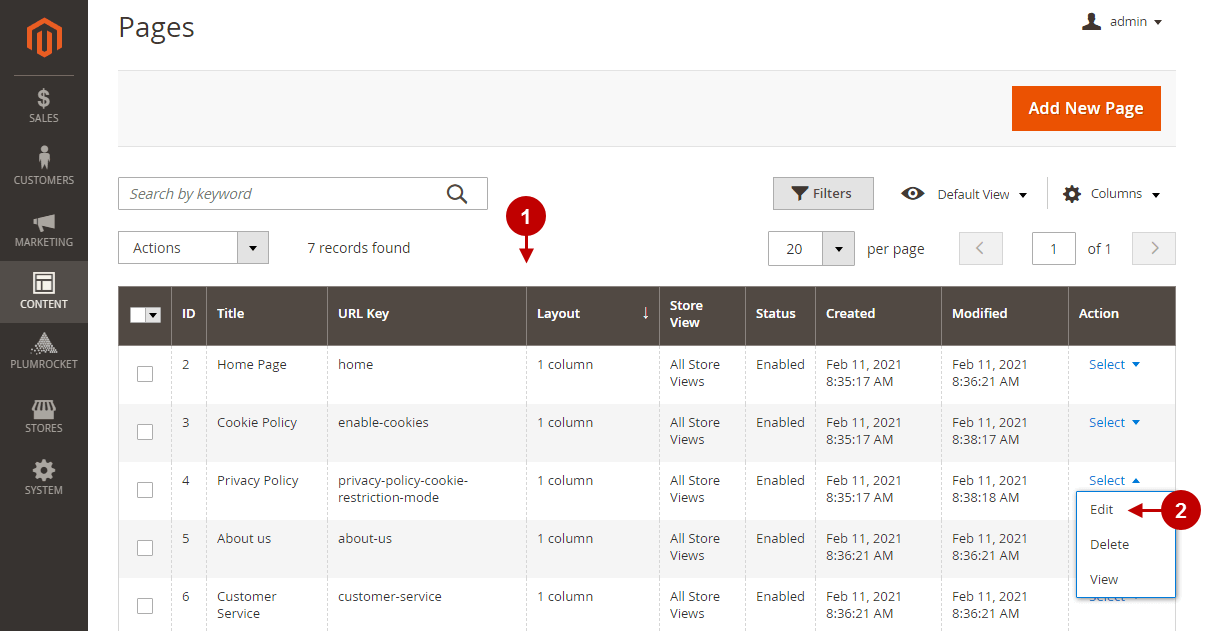
In the main menu, go to the “Content” tab > navigate to the “Elements” section > select “Pages”.
In this section, you can view, delete, and edit all created CMS pages on your store.
Step-by-Step actions:
- The Pages grid displays all CMS pages on your store along with their title, URL key, Layout, Store View, Status, creation, and modification date.
- The “Action” grid column allows you to edit, delete and view CMS pages. Click on “Edit” opposite the corresponding page and follow the Edit CMS Page instructions to find out how to create the new version of a CMS page and request customer consent to it.
Edit CMS Page
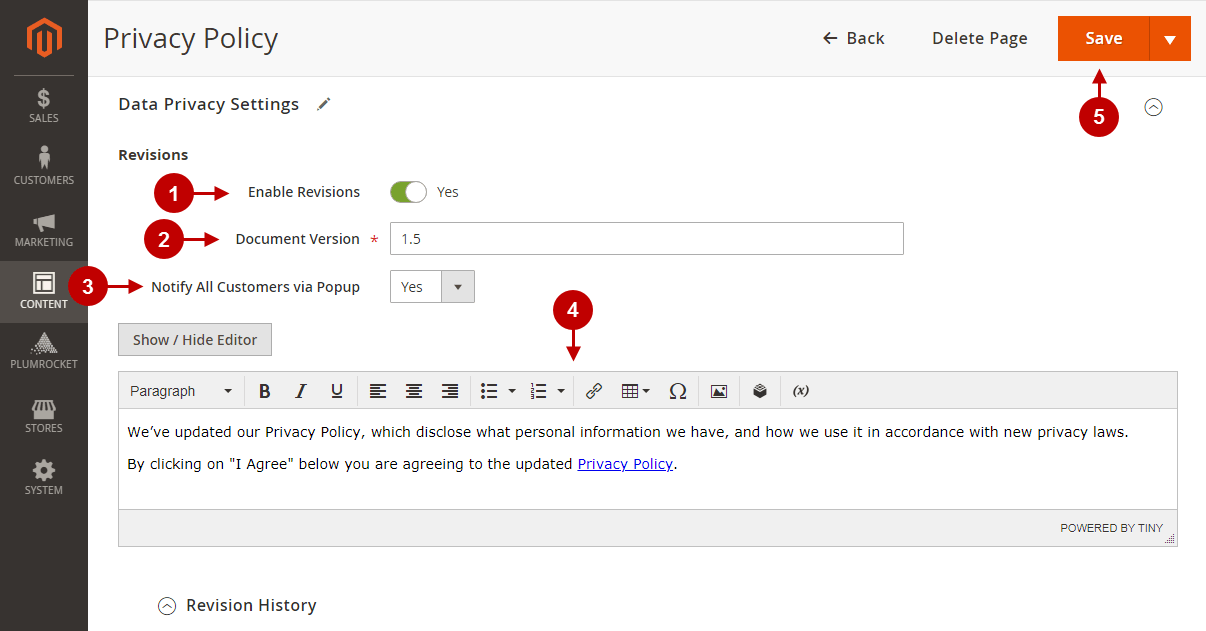
Step-by-Step actions:
- “Enable Revisions“: set to “Yes” to enable CMS page revision.
- “Document Version“: enter the version of the document.
- “Notify All Customers vis Popup“: set to “Yes” to enable popup notifications to all customers upon successful login. Customers will be notified that the agreement is updated and asked to agree with the document’s new version.
- The Editor allows you to enter the request to agree with the new document displayed to customers on the popup.
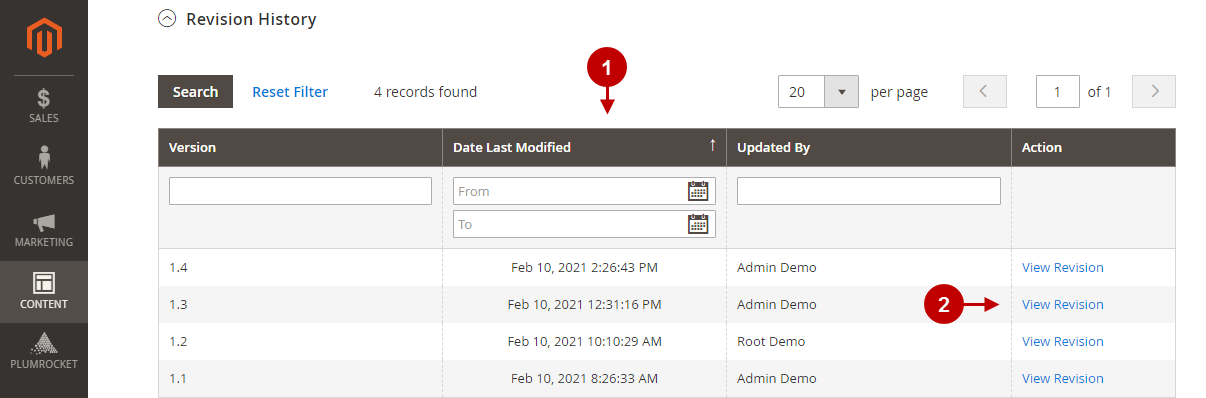
Revision History
Step-by-Step actions:
- The Revision History grid displays all document’s previous versions, along with their modification date and the name of a user who updated the document.
- Click on the “View Revision” button to see the document content.