In this article, you will learn how to correctly configure your Magento 2 US Privacy Laws extnesion. Please, follow the guide below.
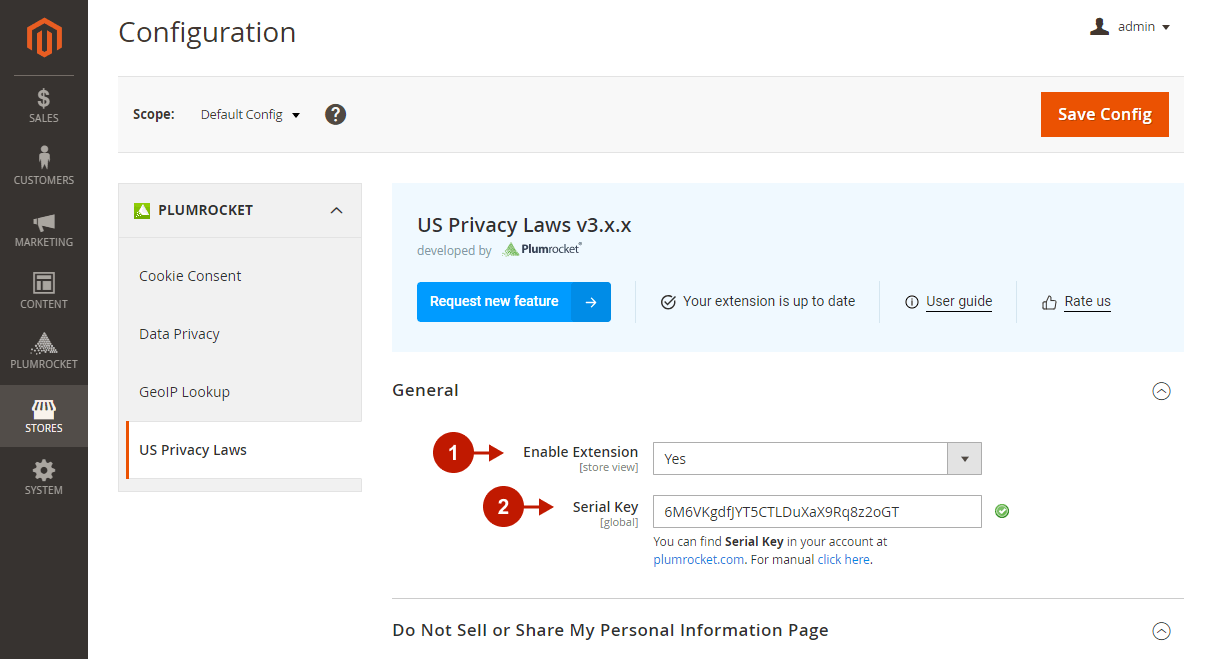
In the Magento admin panel, go to Plumrocket -> US Privacy Laws -> Configuration.
General
Step-by-step guide:
- “Enable Extension”: this option allows you to enable or disable the US Privacy Laws extension.
- “Serial Key”: enter the unique serial key provided to you after purchasing the extension. Please, note: in most cases, this field will be pre-filled with a serial key automatically, and the green checkmark will be displayed. To find and paste your serial key manually, read the Serial Key Activation article.
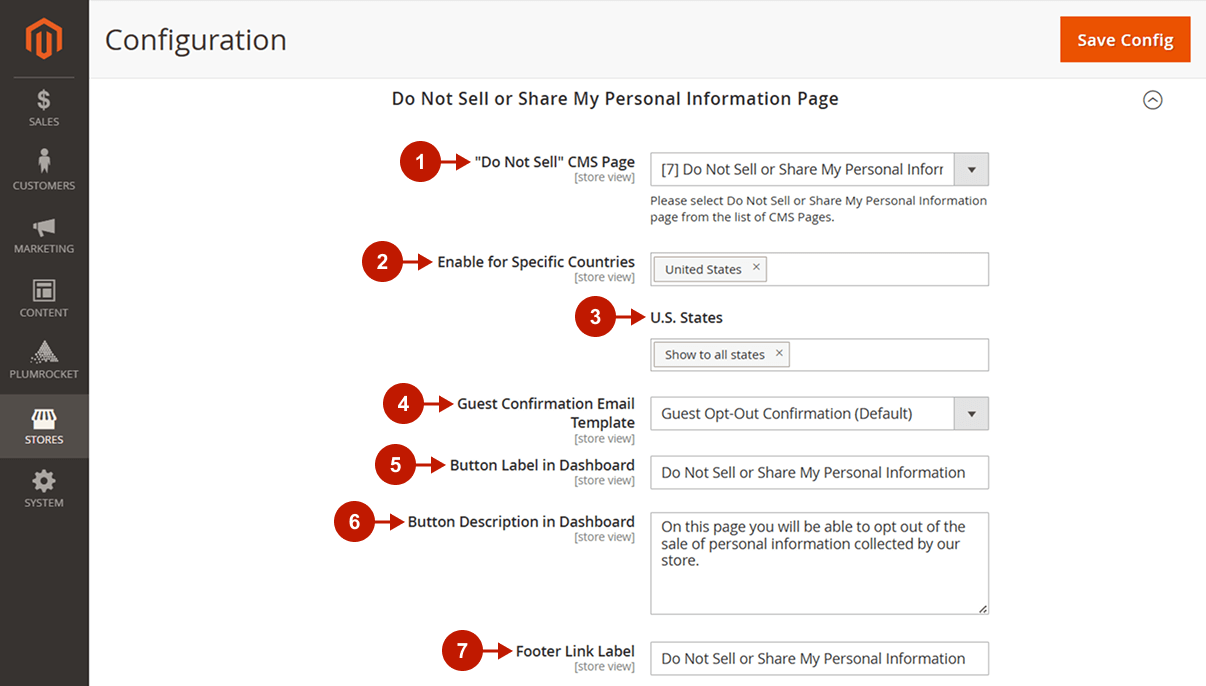
Do Not Sell or Share My Personal Information Page
In accordance with the CPRA requirements, customers have the right to opt-out of the sale or sharing of their personal information. The “Do Not Sell or Share My Personal Information” link will be automatically added to the footer of your Magento store. Your website visitors, both registered and guest ones, can go there and submit a request. Please, follow the steps below to configure it correctly:
Step-by-step guide:
- “Do Not Sell” CMS Page”: select the Do Not Sell or My Personal Information page from the list of CMS pages. The CMS page is automatically created once the extension is installed. To edit it, go to Content > Pages > Do Not Sell or Share My Personal Information > Actions > Edit in your Magento backend.
- “Enable for Specific Countries“: select the countries for customers from which the “Do Not Sell or Share My Personal Information Page” link will be enabled. The extension will use a Customer Billing Address and a built-in IP Geolocation Lookup functionality to detect a customer’s country.
- “U.S. States”: select the U.S. States to enable the “Do Not Sell or Share My Personal Information Page” link for customers from these specific states of the U.S.
- “Guest Confirmation Email Template“: select the email template to automatically notify guest customers about successful request submission.
- “Button Label in Dashboard”: specify the button label.
- Set the text and description for the “Do Not Sell or Share” button displayed in the Privacy Center dashboard.
- “Footer Link Label“: set the link text of the “Do Not Sell or Share” page displayed in your website’s footer.
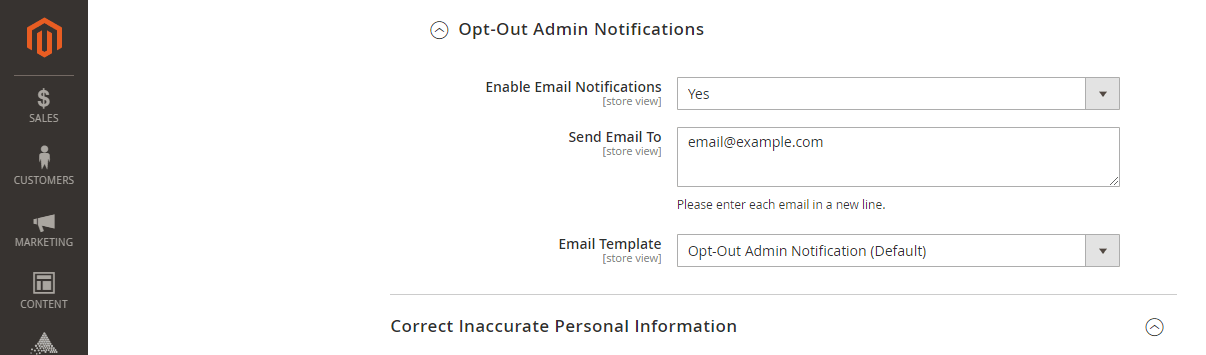
Opt-Out Admin Notifications
Step-by-step guide:
- “Enable Email Notifications“: set to Yes to notify the admin about each new customer request not to sell or share their personal data.
- “Send Email To“: specify the email address(es) where to send customer opt-out notifications.
- “Email Template“: select the template of the opt-out admin notification.
- “Save Config“: click the button to save and apply your configurations.
Correct Inaccurate Personal Information
Under the CPRA, customers have the right to correct inaccurate personal information. Both guest and registered customers can submit a correction request from the Privacy Center dashboard and specify what data should be corrected. Please, follow the steps below to enable and configure the button in the Privacy Center:
Step-by-step guide:
- “Enable Button In Dashboard“: set to Yes to enable the “Correct My Personal Information” button in the Privacy Center dashboard.
- “Contact Email“: specify the email address(es) where the correction requests should be sent to.
- Specify the “Correct My Personal Information” button label and description displayed in the Privacy Center dashboard for logged-in customers.
- Set the “Correct My Personal Information” button label and description displayed in the Privacy Center dashboard for guest users.

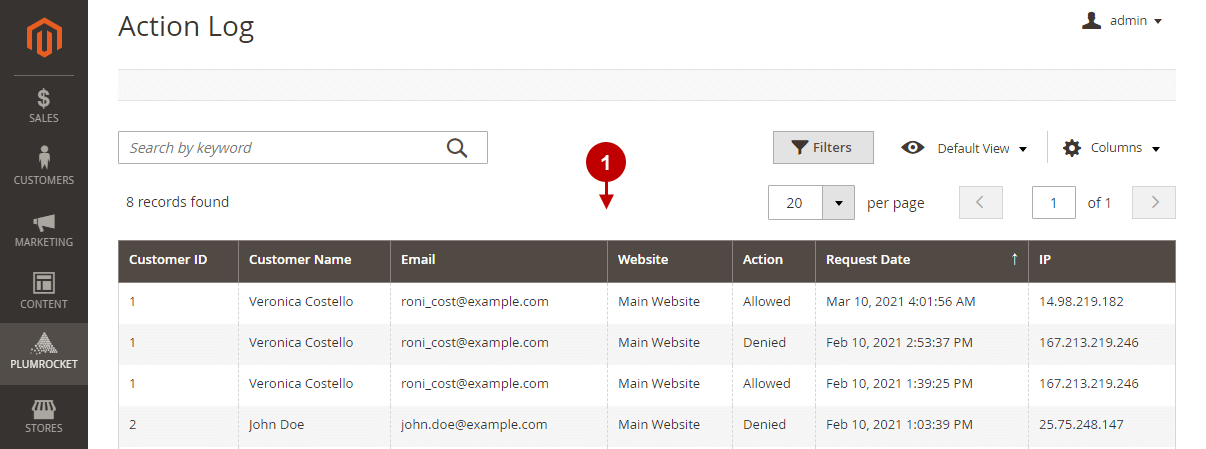
Action Log
In the main menu, go to the “Plumrocket” tab > select “US Privacy Laws” extension > navigate to the “Action Log” section.
Step-by-step guide:
- The Action Log grid displays the action made on the “Do Not Sell or Share My Personal Information” page. Customers can allow or deny the sale of personal data there. The log contains the following information: a customer ID, name and email, the website where the request was submitted, the action itself (“Allowed” or “Denied” the sale of personal data), the date of the request, and a customer IP address.
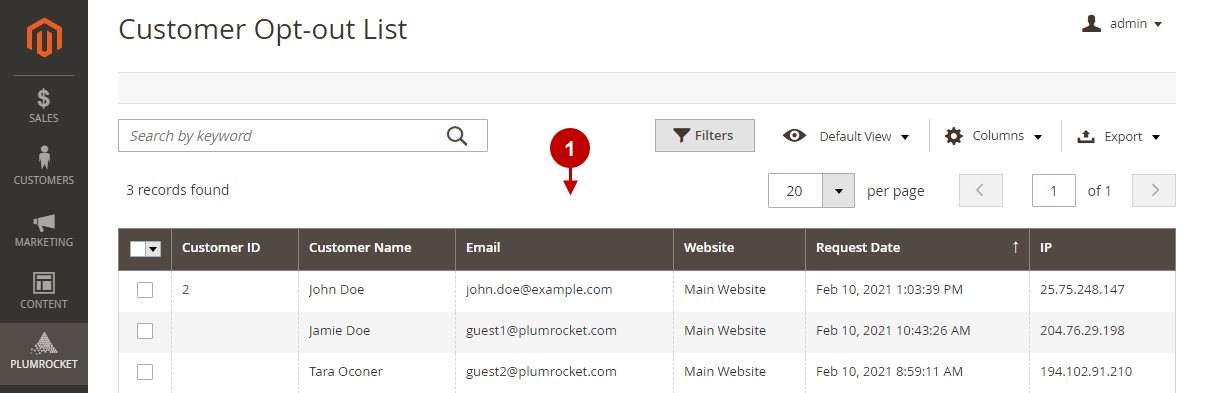
Customer Opt-Out List
In the main menu, go to the “Plumrocket” tab > select “US Privacy Laws” extension > navigate to the “Customer Opt-out List” section.
Step-by-step guide:
- The Customer Opt-Out List grid displays customers’ requests to opt-out of the sale of their personal information on the “Do Not Sell or Share My Personal Information” page. The grid contains each customer’s ID, name, email, a website where the request was submitted, the date of request, and the customer’s IP address.
Google reCAPTCHA on the “Do Not Sell or Share My Personal Information” page
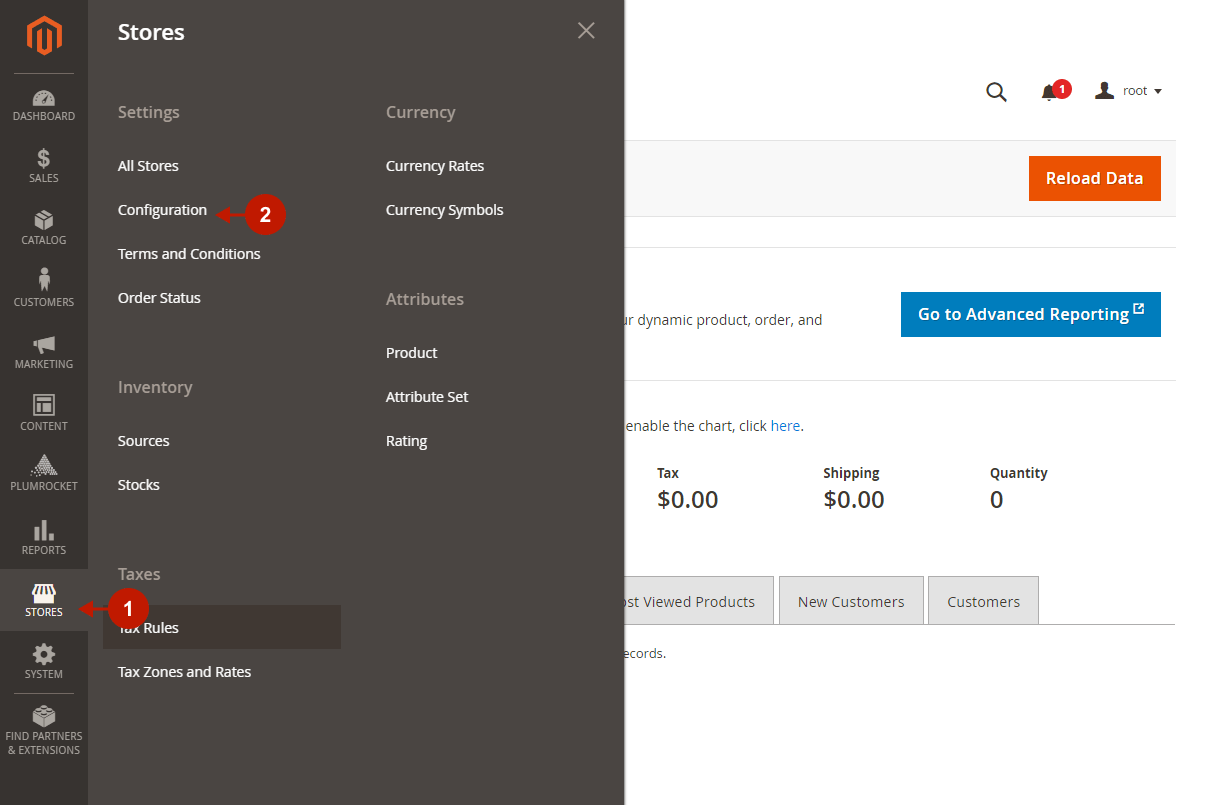
You can enable Google reCAPTCHA on the “Do Not Sell or Share My Personal Information” page. For this, follow the next steps:
Step-by-step guide:
- Go to the “Stores” tab.
- Select the “Configuration” setting.
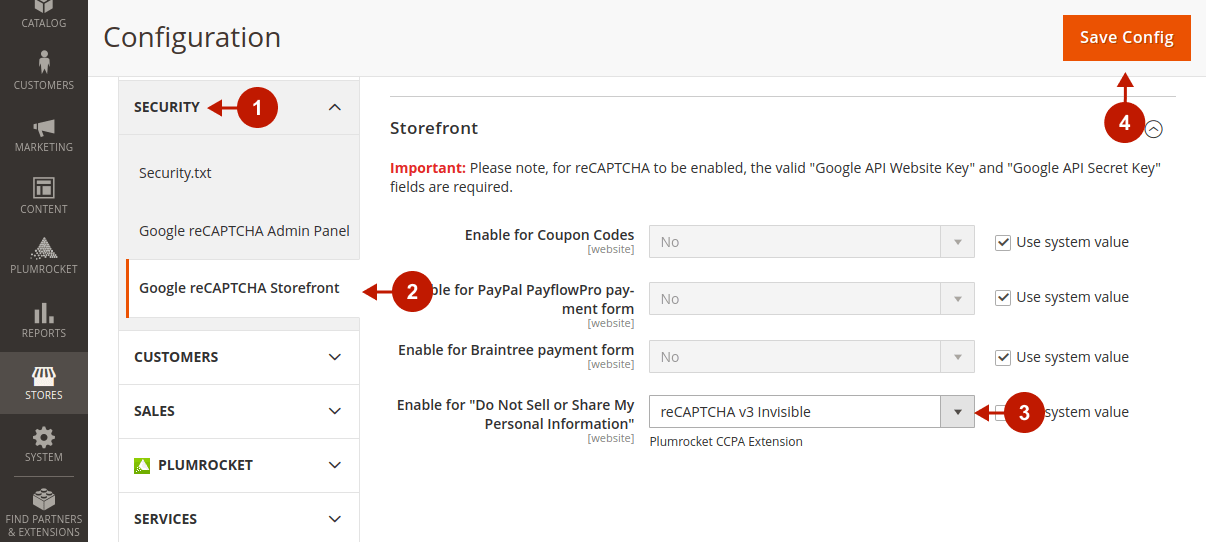
Step-by-step guide:
- Go to the “Security” section.
- Choose the “Google reCAPTCHA Storefront”.
- Choose the needed reCAPTCHA type.
- Save config.
Bundled Extensions
The US Privacy Laws extension integrates with other built-in Plumrocket extensions in order to ensure that your Magento 2 store is fully compliant with the California Consumer Privacy Act requirements. Please, read the information below to configure them correctly:
Data Privacy
Please, follow the Data Privacy configuration instructions to configure the extension.
- Data Privacy extension allows you to display Privacy Center Dashboard and enable store visitors to access data privacy options in one place. Users can download their personal data, get acquainted with the Privacy and Cookie Policy, contact the Data Protection Officer, and more.
- Configure Consent Checkboxes and Locations to require visitors’ consent.
- Manage Data Removal Requests, Downloads Log, Consent Log, and more.
Cookie Consent
Please, follow the Cookie Consent configuration instructions to configure the extension correctly.
- The cookie Consent extension allows you to get customer consent prior to any collection or processing of personal data.
- Display cookie banner and request customer cookie consent. Fully customize the appearance of the Cookie Consent Notice.
- Customize cookie settings, categories, and have full control over managing and blocking cookies.
IP Geolocation Lookup
Please, follow the IP Geolocation Lookup configuration instructions to configure the extension correctly.
- Merchants who work with international customers will definitely benefit from IP Geolocation restrictions in the US Privacy Laws extension.
- With IP Geolocation, you can personalize content for visitors from specific countries. For instance, display Cookie Consent Notice and Consent Checkboxes only to California state residents and disable them for the rest of the world.