Advanced Reviews
Advanced Reviews Extension for Magento 2 helps get more feedback on your products and build bridges of trust between shoppers and your store. Make it easy for your customers to write reviews and navigate between them. At the same time, collect more reviews, make your store trustworthy, and increase sales.
Please read our manual to discover more features and configure them correctly.
Configuration
In the main menu go to the “Plumrocket” tab > select “Advanced Reviews” extension > navigate to “Configuration” section.
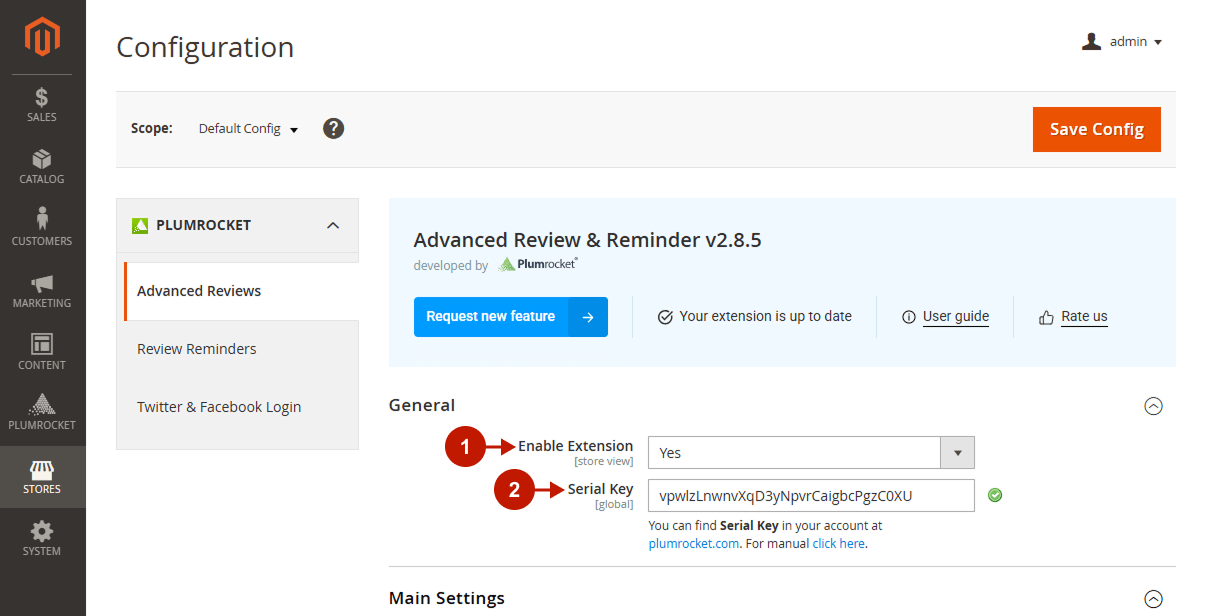
General
Here you will learn how to enable and configure Magento 2 Advanced Reviews Extension correctly. Follow the steps below.
Step-by-Step actions:
- “Enable Extension”: this option allows you to enable or disable this Advanced Reviews v2.x Extension.
- “Serial Key”: enter the unique serial key provided to you after purchasing the extension. Note: In most cases, this field will be pre-filled with a serial key automatically, and the green checkmark will be displayed. To find and paste your serial key manually, read the Serial Key Activation article.
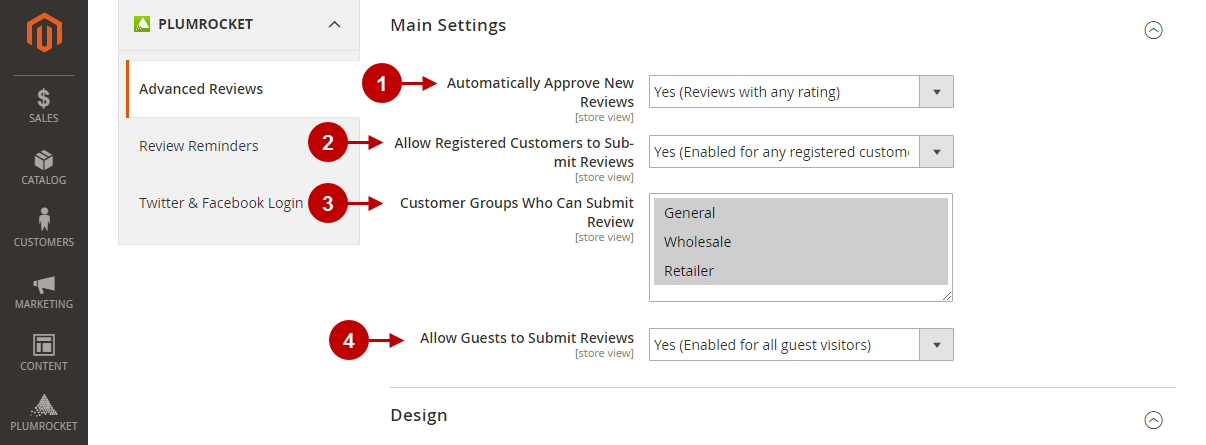
Main Settings
Step-by-Step actions:
- “Automatically Approve New Reviews“: select an appropriate option here, depending on whether you want to approve new reviews manually or automatically. If choosing the latter, specify whether to automatically approve only positive reviews (rated 4 and 5) or ones with any rating.
- “Allow Registered Customers to Submit Reviews“: in this field, you are able to select who of registered customers is eligible to submit reviews: any registered customers, those who bought the product, or forbid all of them to write reviews.
- “Customer Groups Who Can Submit Review“: select one or more customer groups who are allowed to submit reviews: General, Wholesale, or Retailer
- “Allow Guests to Submit Reviews“: select whether you want to allow all guests to submit reviews or guests who bought the product. You can also forbid guests to submit reviews in this field.
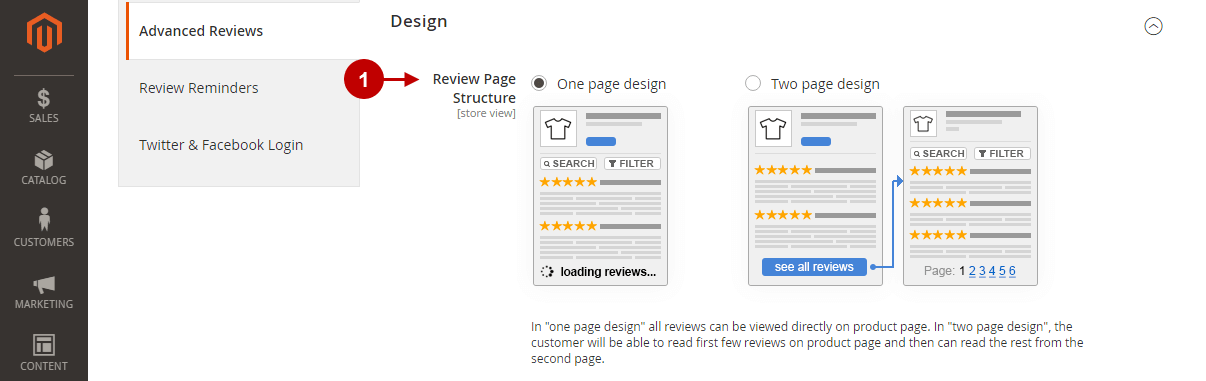
Design
Step-by-Step actions:
- “Review Page Structure“: select which review page design to apply:
- one-page design allows you to view all reviews directly on the product page. It is convenient for websites with a small number of products and product reviews. Otherwise, it will take a long time for the page to load all reviews.
- two-page design allows reading only a few first reviews on the product page, and then you need to proceed to the next page to read the rest. This design lightens the page and is recommended to select when there are many product reviews.
Submit Review Form
Configure fields that are visible and required when submitting a review. Follow the steps below.
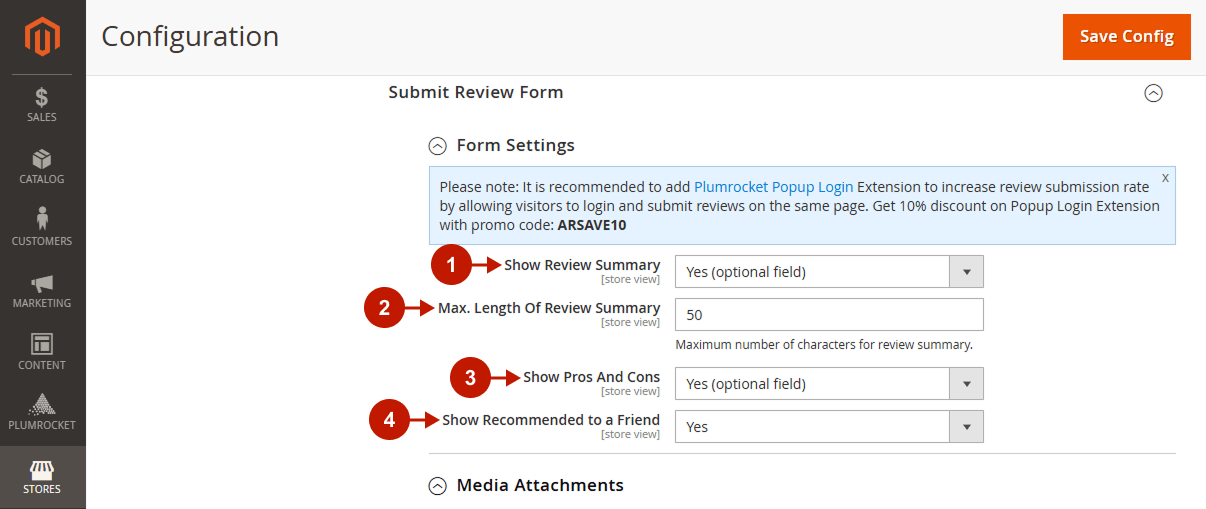
Form Settings
Step-by-Step actions:
- “Show Review Summary“: set the Review Summary field as optional, required, or disable it.
- “Max. Length Of Review Summary“: enter a maximum number of characters for the review summary. When typing, users see how many characters are left.
- “Show Pros And Cons“: set the Pros and Cons fields as optional, required, or disable them.
- “Show Recommended to a Friend“: decide whether to show the “I would recommend this to a friend” button or not.
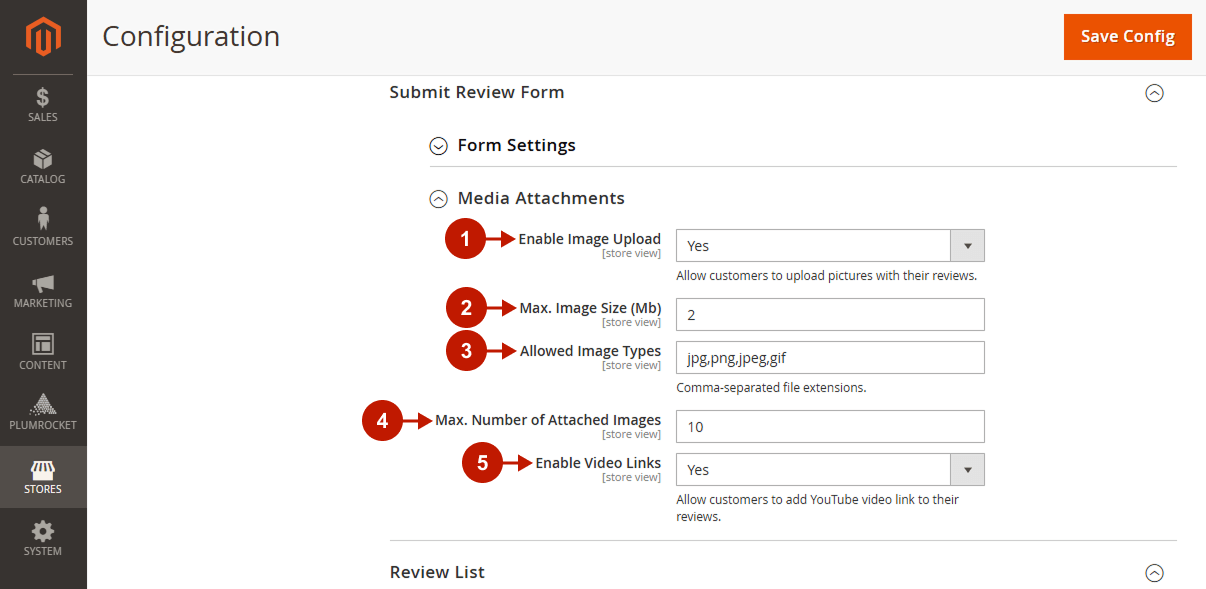
Media Attachments
Step-by-Step actions:
- “Enable Image Upload“: allow customers to attach photos to their reviews.
- “Max. Image Size (Mb)“: set the maximum size of uploaded photos in Mb.
- “Allowed Image Types“: enter comma-separated file extensions that users are able to upload.
- “Max. Number of Attached Images“: specify the maximum number of images that customers can attach to their reviews.
- “Enable Video Links“: set to “Yes” if you want to enable adding YouTube video links to the reviews.
Review List
Here you are able to customize the appearence of the review list on the product page of your Magento 2 store.
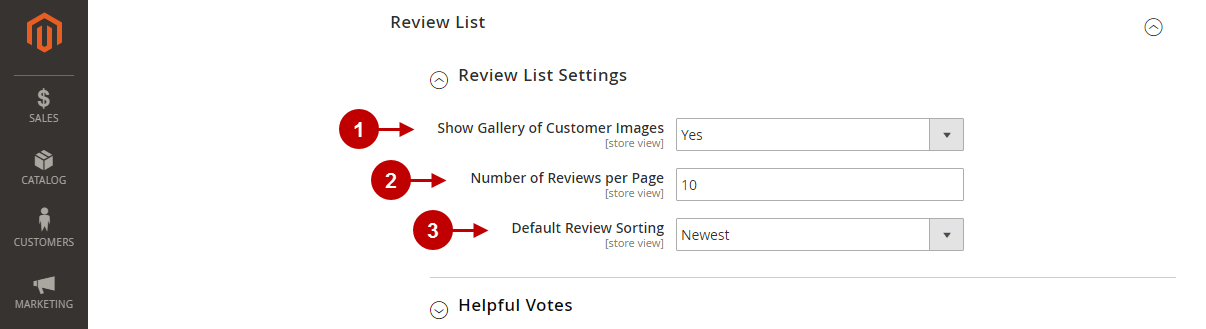
Review List Settings
Step-by-Step actions:
- “Show Gallery of Customer Images“: enable this option if you want to show the customers’ uploaded photos in the review list on the product page.
- “Number of Reviews per Page“: set the number of reviews displayed per page.
- “Default Review Sorting“: select the default review sorting from a drop-down list.
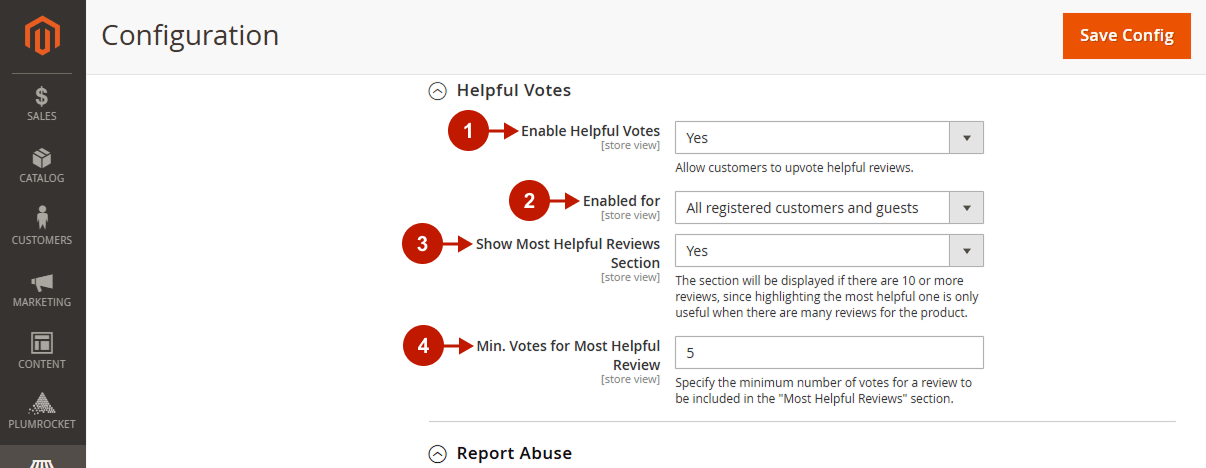
Helpful Votes
Step-by-Step actions:
- “Enable Helpful Votes“: enable this option to allow customers to upvote or downvote other reviews. The review with a lot of helpful votes looks reliable and truthful enough, which helps other visitors decide on a product faster.
- “Enabled for“: select who is able to vote for reviews: all users or registered customers only.
- “Show Most Helpful Reviews Section“: enable this option to show the Most Helpful option when sorting reviews on a product page.
- “Min. Votes for Most Helpful Review“: specify the minimum number of customer’s votes for a review to display it in a Most Helpful Review section on a product page.
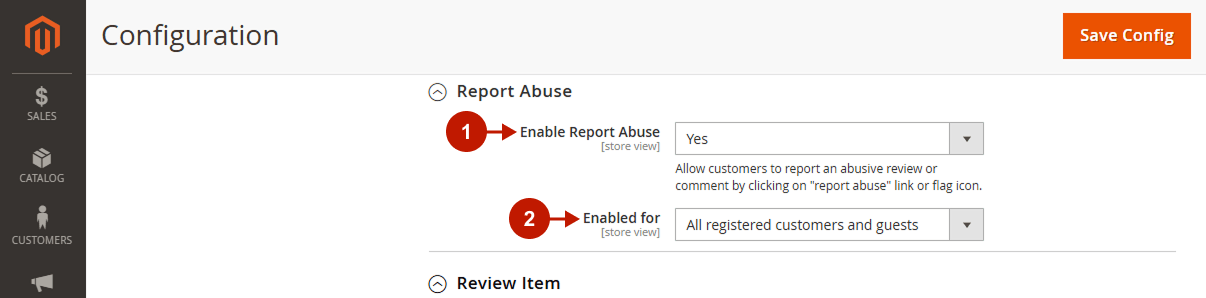
Report Abuse
Step-by-Step actions:
- “Enable Report Abuse“: allow customers to report an abusive review by clicking on the Report flag icon.
- “Enabled for“: select who is able to report abuse: both registered customers and guests, or registered customers only.
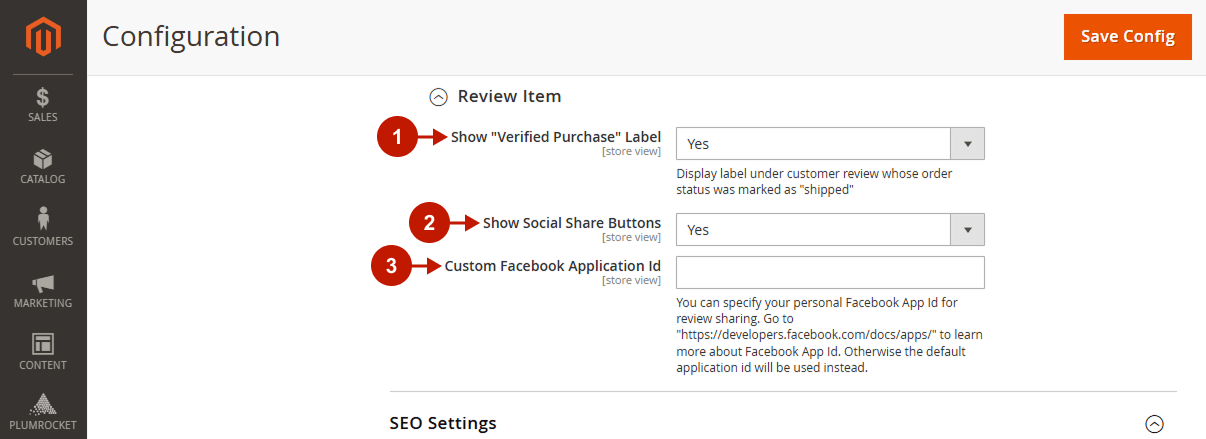
Review Item
Step-by-Step actions:
- “Show ‘Verified Purchase’ Label“: make a review look more reliable by displaying a Verified Purchase label under a review. The label is displayed when the order status is shipped.
- “Show Social Share Buttons“: enable if you want other visitors to share the reviews on their social networks.
- “Custom Facebook Application Id“: for being able to enable review sharing, specify your personal Facebook App ID. Click here to learn more about Facebook App ID. Otherwise, the default application ID will be used.
SEO Settings
In this section, learn how to do reviews at your Magento 2 store SEO-friendly so your store is visible at the top of search engine results. The store looks reliable when displaying real customer reviews, which drives first-time shoppers to make a purchase.
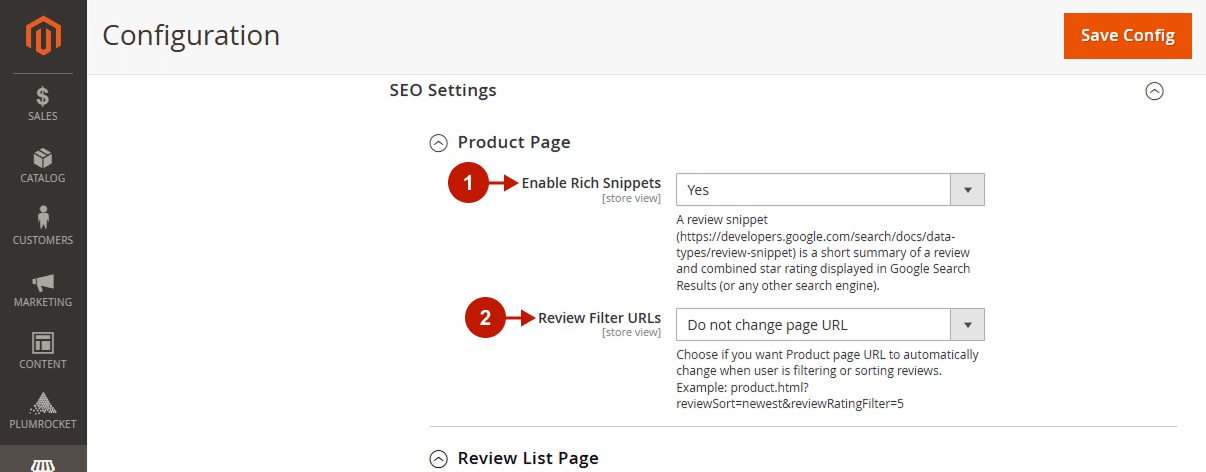
Product Page
Step-by-Step actions:
- “Enable Rich Snippets“: enable to display a review snippet in Google Search Results or any other search engine results from the Product Page on your store. A review snippet is a summary of a review and a star rating displayed in search engine results. Use review snippets to make your website look more reliable and stand out from other searching results. Drive users to visit the website and ensure the website is trustworthy by showing real customer reviews. Click here to read more about rich snippets.
- “Review Filter URL“: select the “Add GET parameters” option if you want the Product Page URL to automatically change when a user is filtering or sorting reviews.
Example: product.html?reviewSort=newest&reviewRatingFilter=5
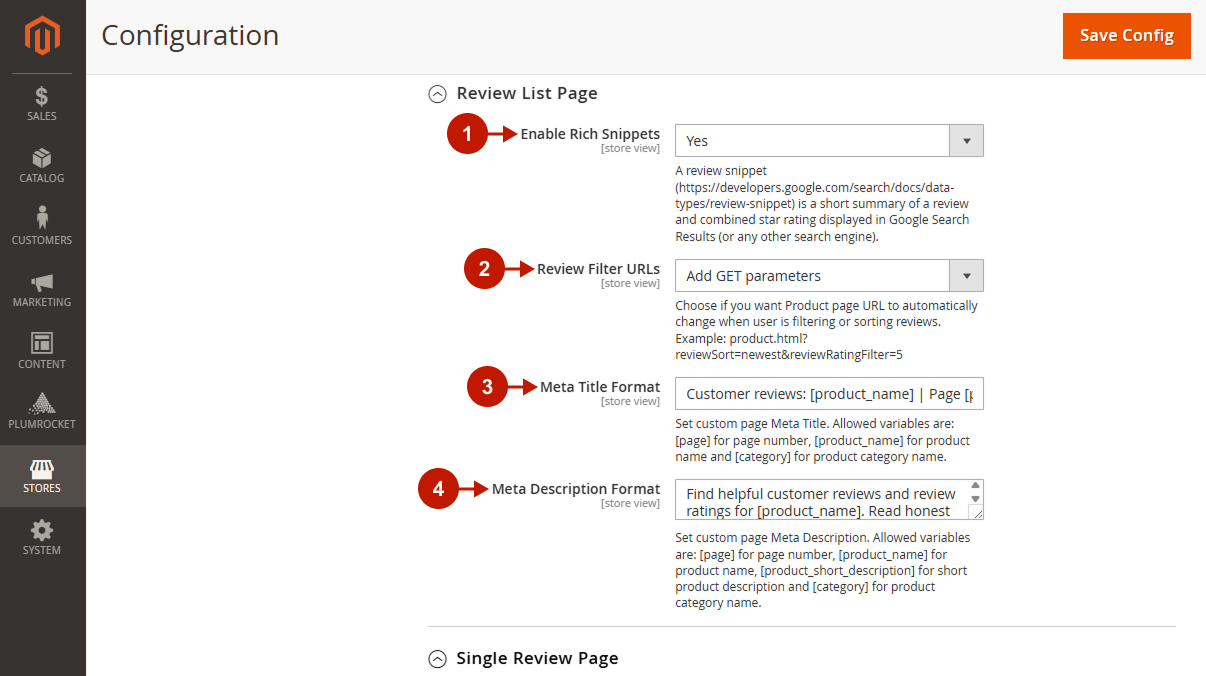
Review List Page
Step-by-Step actions:
- “Enable Rich Snippets“: enable to display a review snippet in Google Search Results or any other search engine results from the Review List Page on your store. Go back to Product Page SEO Settings in this documentation or click here to read more about rich snippets.
- “Review Filter URLs“: select the “Add GET parameters” option if you want the Review List Page URL to automatically change when a user is filtering or sorting reviews.
- “Meta Title Format“: enter custom Meta Title for your Review List Page. Allowed variables: [page], [product_name], and [category].
- “Meta Description Format“: enter custom Meta Description for your Review List Page. Allowed variables: [page], [product_name], [product_short_description], and [category].
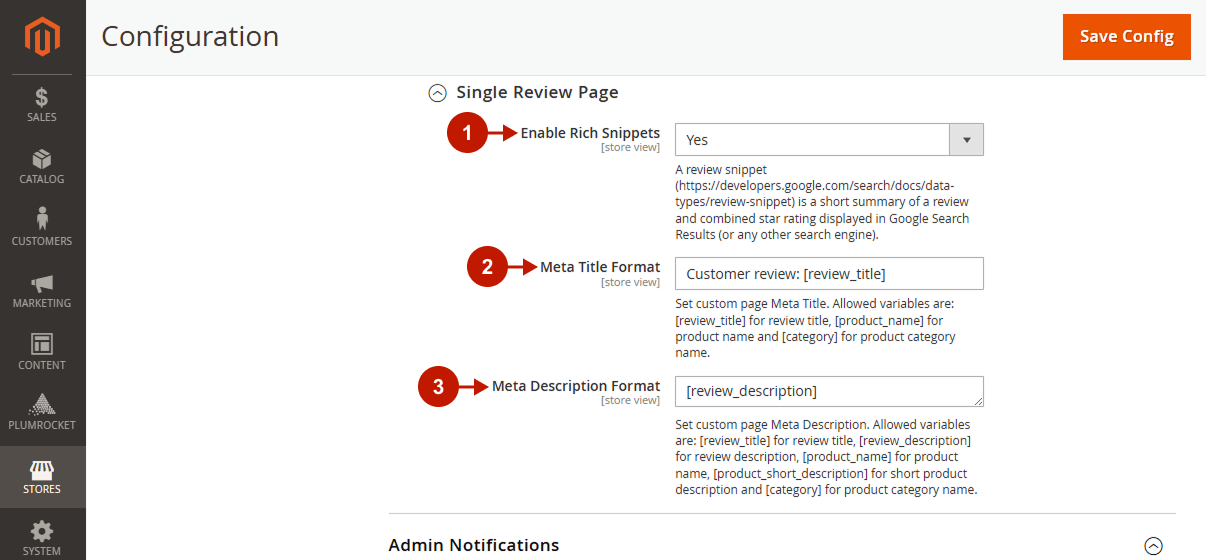
Single Review Page
Step-by-Step actions:
- “Enable Rich Snippets“: enable to display a review snippet in Google Search Results or any other search engine results from the Single Preview Page on your store. Go back to Product Page SEO Settings in this documentation or click here to read more about rich snippets.
- “Meta Title Format“: enter custom Meta Title for your Review List Page. Allowed variables: [review_title], [product_name], and [category].
- “Meta Description Format“: enter custom Meta Description for your Review List Page. Allowed variables: [review_title], [review_description], [product_name], [product_short_description], and [category].
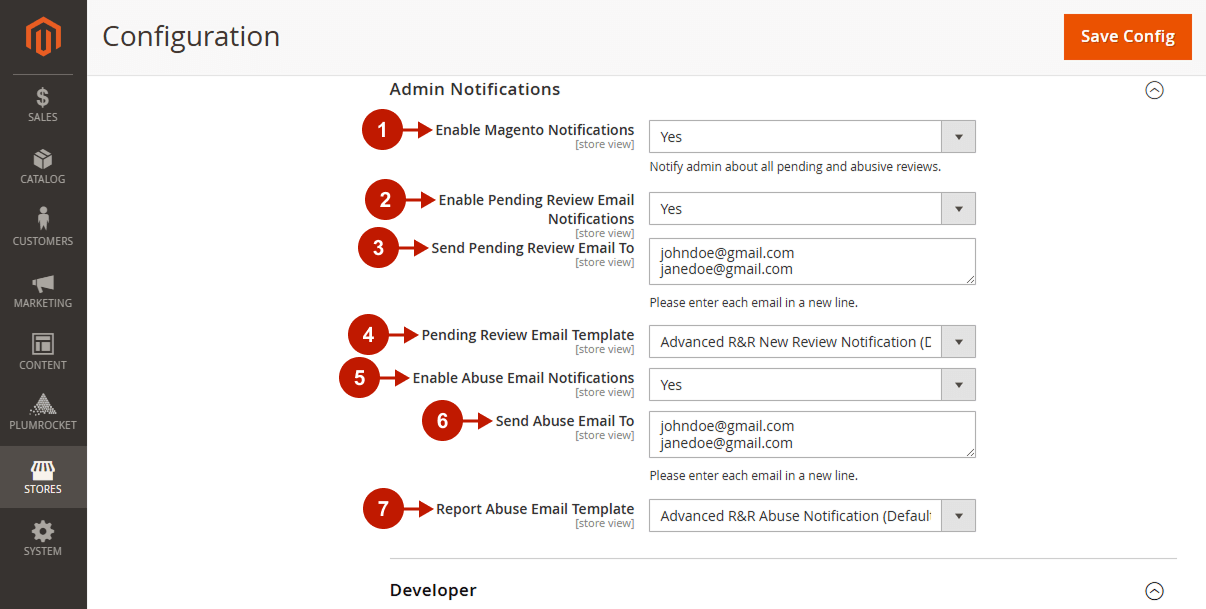
Admin Notifications
Follow the steps below to configure your Magento notifications and be aware of each review. Improve the quality of service in the store by approving or commenting on customer’s reviews in time.
Step-by-Step actions:
- “Enable Magento Notifications“: set to “Yes” to notify an admin of any pending and abusive reviews.
- “Enable Pending Review Email Notifications“: set to “Yes” to notify an admin of pending reviews by email.
- “Send Pending Review Email To“: enter each email in the new line. All notifications about pending reviews will be sent to these emails.
- “Pending Review Email Template“: select the Pending Review email template.
- “Enable Abuse Email Notifications“: set to “Yes” to notify an admin of new abuse reviews by email.
- “Send Abuse Email To“: select the Abuse Notification email template.
- “Report Abuse Email Template“: enter each email in the new line. All notifications about reported abuse will be sent to these emails.
Developer
When using third-party themes, enter the Review Tab Button Selector. Thus, when you press the Add a Review button on a product page, you automatically go to the Reviews tab.
Step-by-Step actions:
- “Review Tab Button Selector“: #tab-label-reviews-title selector is set by default in Magento 2. Click here to learn how to find and enter your selector on a product page if you use third-party theme.

Reviews
In the main menu go to the “Plumrocket” tab > select “Advanced Reviews” extension > navigate to “Reviews” section.
Follow the steps below to learn how to view and manage all reviews in a convenient grid.
Step-by-Step actions:
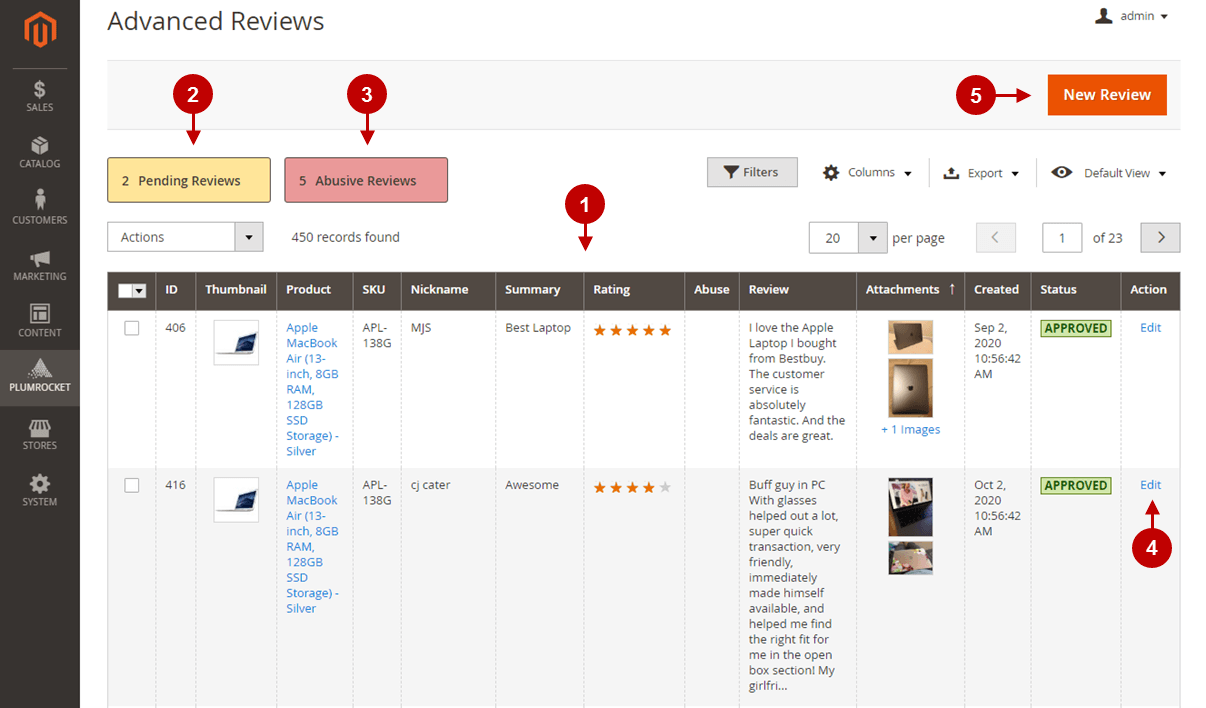
- Advanced Reviews Grid: this grid contains each review in a separate row, along with its details in columns. You can easily navigate between reviews and filter them.
- “ID“: in this column, you can see a product ID.
- “Thumbnail“: preview the main picture of a product here. They are convenient for navigating between different product reviews.
- “Product“: view the product name in this column. You can also click on the link and go to the Product Edit Page.
- “SKU“: you can see a product SKU in this column.
- “Nickname“: a customer’s nickname is displayed here.
- “Summary“: read the summary of the review here.
- “Rating“: see the star rating of each product in this column.
- “Abuse“: a “Yes” mark is displayed in this column if other users marked the review as abusive.
- “Review“: Read the main body of the review here.
- “Attachments“: here, you can see what attachments users added to the review.
- “Created“: see the exact time a review was submitted.
- “Status“: check the status of a review here: “Approved”, “Pending”, or “Not Approved.
- “Action“: you can edit a review by clicking on “Edit” in this column.
- “Pending Reviews“: the number of pending reviews is displayed here. You can also click on this button, and only pending reviews will be presented in the grid.
- “Abusive Reviews“: the number of abusive reviews is displayed here. You can also click on this button, and only abusive reviews will appear in the grid.
- “Edit“: click on “Edit” to be able to modify each field of the review. You can also write an administration comment there. See the “Edit Review” section to read more about this section.
- “New Review“: press on this button to create a product review. See the “Edit Review” section for instructions on how to create a review.
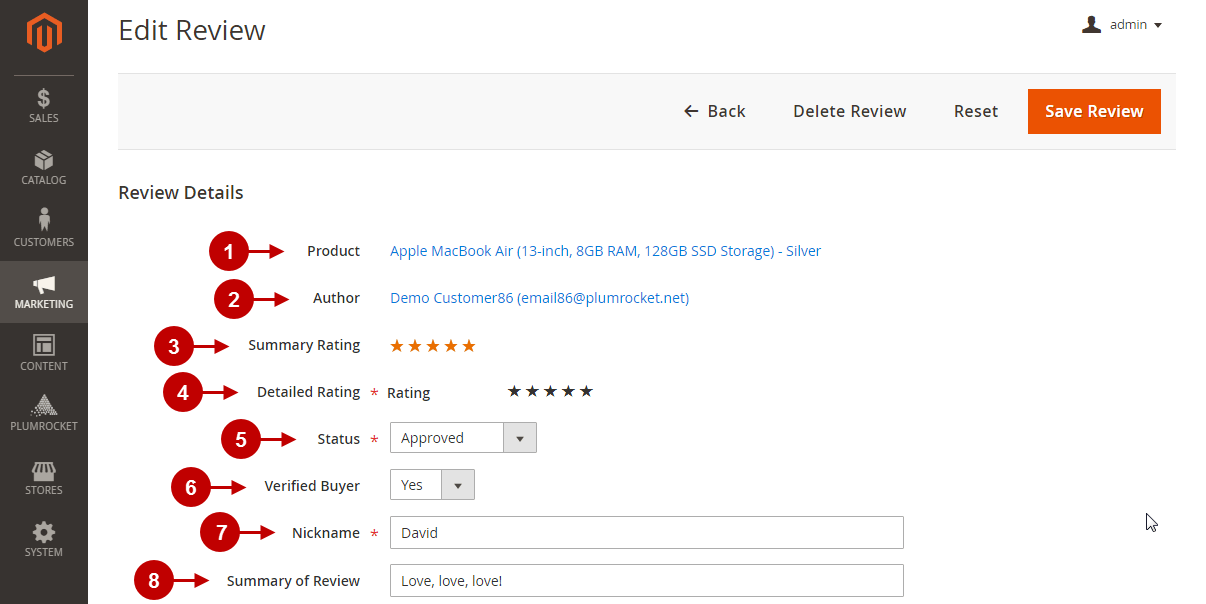
Edit Review
Step-by-Step actions:
- “Product“: you can see the name of the product of this review. You can also click on it and go to the Product Edit Page.
- “Author“: it is the name of the customer. Click on it and go to the Customer Information section.
- “Summary Rating“: here you can see the summarized rating of a product.
- “Detailed Rating“: change the detailed ratings of a product by pressing on the appropriate star.
- “Status“: change the review status here to Approved, Pending, or Not Approved.
- “Verified Buyer“: specify if the buyer is verified or not.
- “Nickname“: edit the customer’s nickname in this field.
- “Summary of Review“: edit the summary of a review. Remember you are limited to 50 characters.
Step-by-Step actions:
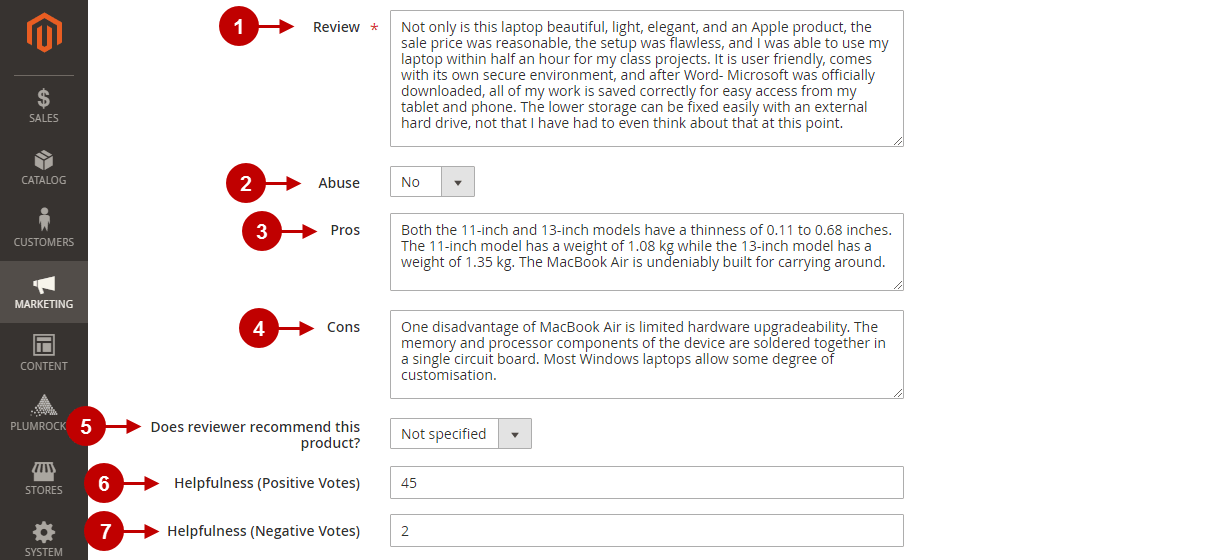
- “Review“: see the review and edit it here.
- “Abuse“: change the Abuse of this review.
- “Pros“: edit the advantages of a product the customer specified in this field.
- “Cons“: edit the disadvantages of a product the customer specified in this field.
- “Does reviewer recommend this product?“: specify if this review should have the “I would recommend this to a friend” mark.
- “Helpfulness (Positive Votes)“: edit the number of upvotes in the review.
- “Helpfulness (Negative Votes)“: change the number of downvotes for the review.
Step-by-Step actions:
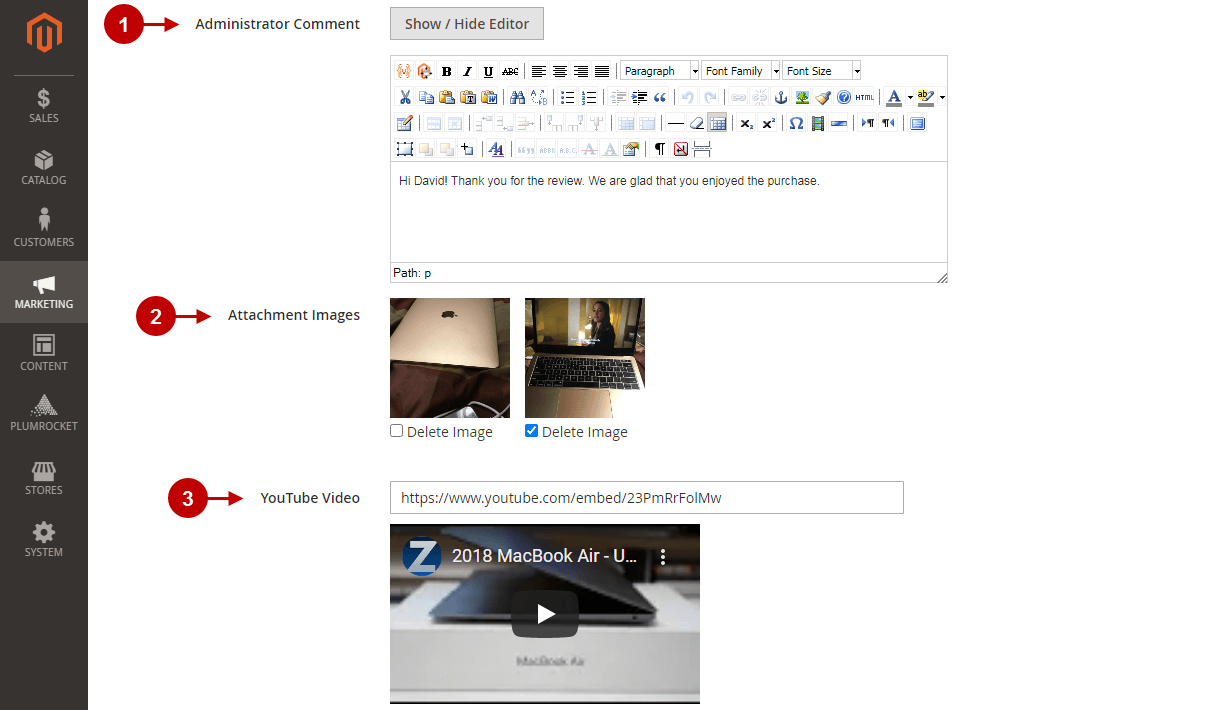
- “Administrator Comment“: use the WYSIWYG editor to write or change an administrator comment to this review.
- “Attachment Images“: here you can see the images that were attached to the review and delete some of them by checking the appropriate box below the image.
- “YouTube Video“: in this field, you can paste the link of a YouTube video related to a product, change or delete it.
Review Reminder
Review Reminder extension allows you to automatically send emails to customers who have purchased a product, reminding them to leave a review. The extension significantly increases the number of product reviews on your Magento Store. Firstly, you can schedule up to three reminders per customer. Secondly, the customer is likely to submit a review due to a convenient form directly in the email. Read about other review reminder configurations in this section.
Configuration
In the main menu go to “Plumrocket” tab > select “Review Reminders” extension > navigate to “Configuration” section.
General
Here you will learn how to configure Magento 2 Review Reminders Extension correctly. Follow the steps below.
Step-by-Step actions:
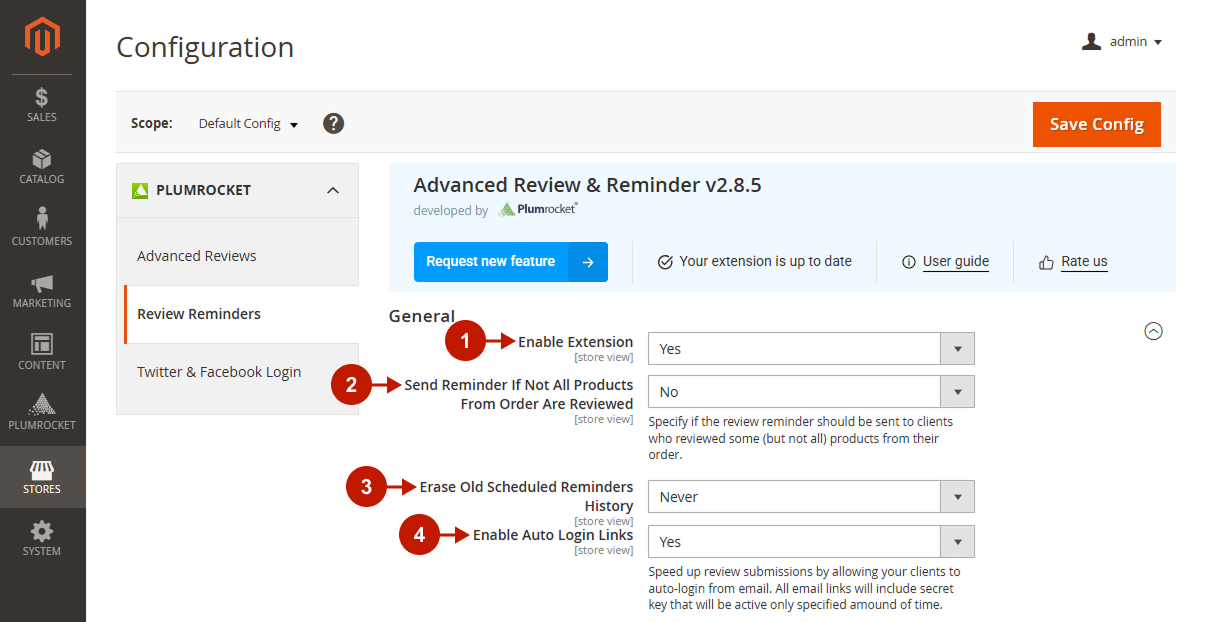
- “Enable Extension“: this option allows you to enable or disable this Review Reminders v2.x Extension.
- “Send Reminder If Not All Products From Order Are Reviewed“: specify whether to send the review reminder to customers who have submitted a review for some (but not all) of the products they ordered.
- “Erase Old Scheduled Reminders History“: select in the drop-down menu whether to erase scheduled reminder history after a certain period or not.
- “Enable Auto Login Links“: set to “Yes” to speed up review submissions by allowing your clients to auto-login from review reminders email. All email links include a secret key and are valid only for a specified amount of time.
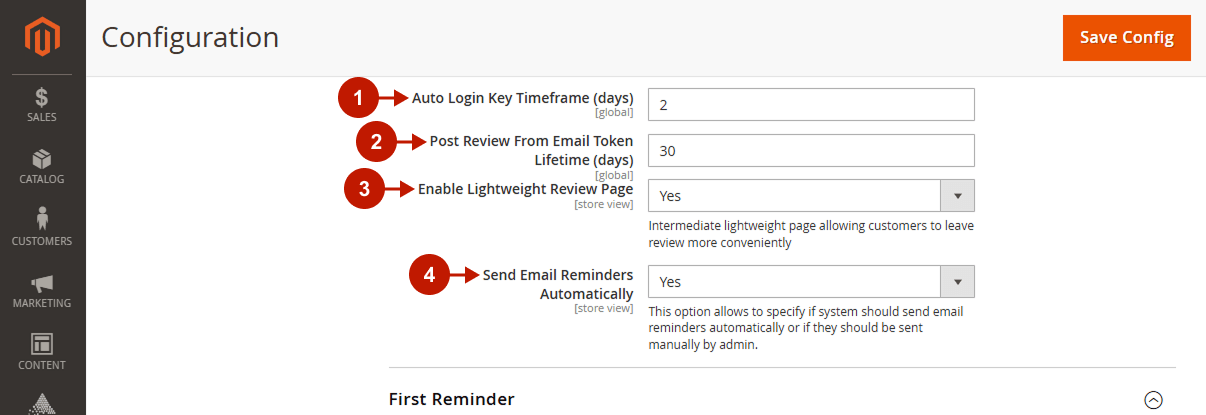
- “Auto Login Key Timeframe (days)“: specify the number of days the key in the auto-login link will be valid, thus customers will be able to auto-login from a review reminder email to submit a review.
- “Post Review From Email Token Lifetime (days)“: specify the number of days the Token will be valid.
- “Enable Lightweight Review Page“: set to “Yes” to enable an intermediate lightweight page allowing customers to leave a review more conveniently.
- “Send Email Reminders Automatically“: this option allows specifying if the system should send email reminders automatically or if they should be sent manually by an administrator.
Step-by-step guide:
- “Auto Login Key Timeframe (days)“: specify the number of days the key in the auto-login link will be valid, thus customers will be able to auto-login from a review reminder email to submit a review.
- “Post Review From Email Token Lifetime (days)“: specify the number of days the Token will be valid.
- “Enable Lightweight Review Page“: set to “Yes” to enable an intermediate lightweight page allowing customers to leave a review more conveniently.
- “Send Email Reminders Automatically“: this option allows specifying if the system should send email reminders automatically or if they should be sent manually by an administrator.
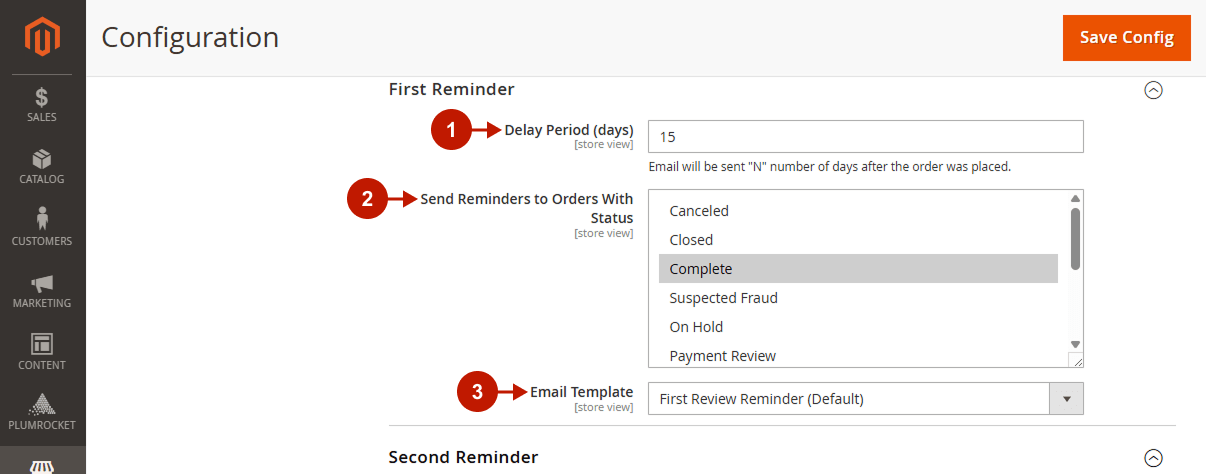
First Reminder
Step-by-Step actions:
- “Delay Period (days)“: specify the number of days the first reminder email will be sent after the order was placed.
- “Send Reminders to Orders With Status“: review reminders will be sent to customers whose order status will be the same as you selected in this field.
- “Email Template“: select the First Reminder email template.
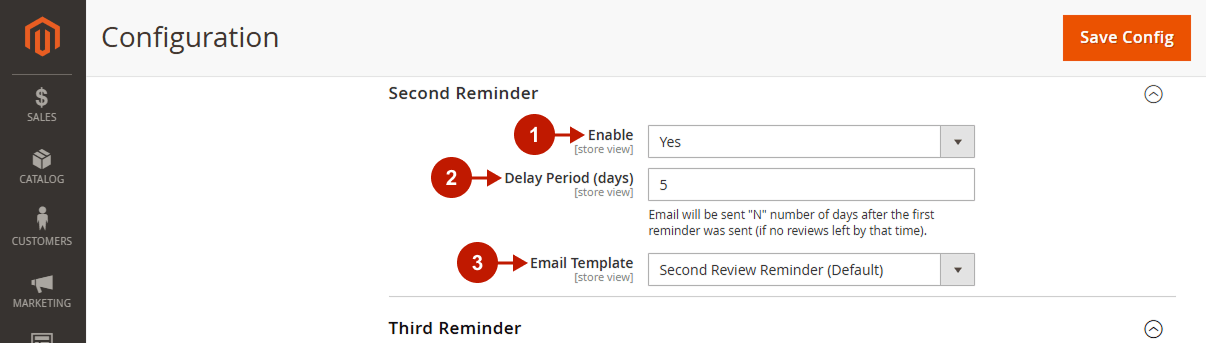
Second Reminder
Step-by-Step actions:
- “Enable“: set to “Yes” if you want to send the second review reminder email to customers.
- “Delay Period (days)“: an email will be sent “N” number of days after the first reminder was sent (if no reviews were submitted by that time).
- “Email Template“: select the Second Reminder email template.
Third Reminder
Step-by-Step actions:
- “Enable“: set to “Yes” if you want to send the third review reminder email to customers.
- “Delay Period (days)“: email will be sent “N” number of days after the second reminder was sent (if no reviews were submitted by that time).
- “Email Template“: select the Second Reminder email template.

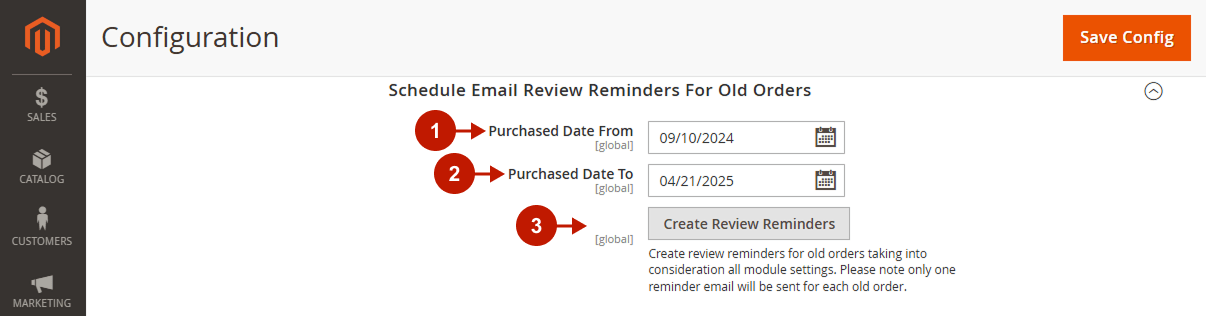
Schedule Email Review Reminders For Old Orders
Create review reminders for orders placed before installing and configuring this extension. This email will be sent according to the settings of this extension. Note: only one reminder email will be sent for each old order.
Step-by-Step actions:
- “Purchased Date From“: A reminder email will be sent to all orders placed from the selected date.
- “Purchased Date To“: select the date by which you want to set a reminder for old orders.
- “Create Review Reminder“: press this button to apply the old order reminder settings.
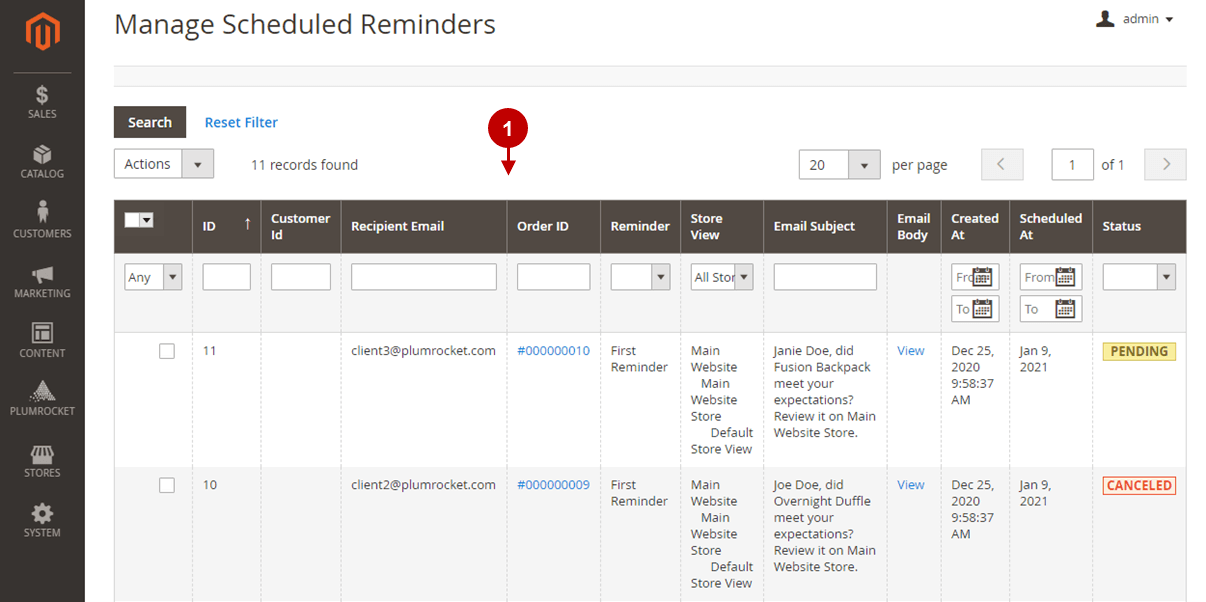
Manage Scheduled Reminders
In the main menu go to the “Plumrocket” tab > select “Review Reminder” extension > navigate to “Manage Scheduled Reminders” section.
Step-by-Step actions:
- Manage Scheduled Reminders Grid: in this grid, you can easily navigate between scheduled reminders and sort them by different parameters:
- “ID“: a review reminder ID.
- “Customer ID“: a customer ID.
- “Recipient Email“: a customer email. Click on it and see personal information and Default Billing Address.
- “Order ID“: an order id. Click on it to see all the order details.
- “Reminder“: you can see here whether it is First, Second or Third Reminder.
- “Store View“: you can see here on which store view this reminder is scheduled.
- “Email Subject“: read the subject of the email here.
- “Email Body“: press the “View” button to preview the main body of the email.
- “Created At“: see the date here when the order was placed.
- “Scheduled At“: see the date here when the reminder was scheduled.
- “Status“: you can see here the Sent, Cancelled, Pending, or Error status of the reminder email.
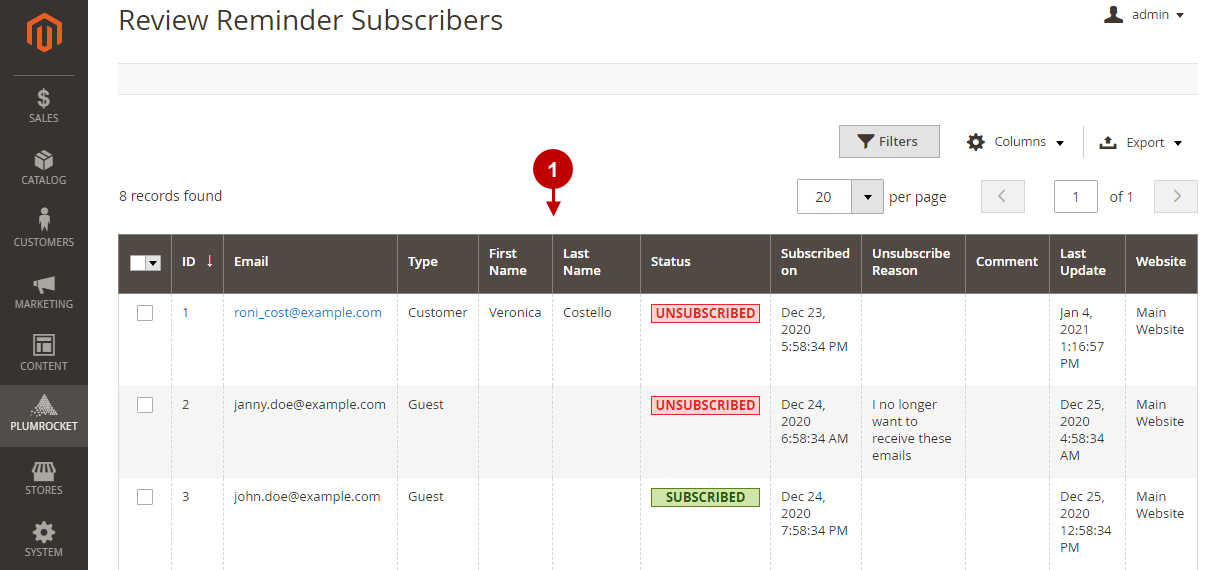
Subscribers
In the main menu go to the “Plumrocket” tab > select “Review Reminders” extension > navigate to “Subscribers” section.
In this section you can view the information about the Remind Reviews subscribers.
Step-by-Step actions:
- Review Reminder Subscribers Grid: this grid allows you to see a customers’ email, type, first and last name, the status and the date of the subscription, the reason unsubscription reason, and the latest update of all information in the grid.
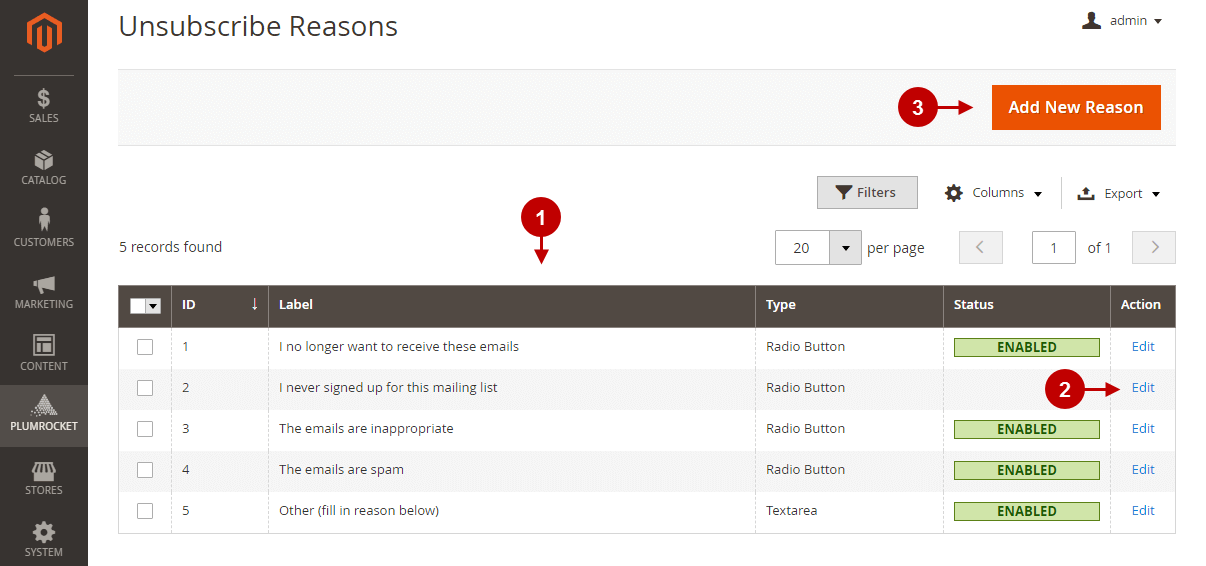
Unsubscribe Reasons
In the main menu go to the “Plumrocket” tab > select “Review Reminders” extension > navigate to “Unsubscribe Reasons” section.
Step-by-Step actions:
- Unsubscribe Reason Grid: this grid allows you to manage reasons and take them into account for improving customers’ store first impression.
- “ID“: you can see the unsubscribe reason ID here.
- “Label“: see the unsubscribe reason in this column.
- “Type“: see whether a customer chose the reason from a radio button or wrote their own reason in a text area.
- “Status“: see whether the reason is enabled or disabled. If enabled, customers can select if when unsubscribing.
- “Action“: click on the “Edit” button to change the Label, Status, and Input Type of the reason.
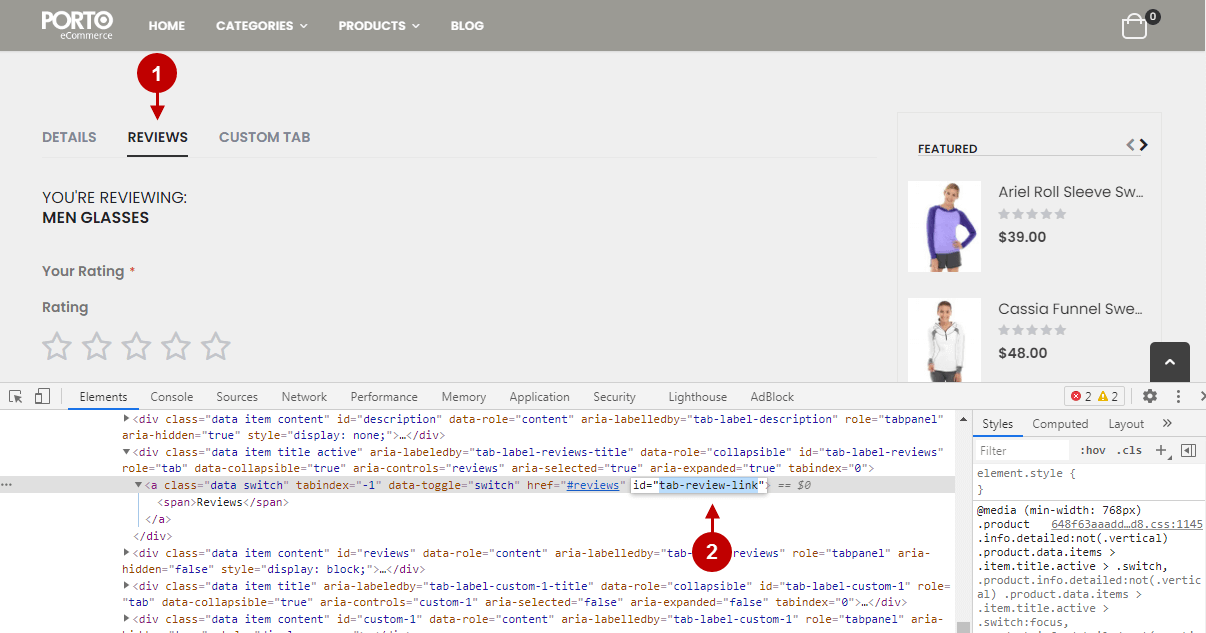
How To Find The CSS Selector for Review Tab on Third-Party Themes
Step-by-Step actions:
- “Reviews“: on a Product Page, scroll down and find the Reviews tab. Next, right-click > inspect, or open the Development Tool in your browser.
- Find the id or class of the Review Tab link or button, and copy “tab-review-link” and paste it into the Developer section.