Theme Settings
Here you will find Private Sales Ocean Blue Magento Theme, configuration tips, that will help you configure the theme according to your needs
This magento private sales theme requires Plumrocket Private Sales Magento Extension and Plumrocket Special Settings Magento Extension. However in order to get the most out of this magento theme it is recommended to install the full solution – Magento Private Sales Script.
The location of key theme files
Images
The images that are used in this theme are stored at the server at this address::
/web/skin/frontend/private_sales_ocean_blue_theme/default/imagesCSS
CSS files are stored at this address:
 /web/skin/frontend/private_sales_ocean_blue_theme/default/css/style.css
 /web/skin/frontend/private_sales_ocean_blue_theme/default/css/style-ie8.css
 /web/skin/frontend/private_sales_ocean_blue_theme/default/css/style-ie.css
The rest of Plumrocket Extensions create their own folders for CSS files. For instance, the Popup Login CSS files are located at this address:
/web/skin/frontend/private_sales_ocean_blue_theme/default/css/plumrocket/popuplogin/popup.cssTemplates
Theme templates are stored at this address:
/web/app/design/frontend/private_sales_ocean_blue_theme/default/template/Java Scripts
Java Scripts are located at this address:
/web/skin/frontend/private_sales_ocean_blue_theme/default/js/plumrocket/How to change a logo on the Splash Page
The logo that is displayed on the splash page is located at the server at this address:
/skin/frontend/private_sales_ocean_blue_theme/default/images/plumrocket/privatesales/splashlogo.pngIn order to change a logo you will have to change the file “splashlogo.png”
Changing Store Logo
Changing Logo on a Site page
The directory structure is the same on a local install as it is on a web server:
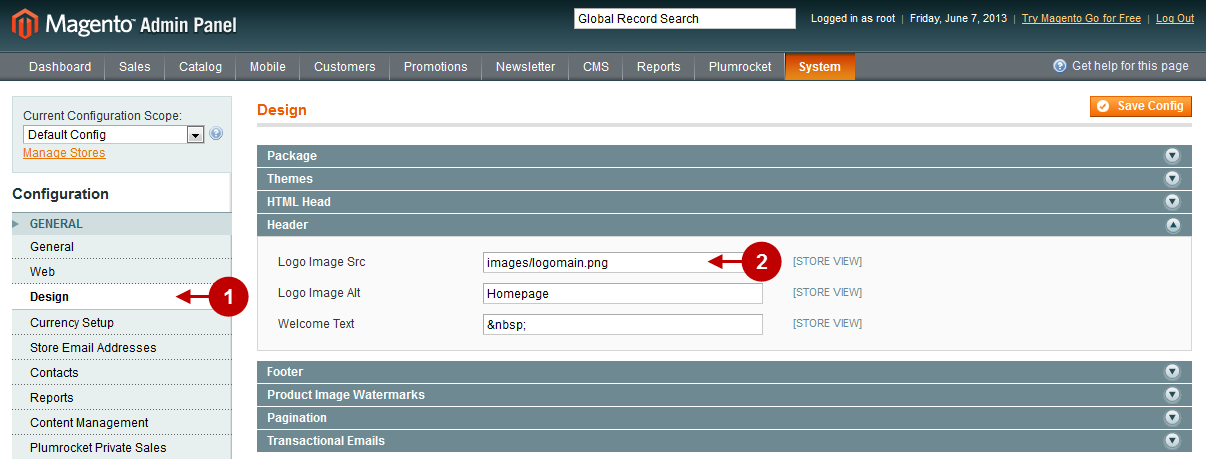
your_magento_install_directory/skin/frontend/default/default/imagesYou’ll need to connect to your site via FTP and upload your own logo to theme images folder. After you upload the logo you will have to confirm the chosen image as a store logo. In order to do this, go to Admin Panel > Configuration and follow the instructions described below:
Detailed description:
- Open the “Design” tab.
- Option “Logo Image Src”: allows you to choose the file name of your logo (Be sure to keep the format images/file_name.file_extenstion) and save the changes.
Changing the Email Logo
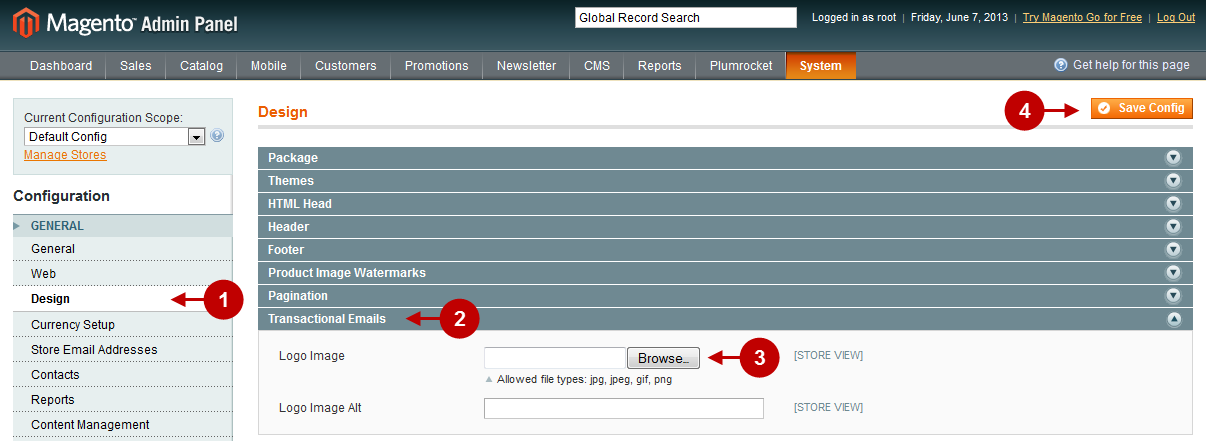
Go to Admin panel, select System > Configuration and follow the instructions given below:
Detailed description:
- In the Configuration panel on the left click on “Design”.
- Select the tab “Transactional Emails”.
- Click on the “Browse” button and select the Logo Image from your computer.
- Press the “Save Config” button.
How to change default Logo for Magento PDF Invoices & Print Outs
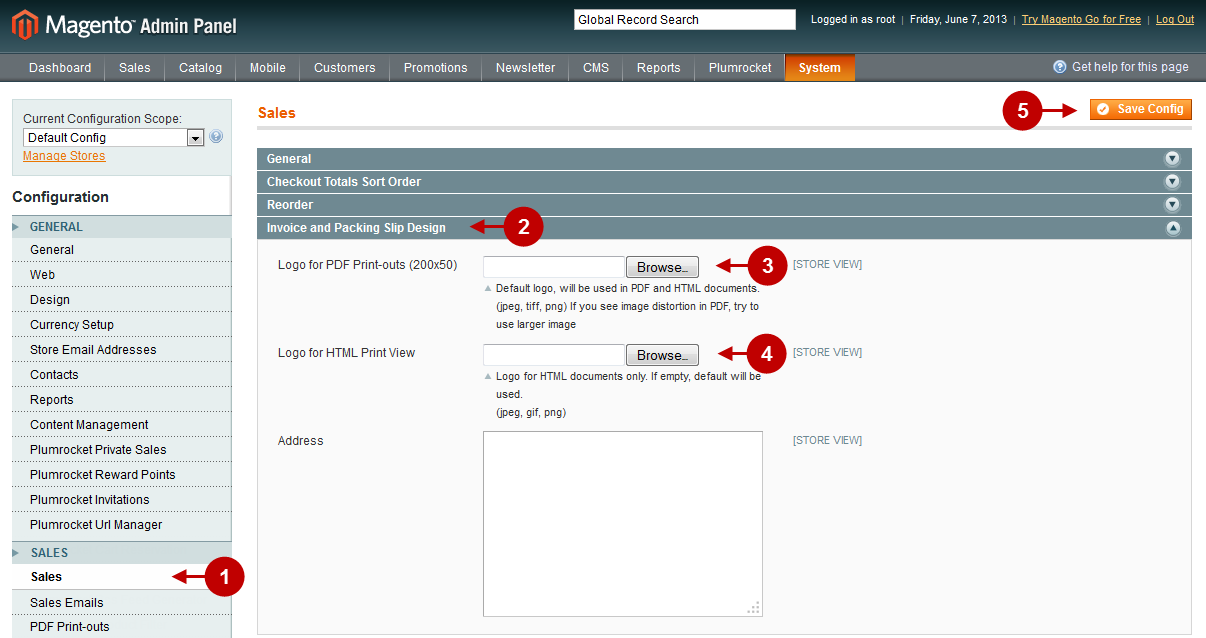
Go to Admin panel, select System > Configuration and follow the instructions given below
Detailed description:
- Move to “Sales”.
- Select the tab “Invoice and Packing Slip Design”.
- Option “Logo for PDF Print-outs (200×50)”: upload your own logo. It seems that the logo extension has to be *.jpg. And your logo should be 200 x 50 px, otherwise the pdf generator would scale whatever image you give it to 200 x 50 px.
- Option “Logo for HTML Print View”: upload your own logo for HTML Print View.
- Press the “Save Config” button.
Boutique Page
For more information on how to create a boutique, move to Creating first boutique.
Create Featured Event
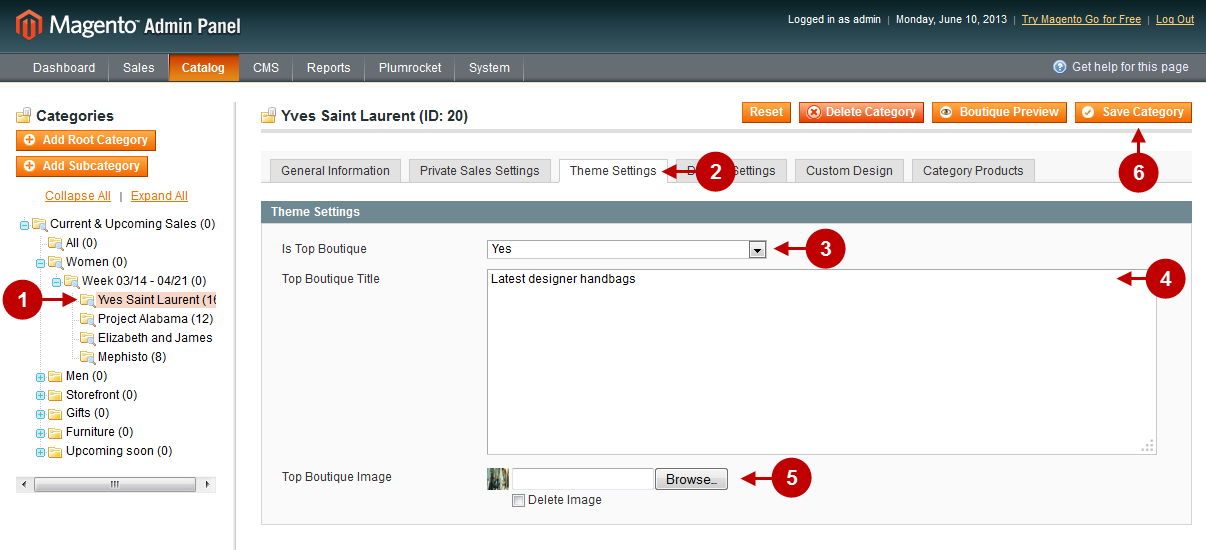
The screenshot below shows how top boutique is configured for the Private Sales Ocean Blue Magento Theme. In order to access the configuration page, go to Admin panel, select Catalog > Manage Categoriesand follow the instructions given below:
Detailed description:
- Select the boutique that will be displayed as a top boutique above the home page.
- Select the tab “Theme Settings”.
- Option “Is Top Boutique”: select “Yes” for the boutique to be displayed above the home page.
- Option “Top Boutique Title”: enter the text that will be displayed next to the boutique title.
- Option “Top Boutique Image”: select the image to represent the top boutique. (Recommended image sizes are described here Recommended Image Sizes.)
- Press the “Save Category” button in order to save the changes.
Additional Event Field at Ocean Blue Magento Theme
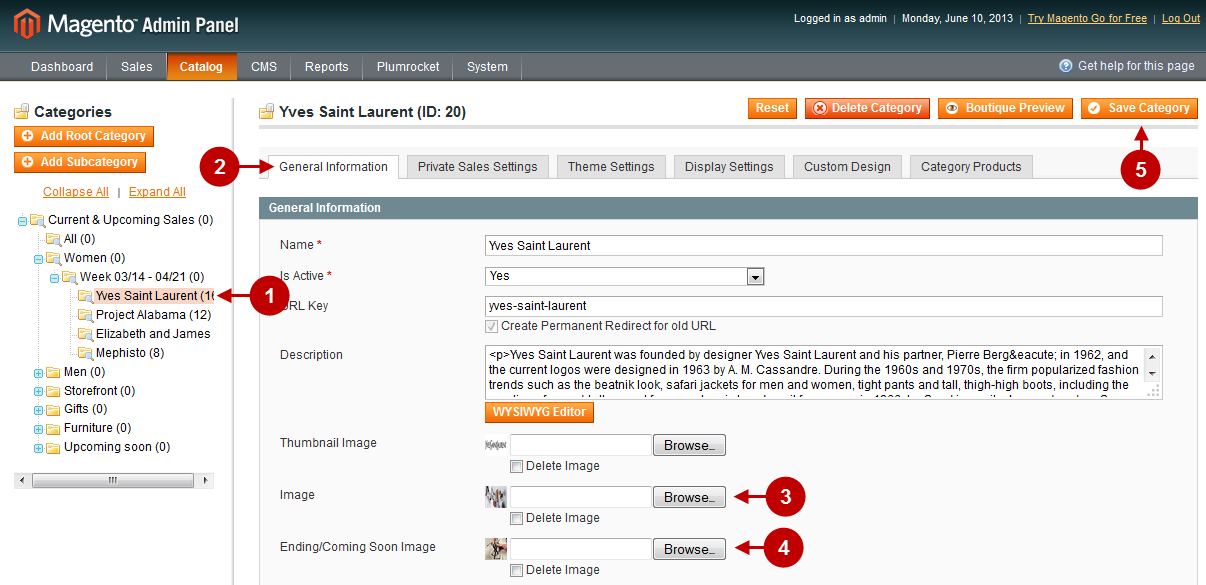
Detailed description:
- Select the boutique you need form the list on the left.
- Select the General Information tab.
- Press “Browse…” next to the field “Image”, in order to choose the image that will be displayed to represent the boutique on the homepage.
- Press “Browse…” next to the field “Ending/Coming Soon Image”, in order to choose the image that will be displayed to represent the boutique belonging to the section Ending or Coming Soon. (Recommended image sizes are described here Recommended Image Sizes.)
- Press the “Save Category” button in order to save the changes.
Editing Static Blocks and Theme Elements
In order to see the list of static blocks move to admin panel and follow the instructions below:
Detailed description:
- Press “CMS”.
- Select “Static Blocks” from the menu.

The screenshots below show what static blocks and theme elements look like in the front-end, as well as ways to edit and configure them.
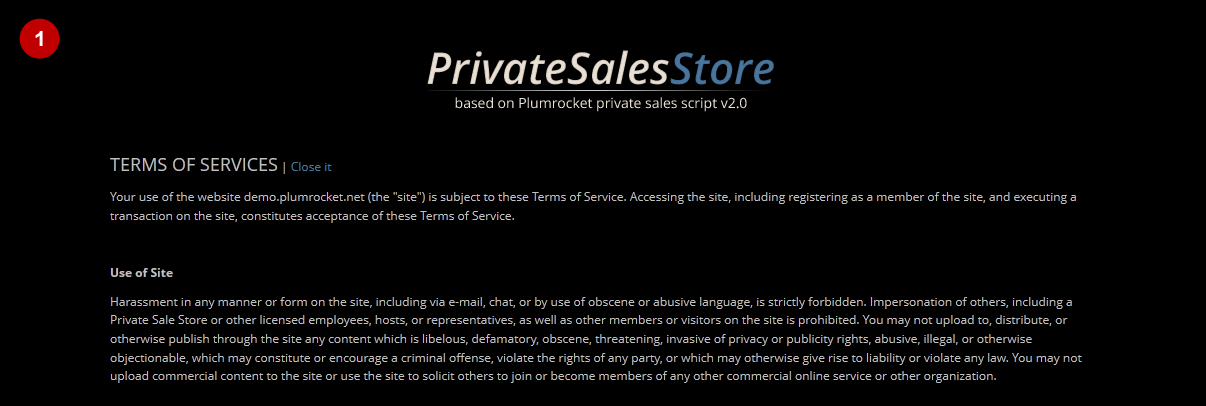
Detailed description:
- In order to change the Terms of Services on Splash page, edit the static block called “Terms of Services – Splash page”.
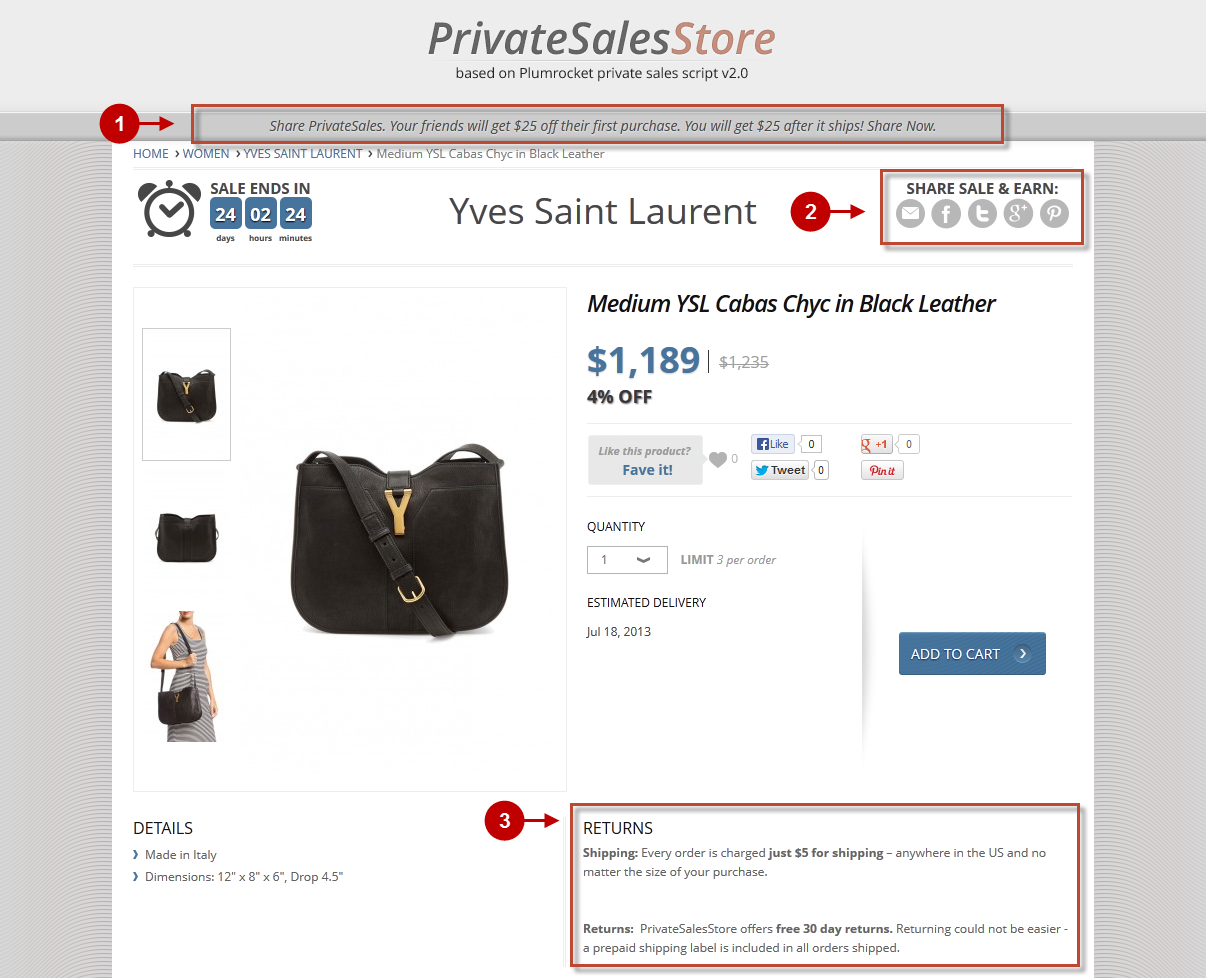
Detailed description:
- In order to change the boutique expiration notification text, edit the static block called “This boutique expired”..
- In order the change the social media buttons, you will have to open the file that is stored at this address:
/web/app/design/frontend/private_sales_ocean_blue_theme/default/template/privatesales/catalog/category/view.phtmland edit this code:
<p><?php echo $this->__('SHARE SALE & EARN:');?> </p>
 <div class="addthis_toolbox addthis_default_style"
<?php echo Mage::helper('privatesales/list')->getSocialLinkFromRelative($this->getBack());?>>
 <a class="addthis_button_email"><img src="<?php echo $this->getSkinUrl('images/letter31.png');?>"
width="31" height="31" style="border:none" /></a>
 <a class="addthis_button_facebook"><img src="<?php echo $this->getSkinUrl('images/facebook31.png');?>"
width="31" height="31" style="border:none" /></a>
 <a class="addthis_button_twitter"><img src="<?php echo $this->getSkinUrl('images/twitter31.png');?>"
 width="31" height="31" style="border:none" /></a>
 <a class="addthis_button_google_plusone_share"><img src="<?php echo $this->getSkinUrl('images/google31.png');?>"
width="31" height="31" style="border:none" /></a>
 <a class="addthis_button_pinterest_share"><img src="<?php echo $this->getSkinUrl('images/pinterest31.png');?>"
width="31" height="31" style="border:none" /></a>
 <div class="atclear"></div>
 </div>
3. In order to change the “Returns” tab, that is located on a product page, edit the static block called “shipping_and_returns_tab”.
Detailed description:
- In order to change the Account Information, edit the static block called “Account Dashboard – Account Information”.
- In order to change the Address Book, edit the static block called “Account Dashboard – Address Book”.
- In order to change the My Orders, edit the static block called “Account Dashboard – My Orders”.
- In order to change the Email alerts, edit the static block called “Account Dashboard – Email alerts”.
- In order to change the Reward Credits, edit the static block called “Account Dashboard – Reward Credits”.
- In order to change the Invite Friends, edit the static block called “Account Dashboard – Invite Friends”.
- In order to change the Help block, edit the static block called “Account – Help Desk Block”.
- In order to change this block, you will have to open the file that is located at this address:
/web/app/design/frontend/private_sales_ocean_blue_theme/default/template/customer/account/helpDesk.phtmland edit this code:
<div class="faqContactBlock"><a href="<?php echo $this->getUrl('faq') ?>" class="sprite-ps2 livechat" title="faq"> faq</a>
 <a href="<?php echo $this->getUrl('contacts') ?>" class="sprite-ps2 number" title="contact us">contact us</a>
 </div>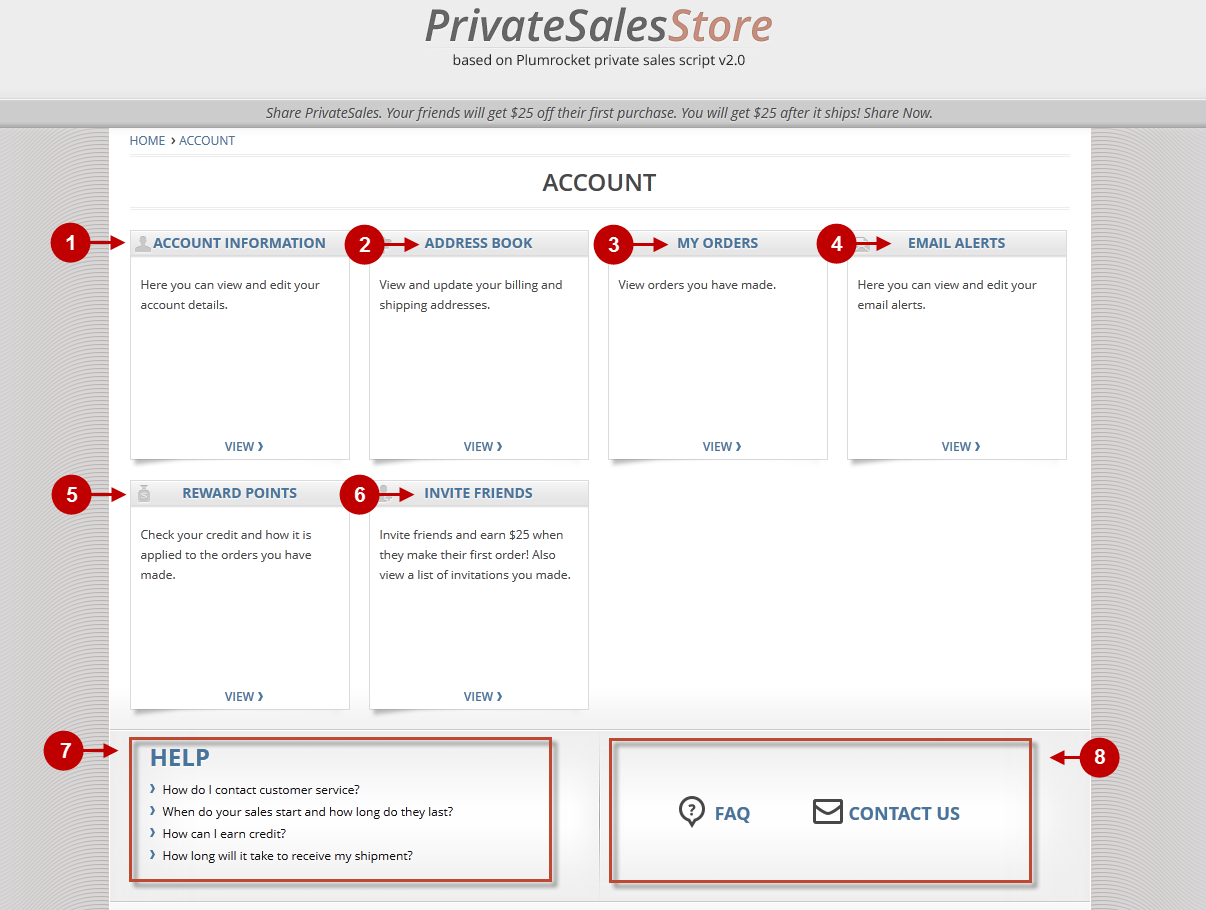
Detailed description:
- This block can be changed if you edit the static block called “Contact page text”.
- In order to change this block, you will have to open the file that is located at this address:
/web/app/design/frontend/private_sales_ocean_blue_theme/default/template/contacts/form.phtmland edit the following text there:
<p>Please contact us via the form below or at <a href="mailto:support@plumrocket.com">support@plumrocket.com</a>
with any questions or requests for information. We will respond within 24 hours. </p>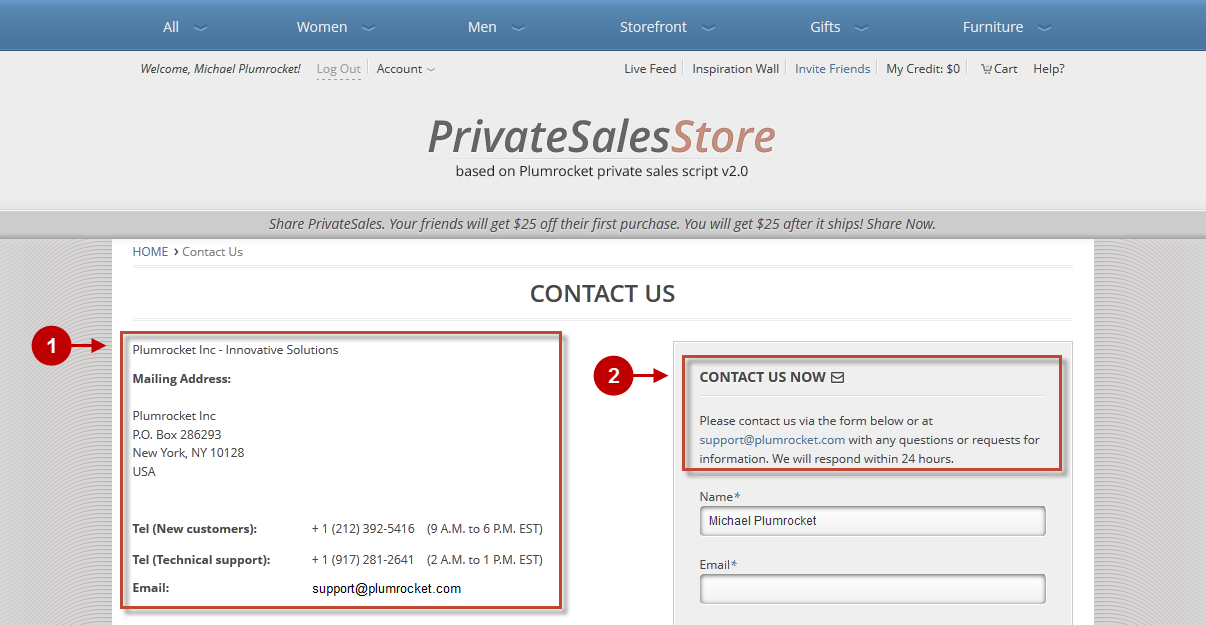
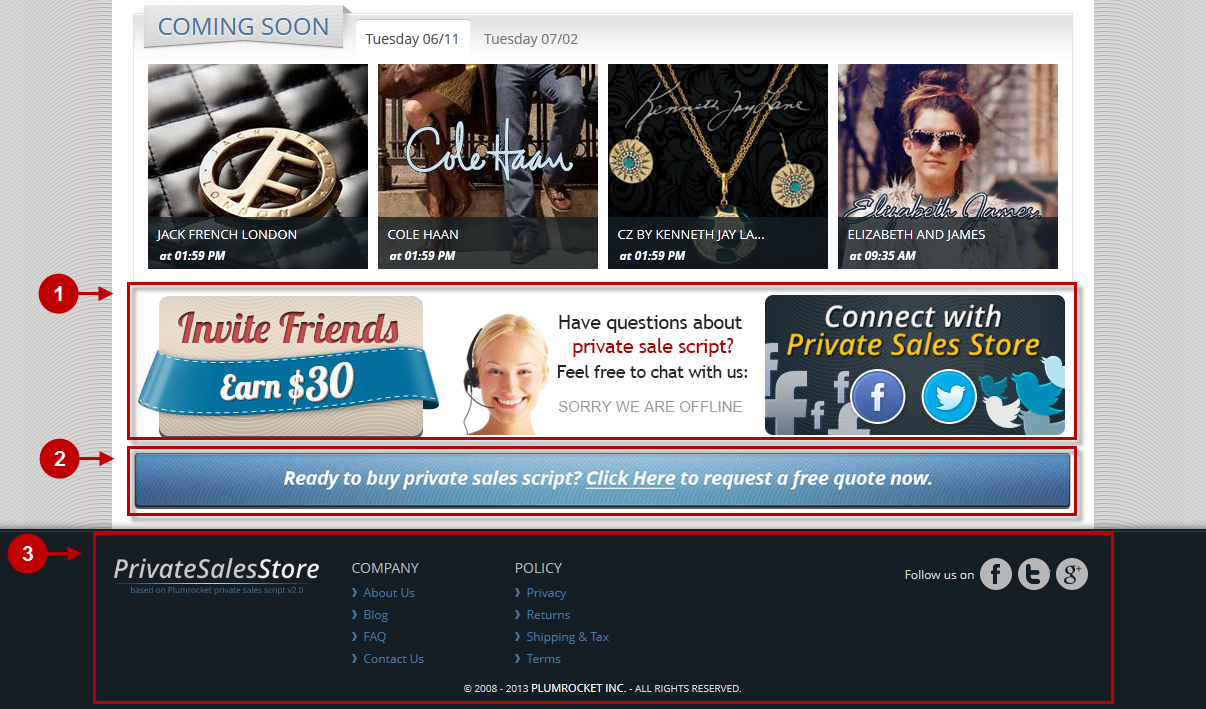
Detailed description:
- In oder to edit these banners, edit the static block called “bottom_banner”.
- In order to change the bottom banner, edit the static block called “bottom_banner_long”.
- In order to change footer links, edit the static block called “Footer Links”.
Adding Pagination on Product List
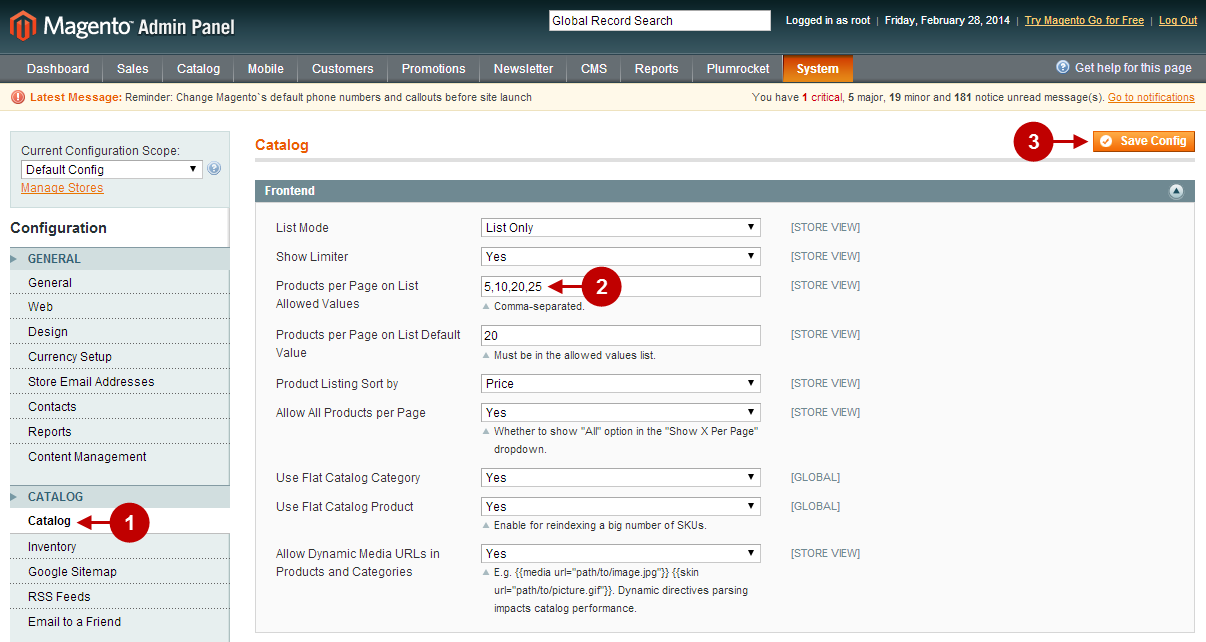
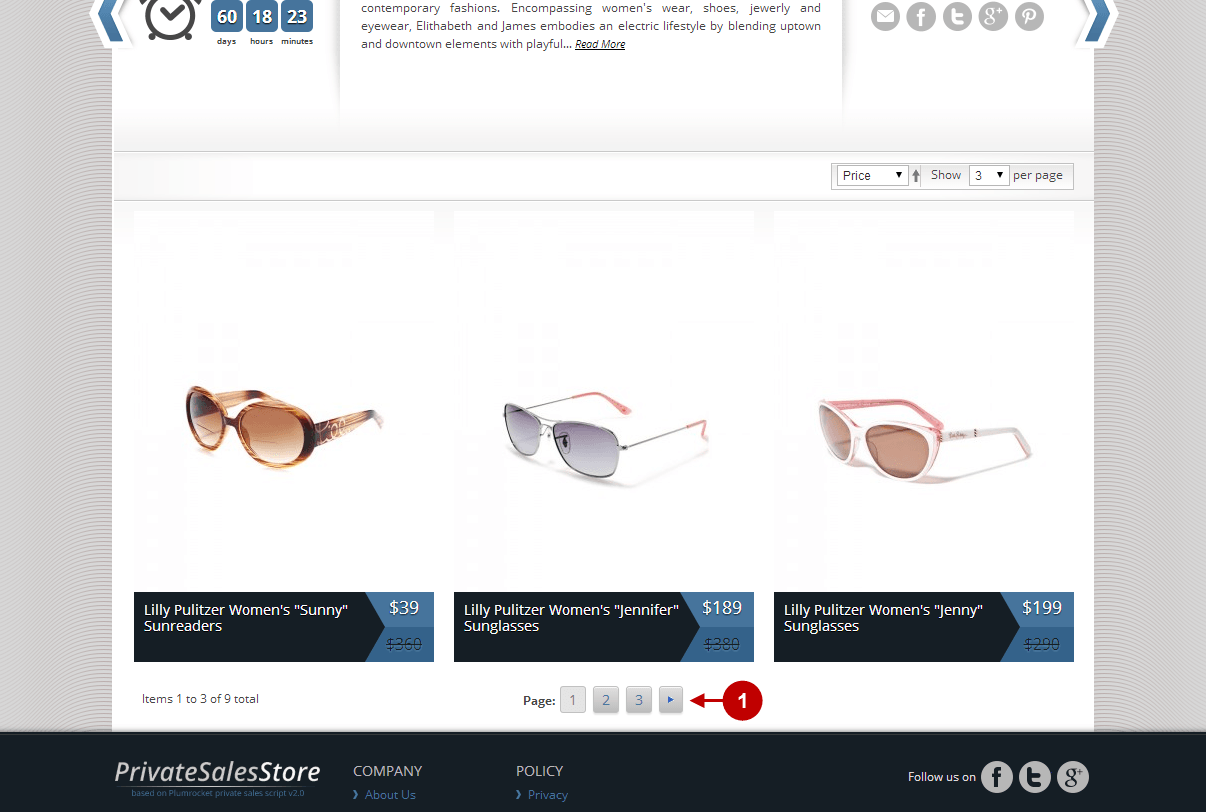
In order to add pagination to the Product List, please follow the step-by-step instructions below:
Detailed description:
- In the Backend go to System > Configuration, click on “Catalog” tab in the right-hand side menu
- Input the needed values into the “Products per Page on Grid Allowed Values” field
- Click on the “Save Config” button
Detailed description:
- The pagination will appear on the Product List
How to enable Customer Reviews for Ocean Blue Magento Theme
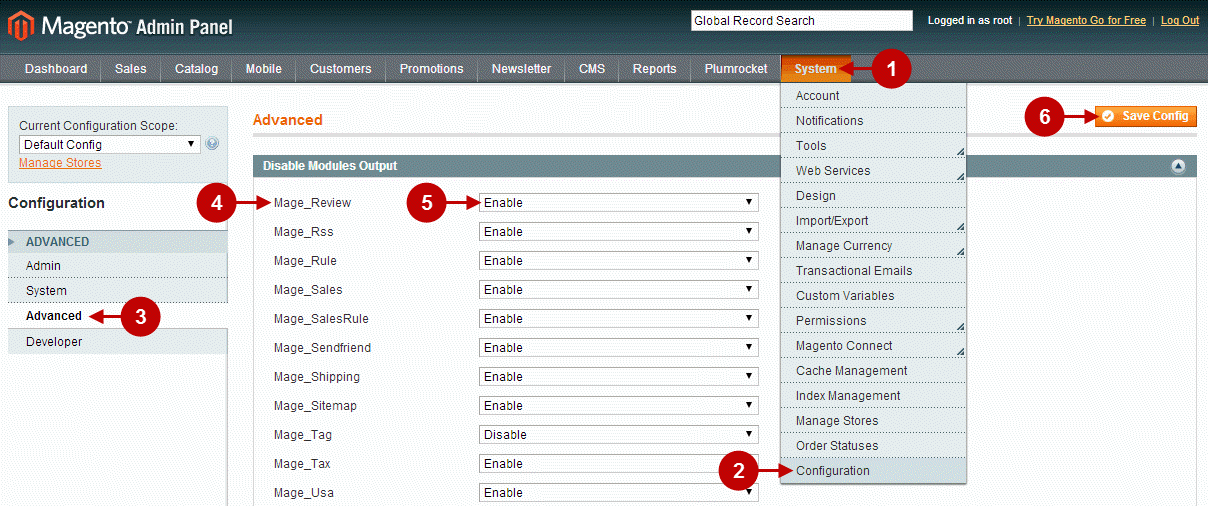
In order to activate customer reviews for your theme, please follow the steps below:
Step-by-Step actions:
- In your Magento backend choose “System” tab.
- Click on “Configuration” tab.
- In the menu on the left select “Advanced”.
- In the list of multiple options please find “Mage_Review”.
- Activate this option be clicking “Enable”.
- Press “Save Config” button.
Clear Magento Cache
After these steps are completed – don’t forget to clear Magento cache. To do this, follow the instructions below:
Step-by-Step action:
- Go to the Admin Panel >> System.
- Click on Cache Management.

Step-by-Step actions:
- Press the “Flush Magento Cache” button.

Sign-out and Sign-in back to Admin Panel. After you have successfully cleared the cache, Reviews and Ratings options will become available in your Magento backend:
Step-by-Step actions:
- Click on “Catalog” tab.
- Roll over to “Reviews and Ratings” menu.

Note: After your customers submit their reviews, these reviews will be available for moderation in “All Reviews” tab.
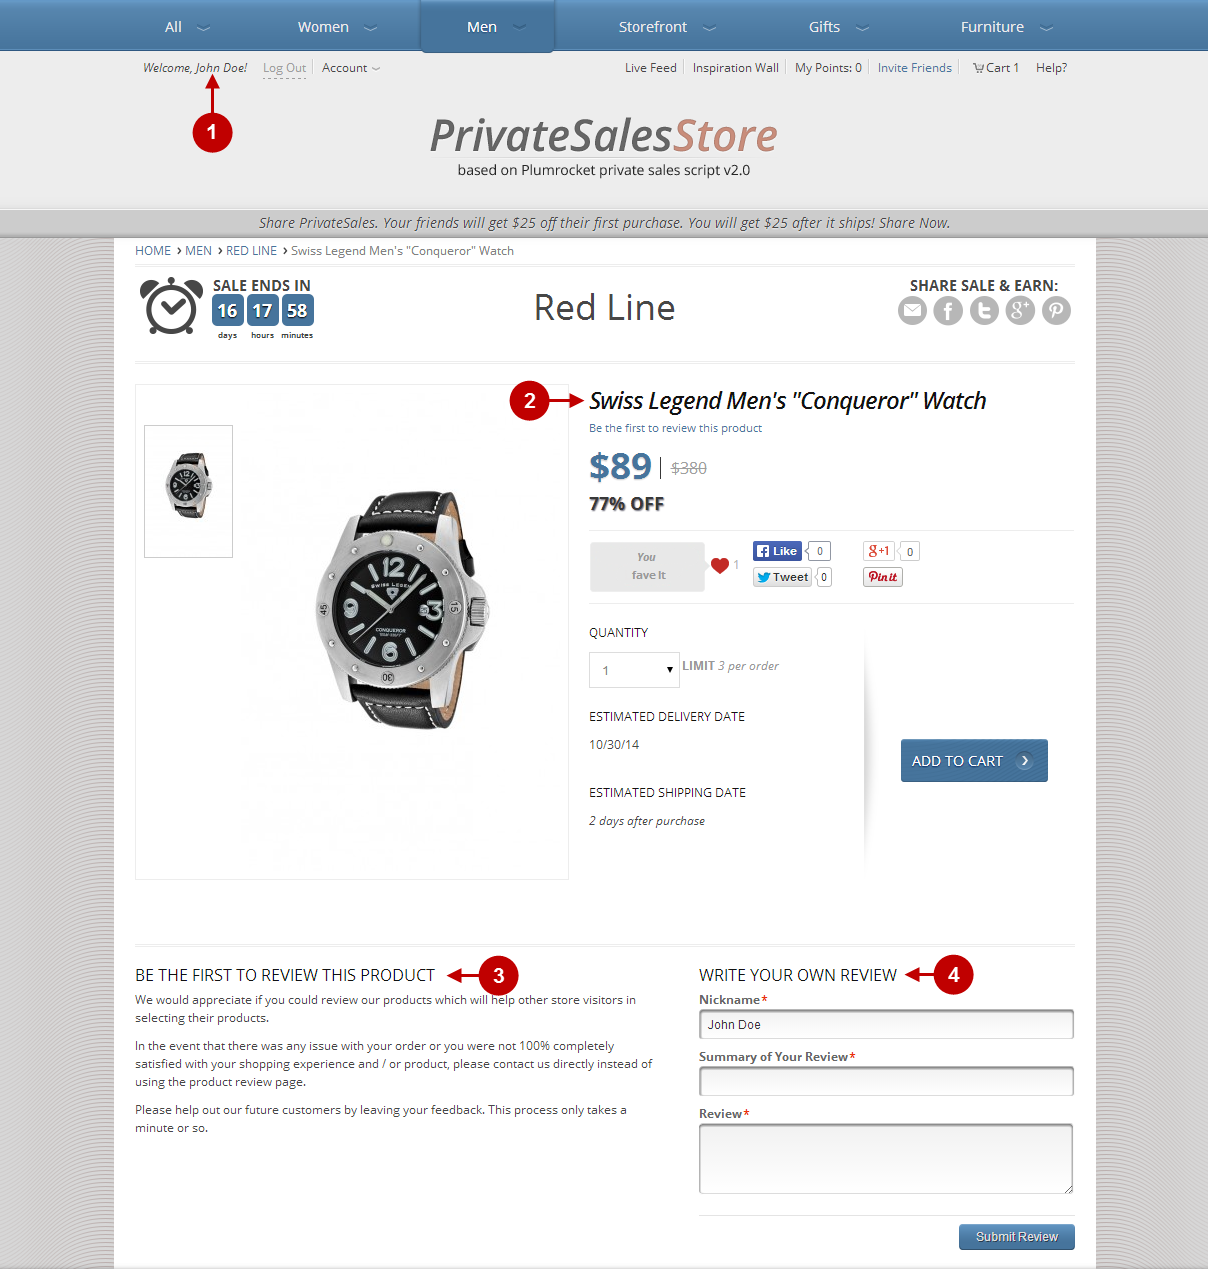
In order to see the appearance of Customer Reviews on your frontend – please follow these steps:
Step-by-Step actions:
- Login to your store as a customer.
- Go to any available product’s page.
- On the product page locate the “Be the first to review this product” section.
- Customer review form will be available for submitting.
Enabling Search on Ocean Blue Magento Theme
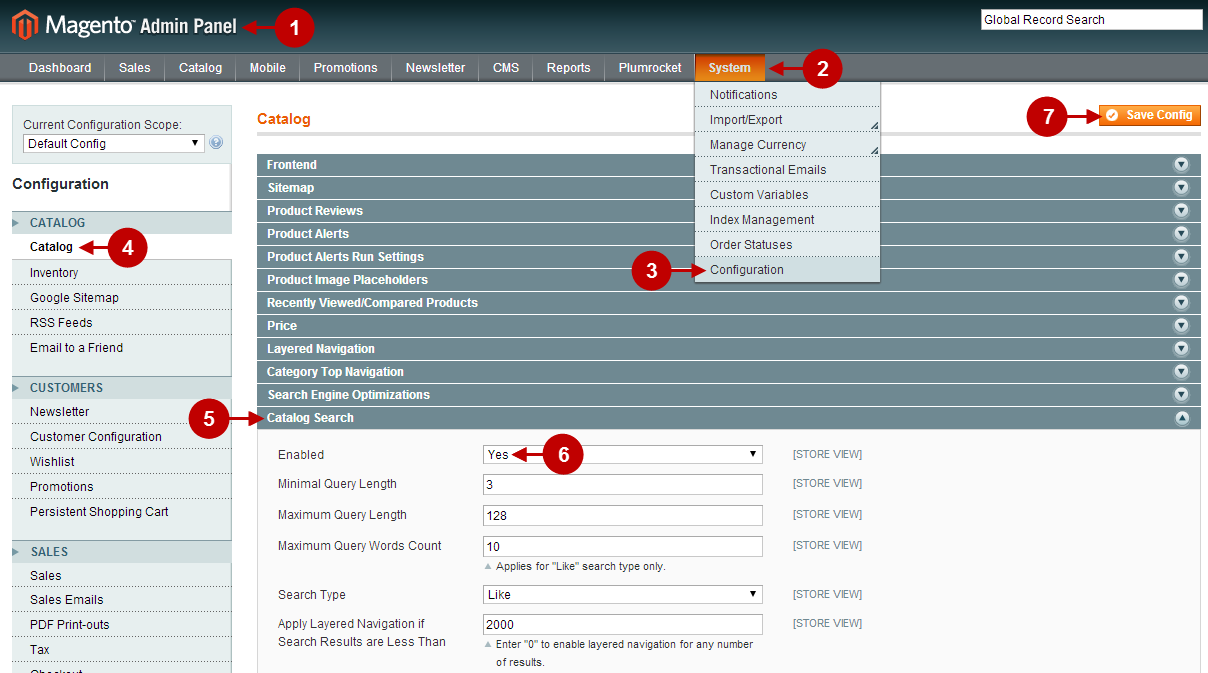
In order to activate search for this theme, please follow the steps below:
Detailed description:
- Login to your Magento admin panel.
- Select “System” tab.
- Click on “Configuration” option.
- Select “Catalog” option from left hand side menu.
- Press on “Catalog Search” tab. Other search options are available there for your convenience.
- Change option “Enabled” to “Yes”.
- Press “Save Config” button to save your changes.
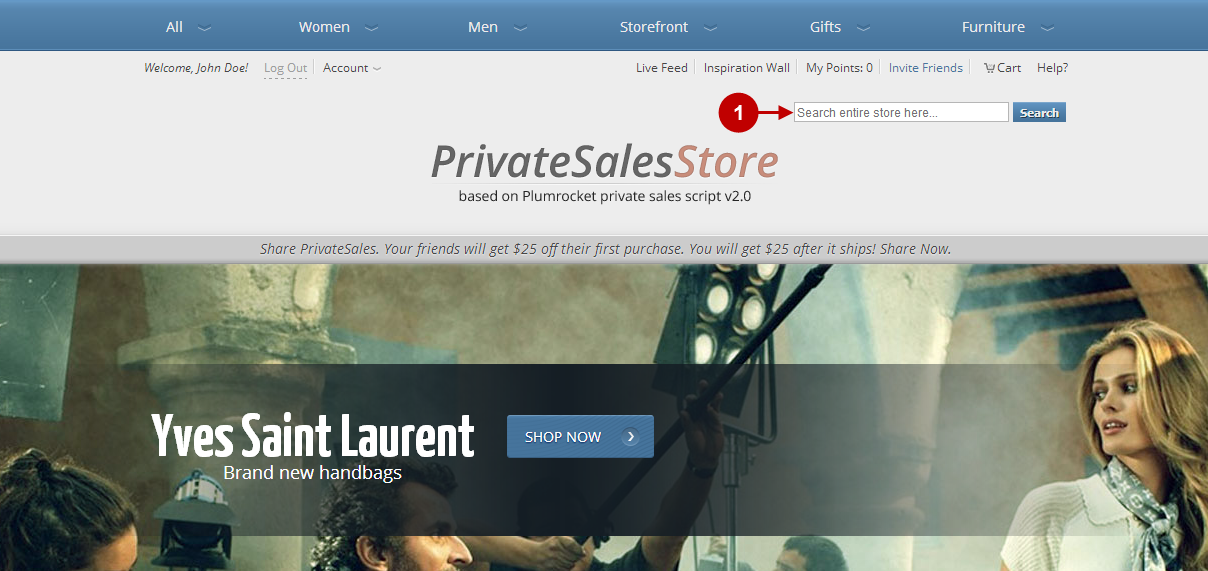
Now go to your Magento frontend, there you can check the search tab as shown below.
Detailed description:
- You can start your search by using this field.
