Below you will find standard social media buttons settings. Please, note that it is just an additional information. After our module is installed these buttons will be automatically set on default. So, you can use this information in case you have accidentally changed the settings, deleted a button or if you want to know where and how you can edit social media buttons at your website.
For more details on settings visit our Plumrocket Faves v1.0 Configuration section.
Default settings for Social Media buttons
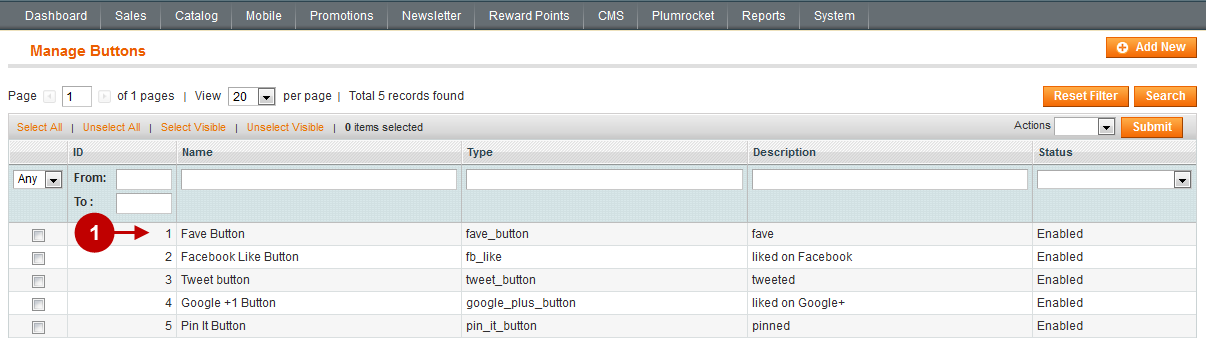
The page “Manage Buttons” allows you to manage social media buttons on your website. The website administrator can manage already existing buttons and add new ones.
In order the access the “Manage Buttons” page you will have to log in first and follow these instructions:
Step-by-Step action:
- Press the “Plumrocket” tab in the menu.
- Select “Faves”.
- Select “Manage Buttons”.

Step-by-Step action:
- Select the required button.
Facebook Button
Detailed description:
- Option “Name”: allows you to choose any name for the button.
- Option “Type”: allows you to choose the type of button (system name for the button) that is used when you insert the button into HTML. This name is unique and it cannot be changed in the future.
- Option “Description”: allows you to provide any description of the button in order to understand what it stands for in the future.
- Option “Status”: shows whether the button is enables or disabled.
- Option “Header Script”: requires you to enter the scripts that must be enabled for the button to function. The default code is as follow
<!--aaaa-->
<script type="text/javascript"
    src="//connect.facebook.net/en_US/all.js#xfbml=1&appId=416086851745150">
</script>- Option “Button Code”: requires you to enter the code of the button. The default code is as follows:
<div class="fb-like" data-show-faces="false" layout="button_count"
    show_faces="false" action="like" colorscheme="light" scrolling="no"
    frameborder="0" allowtransparency="true" width="450" data-send="false"
    data-href="{{url}}">
</div>- Option “Callback code”: requires you to enter the callback code. The default code is as follows:
jQuery(document).ready(function() {
    FB.Event.subscribe('edge.create', function(url) {
        plumrocketFaveObserveEvent(url, '{{type}}');
    });
});- Press button “Save” to save changes.

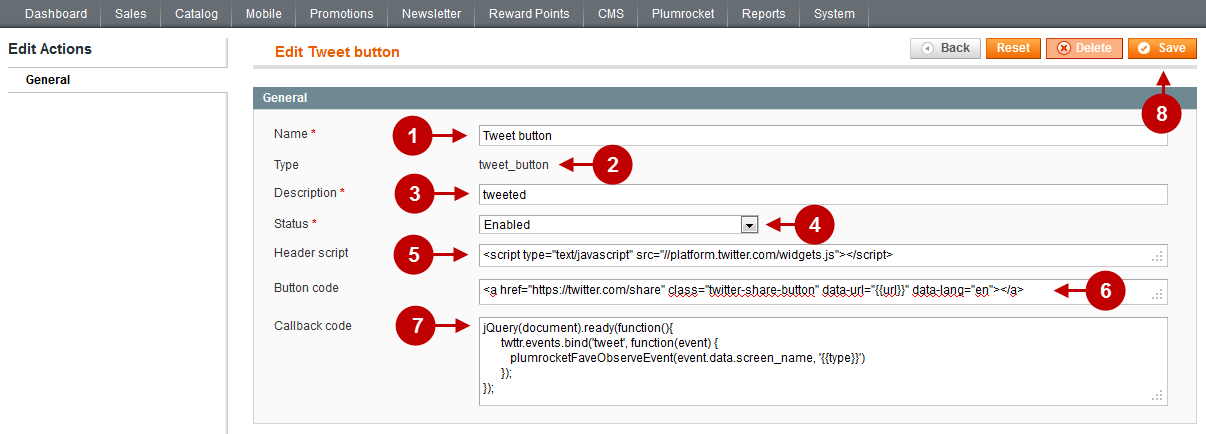
Tweet Button
Detailed description:
- Option “Name”: allows you to choose any name for the button.
- Option “Type”: allows you to choose the type of button (system name for the button) that is used when you insert the button into HTML. This name is unique and it cannot be changed in the future.
- Option “Description”: allows you to provide any description of the button in order to understand what it stands for in the future.
- Option “Status”: shows whether the button is enables or disabled.
- Option “Header Script”: requires you to enter the scripts that must be enabled for the button to function. The default code is as follows:
<script type="text/javascript" src="//platform.twitter.com/widgets.js">
</script>- Option “Button Code”: requires you to enter the code of the button. The default code is as follows:
<a href="https://twitter.com/share" class="twitter-share-button"
    data-url="{{url}}" data-lang="en">
</a>- Option “Callback code”: requires you to enter the callback code. The default code is as follows:
jQuery(document).ready(function() {
    twttr.events.bind('tweet', function(event) {
        plumrocketFaveObserveEvent(event.data.screen_name, '{{type}}');
    });
});- Press button “Save” to save changes.
Google plus Button
Detailed description:
- Option “Name”: allows you to choose any name for the button.
- Option “Type”: allows you to choose the type of button (system name for the button) that is used when you insert the button into HTML. This name is unique and it cannot be changed in the future.
- Option “Description”: allows you to provide any description of the button in order to understand what it stands for in the future.
- Option “Status”: shows whether the button is enables or disabled.
- Option “Header Script”: requires you to enter the scripts that must be enabled for the button to function. The default code is as follows:
<script type="text/javascript" src="http://apis.google.com/js/plusone.js">
</script>- Option “Button Code”: requires you to enter the code of the button. The default code is as follows:
<g:plusone size="medium" href="{{url}}"
    callback="plumrocketFeedObserveGoogleEvent">
</g:plusone>- Option “Callback code”: requires you to enter the callback code. The default code is as follows:
function plumrocketFeedObserveGoogleEvent(obj) {
    if (obj.state == 'on')
        plumrocketFaveObserveEvent(obj.href, '{{type}}');
}- Press button “Save” to save changes.

Pin It Button
Detailed description:
- Option “Name”: allows you to choose any name for the button.
- Option “Type”: allows you to choose the type of button (system name for the button) that is used when you insert the button into HTML. This name is unique and it cannot be changed in the future.
- Option “Description”: allows you to provide any description of the button in order to understand what it stands for in the future.
- Option “Status”: shows whether the button is enables or disabled.
- Option “Header Script”: requires you to enter the scripts that must be enabled for the button to function. The default code is as follows:
<script type="text/javascript" src="//assets.pinterest.com/js/pinit.js">
</script>
<script type="text/javascript"
    src="{{skin}}js/plumrocket/fave/pinIt-callback.js{{/skin}}">
</script>- Option “Button Code”: requires you to enter the code of the button. The default code is as follows:
<a href="http://pinterest.com/pin/create/button/?url={{url}}&media={{media}}&description={{description}}" onclick="return false;"
    class="pin-it-button" count-layout="horizontal">
    <img border="0" src="//assets.pinterest.com/images/PinExt.png"
        title="Pin It" />
</a>
<script type="text/javascript">
    //jQuery(document).ready(function() {
        pinItTracking.add(jQuery('.pin-it-button:last'), '{{url}}');
    //});
</script>- Option “Callback code”: requires you to enter the callback code.
- Press button “Save” to save changes.
