In this section you will find a detailed description of the Plumrocket Faves Extension’s features and settings that can be reached at the admin panel following the access path Plumrocket > Faves.
Configuring Faves Extension
Step-by-Step action:
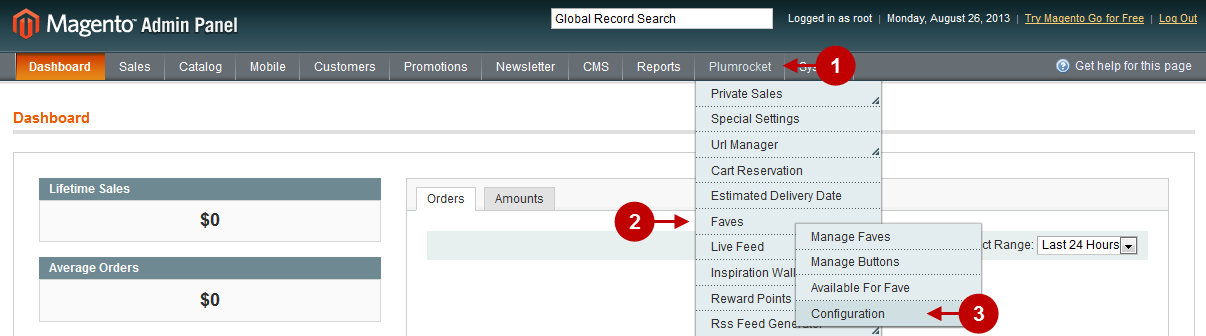
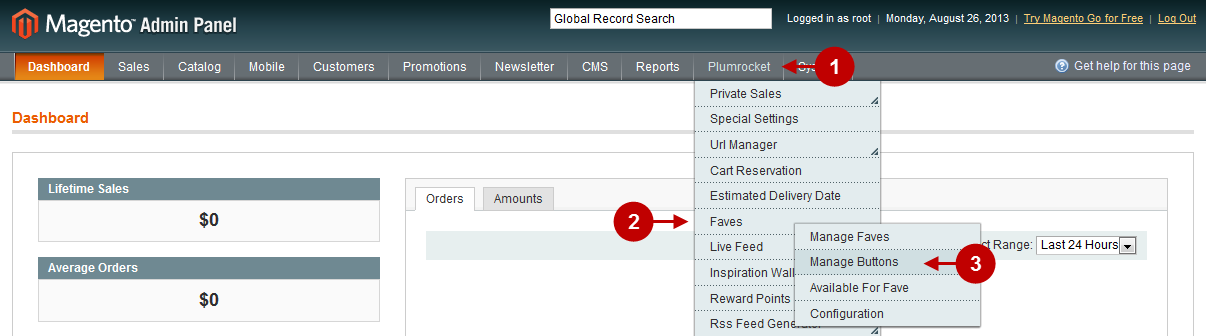
- Press the “Plumrocket” tab in the menu.
- Select “Faves”.
- Select “Configuration”.
Step-by-Step action:
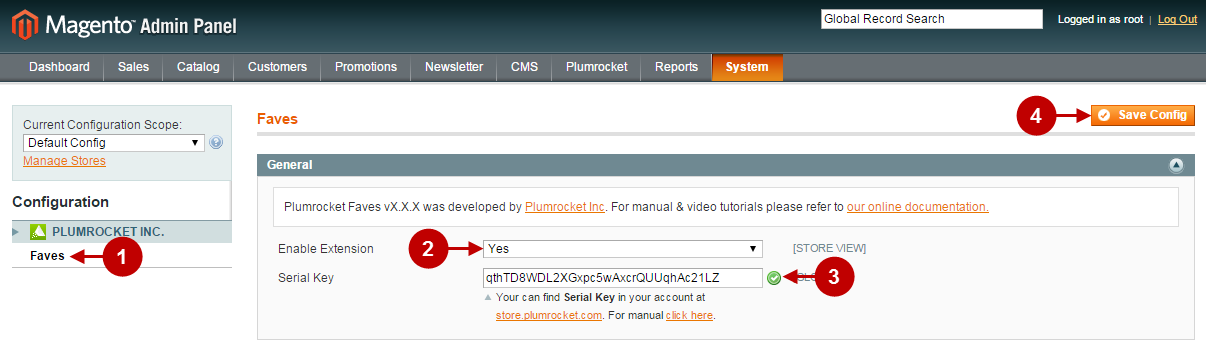
- Select “Faves” in the left menu.
- Option “Enable Plumrocket Faves”: Set “Yes” to enable the Module or “No” to disable it.
- Option “Serial Key”: enter unique serial key provided after the purchase for legitimate and proper functioning of your extension. Note: In most cases this field will be pre-filled with serial key automatically and the green check mark will be displayed. Otherwise please read article Serial Key Activation in order to find and paste your serial key manually.
- Press the button “Save Config” to save the settings.
Manage Faves
In order the access the “Manage Faves” page you will have to log in first and follow these instructions:
Step-by-Step action:
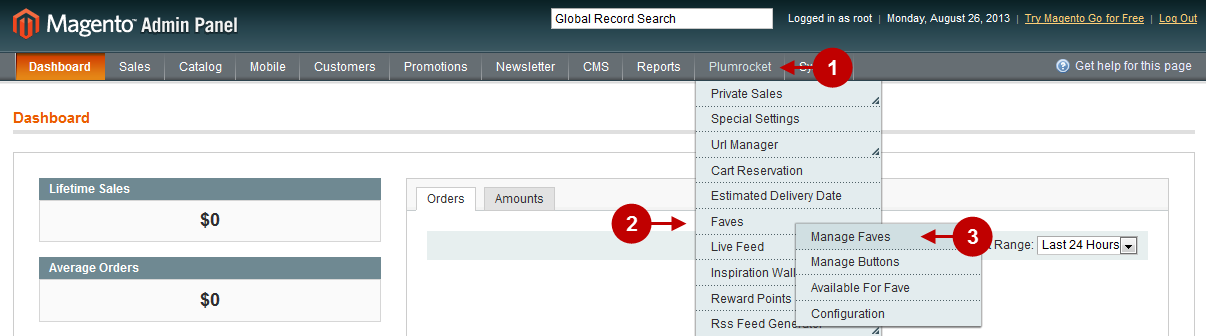
- Press the “Plumrocket” tab in the menu.
- Select “Faves”.
- Select “Manage Faves”.
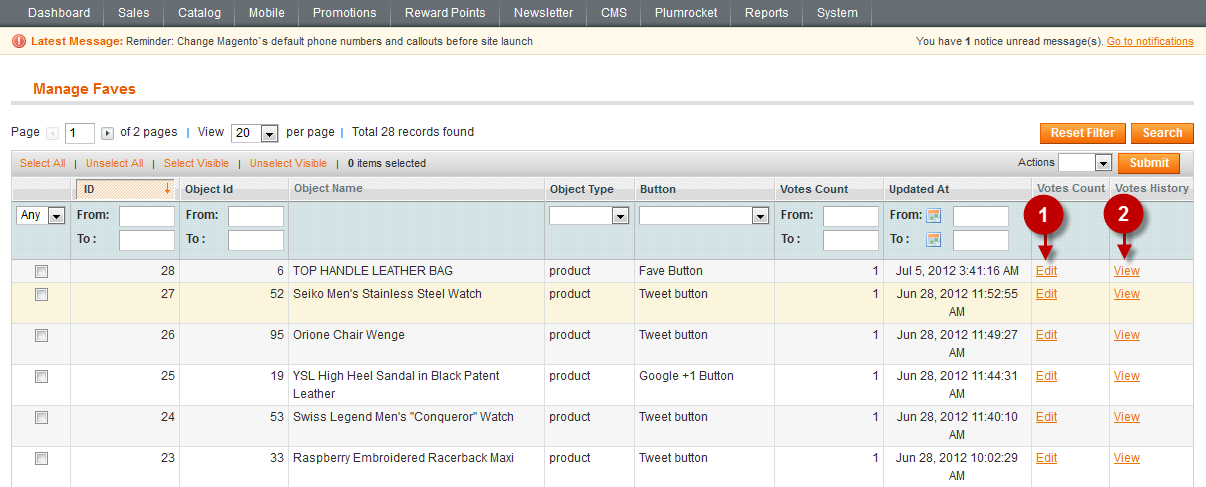
You will see the list of all products that your customers ‘liked’ in social media or marked using the “Fave” button. This page was designed to monitor the statistics of Likes dealing with all the products that your website offers.
The website administrator can use the following options of this page
Detailed description:
- Option “Edit”: allows you to configure the value of Votes Count. Note, configuration changes will be displayed only for the “Fave” button in the front-end.
- Option “View”: allows you to view the history of Likes.
If you click on the “View” button, you will see something similar to the screenshot below:
Step-by-Step action:
- Select the elements you need from the list.
- You can delete elements using the list of actions. To do this, select option ‘delete’ from the list.
- Click on “Submit” button to enable changes.

After you click on the “Edit” button, you will be able to configure Votes count. (This number shows how many people have clicked on the “Fave” button)
Step-by-Step action:
- Select the “General” tab.
- Here you can change the number of Likes.
- Press “Save” to save changes.

Manage Buttons
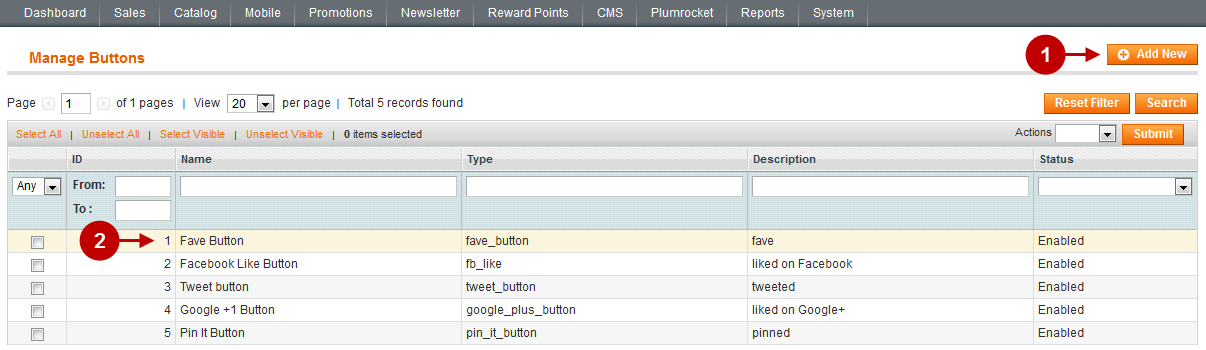
The page “Manage Buttons” allows you to manage social media buttons on your website. The website administrator can manage already existing buttons and add new ones.
In order the access the “Manage Buttons” page you will have to log in first and follow these instructions:
Step-by-Step action:
- Press the “Plumrocket” tab in the menu.
- Select “Faves”.
- Select “Manage Buttons”.
The website administrator can perform the following actions in this page
Step-by-Step action:
- Select “Add new” in order to add a new social media button *
- Select any existing button from the list to be able to edit it.
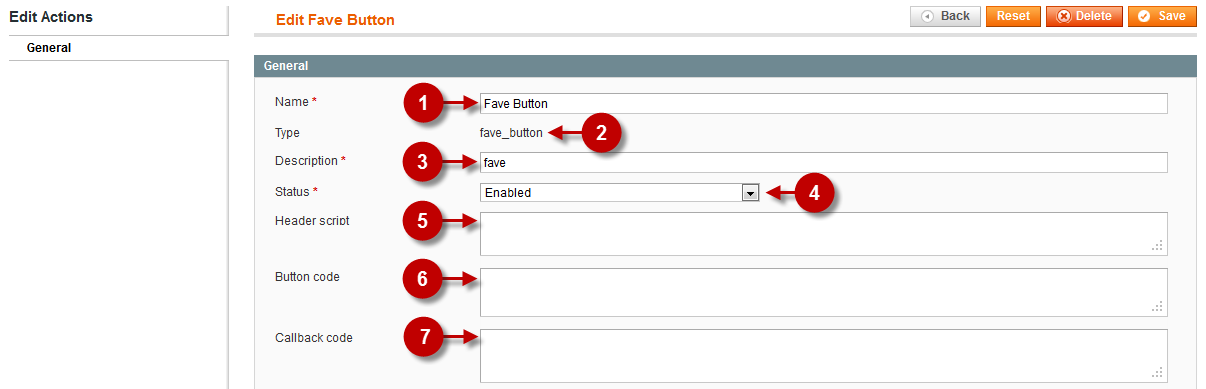
The screenshot below displays the page you will see when adding and editing social media buttons, as well as possible options available here.
Detailed description:
- Option “Name”: allows you to choose any name for the button.
- Option “Type”: allows you to choose the type of button (system name for the button) that is used when you insert the button into HTML. This name is unique and it cannot be changed in the future.
- Option “Description”: allows you to provide any description of the button in order to understand what it stands for in the future.
- Option “Status”: shows whether the button is enables or disabled.
- Option “Header Script”: requires you to enter the scripts that must be enabled for the button to function.
- Option “Button Code”: requires you to enter the code of the button.
- Option “Callback Code”: requires you to enter the callback code *
Important Information:
- If you have the Live Feed module installed on your website and want the products to be added to the Feed Page after user clicks on social media buttons or Fave button, you should enter extra line in the “CALLBACK CODE”: plumrocketFaveObserveEvent(url, type);
Check the example of using Facebook Like Button Callback Code:
            jQuery(document).ready(function(){
                FB.Event.subscribe('edge.create', function(url) {
                    plumrocketFaveObserveEvent(url, '{{type}}');
                });
            });
- HEADER SCRIPT and BUTTON CODE – can be received at social media websites by means of buttons generation service
- if needed “HEADER SCRIPT”, “BUTTON CODE”, “CALLBACK CODE” can be supplemented with variable expressions
Variable expressions are presented in the following format:
{{TAG_NAME}} – these expressions will be replaced by the appropriate ones during parser processing
Standard expressions that can be used here:
{{url}}
{{type}}
{{media}}
{{description}}
Note, that the option plumrocketFaveObserveEvent(url, ‘{{type}}’) is the key here, since it is responsible for callback in the Faves Module. It uses the page URL that are ‘liked’ and button type as the criteria to provide the statistics.
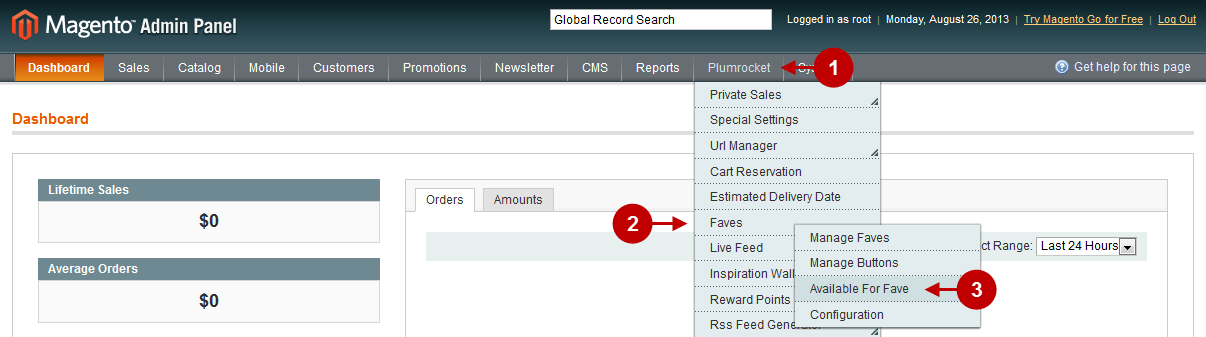
Available For Fave
The “Available For Fave” Tab allows you to manage the types that will function according to the rules of this Magento social media extension.
In order to access the “Available For Fave” page you will have to log in first and follow these instructions:
Step-by-Step action:
- Press the “Plumrocket” tab in the menu.
- Select “Faves”.
- Select “Available For Fave”.
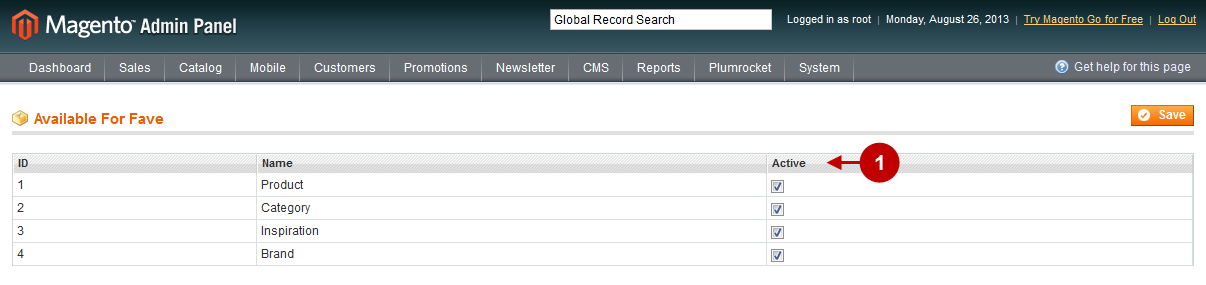
This extension can be set on default for “Product”, “Category”, “Inspiration” (Note, this option can be enabled only if Inspiration Wall extension is installed) and “Brand” (Note, this option can be enabled only if Shop by Brand extension is installed).
The website administrator can enable the section where the ‘Faves’ extension will function.
Detailed description:
- Option “Active”: allows you to activate only that type where the ‘Faves’ module must function.
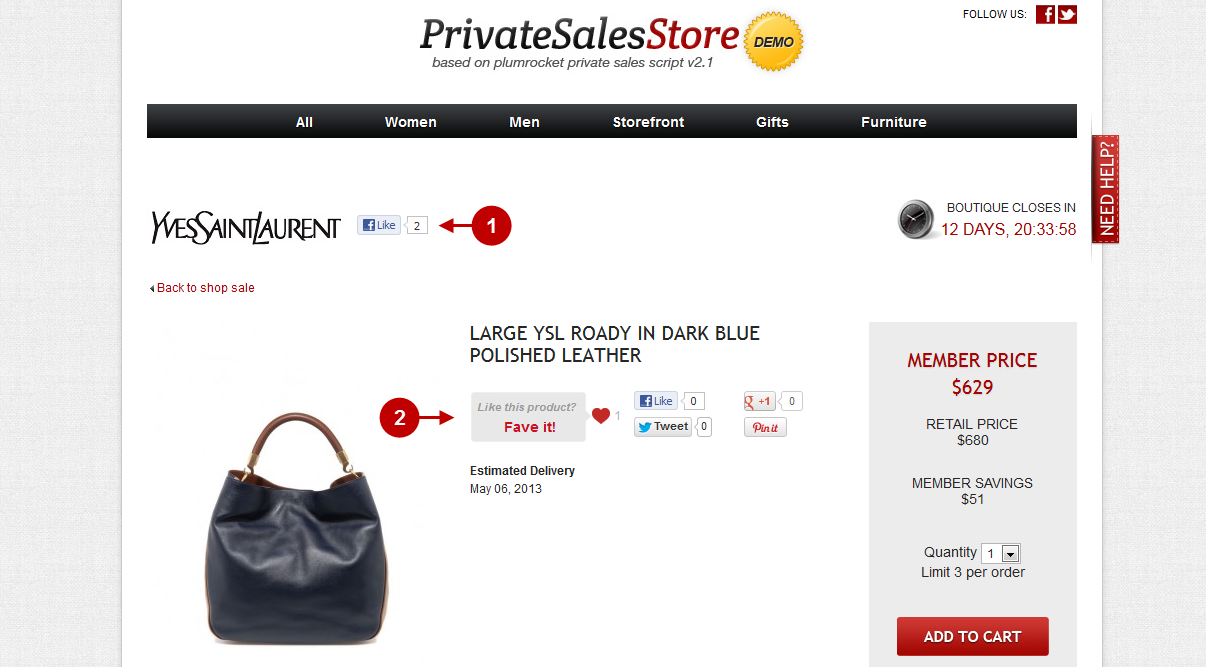
This is how Faves is displayed in the front-end.
Detailed description:
- You can like boutique with facebook social button.
- You can add products to favorites.