Configuring Magento Advanced Reviews & Reminders
Here you will learn how to correctly configure our Advanced Reviews & Reminders Extension. To do this, follow instructions below.
Step-by-Step action:
- Press “Plumrocket” tab in the menu.
- Select “Advanced Reviews & Reminders” module.
- Click on “Configuration” tab.

Detailed description:
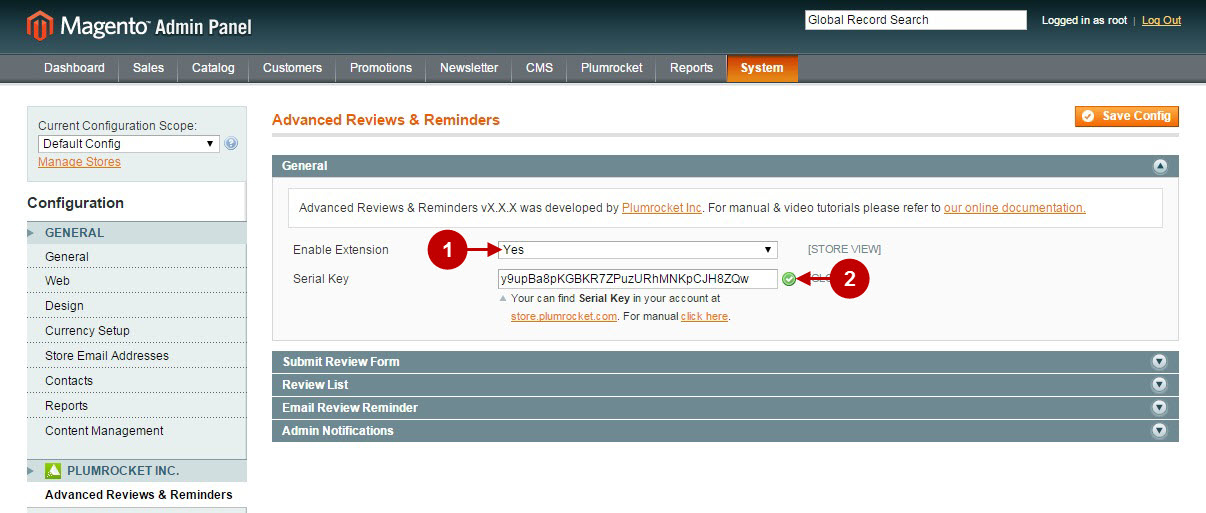
- “Enable Extension”: Select “Yes”, to enable Advanced Reviews & Maintenance module or “No” to disable it.
- Option “Serial Key”: enter unique serial key provided after the purchase for legitimate and proper functioning of your extension. Note: in most cases this field will be pre-filled with serial key automatically and the green check mark will be displayed. Otherwise please read article Serial Key Activation in order to find and paste your serial key manually.
Configuring “Submit Review Form” section
Detailed description:
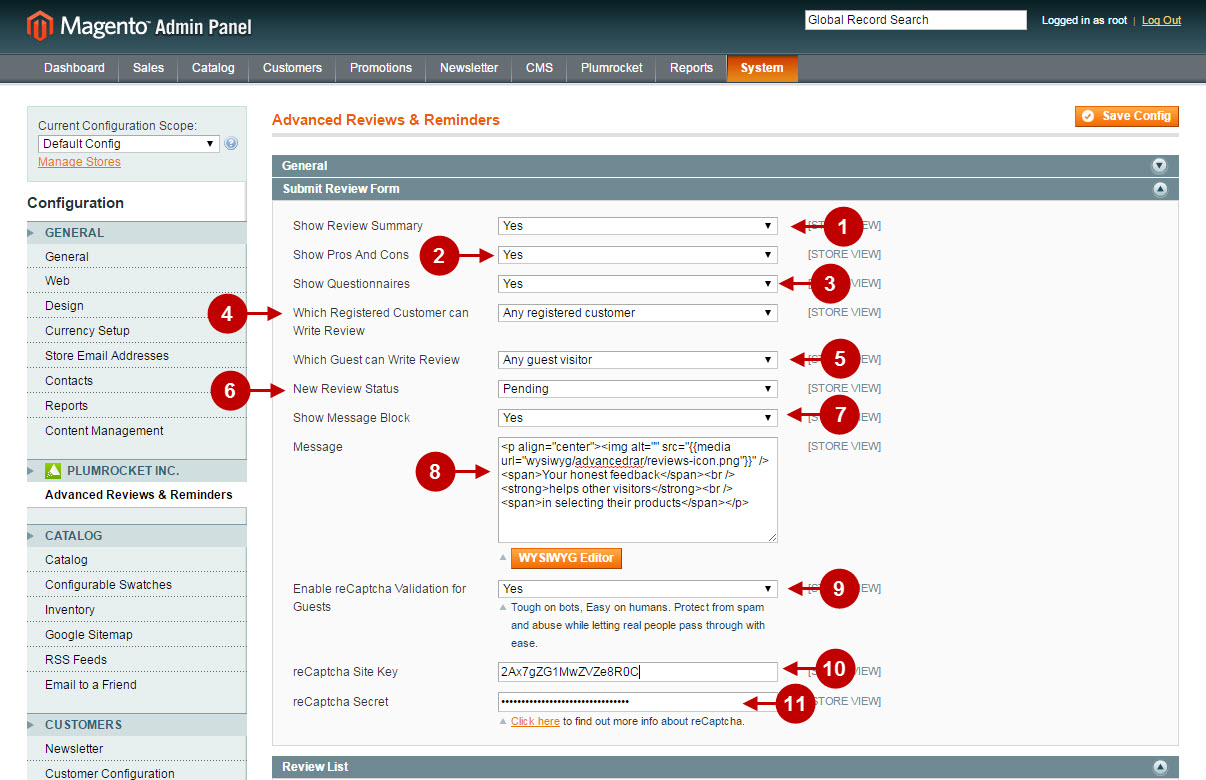
- Option “Show Review Summary”: allows you to display review summary input form. Possible options are: “Required”, “Yes”, “No”.
- Option “Show Pros And Cons”: lets you display pros and cons input forms in the review section. Possible options are: “Required”, “Yes”, “No”.
- Option “Show Questionnaires”: allows you to enable or disable the questionnaires for reviews.
- Option “Which Registered Customer Can Write Review”: if enabled, this option will allow to select the type of customers who can leave reviews.
- Option “Which Guest Guests Can Write Review”: with this option enabled, you can choose the type of guests can who can leave reviews.
- Option “New Review Status”: here you can set the default status for the new reviews. Possible options are: “Pending”, “Approved”, “Approved (review with rating 4 or 5 stars)”.
- Option “Show Message Block”: allows you to display your custom message block.
- Option “Message”: you can specify what message will be displayed in the message block, e.g. ads or other events at your store.
- Option “Enable reCaptcha Validation for Guests”: allows you to display the recaptcha validation section. For more information about recaptcha, please read this article.
- Option “reCaptcha Site Key”: in order to enable recaptcha validation you will need to register your website here. After you have registered your website, copy and paste provided recaptcha site key into this text area.
- Option “reCaptcha Secret”: after you have registered your website – copy and paste provided recaptcha secret into this text area.
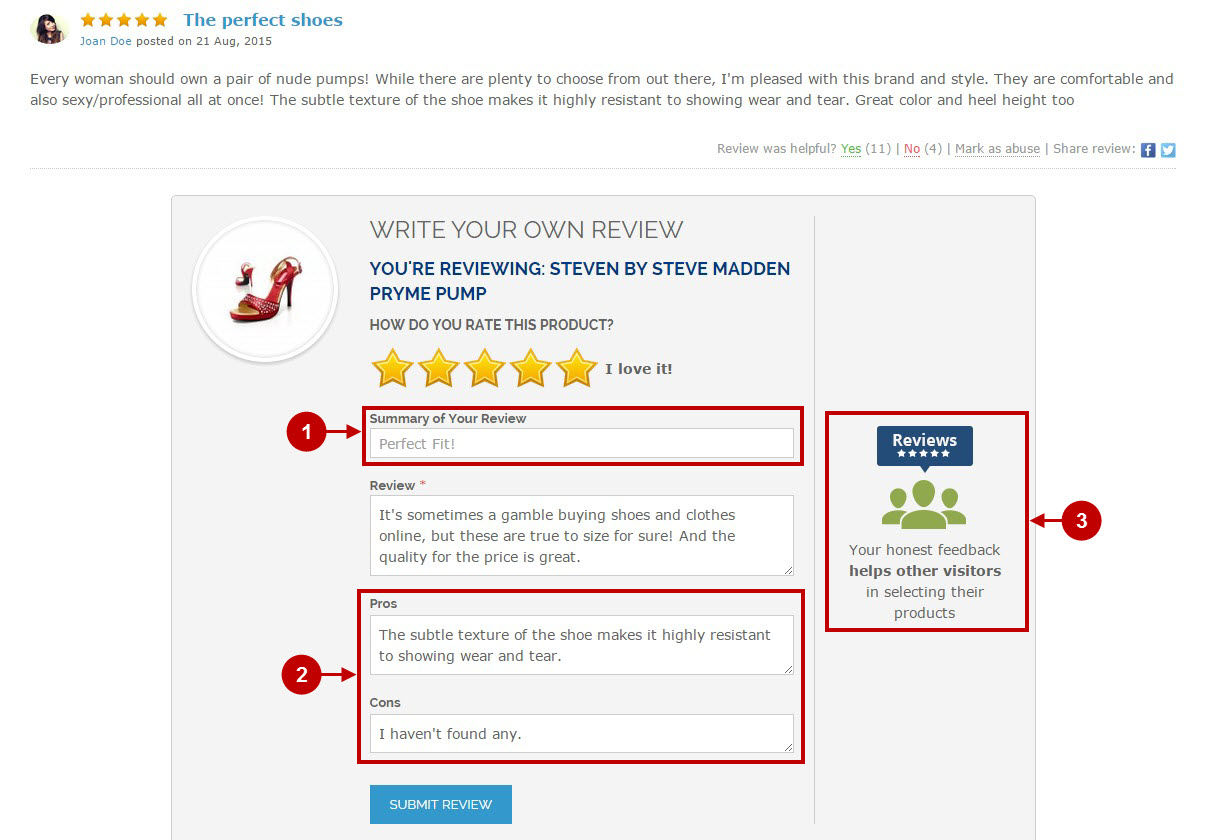
This is how the submit review form will look like on your frontend.
Detailed description:
- If enabled, this is how review summary input form will look like.
- Here’s how the pros and cons input forms will be displayed.
- This is how your custom message block for ads or events at your store can look like.
Configuring “Review List” section
Detailed description:
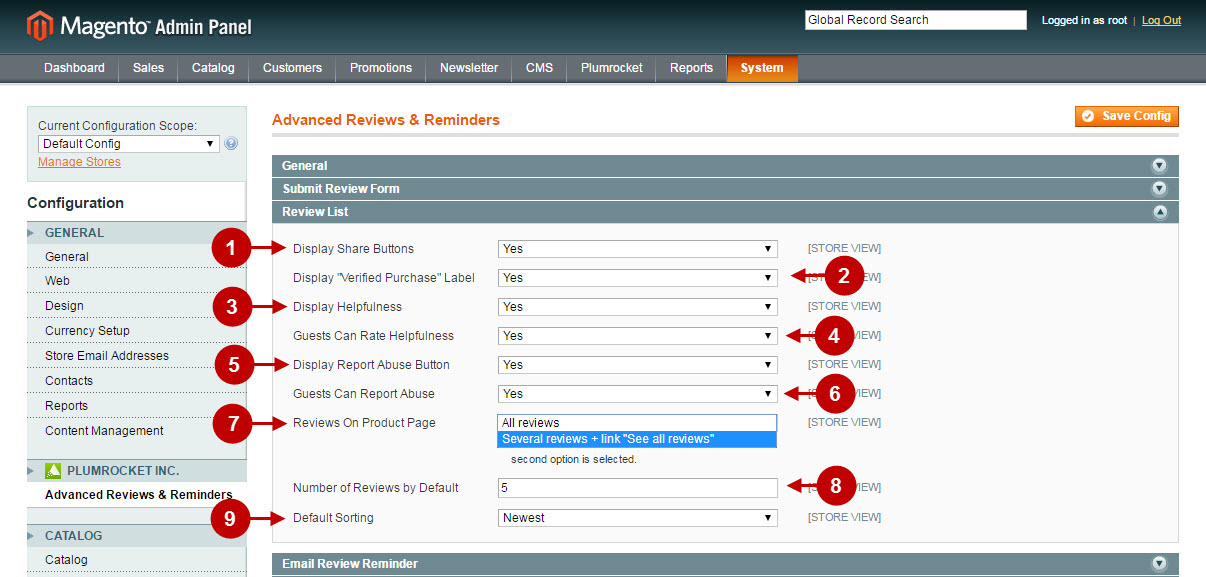
- Option “Display Share Buttons”: allows you to display social share buttons.
- Option “Display “Verified Purchase” Label”: allows to add “Verified Purchase” label to customer’s review.
- Option “Display Helpfulness”: lets you display “Review was helpful?” section.
- Option “Display Report Abuse Button”: allows you to display “Mark as Abuse” button.
- “Guests Can Report Abuse”: with this option enabled, both registered customers and guests can report abuse.
- Option “Reviews on Product Page”: allows you to select how reviews will be displayed in the review list. Possible options are: “All reviews”, “Several reviews + link See all reviews”. Note: if second option is selected – separate page with the complete list of reviews will become available.
- “Number of Reviews by Default”: allows you to specify how many reviews will be displayed in the product review list, if “Several reviews + link See all reviews” option is selected.
- Option “Default Sorting”: allows you to select the sort order of the reviews list. Possible options are: “Newest”, “Helpfulness”, “Best rating”.
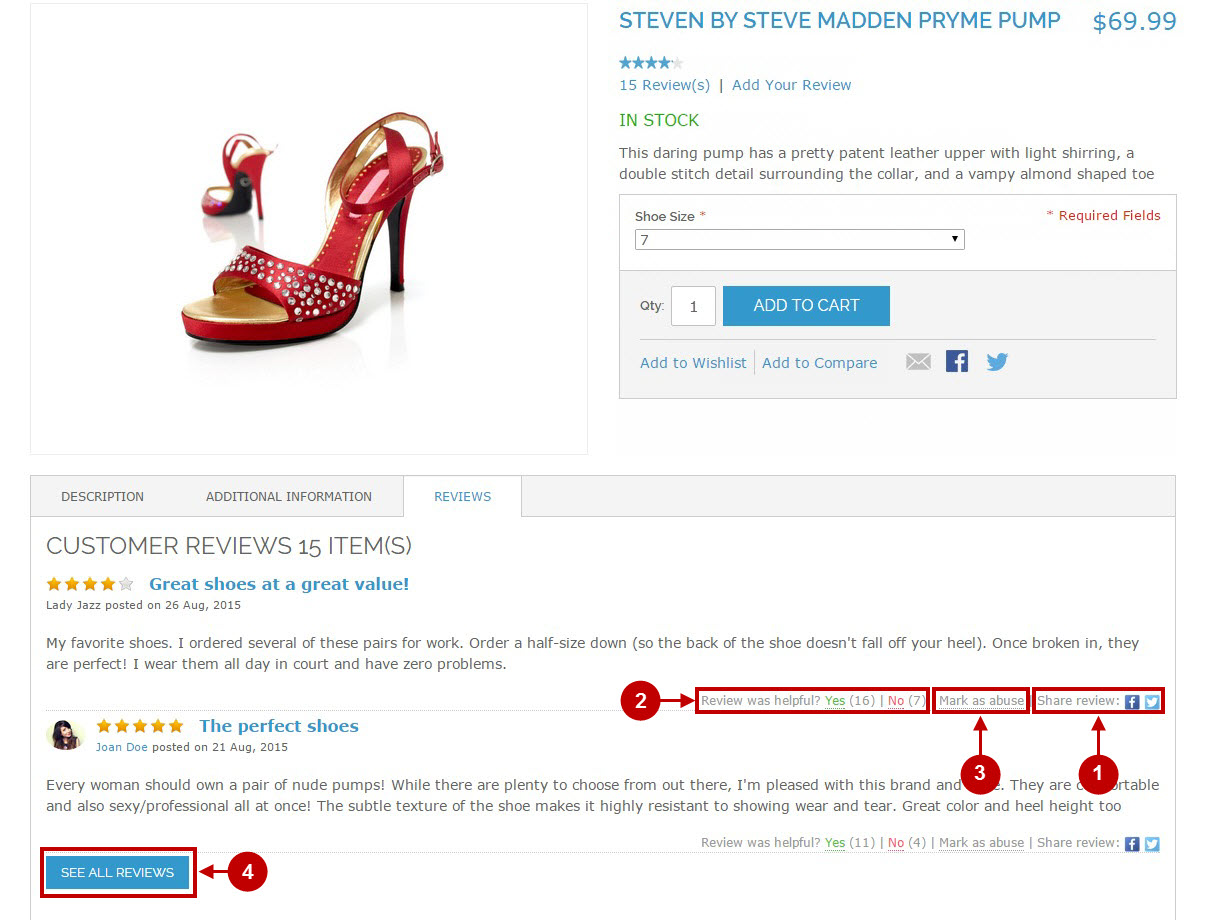
Here’s how the review list section will look like on your frontend.
Detailed description:
- If enabled this is how “Share Buttons” will look like.
- Here’s how the “Report Abuse” button will be displayed.
- This is how “Helpfulness” section will be displayed if enabled.
- If “Several reviews + link See all reviews” option was selected, this is how the “See all reviews” button will look like. By clicking on this button, customers will navigate to the separate page with the complete list of reviews.
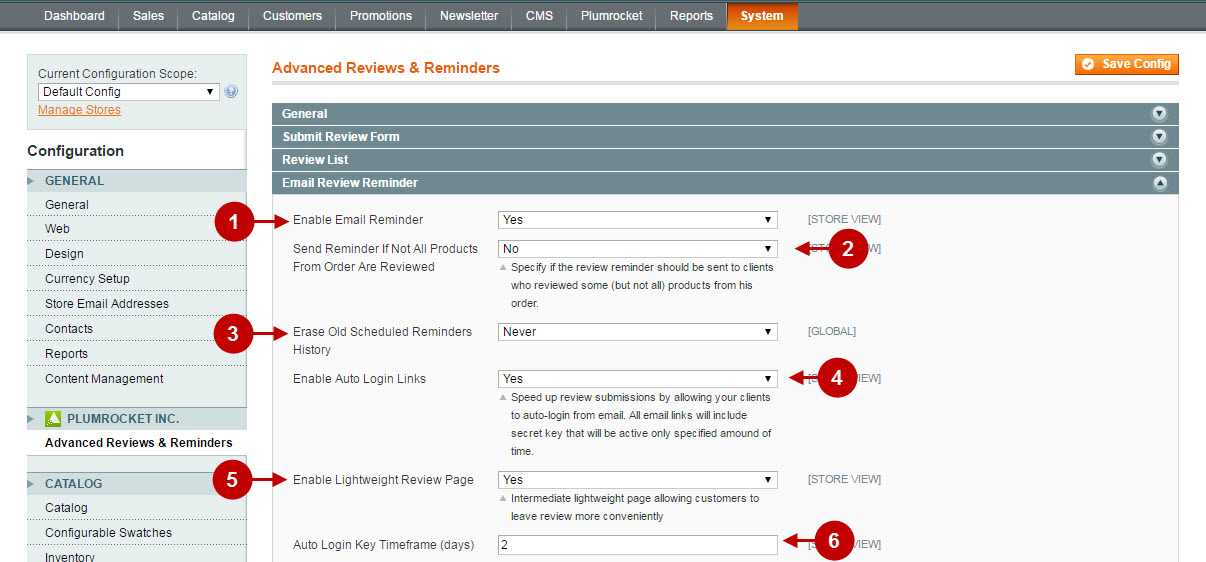
Configuring “Email Review Reminder” section
Detailed description:
- Option “Enable Email Reminder”: allows you to enable or disable email reminder.
- Option “Send Reminder If Not All Products From Order Are Reviewed”: here you can specify whether review reminder should be sent to customers who reviewed some (but not all) products from their orders.
- “Erase Old Scheduled Reminders History”: this option allows you to specify how often reminders history should be erased. Possible options are: “Older than 3 months”, “Older than 6 months”, “Older than 1 year”, ” Older than 2 years”, “Never”.
- Option “Enable Auto Login Links”: allows you to add auto login links to the email reminder. Note: email links will include secret key, that will be active only for specified number of days before it expires.
- Option “Enable Lightweight Review Page”: this intermediate lightweight page allows customers to leave reviews more conveniently.
- Option “Auto Login Key Timeframe (days)”: here you can specify the amount of time auto login key will be active.
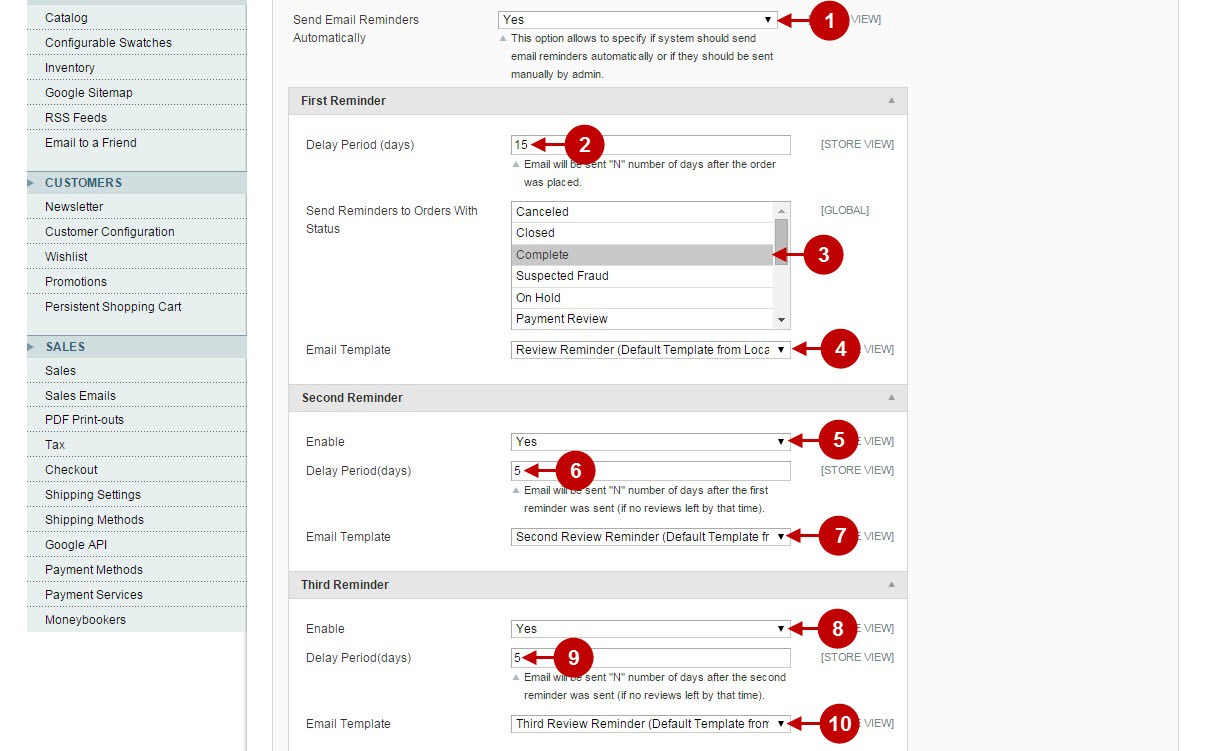
Detailed description:
- Option “Send Email Reminders Automatically”: allows you to specify whether the email reminders should be sent manually or automatically.
- Option “Delay Period (days)”: here you can specify the delay time for the email reminder to be sent after the order was placed.
- “Send Reminders to Orders with Status”: this option allows you to select which customer order groups will get the email reminder.
- Option “Email Template”: allows you to choose the template that will generate review reminder email.
- Option “Enable Second Reminder”: allows you to enable or disable the second review reminder.
- “Delay Period (days)”: this option lets you specify the delay time for the second review reminder to be sent after the first reminder. Note: the second review reminder will be sent only if customer haven’t left any reviews by that time.
- Option “Email Template”: allows you to select the template that will generate the second review reminder email.
- “Enable Third Reminder”: this option lets you enable or disable the third review reminder.
- Option “Delay Period (days)”: allows you to specify the delay time for the third review reminder to be sent after the second reminder. Note: the third review reminder will be sent only if customer haven’t left any reviews by that time.
- Option “Email Template”: here you can select the template for the third review reminder email.
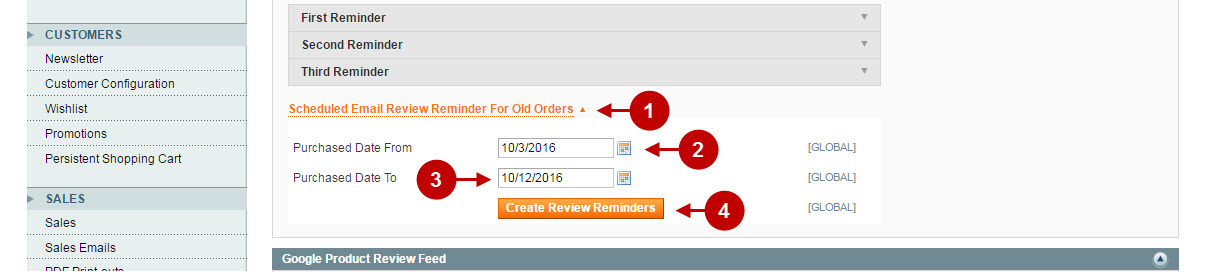
Detailed description:
- Option “Scheduled Email Review Reminder For Old Orders”: allows you set up the Review Reminder functionality that will go through your old orders (created before Advanced Reviews & Reminders). In order to enable it – please indicate the “Purchased Date From” and “Purchased Date To”. Important: For this feature to function – please make sure that “Email Reminder” is enabled, and the order statuses are selected in “Send Reminders to Orders With Status”.
- “Purchased Date From “: indicate the purchase date of the oldest order the Review Reminder should take into account while sending the review reminder for old orders.
- “Purchased Date From “: select the most recent purchase date of the old order.
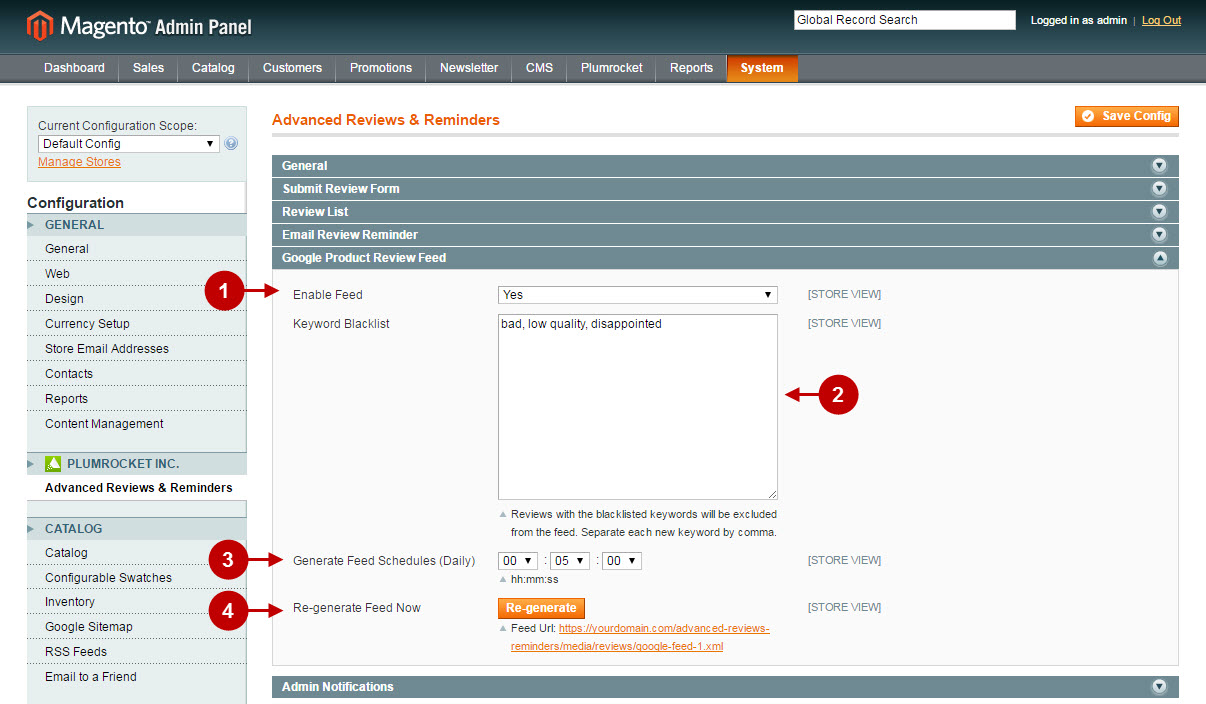
Configuring Google Product Review Feed
Detailed description:
- Option “Enable Feed”: allows you to enable or disable Google Product Review feed generation.
- Option “Keyword Blacklist”: allows to enter the keywords that will be excluded from the feed.
- Option “Generate Feed Schedules (Daily)”: lets you set the specific time for feed generation (works on the daily basis).
- Option “Re-generate Feed Now”: allows you to re-generate the feed manually, disregarding the schedule.
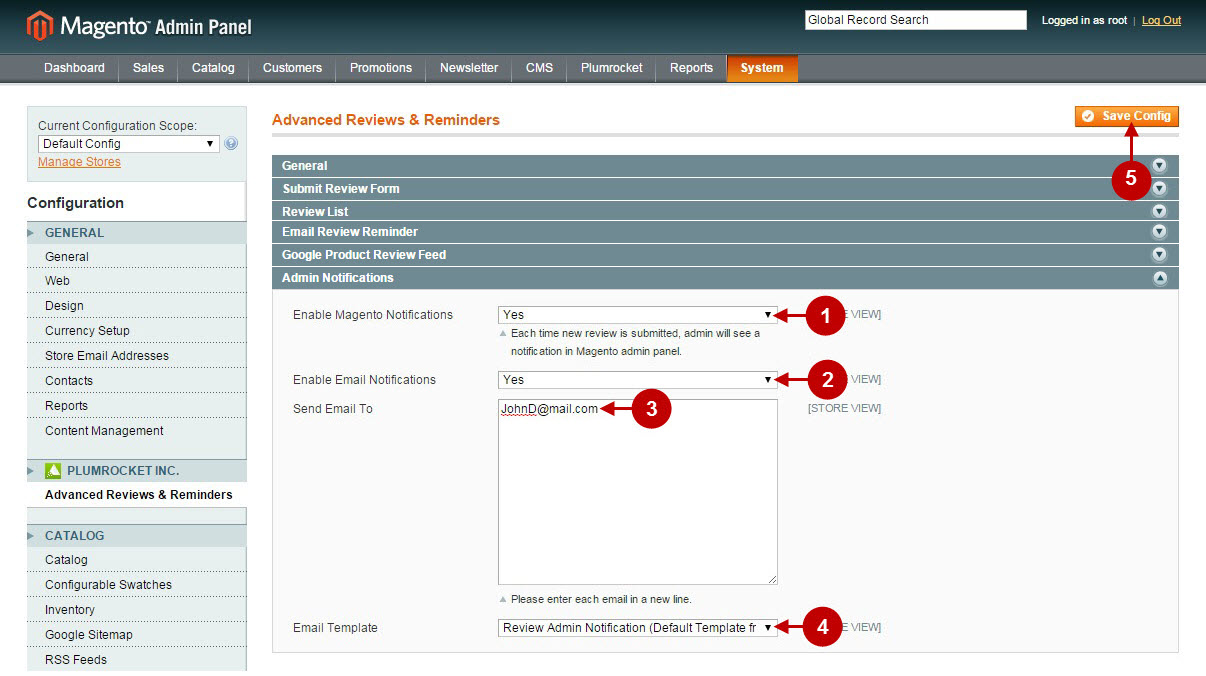
Configuring “Admin Notifications” section
Detailed description:
- Option “Enable Magento Notifications”: allows you to enable or disable magento notifications. If this option is enabled, admin will see a magento dashboard notification each time the new review is submitted.
- Option “Enable Email Notifications”: lets you enable or disable email notifications.
- “Sent Email To”: this option allows you to indicate the emails where the email notification will be sent to.
- Option “Email Template”: allows you to select the template for the review admin notification email.
- Once you finished configuring our advanced reviews & reminders extension – press “Save Config” button to save your changes.
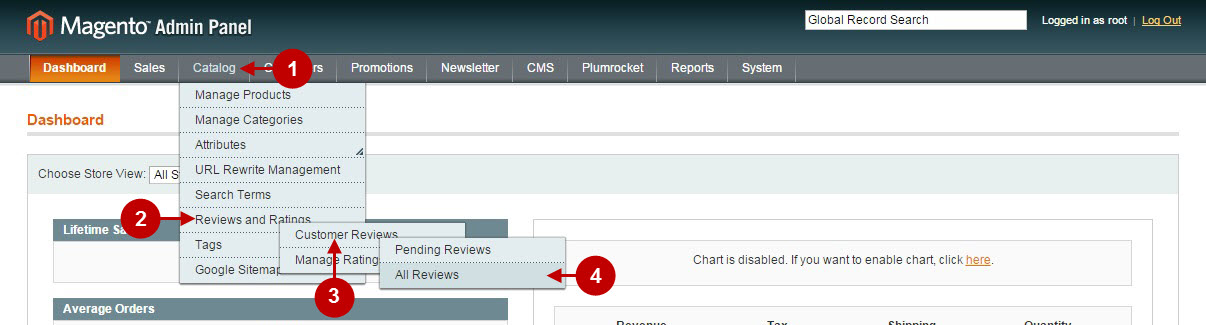
Managing Customer Reviews
Step-by-Step action:
- Press “Catalog” tab in the menu.
- Select “Reviews and Ratings” tab.
- Choose “Customer Reviews” tab .
- Click on “All Reviews” tab.
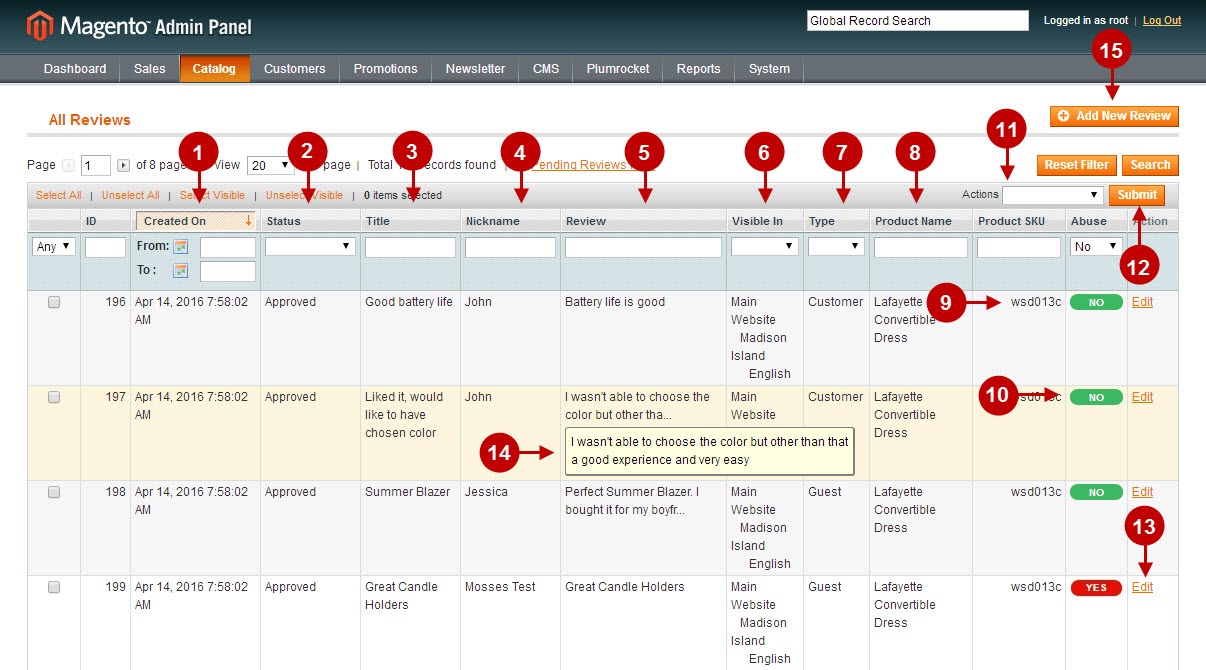
Detailed description:
- “Created On” column: shows when the review was created.
- “Status” column: indicates the current status of the review.
- “Title” column: the title of the review is displayed here.
- “Nickname” column: here you can see the nickname of the reviewer.
- “Review” column: allows you to see the brief of the review.
- “Visible In” column: indicates the site where the review was submitted.
- “Type” column: indicates if review is guest of existing customer.
- “Product Name” column: indicates the name of the reviewed product.
- “Product SKU” column: allows you to see the unique SKU identifier of the product.
- “Abuse” column: indicates whether the review was marked as abuse.
- You can update status and delete review(s) by selecting the according action from the “Actions” dropdown.
- Press “Submit” button to confirm the needed action.
- “Edit” link: allows you to modify each specific review if needed.
- If the review is too long – the tooltip with full text appears.
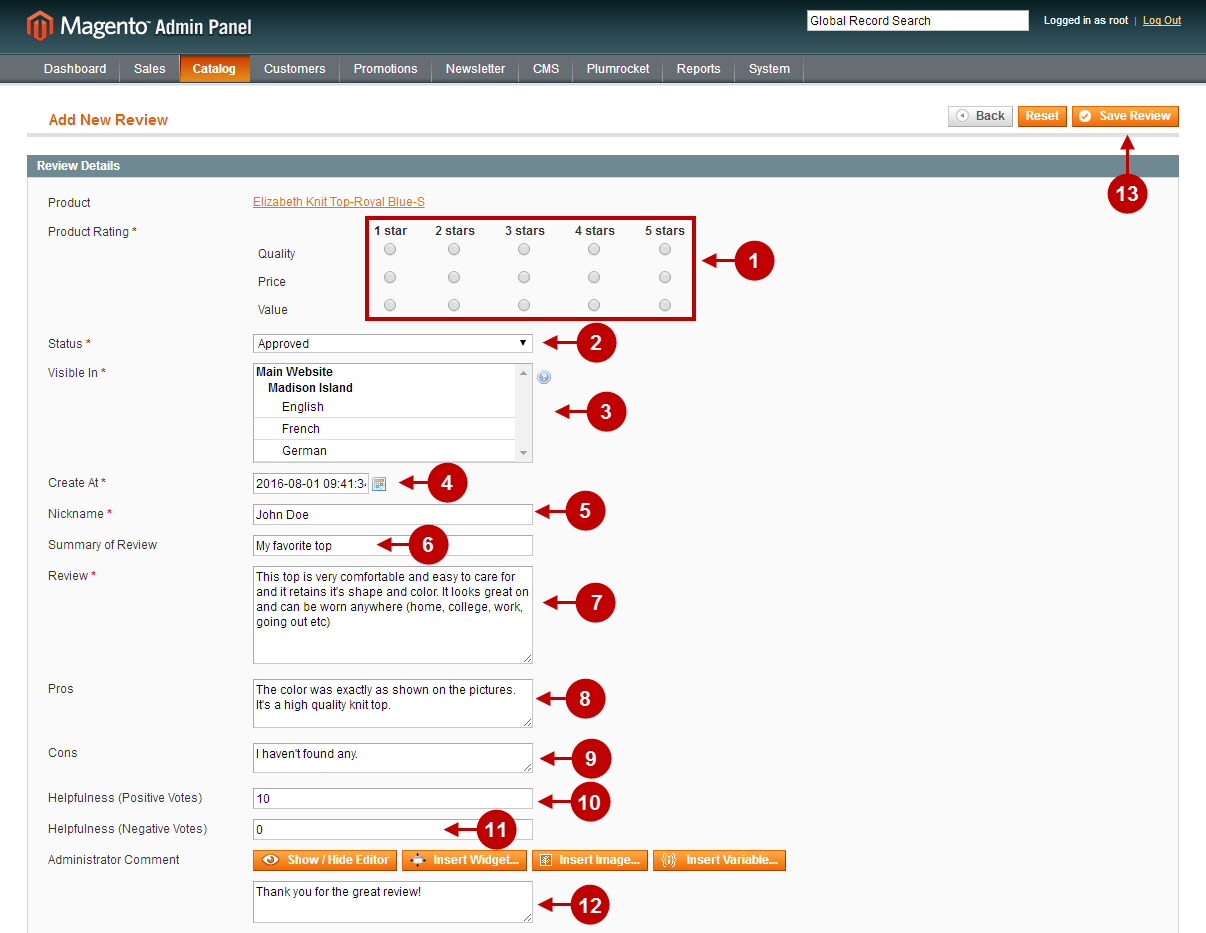
- You can add new reviews by clicking “Add New Review” button.
Detailed description:
- Option “Product Rating”: allows you to set the rating of the product. You can rate by quality, price and value.
- Option “Status”: here you can select the status of the review. Possible options are: “Approved”, “Pending”, “Not Approved”.
- “Visible In”: this option allows you to select the website where review will be visible on.
- “Create at”: option allows to select the review publish date manually.
- Option “Nickname”: allows you to modify the nickname of the reviewer.
- Option “Summary of Review”: here you can indicate the summary of the review if needed.
- Option “Review”: in this text area product review text can be modified.
- Option “Pros”: allows you to describe the advantages of the product.
- Option “Cons”: here you can describe the disadvantages of this product.
- Option “Helpfulness (Positive Votes)”: displays how many people found this review helpful.
- Option “Helpfulness (Negative Votes)”: shows how many people found this review unhelpful.
- “Administrator Comment”: this option allows you to add administrator comment to the review.
- Once you’ve finished creating new review – press “Save Review” button to save your settings.
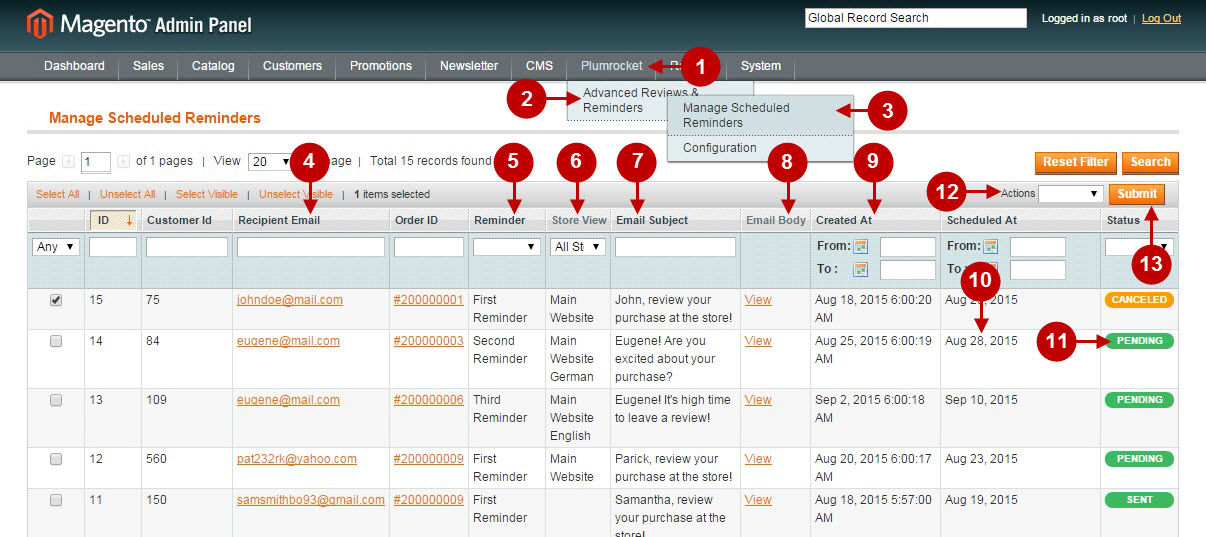
Managing Review Reminders
Detailed description:
- Press “Plumrocket” tab in the menu.
- Navigate to “Advanced Reviews & Reminders” module menu.
- Select “Manage Scheduled Reminders” tab.
- “Recipient Email” column: here you can the email of the recipient.
- “Reminder” column: indicates the number of the reminder.
- “Store view” column: allows you to see the Store view where the purchase was made.
- “Email Subject” column: here you can see the subject of the email reminder.
- “Email Body” column: here you can view the reminder email body.
- “Created at” column: allows you to see when the reminder was created.
- “Scheduled at” column: indicates when the reminder should be sent.
- “Status” column: allows you to see the status of the reminder.
- You can delete, cancel and send the selected reminder(s) by selecting the according action from the Actions dropdown.
- Press “Submit” button to confirm the needed action.
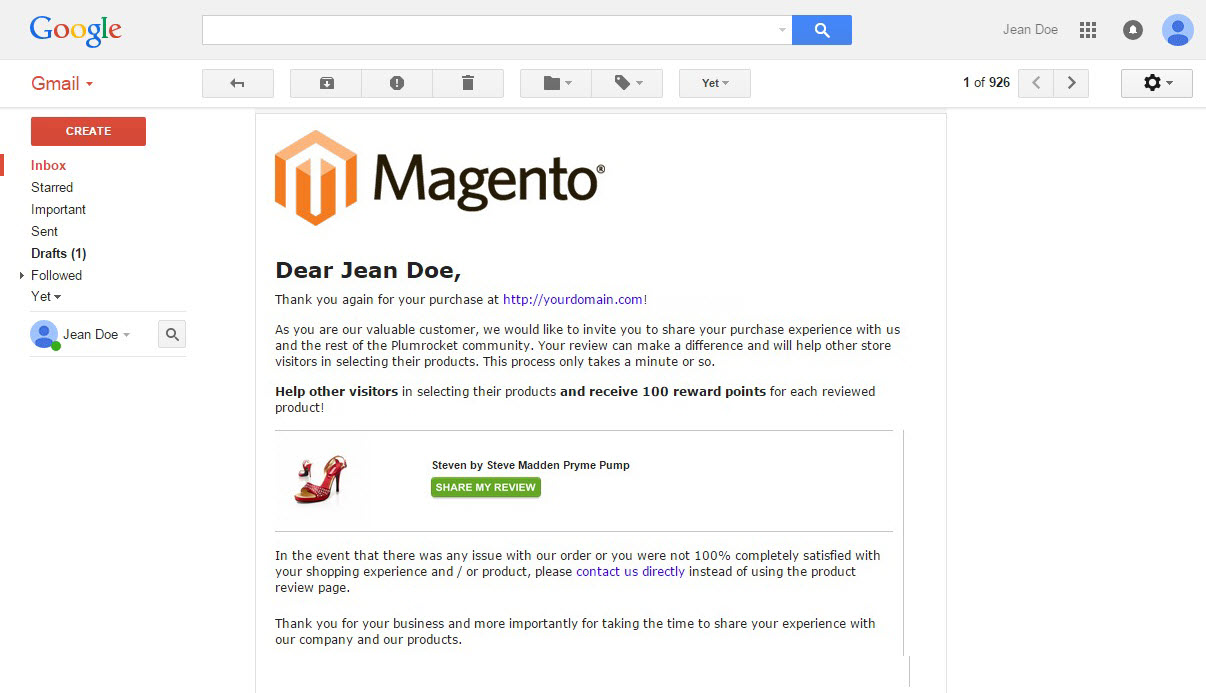
Here’s how the email review reminder will look like.
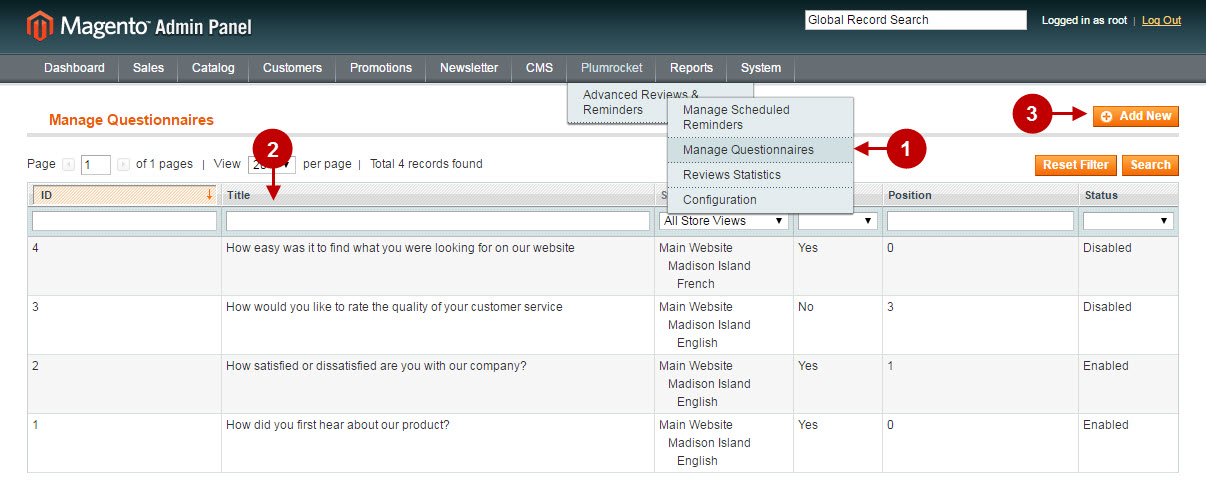
Managing Questionnaires
Detailed description:
- Go to “Plumrocket” tab > “Advanced Reviews and Reminders” > select “Manage Questionnaires” option.
- This grid allows to manage your questionnaires. You can search for a questionnaire using various filters, edit the existing ones or create new questionnaires.
- Press “Add New” button to create your new questionnaire.
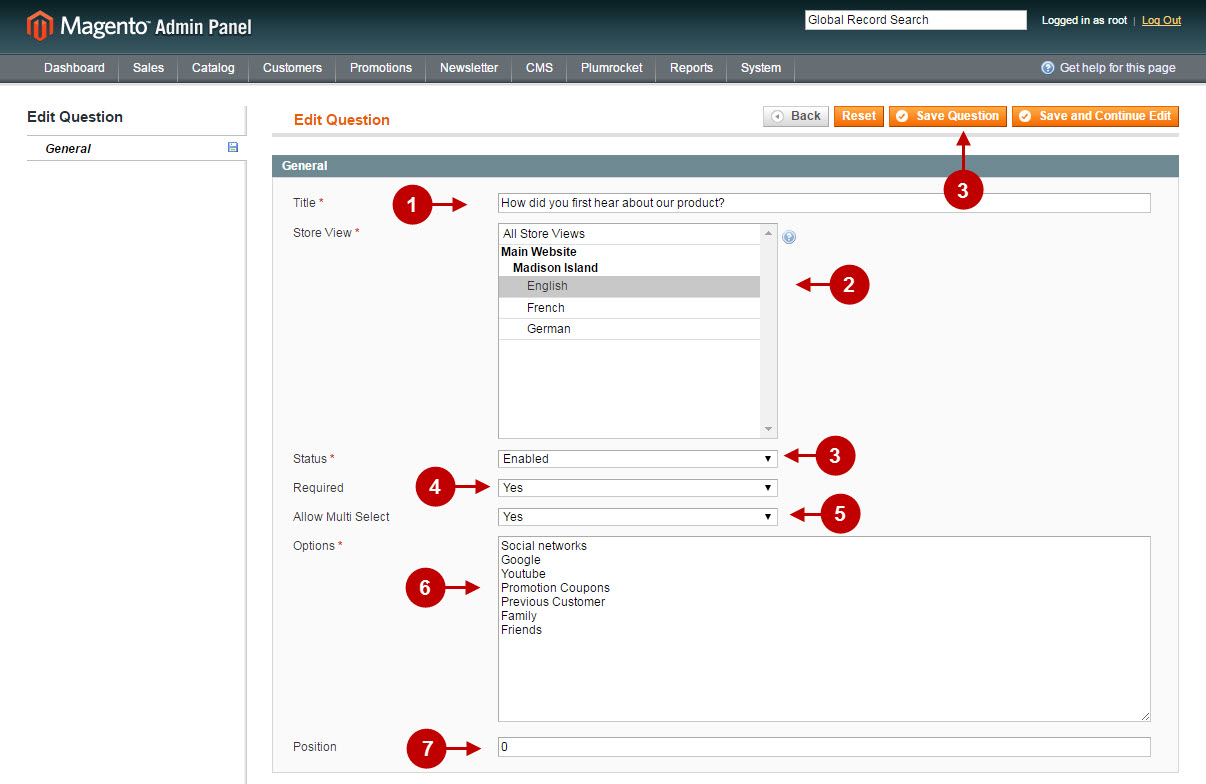
This tab allows you to add new questionnaire.
Detailed description:
- Enter your question into the “Title” field.
- Option “Store View”: allows to select the store view the questionnaire will be displayed on.
- Option “Status”: allows to enable or disable the questionnaire.
- Option “Required”: set “Yes” in order for the questionnaire to be required, or “No” to make it optional.
- Option “Allow Multi Select”: lets you enable or disable multi-selection of the answers.
- This field allows you to specify the available answers of your questionnaire.
- Option “Position”: allows you to set the position of the questionnaire (use this option if you have multiple questionnaires. Leave “0” if you have 1 questionnaire).
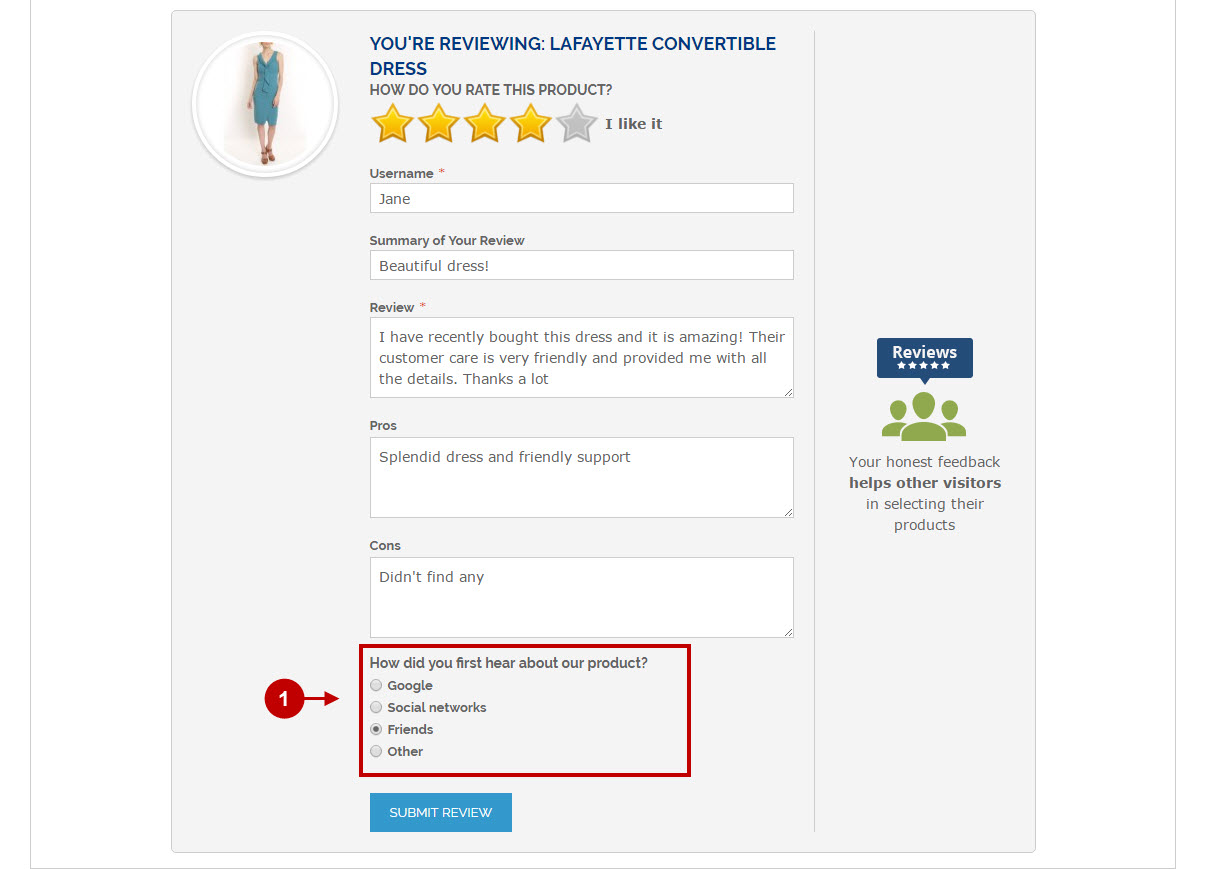
Detailed description:
- This is how your questionnaire will look like on your Magento frontend.
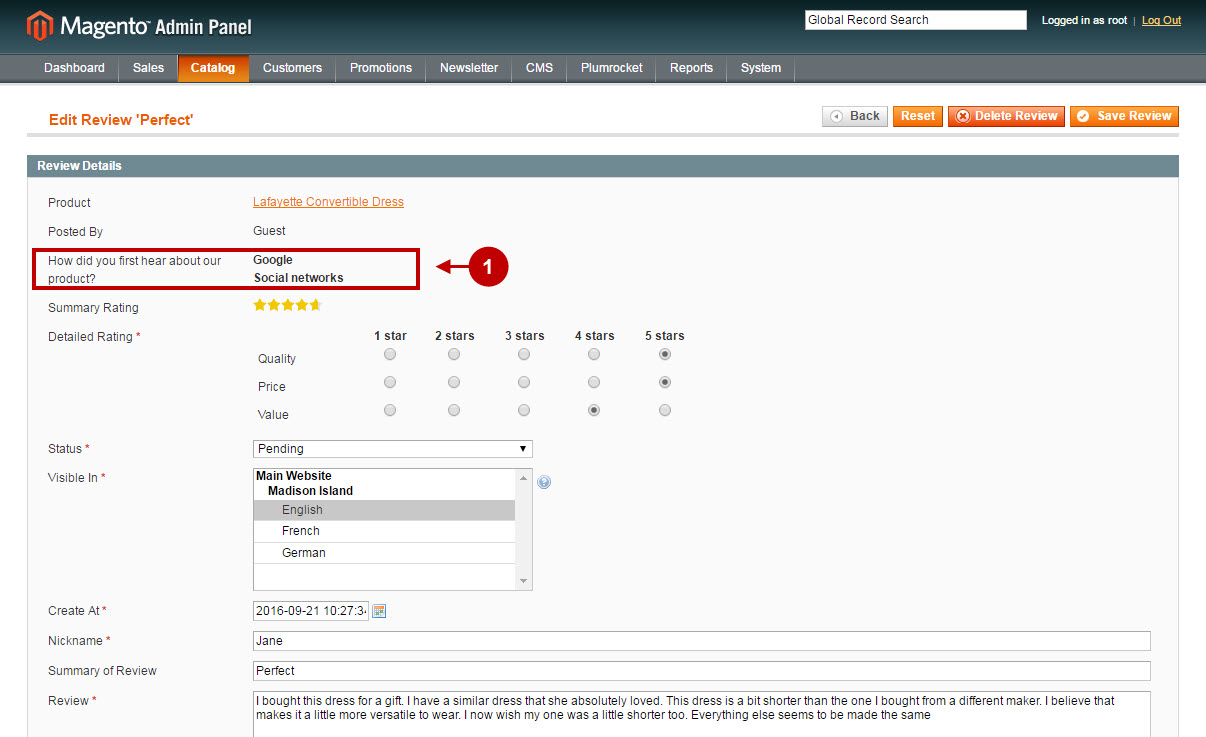
Detailed description:
- When a customer leaves a review, you can check the questionnaire answers in the customer’s review tab (go to “Catalog” tab > select “Reviews and Ratings” > select “Customer Reviews” > go to “All Reviews” section > click on the needed review).
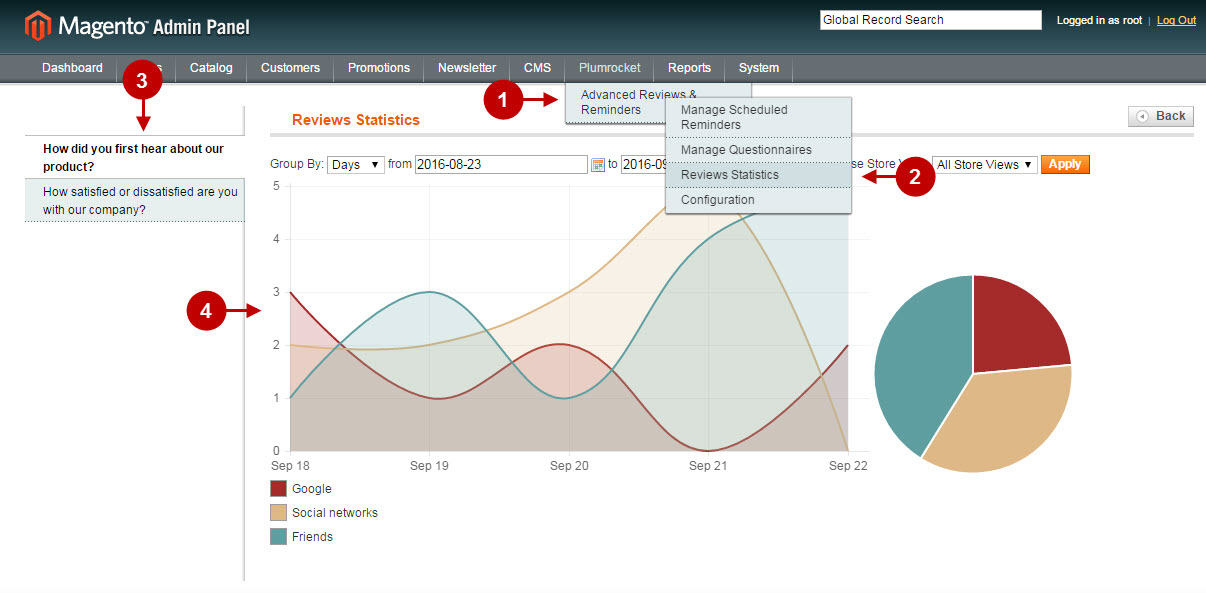
Reviews Statistics
Follow the instructions below to check the reviews statistics.
Detailed description:
- Go to “Plumrocket” tab > “Advanced Reviews and Reminders”.
- Select “Reviews Statistics” option.
- Select the questionnaire you need to review its statistics.
- This tab allows you to preview the visual diagrams of the statistics based on date range and store views.
Configuration of Magento Advanced Reviews & Reminders module is now completed.