Configuring Popup Login Extension
In order the access this Magento Popup Login extension configuration page you will have to log in first and follow these instructions:
Step-by-Step action:
- Press the “System” tab in the menu.
- Select “Configuration”.

This page allows you to change settings of this Magento Popup Login. The new settings will be activated after you press the “Save config” button.
Detailed description:
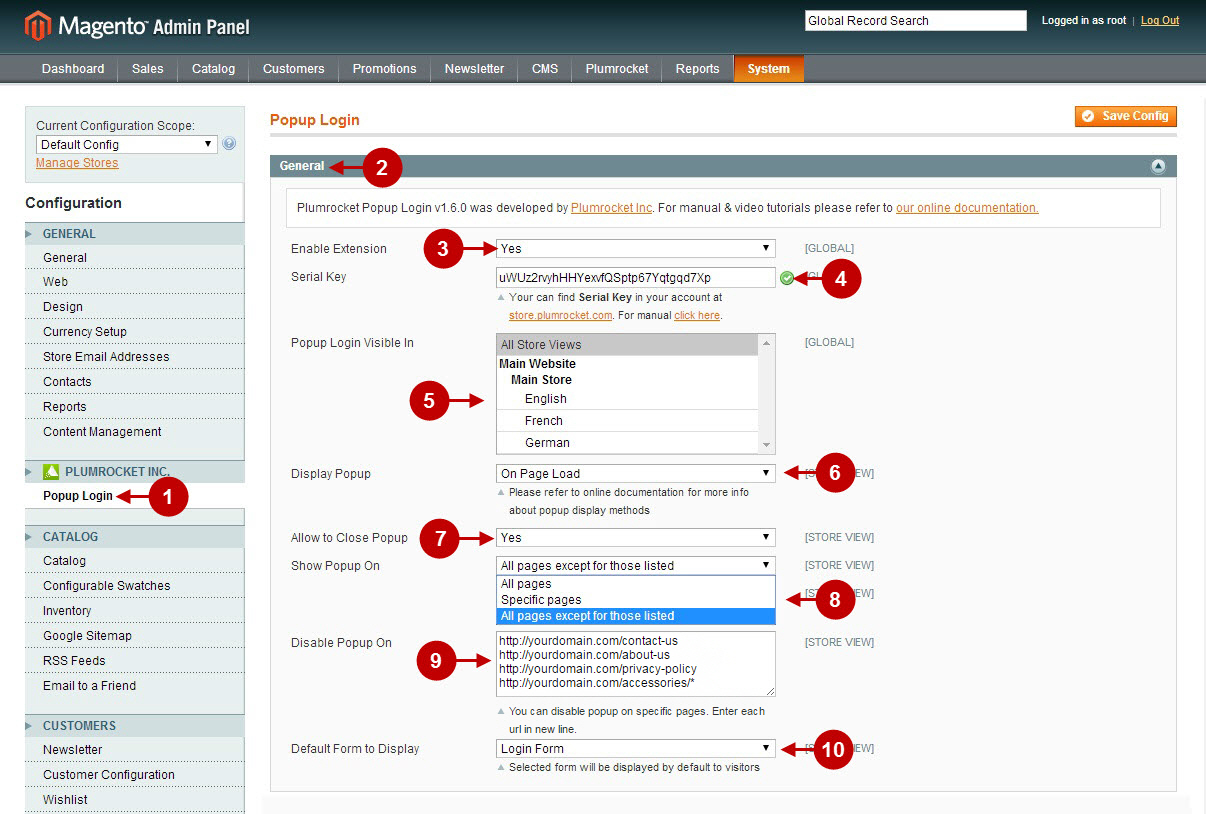
- Select “Popup Login” in the left menu.
- Select the “General” tab.
- Enable Plumrocket Popup Login: Select “Yes”, to enable the module or “No” to disable it.
- Option “Serial Key”: enter unique serial key provided after the purchase for legitimate and proper functioning of your extension. Note: In most cases this field will be pre-filled with serial key automatically and the green check mark will be displayed. Otherwise please read article Serial Key Activation in order to find and paste your serial key manually.
- Popup Login Visible In: allows you to choose on which Store Views Popup Login form will be displayed.
- Display Popup : allows you to choose the display method, i.e. the event after which the popup login form will be displayed. Choose one of the suggested variants:
- On page load – the popup login form will be displayed when the paged is refreshed;
- On page click – the popup login form will be displayed when a user clicks anywhere on the page;
- On page links click – the popup login form will be displayed when a user clicks on any page link;
- Manually – allows you to choose any page element that will launch the popup login form if pressed. In order to learn more about configuration, read Developer’s Guide & API Reference.
- Allow to Close Popup : with this enabled your customers will be able to close popup.
- Show Popup On : this multifunctional feature allows you to indicate where popup login should be displayed. Select from suggested options:
- All pages – the popup login form will be displayed on all pages of your website;
- Specific pages – the popup login form will only be displayed on the pages you indicate (additional “Enable Popup On” text area will appear like shown below);
- All pages except for those listed – the popup login form will be displayed everywhere except for the pages you indicate (additional “Disable Popup On” text area will appear like shown below) ;
- “Enable Popup On” or “Disable Popup On” text area will appear depending from the above option. Use a “wildcard” option – now you can define URL pattern with asterisk at the end. This URL pattern (“/*”) will match any sequence of characters from that point forward.
- Default Form to Display : allows to select which form will be displayed to visitors by default. Available options are “Login Form” or “Registration Form”.
Other options available at the Popup Login Configuration page are described below.
Detailed description:
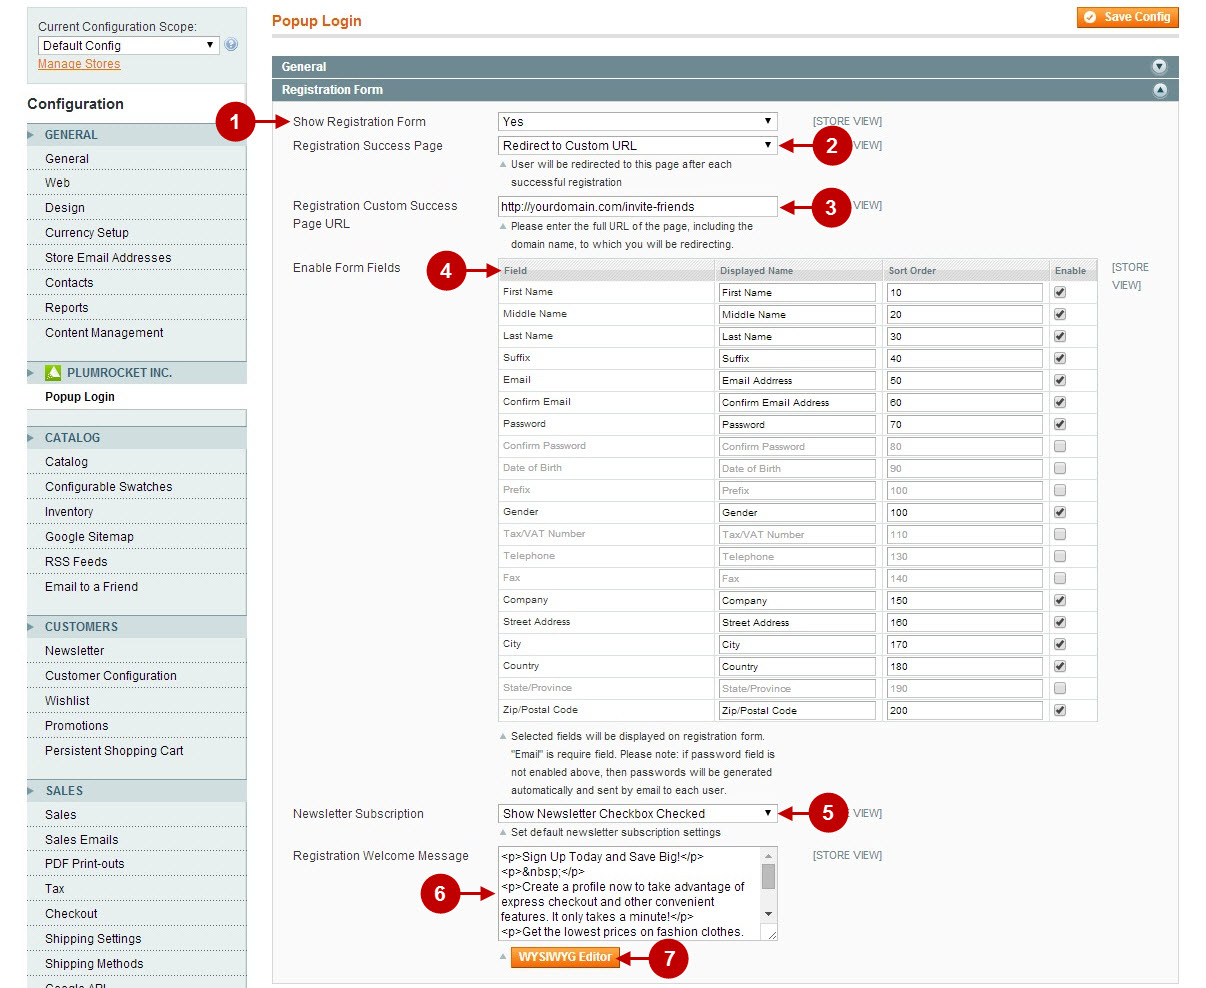
- Show Registration Form: allows you to display the Registration form in the Popup box. Select either “Yes” or “No” in order to enable/disable the form.
- Registration Success Page: allows you to select the page customer will be redirected to after each successful registration.
- Stay on current page: option allows your customer to stay on current page without any redirection.
- Complete the “click” action: option will complete the action after customer clicks on a button or a link and registers/logs in via the Popup Login.
- Redirect to custom URL: option lets you specify any URL your customer will be redirected to.
- You may also select any Magento CMS page from the list provided.
- Registration Custom Success Page URL: allows you to indicate the URL of the custom page your customer will be redirected to after successful registration.
- Enable Form Fields: allows you to select the fields that will be displayed on registration form.
- Newsletter Subscription: allows you to set newsletter subscription settings that will be used by default.
- Registration Welcome Message: allows you to edit the popup welcome message that will be displayed in the Registration Form.
- You can use the “WYSIWYG” editor to fill in the field above.
Detailed description:
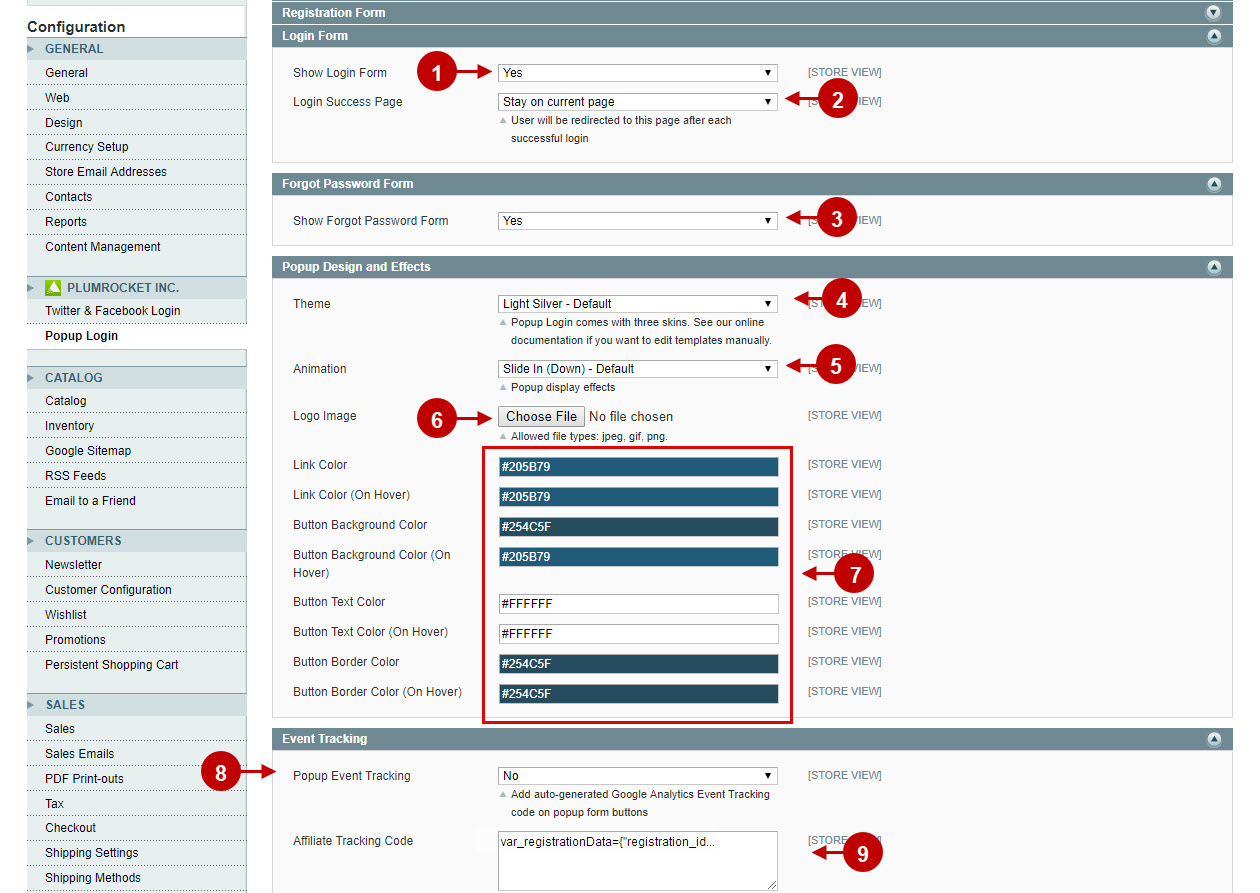
- Show Login Form : allows you to enable or disable Login Form of Popup Login.
- Login success Page: allows you to select the page customer will be redirected to after successful login.
- Show Forgot Password Form: allows you to enable or disable Forgot Password Form of Popup Login.
- Theme: allows you to select between 3 skins for popup.
- Animation: helps you select from various animation effects for displaying popups.
- Logo Image: allows you to place a logo on Login Form of Popup Login.
- The following fields allows admin change the element styles and popup design by changing the Link color, Button background color, Button text and border colors .
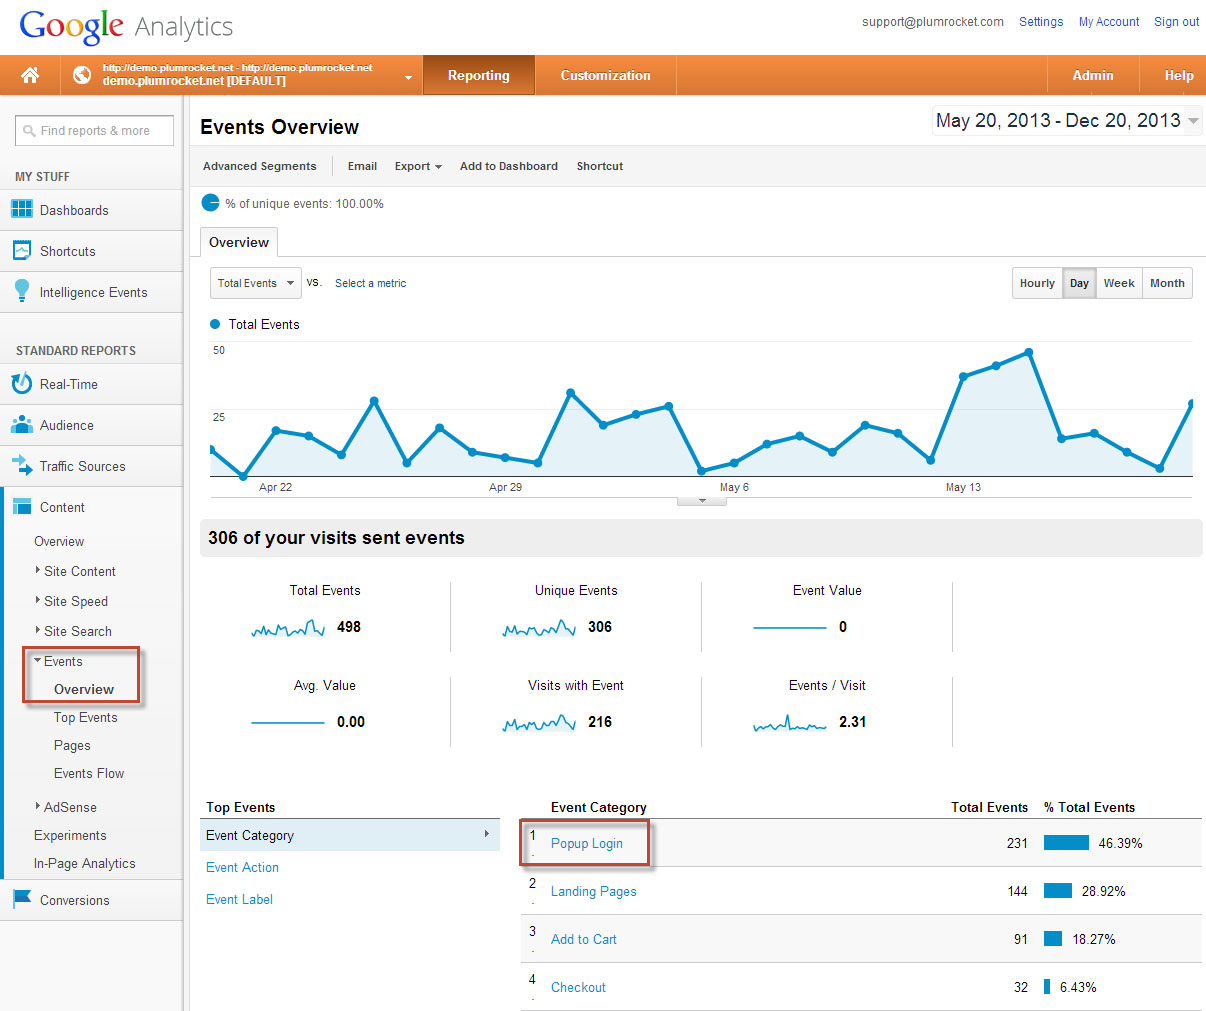
- Popup Event Tracking: select “Yes” in order to enable Google Analytics Event Tracking from your store. This will let you track clicks on all buttons in registration, login and forgot password forms.
- Affiliate Tracking Code: allows you to set the code that will be activated after each successful registration via Popup Login.
- Press “Save Config” to save the changes.
Using this Magento Popup Login Extension you will be able to track users activity via Google Analytics. The screenshot below shows the Event tracking via Google Analytics:
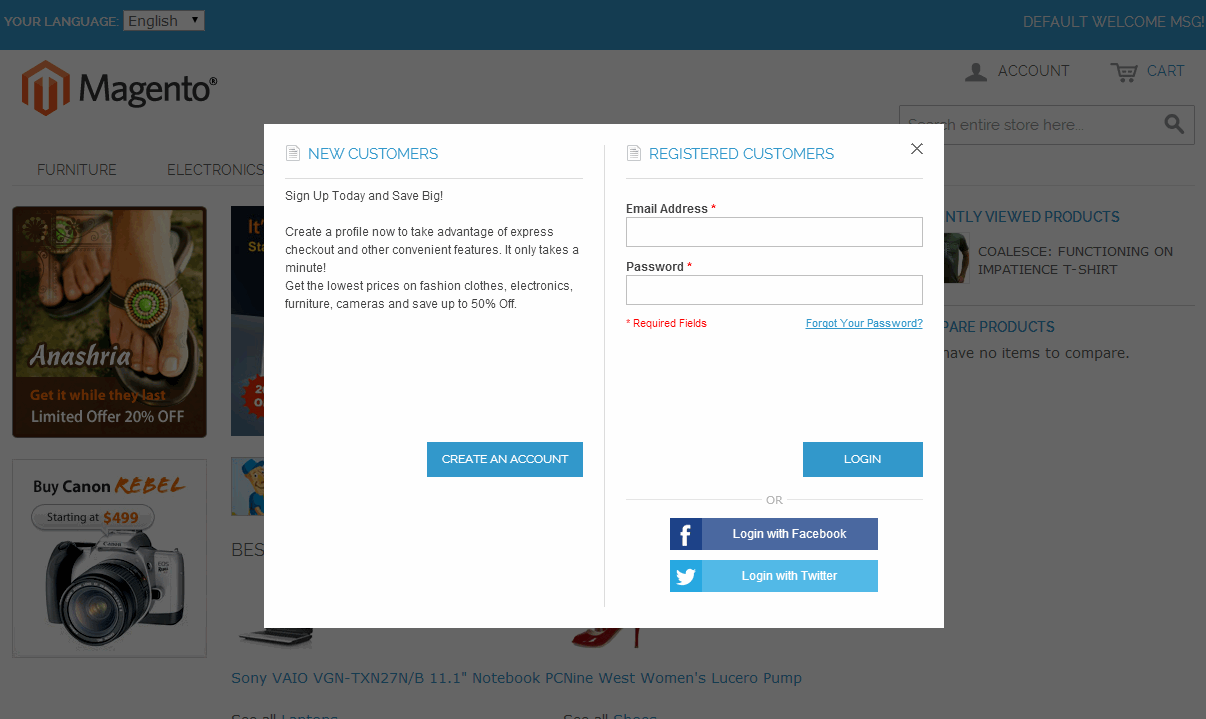
This is how the Magento Popup Login Extension (with Light Silver Theme) looks like on the frontend:
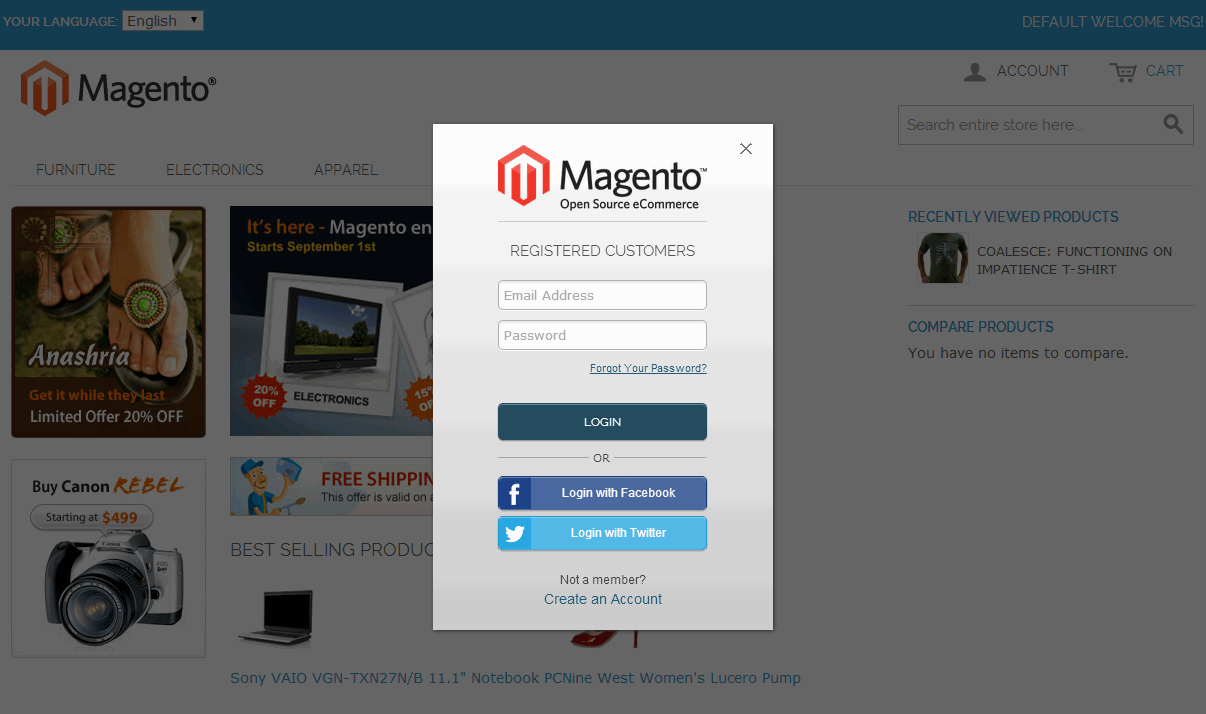
Twitter & Facebook Login buttons in Popup Login Magento Extension by Plumrocket Inc.
If you want to allow users to login with their Facebook and Twitter accounts – please also download and install our free Twitter & Facebook Login extension. Once done, please follow the information outlined in Twitter & Facebook Login Installation article. We also offer Social Login Pro extension that supports about 50 social networks.
After you finish with configuration, both Popup Login and social network extension will appear on your Magento frontend as displayed below.
