In this article, you will learn how to configure the Magento 2 Social Login Pro extension correctly. Please, check our step-by-step guide below.
Configuring Social Login Pro Extension for Magento 2
General
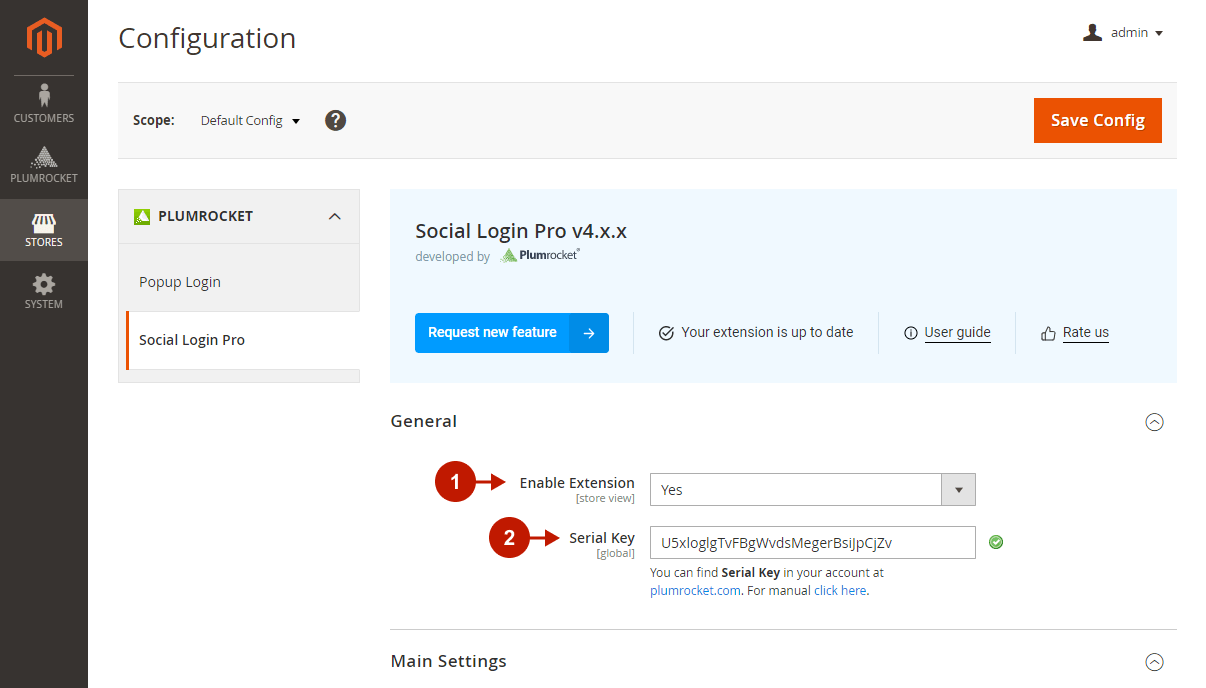
In order to enable and configure the extension, go to the Plumrocket tab in the Magento admin panel -> Social Login Pro -> select the Configuration tab.
Step-by-step guide:
- “Enable Extension“: set this option to Yes to enable the extension.
- “Serial Key“: enter the unique serial key provided after the purchase for the legitimate and proper functioning of your extension. Note: in most cases, this field will be pre-filled with the serial key automatically, and the green check mark will be displayed. Otherwise, please read the Serial Key Activation article in order to find and paste your serial key manually.
Main Settings
Step-by-step guide:
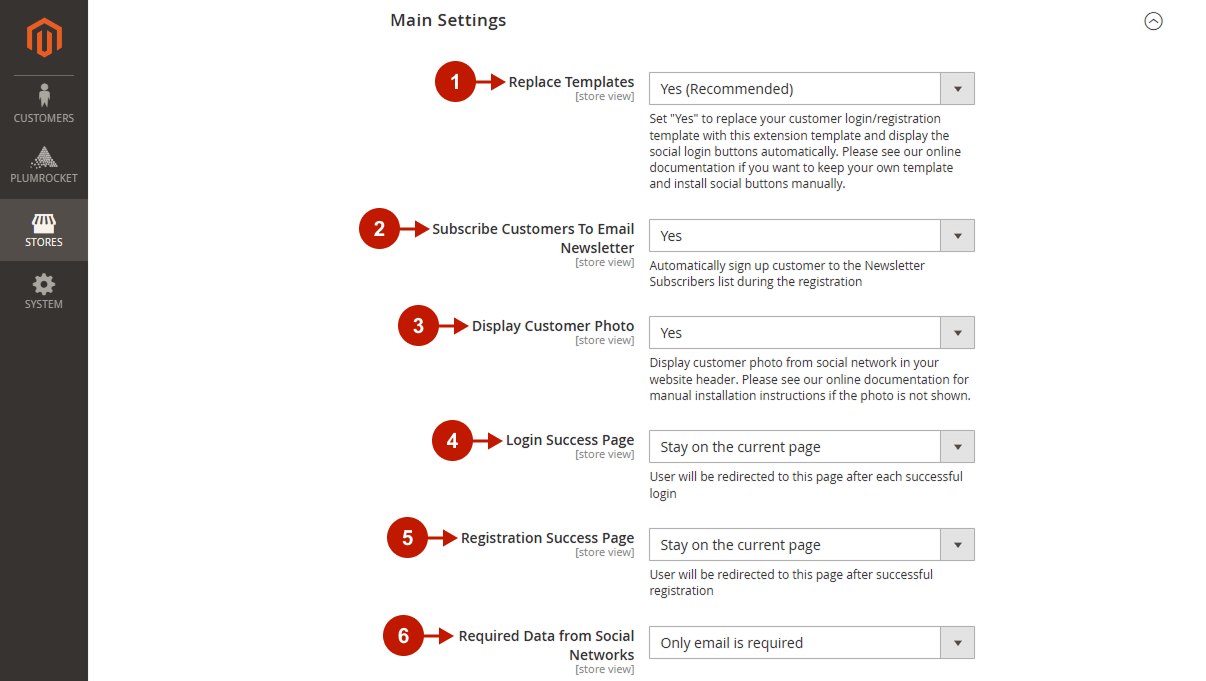
- “Replace Templates“: set it to Yes to replace your customer login/registration template with this extension template that automatically displays social login buttons.
- “Subscribe Customers To Email Newsletter“: set it to Yes to automatically subscribe customers to the newsletter during the registration.
- “Display Customer Photo“: set to Yes if you want a user’s social media profile photo to appear in the header of your website next to the username. Please check the user guide on how to display a user’s profile photo manually in any custom location, or use this manual installation guide if the photo is not displayed by default.
- “Login Success Page“: choose the page you want to redirect users to after they successfully sign in to your store.
- “Registration Success Page“: choose the page you want to redirect users to after they successfully register on your store.
- “Required Data from Social Networks“: specify what data you need to receive from the social network during user registration on your store:
- No profile data is required (quick registration): all required fields of the default Magento registration form that the social network does not return via the API will be pre-filled with temporary data to speed up the registration process.
- Only email is required: users will be prompted to enter their email address if it is not returned by the social network API.
- All account registration fields are required: users will be redirected to the Magento registration form to provide any missing information that the social network did not return.
Step-by-step guide:
- “Default Customer First Name“: set the first name that will be assigned to users when registering via social networks, if it cannot be retrieved from the network or email address.
- “Default Customer Last Name“: set the last name that will be assigned to users when registering via social networks, if it cannot be retrieved from the network or email address.
- “Get Username From Email Address”: choose if the Username should be parced from the email address if it is missed.

Social Login Buttons
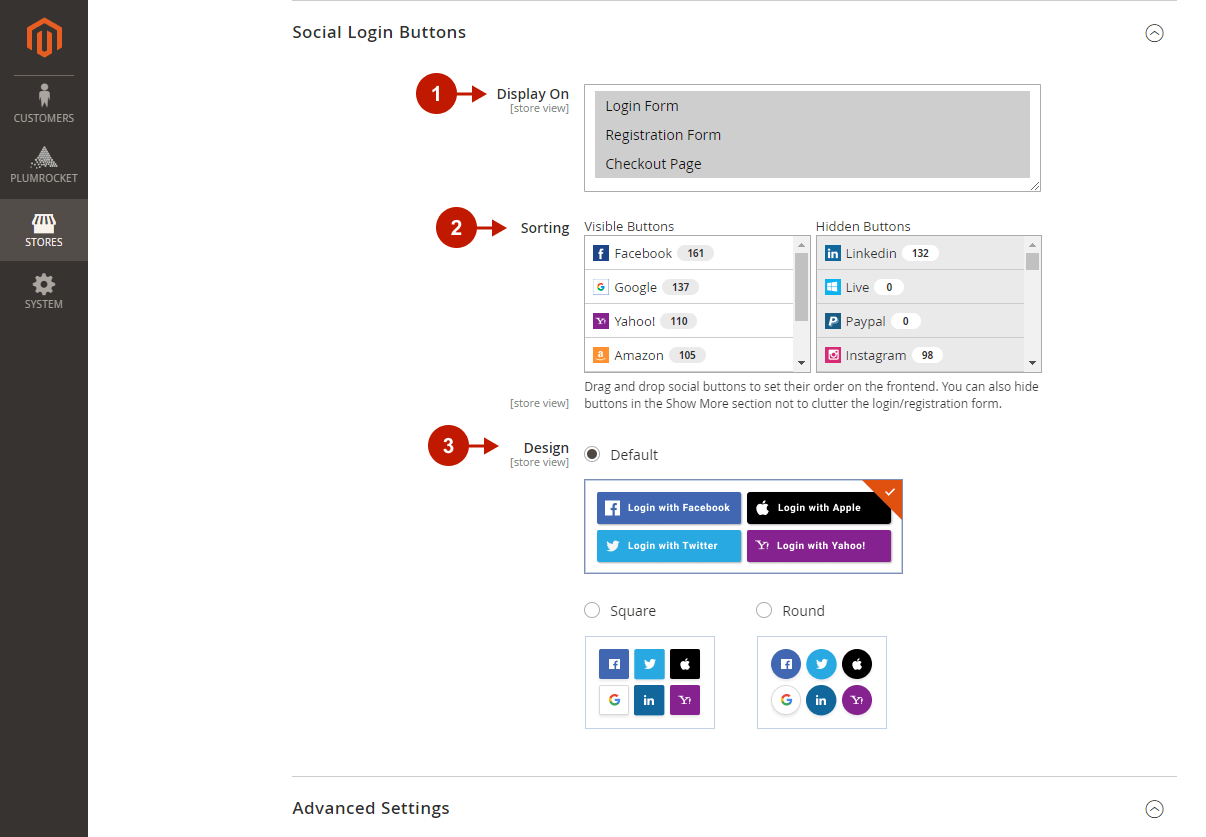
In this section, you can customize the appearance and order of the social buttons on the frontend.
Step-by-step guide:
- “Display On“: choose where to display social login buttons. You can also insert the Social Login buttons widget into your pages. Please check our How to insert Social Login buttons widget in Magento 2 guide.
- “Sorting“: drag & drop social buttons to set their order on the frontend.
- Visible buttons: drag and drop networks into this column to display them by default on login and registration forms.
- Hidden buttons: drag and drop networks into this column to display to hide buttons in the Show More section not to clutter the login/registration form. See how this visual sorting interface works on the frontend.
- “Design“: choose the appearance of the social buttons to match your website’s design.
Advanced Settings
Step-by-step guide:
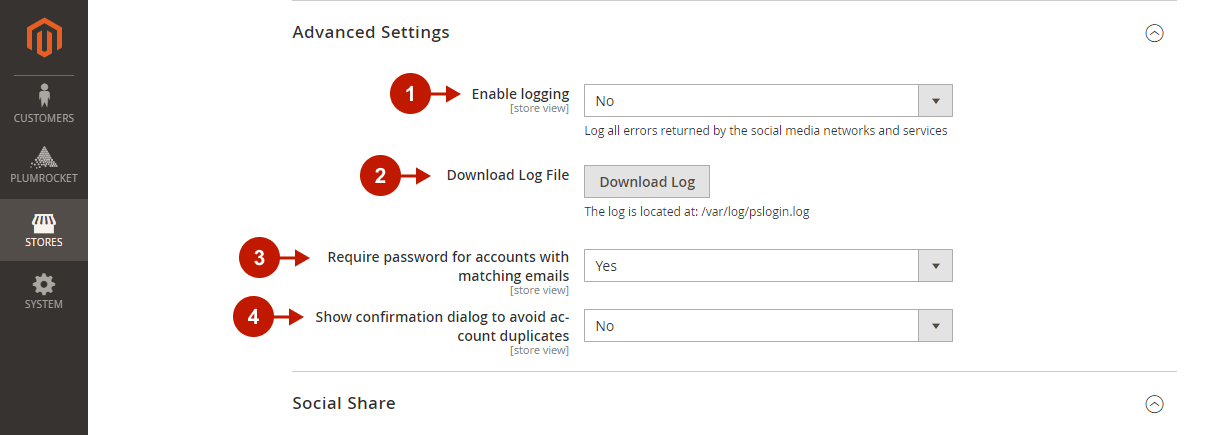
- “Enable logging“: set to Yes to log all errors that occur with the social network API and returned data for future debugging.
- Click Download Log and find it in
/var/log/pslogin.logfolder. - “Require password for accounts with matching emails“: set the action to be taken when a user for the first time tries to log in via a social network that returns the same email address already assigned to an existing Magento account:
- Yes: users will be prompted to confirm the password and the accounts will be linked. Users will no longer be prompted to confirm the password during the next social login attempt.
- No: the passwords validation step will be skipped, and users will automatically log in to the existing Magento account with a matching social network email address. These two accounts will be automatically linked.
- “Show confirmation dialog to avoid account duplicates“: set the action to be taken when a user logs in via a social network that returns an email address that does not exist in Magento:
- Yes: a confirmation dialog will appear asking users to confirm if they already have a store account. If they answer ‘yes‘, a Magento login form will appear and after the successful login, the social network will be linked to the existing Magento account. Otherwise, a new account will be automatically created.
- No: a new Magento account will always be automatically created.
Social Share
Let users share your store on social media to spread the word and get more social traffic.
Step-by-step guide:
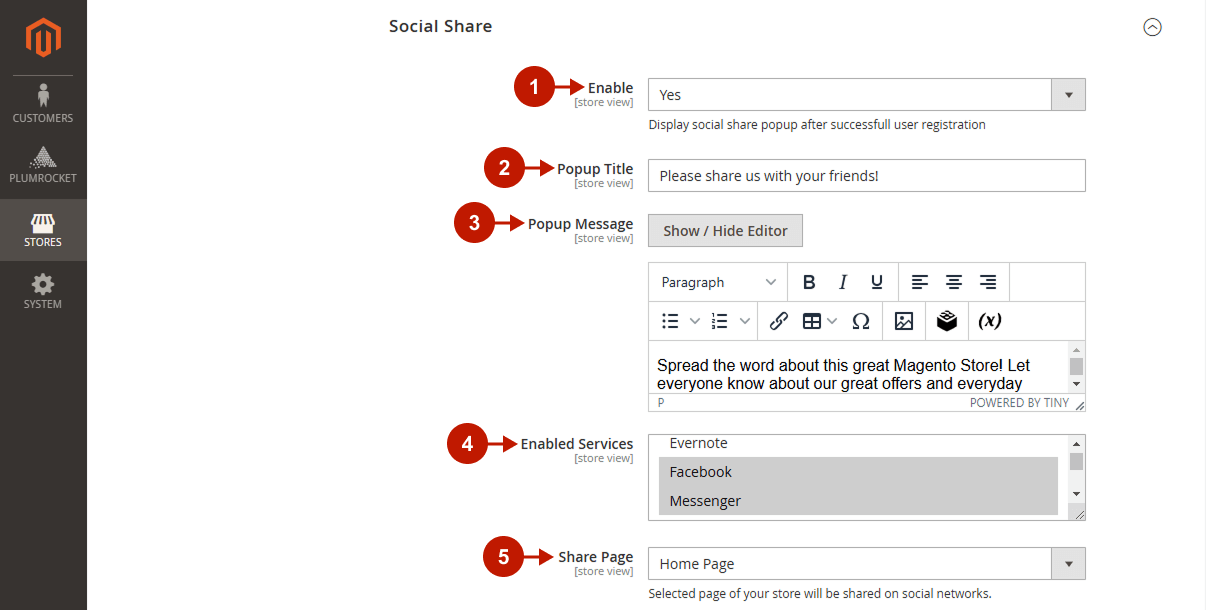
- “Enable“: set to Yes to display the Social Share popup to users after successful account registration.
- “Popup Title“: specify the call-to-action title that will be displayed on the social share popup.
- “Popup Message“: using the WYSIWYG editor, set the message that will appear on the Social Share Popup.
- “Enabled Services”: select the social networks that should be enabled for the Social Share Popup.
- “Share Page“: select your store page to be shared on social media.
Connect Multiple Social Accounts
You can allow registered users to link their Magento accounts with multiple social network accounts. This is convenient for users since they have one account on your store and can quickly log into it via any of the connected social networks. At the same time, you can avoid duplicate accounts.
Step-by-step guide:
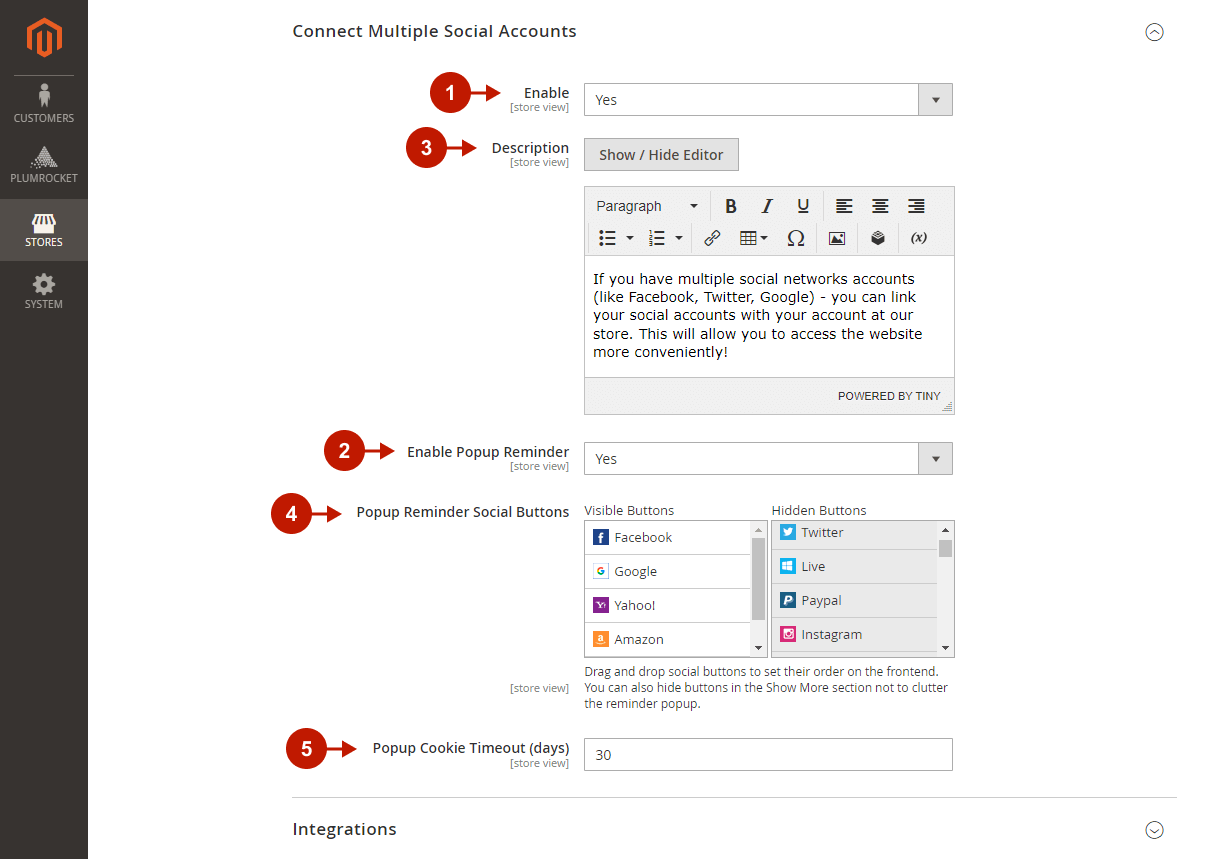
- “Enable“: set it to Yes to let registered users connect their existing Magento account to multiple social network accounts.
- “Enable Popup Reminder“: set to Yes to display to customers a popup window after successful login, reminding them to connect social networks to their Magento store account.
- “Description“: using the WYSIWYG editor, set the message that will appear in a Popup Reminder.
- “Popup Reminder Social Buttons“: display social buttons on the popup reminder to prompt users quickly connect their social accounts.
- Visible buttons: drag and drop social buttons into this column to display them by default on the popup reminder.
- Hidden buttons: drag and drop networks into this column to display to hide buttons in the Show More section not to clutter the popup reminder.
- “Popup Cookie Timeout (days)“: if a user closes the popup reminder, it will be displayed again to the same user after the specified number of days. Enter “0” to never show the popup again after it is closed for the first time.
Integrations
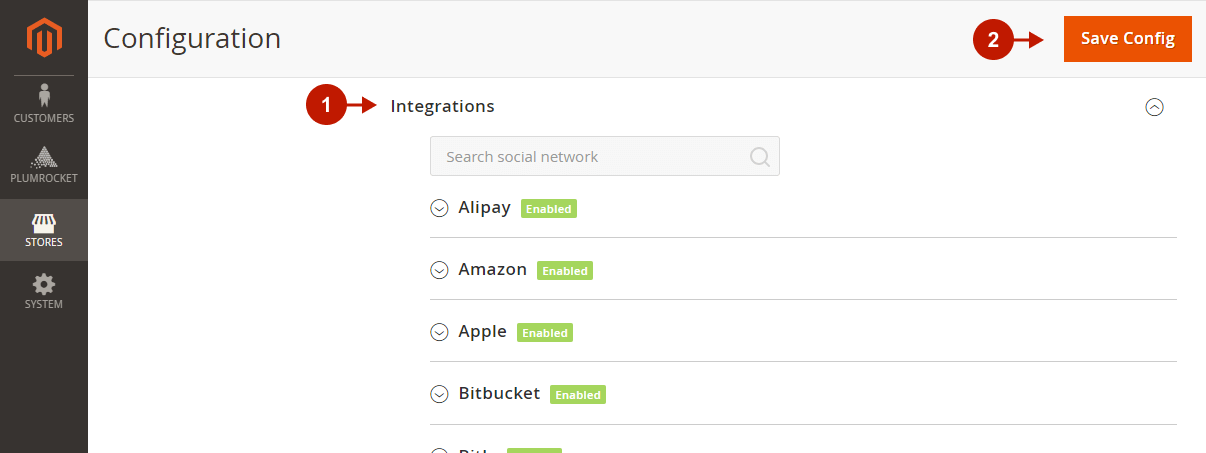
Each of the social networks supported by this Magento 2 Social Login Pro has its own API, that should be set up in order for the integration to work properly.
Step-by-step guide:
- Please find the social network you want to set up in the Social Login Pro v4.x Integrations grid and follow the provided step-by-step guide to get it right.
- Click Save Config so save your configurations.
Managing Customer Social Network Accounts in Magento 2 Admin Panel
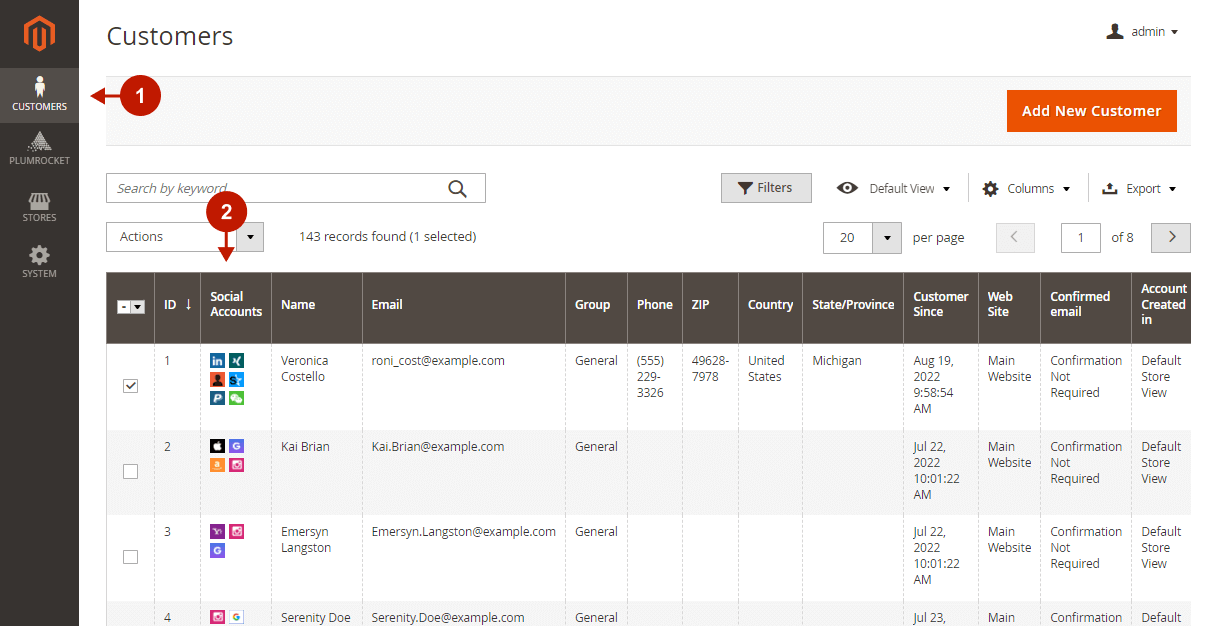
The extension automatically adds the Social Accounts column to the Customers grid in the Magento 2 admin panel. Thus, you can search customers by their connected social networks and visually see all linked accounts from the Customers grid.
Step-by-step guide:
- Go to the Customers tab in the main Magento menu > select All Customers.
- Navigate to the Social Accounts column in the Customers grid to view the connected social accounts for each customer.
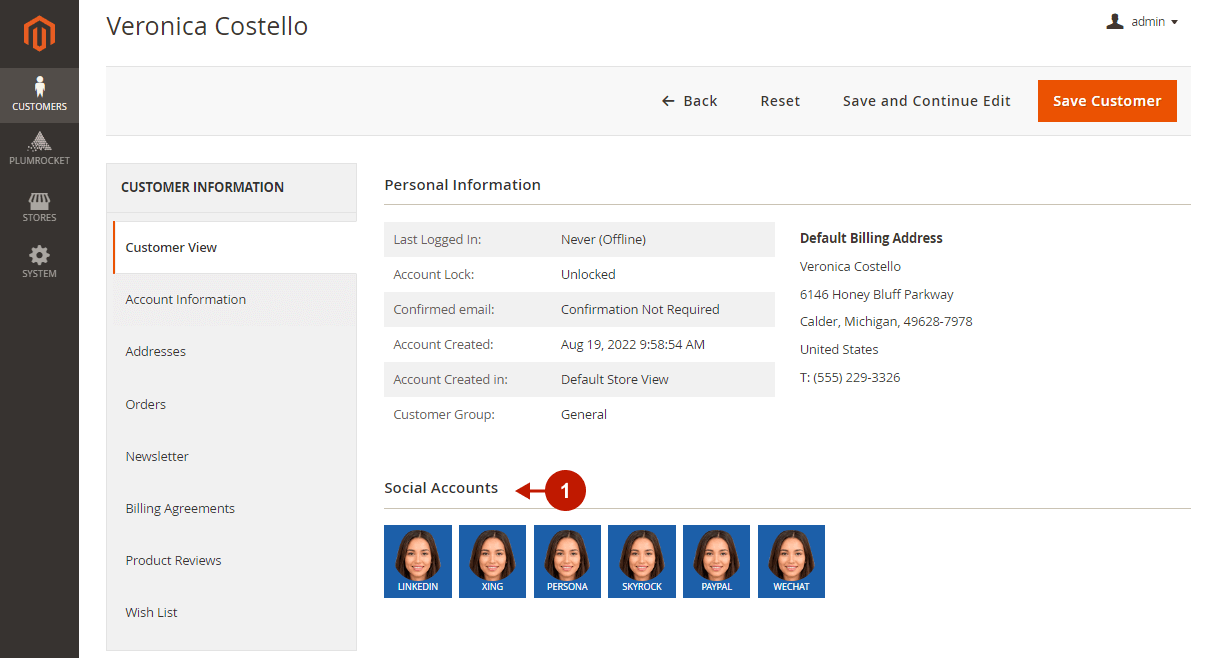
You can also view a customer’s social account. From the Customers grid, go to the customer edit page by clicking Edit under the Action column of the corresponding customer.
Step-by-step guide:
- The “Social Accounts” section allows the admin to navigate to the customer’s social account directly from the Customer Edit Page by clicking on the social icon.
Visual Sorting Interface On the Frontend
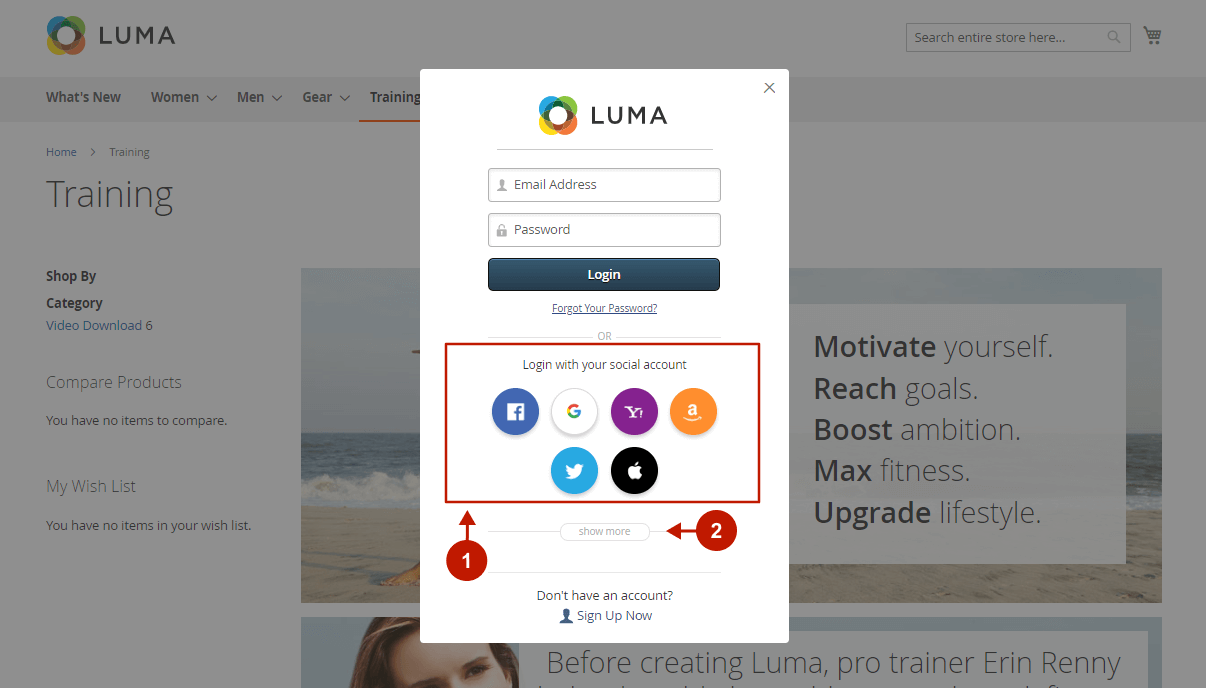
Depending on how you sort buttons in the extension configuration, they will appear in the frontend.
Step-by-step guide:
- “Visible Buttons” appear by default below the login/registration form.
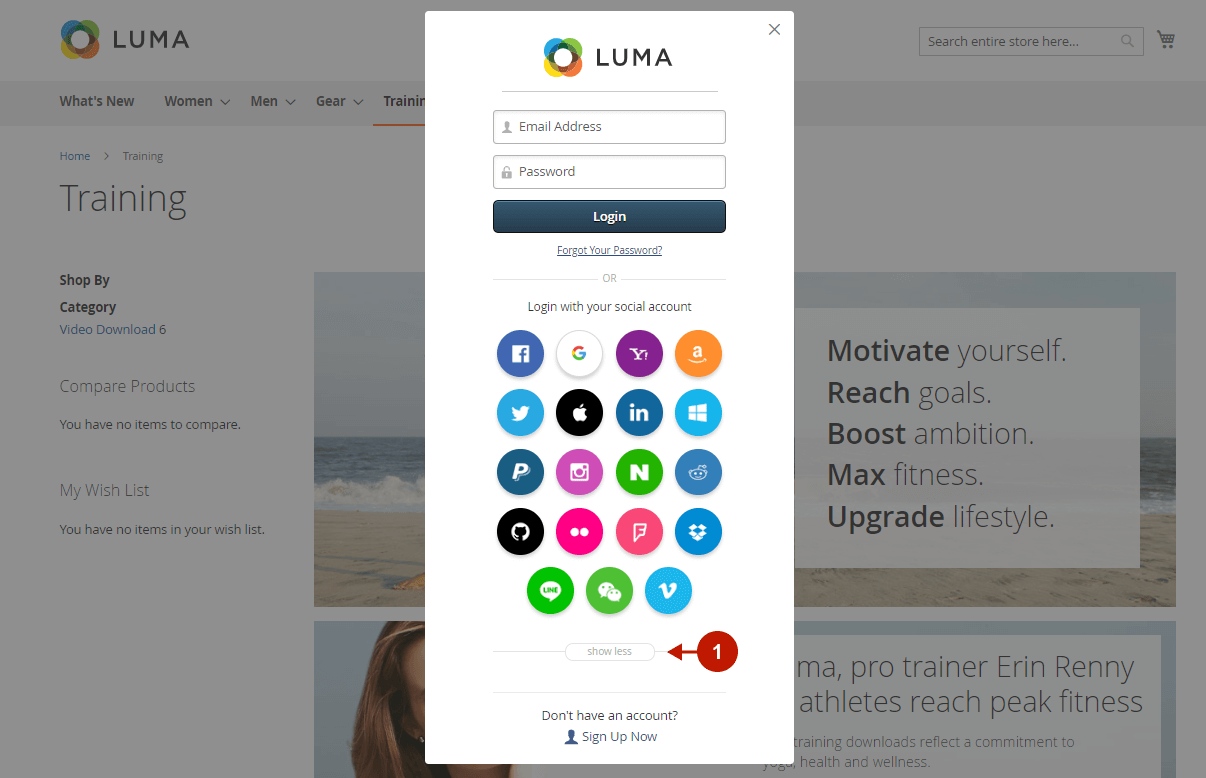
- “Hidden Buttons” will be displayed after clicking Show More.
Step-by-step guide:
- Users can hide the expanded buttons back by clicking Show Less.
This Social Login Pro extension comes bundled with the Magento 2 Popup Login plugin. Please refer to the Popup Login extension configuration guide to properly configure the extension.
