
What is Layered Navigation in Magento 2? It’s a feature that adds filters to category and search pages, helping customers quickly narrow down large catalogs. This improves usability, reduces bounce rates, and makes it easier for shoppers to find what they need.
However, configuring Magento’s default layered navigation isn’t always straightforward. Setting up attributes correctly, managing display options, and optimizing performance can sometimes feel complex. Furthermore, the standard functionality might lack the advanced features needed for a truly seamless shopping experience, such as AJAX loading (filtering without page reloads).
For truly smooth, fast, and flexible filtering, the default setup often isn’t enough. The Magento Layered Navigation extension is built to elevate the customer’s filtering experience—delivering precision, speed, and ease where it matters most.
In this post, we’ll cover how to effectively set up and manage Magento 2’s default layered navigation and enhance it with advanced features using the Layered Navigation & Product Filter extension.
Managing Default Magento 2 Layered Navigation
Magento 2 provides built-in tools to manage the basic layered navigation functionality. Here’s how to handle the common tasks:
How to Enable Layered Navigation in Magento 2
By default, layered navigation is usually active if you have filterable attributes configured.
To manage its core settings:
Step-by-step guide:
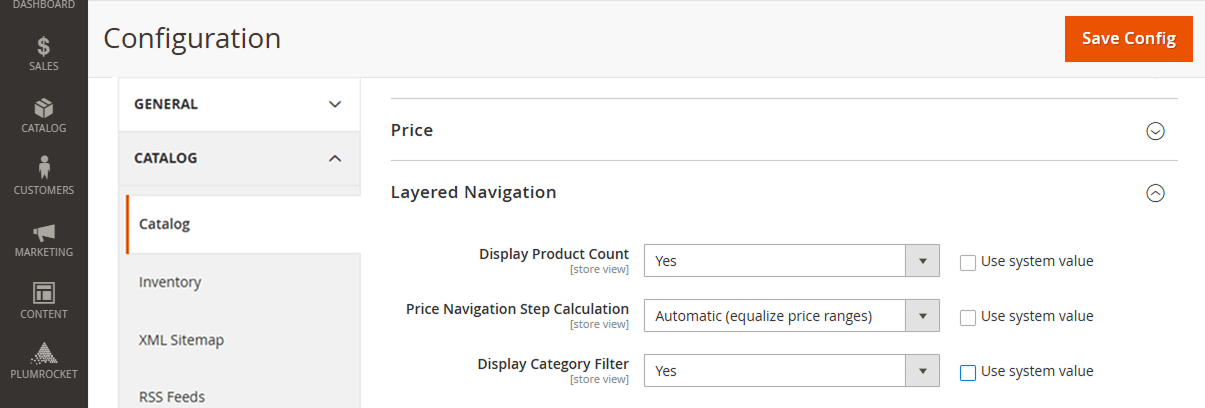
- Navigate to Stores > Settings > Configuration in your Magento Admin Panel.
- In the left-side panel, expand Catalog and click on Catalog.
- Expand the Layered Navigation section.
- Ensure “Display Product Count” is set to Yes if you want customers to see how many products match each filter option.
- Set “Price Navigation Step Calculation” to your preferred method (Automatic, Manual, or Automatic (equalize price ranges)).
To make attributes available for layered navigation, you must configure them individually:
Step-by-step guide:
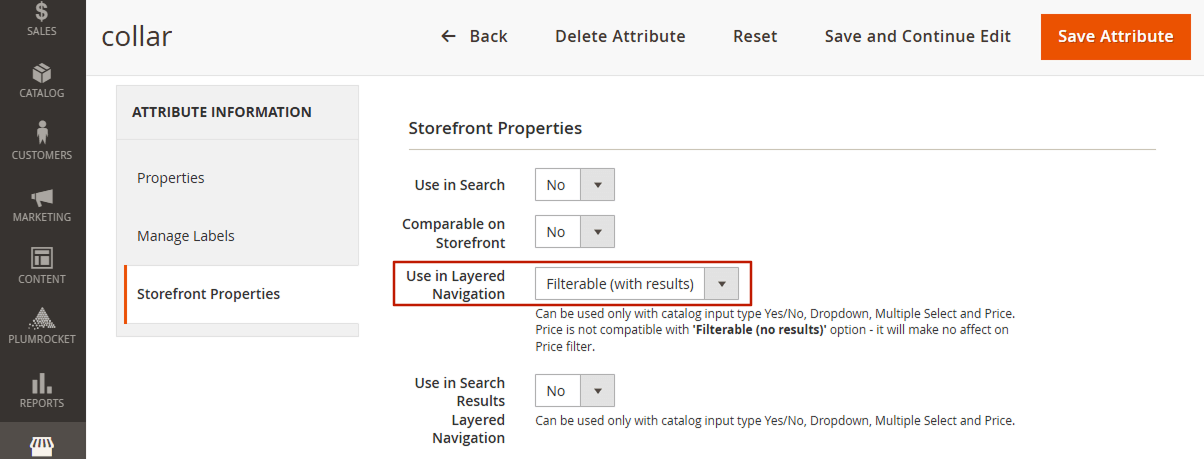
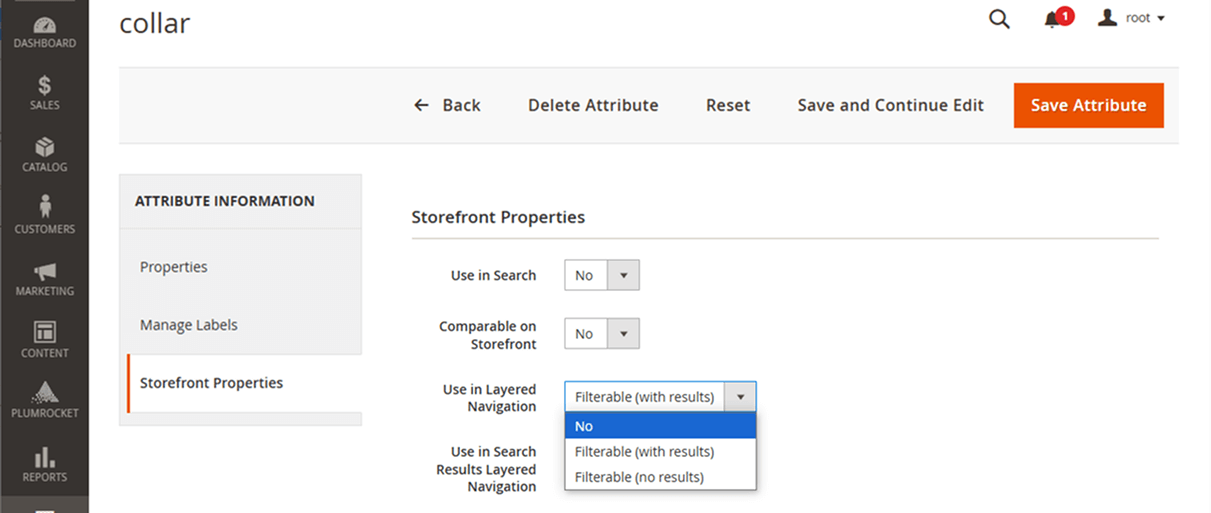
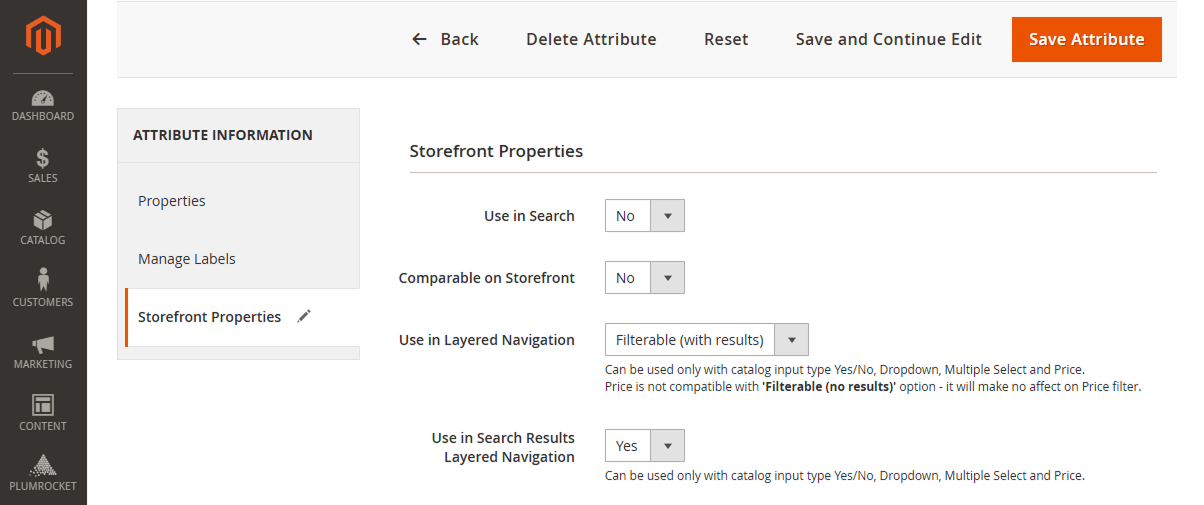
- Go to Stores > Attributes > Product.
- Select an attribute, go to Storefront Properties
- Set “Use in Layered Navigation” to Filterable (with results) or Filterable (no results).
- Remember to clear the Magento cache after making configuration changes.
Using these steps effectively serves to enable layered navigation in Magento 2 by making sure the system is configured and attributes are designated as filterable.
How to Disable Layered Navigation in Magento 2
There is no single toggle or setting in the Magento 2 admin panel to fully disable layered navigation. However, in this section, we’ll walk through the various methods you can use to effectively turn it off or remove its impact from your storefront.
Method 1: Disable Layered Navigation via Attribute Settings
If you need to completely disable layered navigation across your Magento store (which is generally not recommended for usability), the most straightforward way is to prevent each attribute from being used in layered navigation.
To disable Layered Navigation in Magento 2, follow these steps:
Step-by-step guide:
- Go to Stores > Attributes > Product.
- For each attribute currently used in layered navigation, edit it.
- Go to Storefront Properties.
- Change “Use in Layered Navigation” to No.
- Save the attribute and clear the cache.
- Repeat for all filterable attributes.
This effectively disables layered navigation in Magento 2 by removing the filter options. Alternatively, theme customizations or developer intervention might be required for a more complete removal from the layout.
Method 2: Disable Layered Navigation for Specific Categories
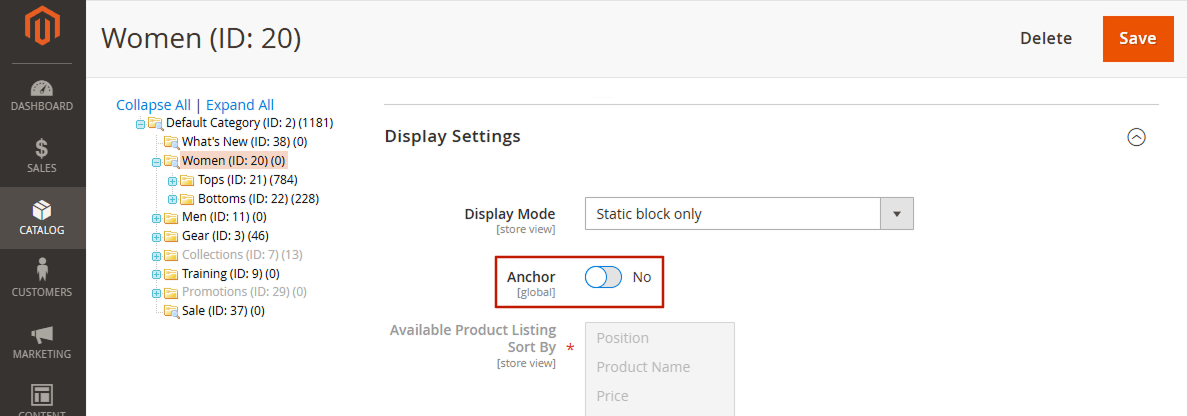
Magento doesn’t offer a direct toggle to enable layered navigation for just one category while disabling it elsewhere (without customizing the theme). However, you can control its behavior on a per-category basis using the “Is Anchor” setting.
An “Anchor” category tells Magento to include products from its direct subcategories when displaying the product list and generating layered navigation filters.
If a category is set to Is Anchor = Yes, its layered navigation will display filter options based on all filterable products within that category and all its anchor subcategories.
If a category is set to Is Anchor = No, it will typically only display products directly assigned to it, and the layered navigation will only reflect those products (or might not display effectively if there are few products directly assigned).
How to Set a Category as an Anchor:
Step-by-step guide:
- Navigate to Catalog > Categories.
- Select the category you want to configure from the category tree on the left.
- Expand the Display Settings section.
- Find the Is Anchor dropdown menu.
- Set it to Yes to enable layered navigation that includes products from subcategories. Set it to No if you only want products directly assigned to this category considered (which often results in limited or no layered navigation).
- Click Save.
- Clear the Magento cache (System > Tools > Cache Management).
Method 3: Hiding via Theme Customization
This is another method to remove the Magento layered navigation from category pages. It directly modifies your theme’s layout files to prevent the layered navigation block from being rendered on pages like category views. It’s a more permanent solution for globally hiding the navigation across your site (or specific page types).
Magento uses layout XML files to define the structure of every page on your storefront. These files dictate which blocks (like the header, footer, product list, layered navigation, etc.) are displayed and where they are positioned within containers. To hide a block globally, you essentially tell Magento not to include its definition in the relevant layout file(s).
If diving into theme XML feels complex or you need more specific layout adjustments, our Magento custom development team can handle these customizations for you. Let us tailor your theme precisely to your requirements.
Step 1: Create or Use a Child Theme
Never edit core Magento files or parent theme files directly. Doing so will cause your changes to be lost during Magento or theme updates. You should always make customizations within a child theme that inherits from your parent theme. If you don’t have one, you’ll need to create it.
Step 2: Locate the Target Layout File
The primary layout file controlling the standard category page view is catalog_category_view.xml.
Step 3: Override the Layout File
- In your child theme’s directory structure, create the necessary folders if they don’t exist:
app/design/frontend/YourVendor/YourTheme/Magento_Catalog/layout/. - Copy the original
catalog_category_view.xmlfrom the parent theme (or the base Magento Catalog module if the parent doesn’t override it) into this new directory in your child theme. - Alternatively, and often preferred for simple overrides: Create a new
catalog_category_view.xmlfile in your child theme’sMagento_Catalog/layout/ directory. This file only needs to contain the instructions to modify the parent layout.
Step 4: Add the Removal Instruction
Open the catalog_category_view.xml file you just created or copied in your child theme. You need to add an instruction to remove the layered navigation block. The standard block names are:
catalog.leftnav(for traditional sidebar layered navigation)catalog.topnav(sometimes used by themes for horizontal layered navigation)
(Check your specific theme’s code if unsure of the exact block name)
Inside the <body> tags of your XML file, add the following line, replacing BLOCK_NAME with the correct name:
<?xml version="1.0"?>
<page xmlns:xsi="http://www.w3.org/2001/XMLSchema-instance" xsi:noNamespaceSchemaLocation="urn:magento:framework:View/Layout/etc/page_configuration.xsd">
    <body>
        <referenceBlock name="catalog.leftnav" remove="true"/>
        <!-- Or potentially: <referenceBlock name="catalog.topnav" remove="true"/> -->
    </body>
</page>
(If you copied the entire file, find the existing <block name="catalog.leftnav" ...> definition and either delete it or add remove="true" as an attribute within its opening tag. However, using <referenceBlock... remove="true"/> in a smaller override file is generally cleaner.)
Step 5: Save and Deploy
Save the modified XML file. Upload it to your server if necessary.
Following these methods is the practical approach to remove layered navigation in Magento 2 from the storefront.
Method 4: Hiding Layered Navigation on Specific Categories (Magento 2.4.x or later)
In older Magento versions, you could paste XML directly into a “Layout Update XML” field in the admin. This field no longer exists in recent Magento 2 versions (e.g., 2.4.x) for security and usability reasons. Instead, you use predefined layout updates created within your theme’s code:
First, you need to create a specific layout XML file within your active theme (e.g., app/design/frontend/Vendor/Theme/Magento_Catalog/layout/catalog_category_view_hide_nav.xml). This file would contain the instruction to remove the block, typically:
<?xml version="1.0"?>
<page xmlns:xsi="http://www.w3.org/2001/XMLSchema-instance" xsi:noNamespaceSchemaLocation="urn:magento:framework:View/Layout/etc/page_configuration.xsd">
    <body>
        <referenceBlock name="catalog.leftnav" remove="true"/>
         <!-- Use catalog.topnav if you use horizontal navigation and want to remove it -->
         <!-- <referenceBlock name="catalog.topnav" remove="true"/> -->
    </body>
</page>
Once this file has been created and deployed, you can apply it:
Step-by-step guide:
- Go to Catalog > Categories.
- Select the desired category.
- Expand the Design section.
- Locate the Custom Layout Update dropdown menu.
- Select the custom layout file created by your developer (e.g., it might be named something like “Hide Layered Navigation”).
- Save the category and clear the cache.
How to Make Layered Navigation Open By Default in Magento 2
To make the Magento 2 layered navigation open by default, you can use one of these methods:
- Third-Party Extensions: Plumrocket’s Magento 2 layered navigation extension not only enriches layered navigation with plenty of user-friendly features, but also displays filters opened by default, without needing code changes.
- Theme Customization (CSS/JS): This approach involves modifying the theme’s CSS or JavaScript files to change the default state of the filter blocks from collapsed to expanded. This usually requires front-end development knowledge.
By applying either solution, you can improve user experience by reducing the number of clicks needed to view filter options.
How to Configure the Layered Navigation Price Filter in Magento 2
The Magento 2 layered navigation price filter is one of the most commonly used filters, allowing customers to shop within their budget. Here’s how to configure it and what to check if it’s not behaving as expected.
Follow these steps to configure the Magento layered navigation price filter:
Step 1: Ensure Price Attribute is Filterable
Step-by-step guide:
- Navigate to Stores > Attributes > Product.
- Select an attribute, go to Storefront Properties.
- Set “Use in Layered Navigation” to Filterable (with results).
- Set “Use in Search Results Layered Navigation” to Yes if you also want it available on search results pages.
- Save the attribute.
Step 2: Configure Price Navigation Steps
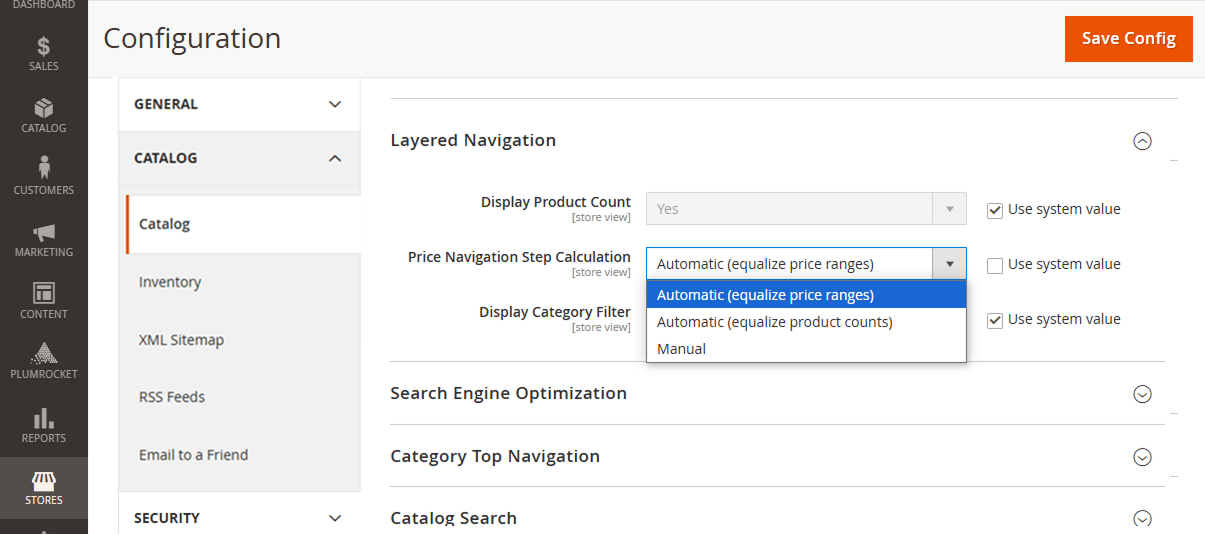
Step-by-step guide:
- Navigate to Stores > Settings > Configuration.
- Expand Catalog in the left panel and click Catalog.
- Expand the Layered Navigation section.
- Find the “Price Navigation Step Calculation” setting. Additionally, while setting Price Navigation Step Calculation, you have three options:
Automatic (equalize price ranges): Magento attempts to create price ranges (steps) of roughly equal size (e.g., $0-100, $100-200).
Automatic (equalize product counts): Magento tries to create price ranges that contain a similar number of products within each range. This is often the preferred automatic method in newer versions.
Manual: You define the size of each price step yourself. If selected, you must also configure: Default Price Navigation Step ( Enter the value for each price rang, e.g., enter 100 for steps like $0-100, $100-200, etc.); Maximum Number of Price Intervals (Set the upper limit for how many price ranges can be show).
- Save the configuration.
Step 3: Clear Cache
After making attribute or configuration changes, always clear the Magento cache (System > Tools > Cache Management).
While standard Magento limits the price filter to rigid steps, our Layered Navigation extension enhances the experience with a user-friendly price slider and options for custom ‘from-to’ ranges, giving customers precise control over their budget.
How to Customize Magento 2 Layered Navigation
You’ve learned how to manage Magento’s built-in layered navigation – how to enable Magento 2 layered navigation attributes, and potentially how to disable Magento 2 layered navigation or hide it. But what if the standard options feel… limiting? This is where a Magento 2 Layered Navigation extension becomes invaluable for online stores.
With the use of this extension, you can easily filter by customizable options, enable multi-select within filters, and even add custom filter in Magento layered navigation. This tool offers a straightforward configuration process to enhance your store without technical concerns.
Add Custom Filter in Layered Navigation
The layered navigation extension for Magento 2 allows you to filter products by any custom attribute. For details on how to enable filtering by custom attributes, check out this step-by-step guide.
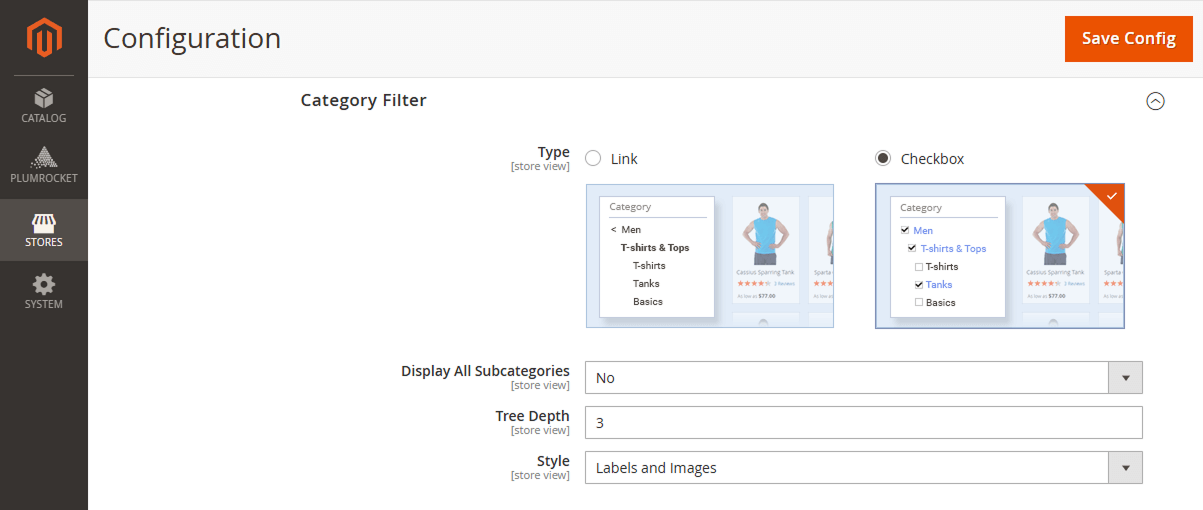
Change to Horizontal/Vertical Layered Navigation
The extension allows you to easily customize the navigation’s appearance (Horizontal/Vertical layouts) and filter order (drag-and-drop), alongside options for category-specific and other useful filters (like stock status).
Improve Price Filtering With User-Friendly Slider
To enhance price filtering and move beyond the basic price steps provided by default in Magento, consider implementing a more user-friendly approach.
The extension introduces a dynamic price slider that allows customers to intuitively select their desired price range. For users who prefer precision, include ‘from-to’ input fields where they can enter their exact budget. Additionally, offer the option to manually configure price steps, providing greater flexibility compared to the platform’s standard automatic settings.

Filter Multi-Select Option
Magento 2 Layered Navigation extension allows customers to select multiple options across different filter attributes. Once shoppers made all their selections, they click a single “Apply Filters” button, and the product list updates just once with all criteria applied. It significantly speeds up the process for decisive buyers.
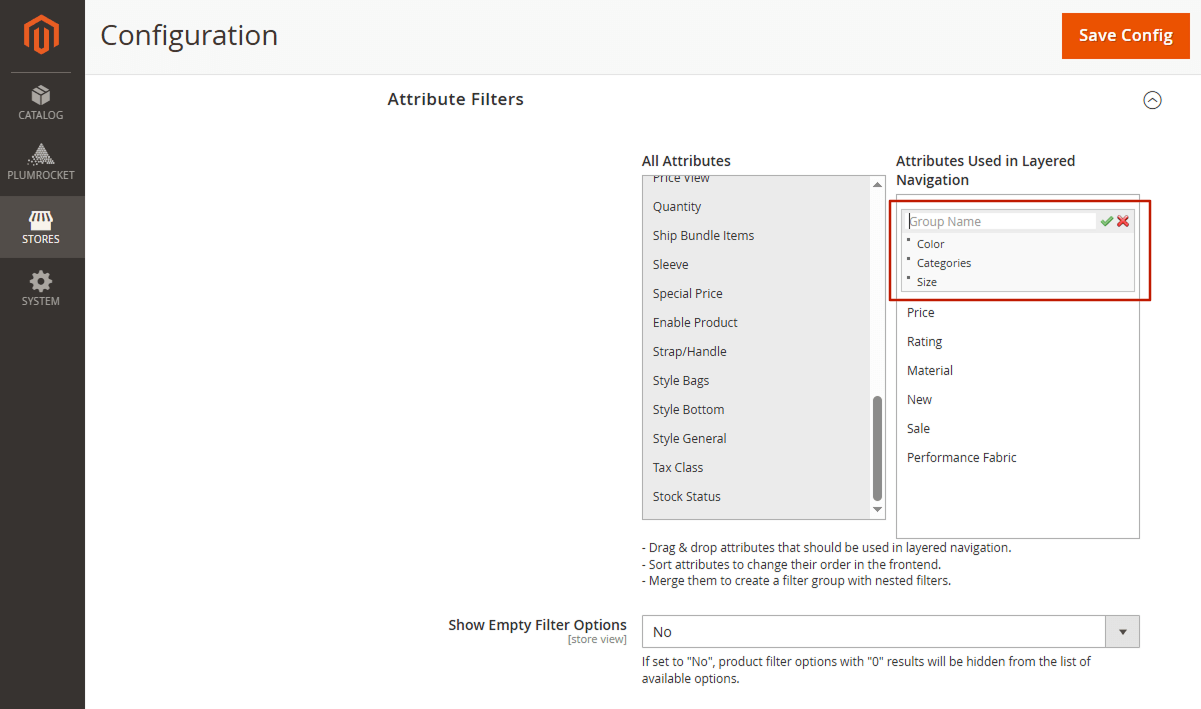
Custom Fitler Groups
Magento 2 layered navigation module creates a cleaner, more intuitive layout with group filters. Combine similar attributes into nested groups to simplify complex filter sets and make the interface more structured. This approach not only improves usability but also helps customers quickly locate what they’re looking for—even when browsing through extensive product catalogs.
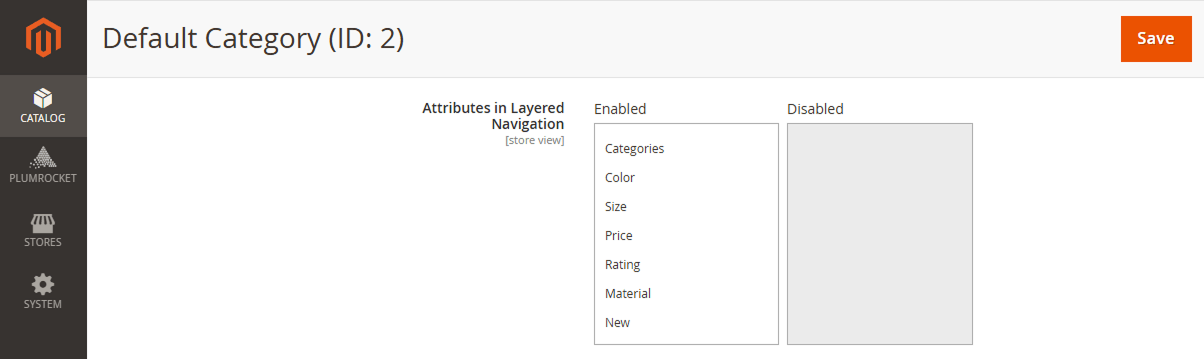
Custom Filter List for Each Category
The extension tailors the Magento 2 layered navigation for each filter category by showing only filters that make sense in context. For example, display size and color filters for clothing categories, and hide them in electronics.
Additional Filters
Leverage the module to enhance the default navigation with additional filters like Stock Status, Product Rating, New Arrivals, and Sale. These allow your customers to focus on what matters most to them—whether it’s only showing in-stock items, browsing the newest products, or finding the best deals. With these extra filtering options in place, you’ll reduce friction in the shopping journey and help drive more conversions.
This Magento 2 layered navigation extension equips merchants with an easy-to-manage solution for a superior Magento custom layered navigation experience, overcoming standard limitations and boosting store performance without demanding extensive development resources.
Streamlined Navigation = Happier Customers
Don’t lose conversions to clunky filters or slow page reloads. Give your shoppers the speed and control they expect:
🚀 Instant AJAX filtering – no more reload delays
🎯 Multi-select, sliders & custom filters for precise control
🧩 Category-specific filters that adapt to your catalog