
Often, websites need tailored design solutions to create a user-friendly website that makes sales. However, pre-built modules or themes can’t always fulfill all the website’s needs and create a seamless user experience. In such cases, the best decision is customization.
One of the most frequent requests is to customize the Magento 2 product page. This can be done in two ways: by creating a custom module or a custom theme. While both methods are useful and effective, this tutorial will focus on the second method. Using a custom theme is often the best option if the primary goal is to alter the arrangement, style, and general look of your product pages.
Unlock the full potential of your store with tailored Magento development services that meet your unique needs.
Step 1. Create Custom Theme in Magento 2
So, let’s create a custom theme to customize the product page.
- Create directories with the following path:
<em>app/design/<Vendor_name>/<Theme_name></em>. - Create two files in the directory:
theme.xmlandregistration.php
Here is the code for the theme.xml file:
<?xml version="1.0"?>
<theme xmlns:xsi="http://www.w3.org/2001/XMLSchema-instance" xsi:noNamespaceSchemaLocation="urn:magento:framework:Theme/etc/theme.xsd">
    <title>Custom Theme</title>
    <parent>Magento/luma</parent>
</theme>
Below is the code for the registration.php file:
<?php
\Magento\Framework\Component\ComponentRegistrar::register(
    \Magento\Framework\Component\ComponentRegistrar::THEME,
    'frontend/Plumrocket/Custom_Theme',
    __DIR__
);
- Execute the following command:
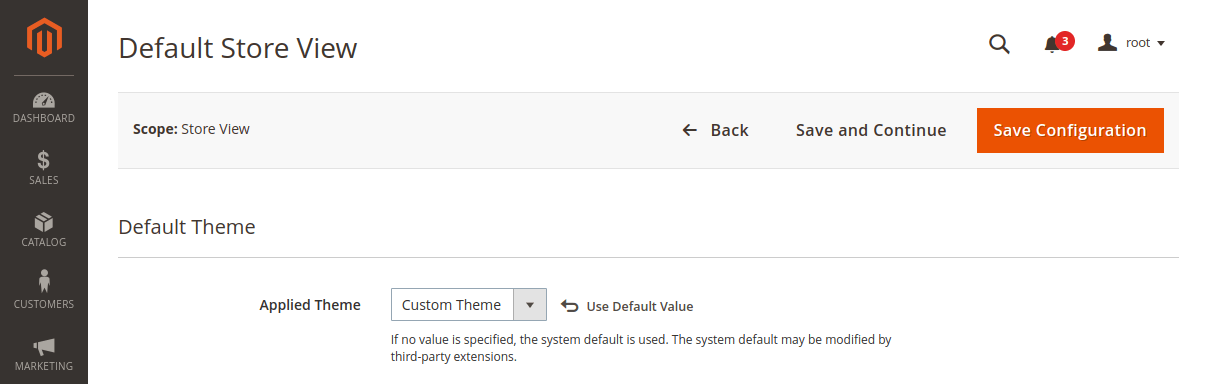
php bin/magento setup:upgrade- Apply the new custom theme by going to Content -> Configuration in the admin panel and selecting the desired store view.
Step 2. Enable Template Path Hints
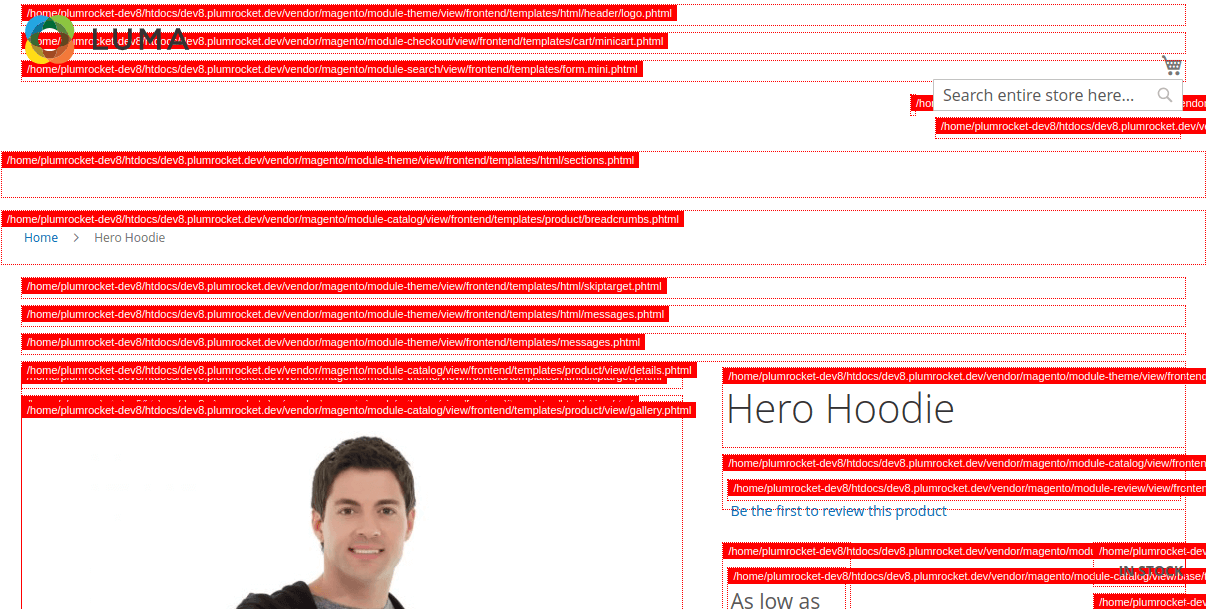
First of all, in order to customize the Magento 2 product page, you need to enable path hints.in/magento setup:upgra Path hints is a debugging tool that visually displays the paths to the layout and templates files used to render a page. This significantly reduces the time spent searching for the desired layout/template file.
You can enable path hints by following these steps:
- In the Magneto admin panel, go to Stores > Configuration > Advanced > Developer.
- Under the ‘Debug’ tab, set the “Enable Template Path Hints for Storefront” to Yes.
- Click the Save Config button.
- Clear the cache via System > Cache Management > Flush Cache Storage or by using the
php bin/magento cache:flushcommand.
This is what the product page will look like with path hints enabled:
Step 3. Customize Product Page in Magento 2 Using Layout File
There are 2 methods to customize the Magento 2 product page using the layout file: override the existing layout or create a custom product layout file.
Depending on the product pages you need to customize, both methods require you to create xml files, and their names may contain a specific product type: catalog_product_view_type_<em>product_type</em>.xml. Instead of product_type, you need to enter the product type you’re customizing. Possible options: simple, configurable, grouped, downloadable, bundle, virtual.
However, you can modify the product page not only by its type but also by ID or SKU. All you need to do is specify this ID/SKU in the file name. For example, to customize the product page with SKU MH07, you need to create a file named catalog_product_view_sku_MH07.xml, and for the product page with ID 10, the file name would be catalog_product_view_id_10.xml.
Method 1. Overriding layout to customize product page
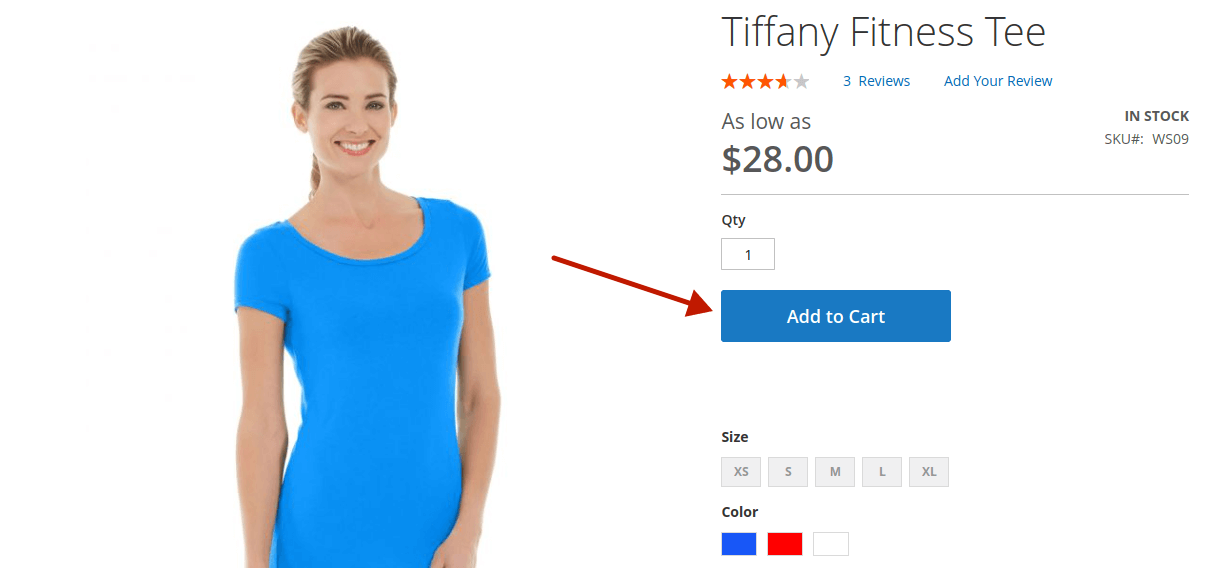
Let’s move from theory to practice. Let’s customize product page for all products, placing the Add to Cart button near the product price and removing the Add to Wish List and Add to Compare buttons:
- Create the file
app/design/frontend/Plumrocket/Custom_Theme/Magento_Catalog/layout/catalog_product_view.xml:
<?xml version="1.0"?>
<page xmlns:xsi="http://www.w3.org/2001/XMLSchema-instance" xsi:noNamespaceSchemaLocation="urn:magento:framework:View/Layout/etc/page_configuration.xsd">
    <body>
        <move element="product.info.addtocart.additional" destination="product.info.main" after="product.info.price" />
        <referenceBlock name="product.info.addto" remove="true" />
    </body>
</page>
- Clear the cache and check the result.
Here is the page before customization:
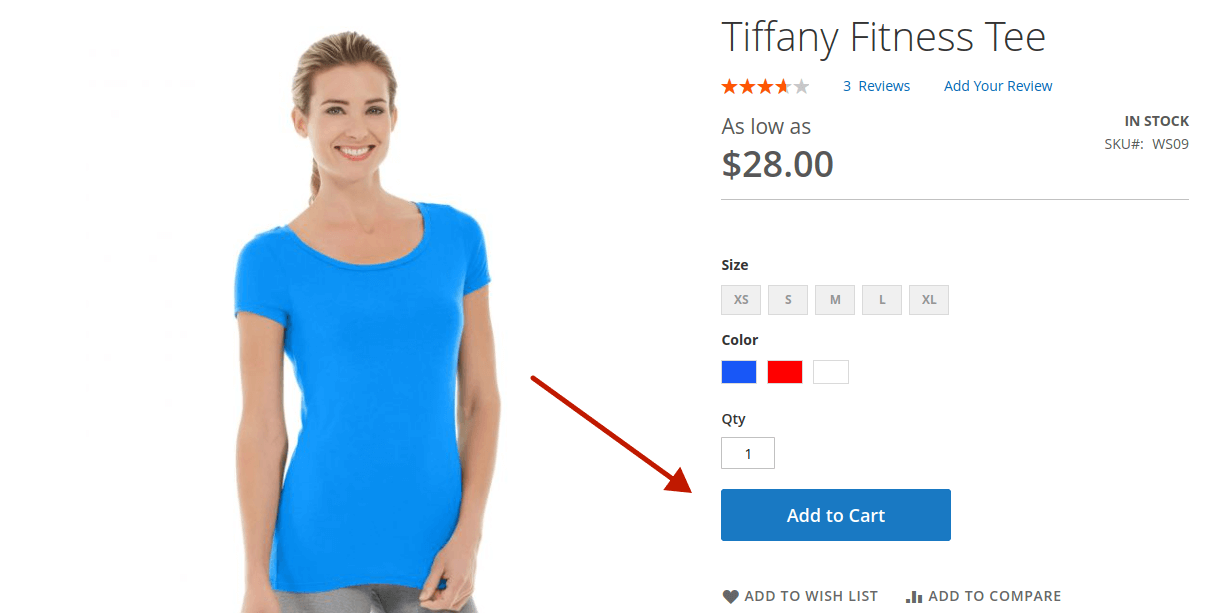
Below the page after customization:
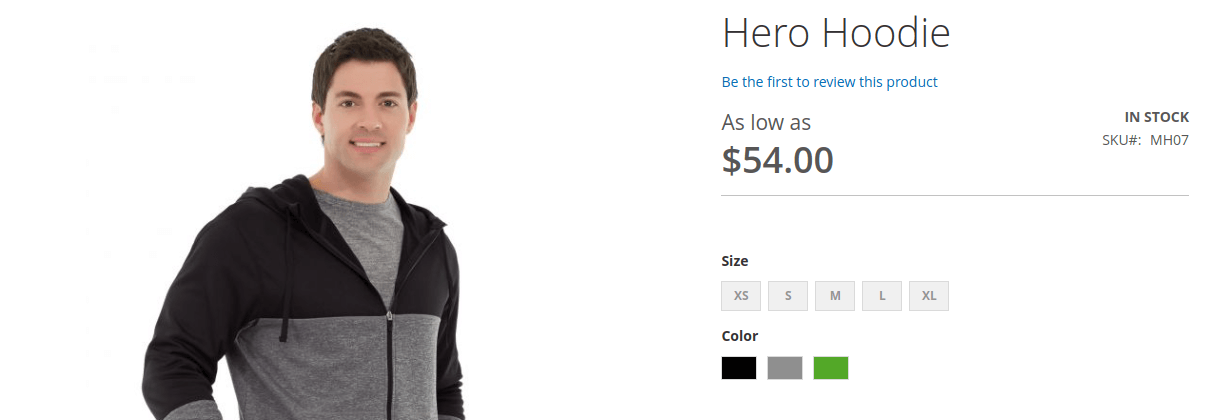
- To remove the Add to cart button for the product with SKU MH07, you should create the file
app/design/frontend/Plumrocket/Custom_Theme/Magento_Catalog/layout/catalog_product_view_sku_MH07.xml:
<?xml version="1.0"?>
<page xmlns:xsi="http://www.w3.org/2001/XMLSchema-instance" xsi:noNamespaceSchemaLocation="urn:magento:framework:View/Layout/etc/page_configuration.xsd">
    <body>
        <referenceBlock name="product.info.addtocart.additional" remove="true" />
    </body>
</page>
- Clear the cache and check the result:
Method 2. Creating custom layout to customize product page from admin panel
This method involves creating a custom layout that can be enabled/disabled from the admin panel. This allows the administrator to flexibly customize the product page directly from the admin panel. All you have to do is to create the app/design/frontend/Plumrocket/Custom_Theme/Magento_Catalog/layout/catalog_product_view_selectable__.xml file.
For example, let’s customize the product page with SKU MP03:
- Create the
app/design/frontend/Plumrocket/Custom_Theme/Magento_Catalog/layout/catalog_product_view_selectable_MP03_custom.xmlfile:
<?xml version="1.0"?>
<page xmlns:xsi="http://www.w3.org/2001/XMLSchema-instance" xsi:noNamespaceSchemaLocation="urn:magento:framework:View/Layout/etc/page_configuration.xsd">
    <body>
        <referenceBlock name="product.info.review" remove="true"/>
    </body>
</page>
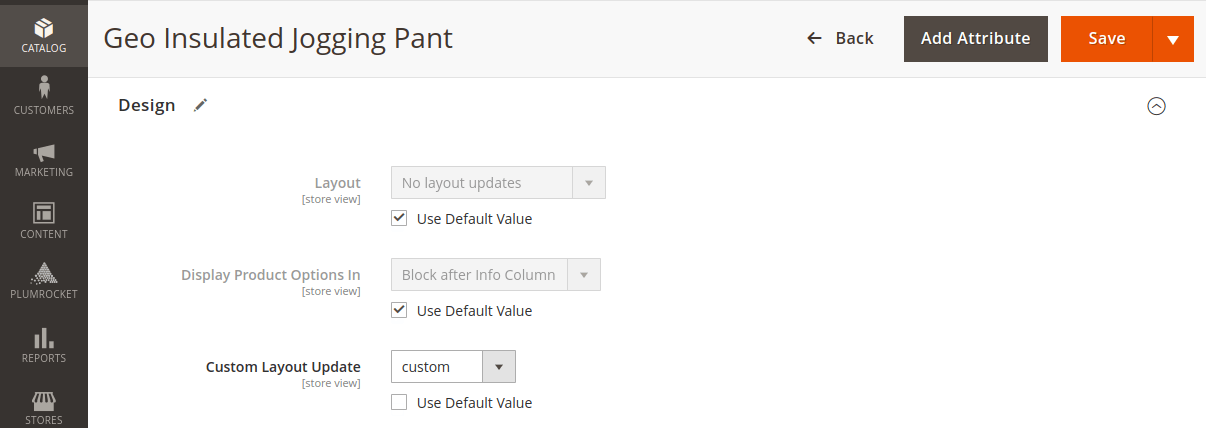
- Go to Catalog > Products and go to the product settings with SKU MP03. A new option has appeared in the “Custom Layout Update” field under the Design section.
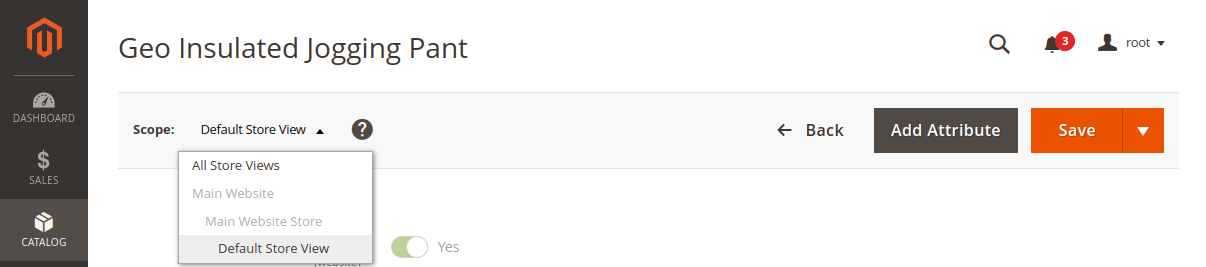
If you don’t see it, try changing the Scope to the one that your custom theme applies to.
- Let’s change the value of the Custom Layout Update field to custom:
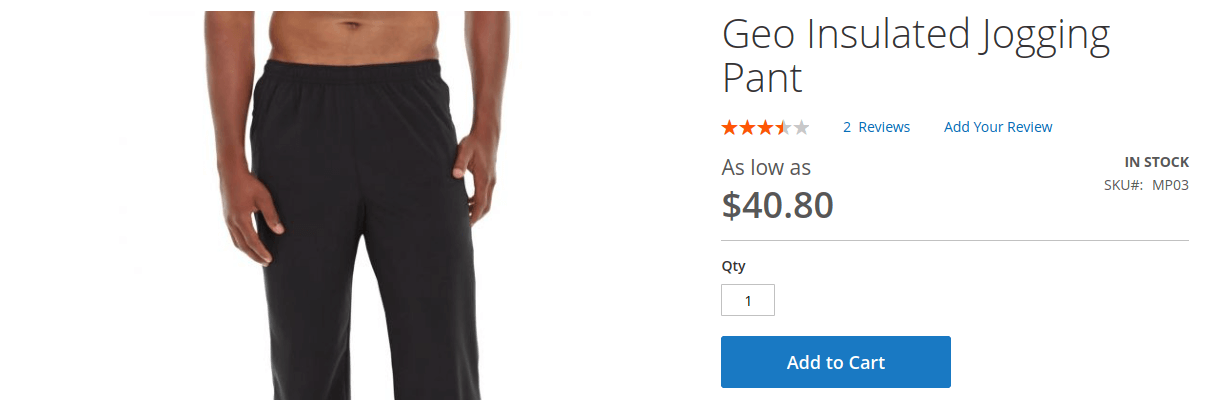
Now, you can go to a storefront and see the result. Here is the Product page view without the custom layout update:
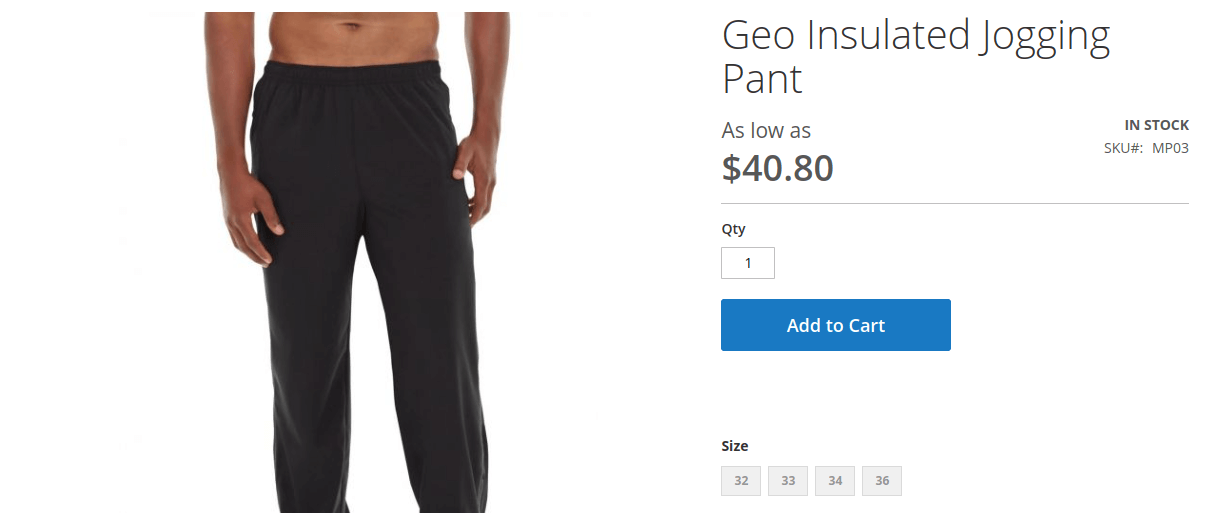
Here is the Product page view with a custom layout update:
I hope you found this tutorial helpful! If you need any assistance with custom Magento development, feel free to reach out to us.
Frequently Asked Questions (FAQ)
Almost always the filename. Magento only picks up files that match the pattern exactly:catalog_product_view_selectable_<SKU>_<name>.xml
The SKU has to match the product exactly, including case and any dashes. The file has to sit in Magento_Catalog/layout/ inside your theme, not in the theme’s root layout/ folder. And the theme that contains the file has to be the theme applied to the scope you are editing, which is why switching the Scope selector at the top of the product page often makes the option appear.
Flush the cache after adding the file. Magento reads the available options from the layout files on disk, so a stale cache hides new ones.
remove="true" takes the block out of the layout entirely, along with everything nested inside it. It is applied after all layout files merge, so it beats any instruction that tries to add the block back. Use it when you are certain nothing else depends on that block.display="false" leaves the block in the layout but stops it rendering. Safer when other blocks reference it, and easier to reverse later.
The failure mode worth knowing: removing a parent block silently removes its children too. If part of the page disappears that you never touched, this is usually why. Turn on path hints and check what was nested inside the block you removed.
Create a custom theme. Editing core theme files under vendor/ works right up until the next update overwrites everything, and then you are rebuilding your changes from memory under time pressure.
A child theme takes about ten minutes to set up, as shown in Step 1, and every override you write afterwards lives in your own directory. It is the difference between a change you own and a change you rent.
Partly. Hyvä still runs on Magento’s layout XML system, so the mechanism carries over: the same handles, the same move and referenceBlock instructions, the same selectable layout files.
What doesn’t carry over is everything specific to Luma. Templates, block names and styling are different, so the examples in this tutorial will not map one to one onto a Hyvä storefront. Enable path hints on your own theme and confirm the block names before writing the override.
If you are moving to Hyvä or already running it, our Hyvä theme development team handles this kind of work daily.
Through the theme, not the layout file. Layout overrides apply wherever their theme is applied, so scope the theme instead.
Go to Content > Design > Configuration, find the row for the store view you want, and apply your custom theme there only. Other store views keep the parent theme and stay untouched. For a multi-language or multi-brand setup, that usually means one child theme per variation rather than one theme with conditional logic inside it.
