The checkout success page, also known as the thank you page, appears on the website when the item is paid. This page is designed to express gratitude for completed orders and display key details about the purchase. Although, by default, the Magento 2 checkout success page is quite generic and simple, you may enhance it and create an engaging page that encourages repeat sales. So, to create such a page, you need to customize the checkout success page in Magento 2.
In this tutorial, we prepared a step-by-step guide on how to add a block to the checkout success page to optimize this page and create a seamless user experience.
Want to build a beautiful success page without writing any code? Discover our powerful Magento 2 Checkout Success Page Extension.
Method 1: Adding Custom Block to the Magento 2 Checkout Success Page (Via Admin Panel)
Magento 2 provides a fairly simple and convenient method to add a custom block to the checkout success page using only the admin panel without the necessity to edit files. So, let’s get started!
Step 1. Creating a CMS block
The following method is based on CMS blocks. At this stage, you need to create and configure a CMS block, including specifying the content you need to display.
To create a CMS block, navigate to Content -> Blocks in the menu and click the Add New Block button.
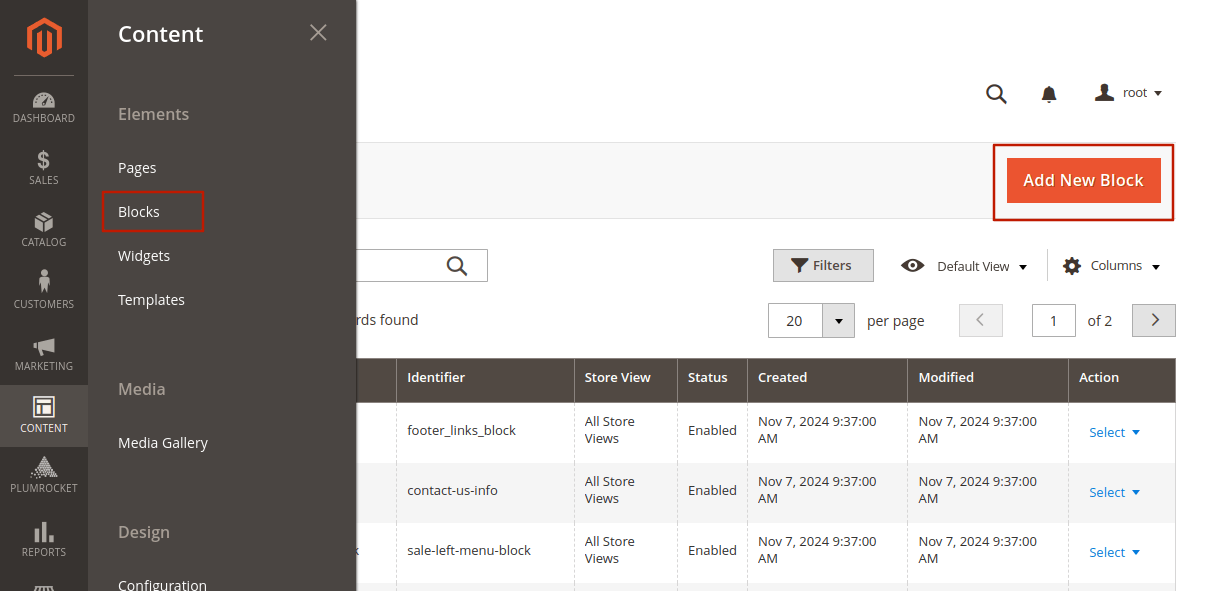
You’ll see the CMS block creation form, where you need to specify the block name, its ID, store view, and its content.
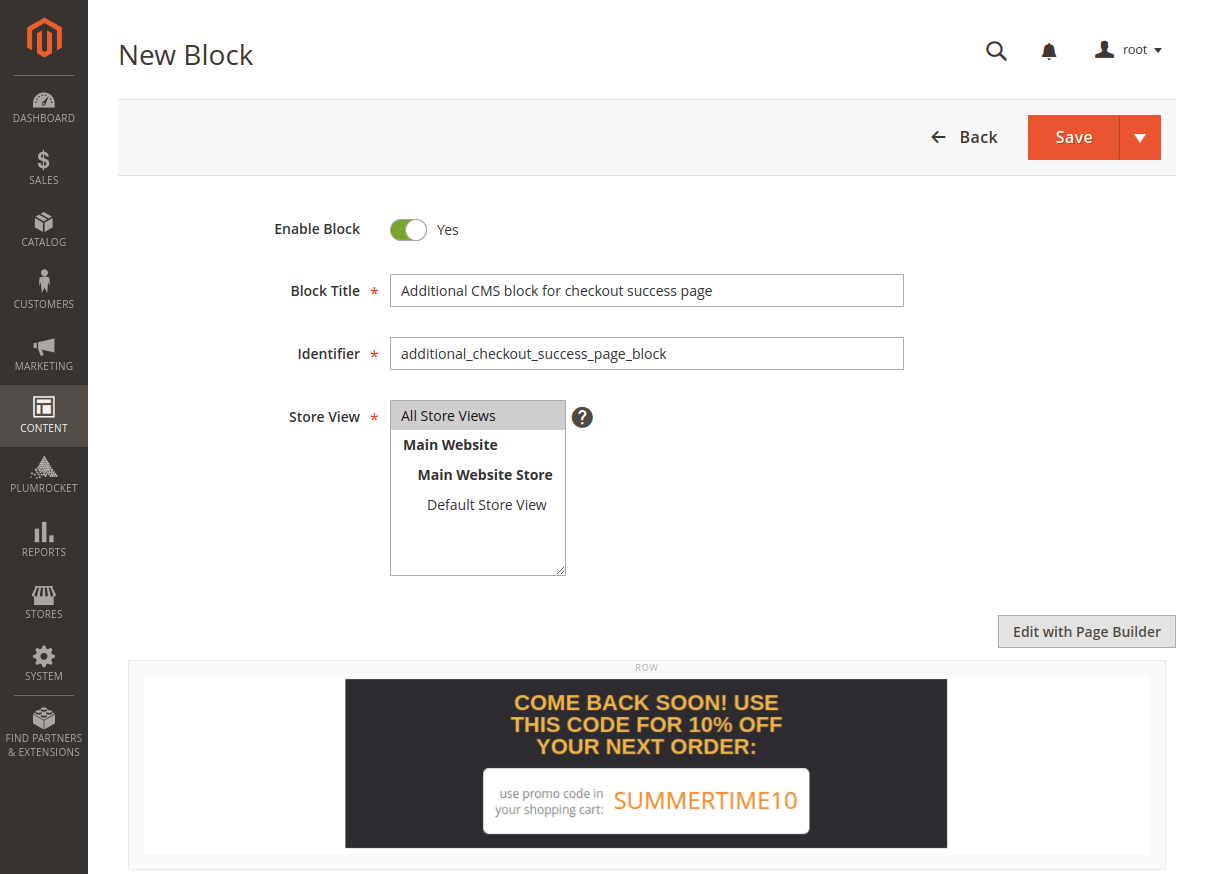
Step 2. Configuring the widget to render the CMS block
After creating a CMS block, it will not display automatically. Therefore, you need to add a widget to render the block.
Step-by-step guide:
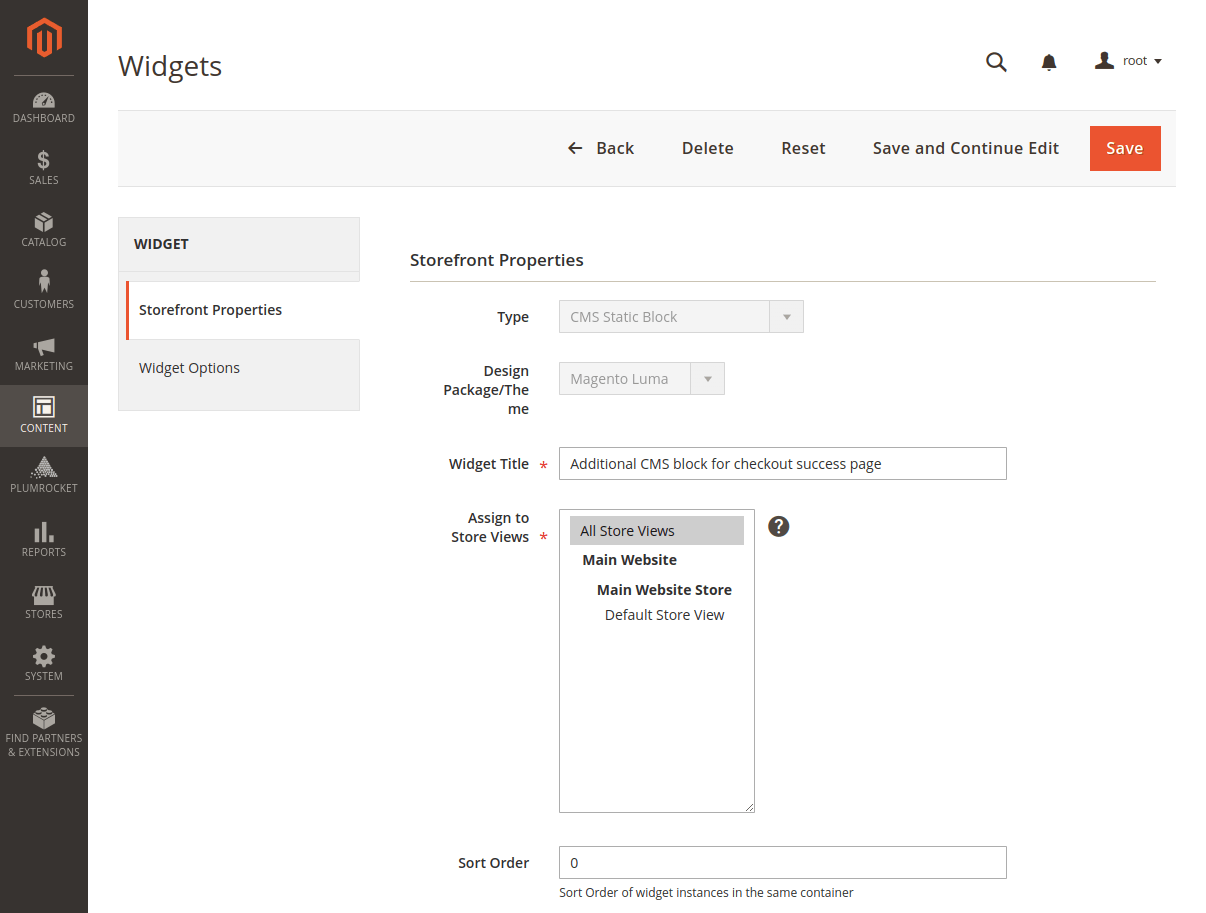
- To set up the widget, navigate to Content -> Widgets in the admin panel and click Add Widget.
- In the widget creation form, select CMS Static Block for the Type field and choose your active theme for the Design Theme field.
- Name the widget, assign it to the store views where it should appear, and set the sort order.
Next, we proceed to the Layout Updates section, which determines where the block will be displayed. To have the block appear on our custom Magento 2 Checkout Success Page, set the following fields:
Step-by-step guide:
- Select Specified Page in the Display on field.
- Choose One Page Checkout Success in the Page field.
- Specify the container in which the block will be placed.
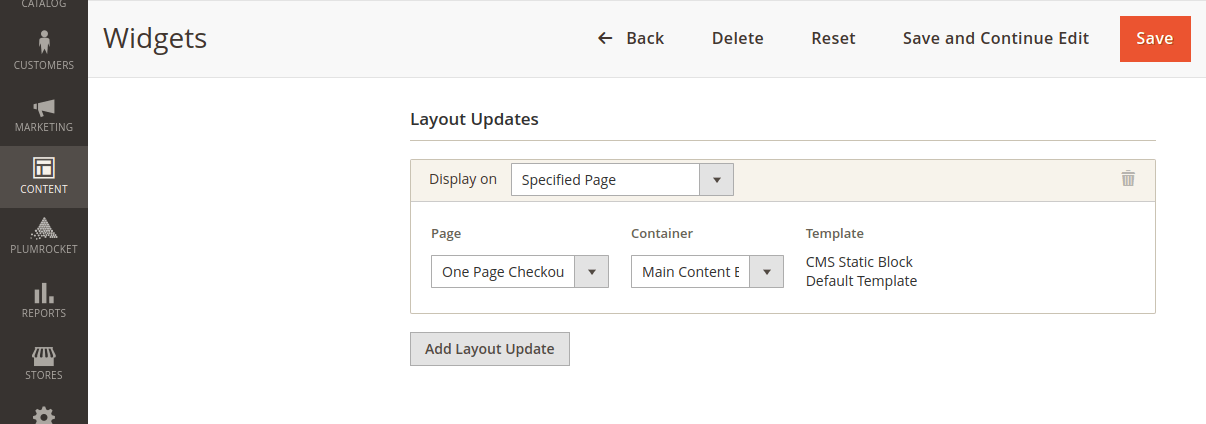
The final step is to select the CMS block that you want to display. To do this, follow the next steps:
Step-by-step guide:
- Navigate to the Widget Options tab.
- In the Block field, select the previously created block.
- Save the widget.
- Clear the Magento cache so that the changes are reflected on the frontend.
Here is the example:
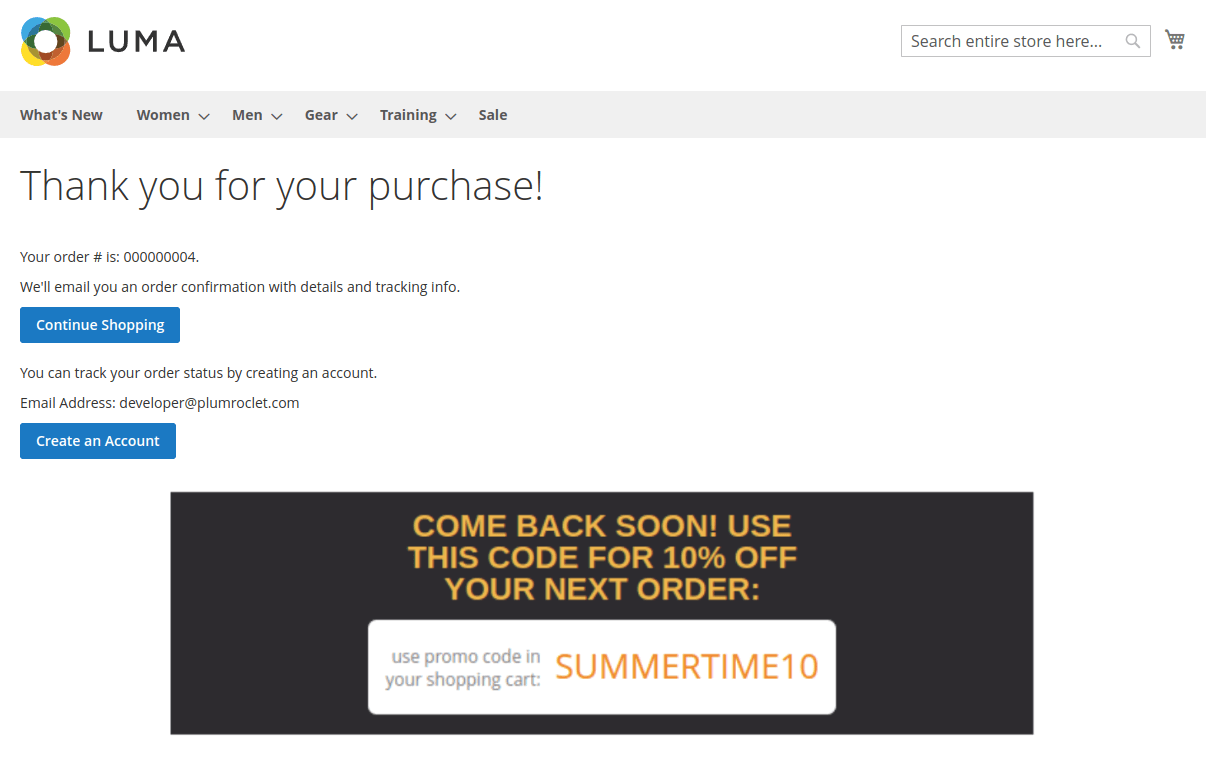
Method 2: Adding a Custom Block to the Magento 2 Checkout Success Page (Via Custom Extension)
Magento 2 also allows you to add custom blocks to the checkout success page via the admin panel without editing the code. However, this method provides quite limited capabilities, and often websites require a more flexible approach that can be implemented programmatically.
Let’s take a closer look at creating a custom extension to display a custom block.
Step 1: Creating a custom module
To register your module in Magento, create a registration.php file following the path app/code/VendorName/ModuleName/registration.php. Here is the file content:
<?php


use Magento\Framework\Component\ComponentRegistrar;


ComponentRegistrar::register(ComponentRegistrar::MODULE, 'VendorName_ModuleName', __DIR__);
Now you need to create a module.xml file. To accomplish this, create a file with the following path app/code/VendorName/ModuleName/etc/module.xml and locate the code within that file:
<?xml version="1.0"?>
<config xmlns:xsi="http://www.w3.org/2001/XMLSchema-instance"
       xsi:noNamespaceSchemaLocation="urn:magento:framework:Module/etc/module.xsd">
   <module name="VendorName_ModuleName"/>
</config>
Step 2: Implementing custom block output
Now let’s move on to displaying the custom block on the Magento 2 Checkout Success Page.
Create checkout_onepage_success.xml file following this path: app/code/VendorName/ModuleName/view/frontend/layout/checkout_onepage_success.xml.
Here is the file content:
<?xml version="1.0"?>
<page xmlns:xsi="http://www.w3.org/2001/XMLSchema-instance" layout="1column" xsi:noNamespaceSchemaLocation="urn:magento:framework:View/Layout/etc/page_configuration.xsd">
   <body>
       <referenceContainer name="content">
           <block class="Magento\Framework\View\Element\Template" name="custom.coupon_block" template="VendorName_ModuleName::coupon.phtml" after="-" />
       </referenceContainer>
   </body>
</page>
Create coupon.phtml, here is the path: app/code/VendorName/ModuleName/view/frontend/templates/coupon.phtml. The content:
<div style="background-color:#333; color:#ffcc00; text-align:center; padding:20px;">
   <p style="margin: 0;">COME BACK SOON! USE THIS CODE FOR 10% OFF YOUR NEXT ORDER:</p>
   <div style="background-color:white; color:#ff8c00; display:inline-block; border-radius:5px; font-weight:bold;">
       SUMMERTIME10
   </div>
</div>
Below is an example of the expected result:
Important Information:
You can also display the CMS block by changing the contents of the checkout_onepage_success.xml file to the following:
<?xml version="1.0"?>
<page xmlns:xsi="http://www.w3.org/2001/XMLSchema-instance" layout="1column" xsi:noNamespaceSchemaLocation="urn:magento:framework:View/Layout/etc/page_configuration.xsd">
   <body>
       <referenceContainer name="content">
           <block class="Magento\Cms\Block\Block" name="custom.coupon_block" after="-" >
               <arguments>
                   <argument name="block_id" xsi:type="string">additional_checkout_success_page_block</argument>
               </arguments>
           </block>
       </referenceContainer>
   </body>
</page>
In this example, additional_checkout_success_page_block is the CMS block ID that needs to be displayed. Make sure a CMS block with this ID exists in your Magento.
Method 3: Using Magento 2 Checkout Success Page Extension for Easy Customization
The customization process is often not that easy, as it requires both technical knowledge and time. For those looking for reliable and tailored solutions, use the Checkout Success Page extension that provides a streamlined and quick way to customize the checkout success page in Magento 2.
It offers a range of features designed to help you build a checkout success page that ищер meets your business needs and delights your customers. For example, by leveraging the Magento 2 Checkout Success page extension, you can:
- Use the ready-made templates, which are already equipped with upgraded blocks. These templates include full order summary, shipping details and order subtotal, discount codes, recommended products, and social media banners.
- Enable and disable blocks as needed.
- Customize the content of each block.
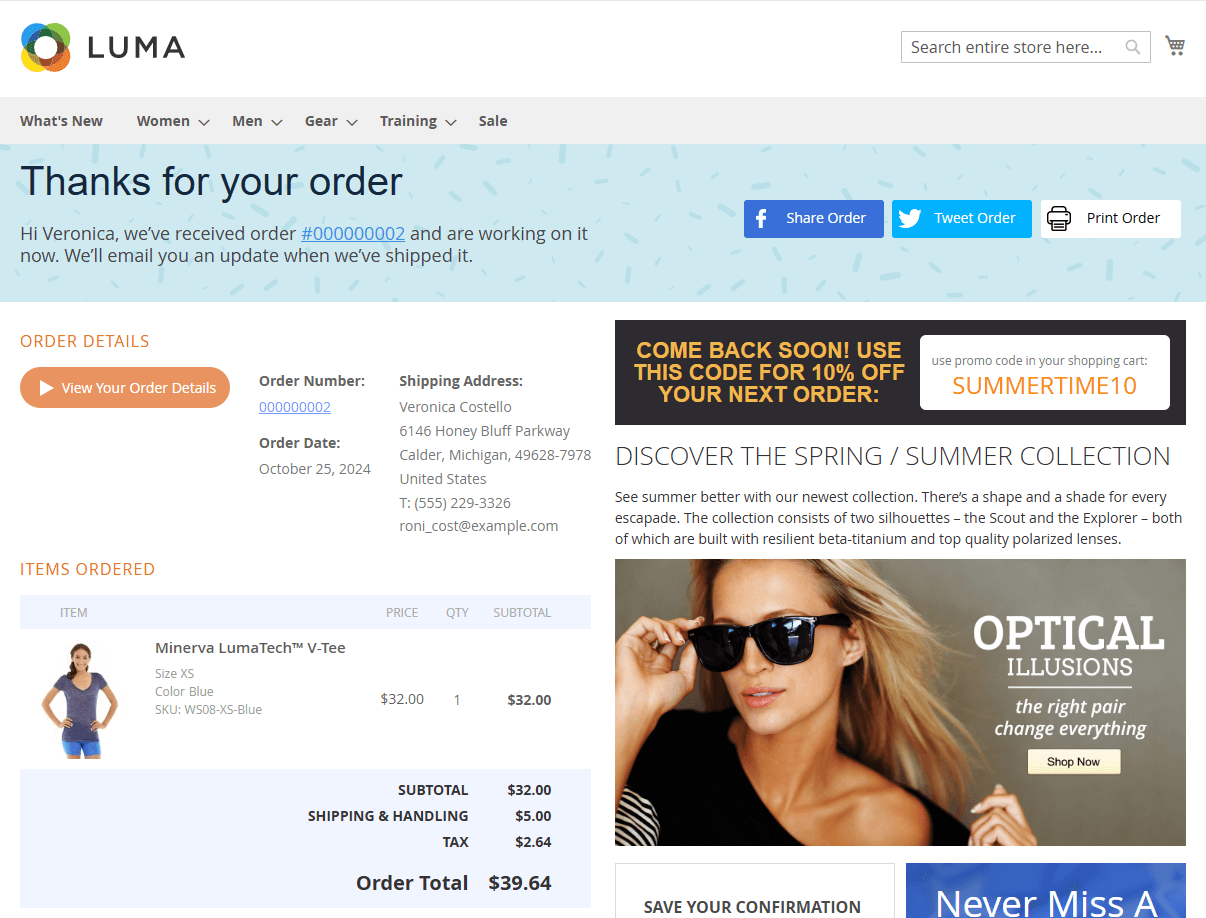
With the Magento 2 Checkout Success Page Extension, delivering a tailored, professional, and engaging checkout success page has never been easier!
