The user journey on your store doesn’t end after payment. The thank you page offers an opportunity for further customer engagement, which may result in customer loyalty and repeated purchases. This page is critical in creating a smooth user experience and ensuring more sales.
The order success page appears after completing the purchase online when the payment has been made. Usually, you can see there a message of gratitude for a purchase, therefore, this page is also known as a thank you page. Beyond that, it summarizes all order details, such as order number, shipping address, and other relevant information. So, the thank you page isn’t just a page with a positive message, it is an essential part of the ecommerce website, which boosts transparency and trust in your store.
In this tutorial, we will explore several methods to customize the Shopify thank you page to optimize the post-purchase experience for your customers.
Why Customize the Shopify Thank You Page
Customization is all about flexibility. It allows you to create personalized solutions that align with your specific goals and open up new opportunities. The basic Shopify thank you page looks quite simple and generic, but with customization, you can add some additional functionality or elements to enhance it.
If leveraged appropriately, it would improve your sales and average order value by upselling and cross-selling. Additionally, adding an estimated delivery date will enhance transparency and build trust with your customers. Another element you can often see on the Thank You pages is an attractive discount for the next purchases, which ensures repeat sales as well as fosters customer loyalty.
So, customization is a way to enhance the post-purchase experience and create more engaging and valuable interaction, ultimately driving sales.
What to Include on the Shopify Thank You Page
By default, the Thank You page consists of the following elements: order details, a link to the order status page, customer contact information, and a Continue Shopping button. This provides essential information, but you may further optimize this page to enhance customer experience and achieve your business goals.
When customizing the Shopify thank you page, you may add any content that helps you to meet your needs. For example, if you want to encourage repeat purchases, you could offer coupon codes or discounts for the next order.
Here is a list of additional elements you might include on the thank you page:
- Order confirmation or order status
- Thank you message
- Order tracking details
- Estimated delivery date
- Feedback form or survey questions
- Coupon code for next purchase
- Customer support contact details
- Social media links
- Product recommendations
How to Customize the Thank You Page (for Shopify Plans)
To customize the Shopify thank you page, you may choose between 2 methods: leveraging apps or embedding custom code. They differ in the level of customization offered and the technical skills required. Let’s take a closer look at both options.
Method 1. Using Shopify Apps
Let’s start with a simpler, but less flexible way – using Shopify apps. This method doesn’t require advanced coding skills and allows merchants to enhance their thank you pages quickly and efficiently.
Various vendors place their applications on the Shopify App Store, including those related to a custom thank you page. So you only need to browse and select the app that best fits your needs.
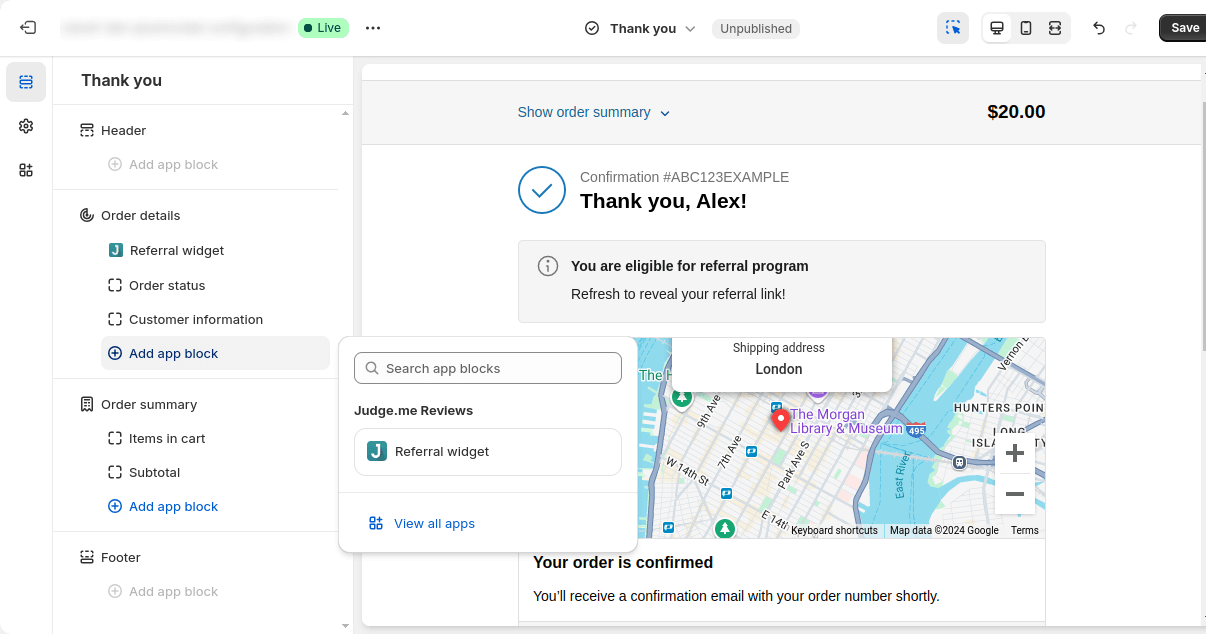
After choosing the application and installing it on your store, you have to add a new block to the Thank You page. To accomplish it, follow this:
- Go to Online Store -> Themes -> Customize.
- At the top of the editor, select the desired page – in our case, the thank you page.
- Open the Sections tab on the left sidebar.
- Click the Add app block button.
- In the Apps tab, click the ‘+’ icon and, if supported by the application, choose the page where you’d like to add the block.
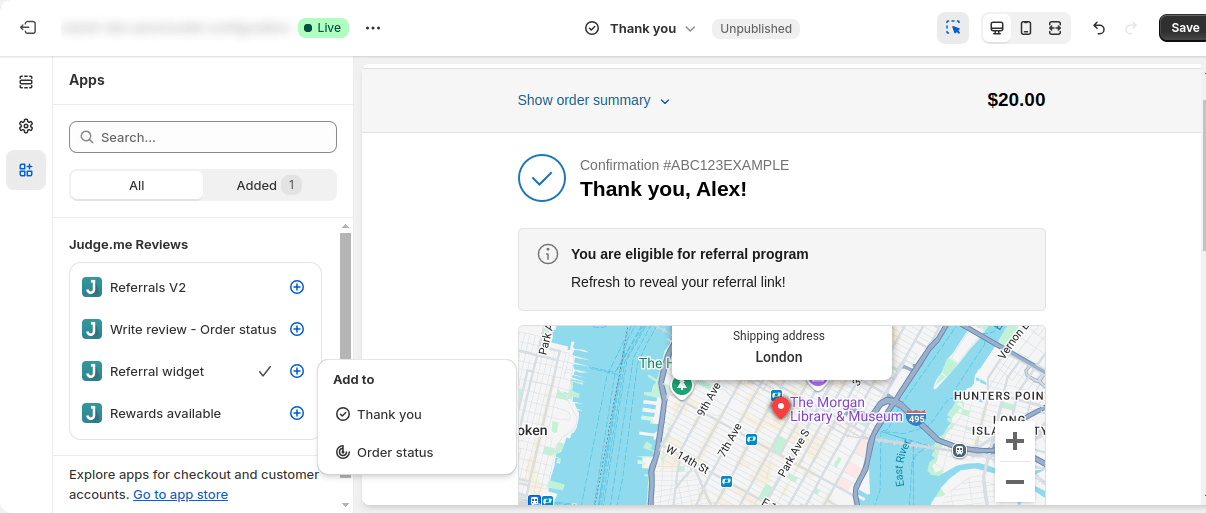
This is how you can customize the Shopify thank you page using an additional block from a third-party app. Besides the limited flexibility of this method, there’s another drawback of using apps to customize the thank-you page for those on a basic plan – the vendor of the application may require a subscription to a more expensive plan to access this feature.
Method 2. Using Custom Code
Let’s move on to a more flexible customization method, which ensures more control over the customization process. This method allows you to display any element or block, such as personalized messages, tracking scripts, or promotional content, directly on the thank you page. In contrast with the previous approach, this one requires embedding custom code into the page and working knowledge of HTML, CSS, and JavaScript languages.
Important Information:
This method relies on the Additional Scripts section in the settings. The Additional Scripts feature will be deprecated on August 28, 2025, and replaced by Shopify Functions. Until then, Shopify will continue to release additional Functions APIs to cover existing Scripts use cases. However, you can switch to an older Shopify version to maintain access to Scripts functionality.
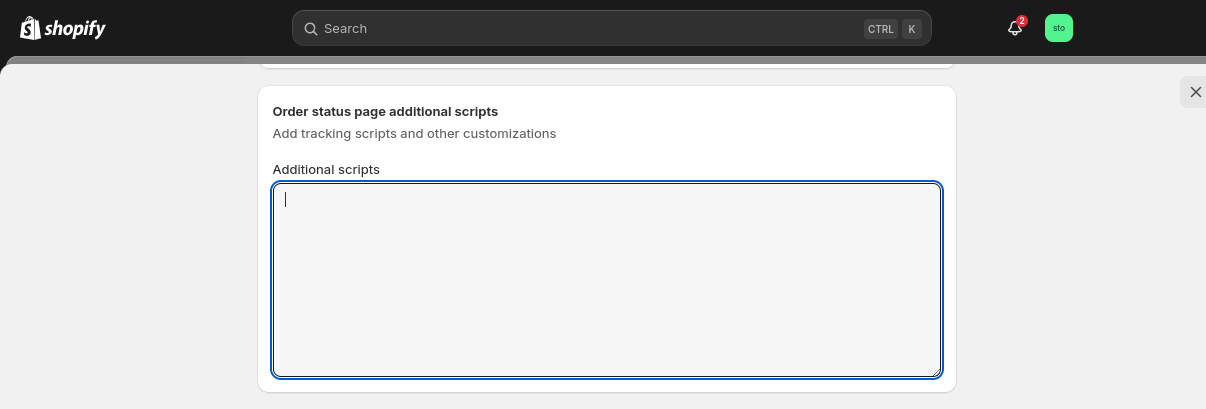
To start with, let’s navigate to the Additional Scripts section, where you can add your custom code to customize the Shopify Thank You Page:
- Go to the store Settings.
- Click on the Checkout tab.
- At the very bottom of this tab, you can find the Order status page additional scripts section.
Adding New Elements
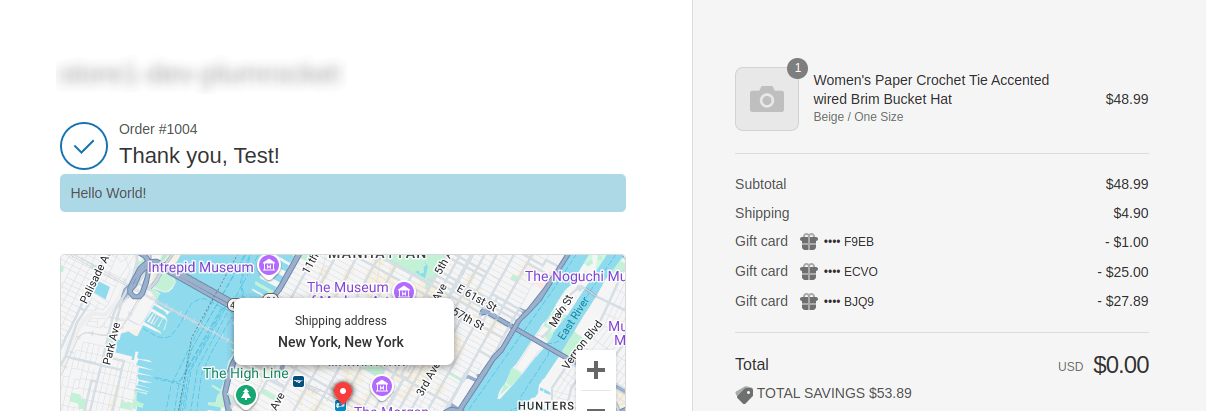
Let’s start with displaying a simple ‘div’ element with the “Hello World” text. Here is a code snippet:
<script>
	const div = document.createElement('div');
	div.innerHTML = 'Hello World!';
	div.style.backgroundColor = "lightblue";
	div.style.marginTop = "10px";
	div.style.padding = "10px";
	div.style.borderRadius = "5px";

	const container = document.querySelector("div.section");
	container.append(div);
</script>
This code creates an HTML element, assigns CSS styles to it, and adds a ‘Custom block’ string to this element. Then, using a document.querySelector(), it gets the element that matches the specified selector div.section and inserts the newly created after all its child elements.
After creating a test order, you can see what the custom Shopify thank you page looks like:
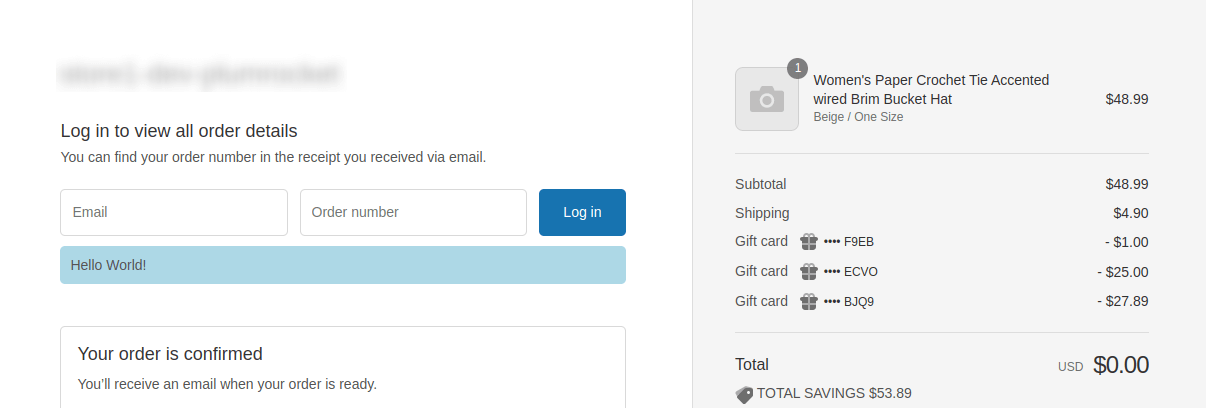
The changes also apply to the Order Status page:
Removing Elements
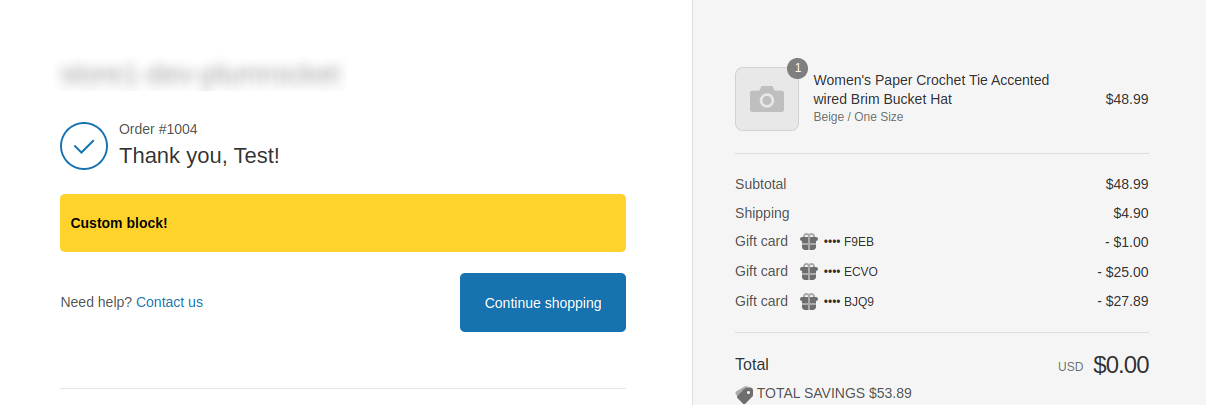
You can not only add but also remove various elements from the page. Below is a code snippet:
<script>
	const div = document.createElement('div');
	div.innerHTML = 'Custom block!';
	div.style.backgroundColor = "#ffd32c";
	div.style.color = 'black';
	div.style.fontWeight = 'bold';
	div.style.marginTop = "30px";
	div.style.padding = "20px 10px";
	div.style.borderRadius = "5px";

	document.addEventListener('DOMContentLoaded', () => {
		const containerToAdd = document.querySelector(".section");
	    const containerToRemove = document.querySelector(".step__sections > .section:nth-child(3)");

	    containerToAdd.append(div);
	    containerToRemove.remove();
	});
</script>
That’s what our Thank You Page looks like:
Rendering Sections
However, it’s not very convenient to structure HTML elements directly within the <script> tag. It would be more efficient to render a file with a pre-formed block. Shopify provides a solution for this – the Section Rendering API.
According to the official Section Rendering API documentation, we can render any section by its identifier.
Let’s create the custom section, which later will be rendered by its identifier:
- Navigate to Online Store -> Themes -> … -> Edit code, to access the Theme Editor.
- Open the Sections directory.
- Click the Add a new section button.
- Select the Liquid file type and provide the name for the new section. This name will serve as an identifier for the Section Rendering API (in our case it’s
custom-thank-you-block.liquid).
Here is a code snippet for a custom section:
<style>
    .section-wrap{
        border: 1px solid #dbdbdb;
        padding: 30px 20px;
        border-radius: 8px;
        box-shadow: 3px 4px 15px #d5d5d5;
    }

    .section-title{
        color: #222;
        font-size: 22px;
        font-style: normal;
        font-weight: bold;
        line-height: 1.3;
        letter-spacing: 0;
        margin-bottom: 18px;
    }

    .section-desk{
        font-size: 18px;
        font-style: normal;
        font-weight: 400;
        line-height: 1.5;
        color: #222222;
    }
</style>

<div class="section-wrap">
    <h3 class="section-title">
        Congratulations!
    </h3>

    <p class="section-desk">
        You rendered your custom section. Keep it up!
    </p>
</div>

{% schema %}
{
  "name": "Custom block",
  "settings": []
}
{% endschema %}
Now, all the HTML markup is placed in a separate file, and we can load it using the script below:
<script>
	function createDiv(content) {
        const div = document.createElement('div');
        div.style.padding = '30px 0 0';
        div.innerHTML = content;
        return div;
    };

	document.addEventListener('DOMContentLoaded', () => {
		const containerToAdd = document.querySelector(".section");

	    (async function() {
	        if (!Shopify.checkout) {
	            return;
	        }

	        let appendToBody = await fetch('/?sections=custom-thank-you-block')
	            .then(response => response.json())
	            .then(data => {
	            	containerToAdd.append(createDiv(data['custom-thank-you-block']));
	            });
    	})();
	});
</script>
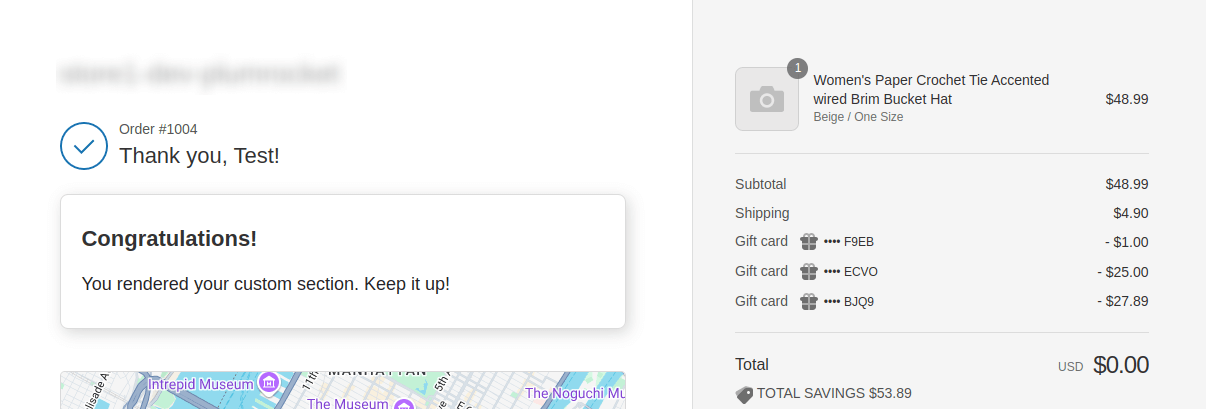
In this example, we used the fetch() function to load a custom block asynchronously. Once the HTML for the block is retrieved, it’s passed to the createDiv() function, which creates a new <div> element and inserts the HTML content. This new element is then added to the page using the containerToAdd.append() method.
Also, we added the !Shopify.checkout condition to customize the thank you page. This condition prevents any changes on the Order status page, but if we remove it, the section will be displayed on both pages.
This is what our custom thank you page looks like now:
Dynamic Customization Based on Product Attributes
The Shopify.checkout object contains a lot of valuable information, including the purchased product details. This allows us to customize the Shopify thank you page depending on the products that the customer has bought.
An array of these products can be assessed through the line_items key. Each item of this array contains information about the product, enabling us to create conditions to display specific content on the thank you page.
Here is a list of several important product attributes that are located in the line_items array:
- Product_id
- price
- sku
- quantity
- variant_id
- variant_title
Here is the example of the code that customizes Shopify thank you page only if the customer bought the product with the title ‘Bucket Hat’ and QTY less than 5.
<script>
	function createDiv(content) {
        const div = document.createElement('div');
        div.style.padding = '30px 0 0';
        div.innerHTML = content;
        return div;
    };

	document.addEventListener('DOMContentLoaded', () => {
		const containerToAdd = document.querySelector(".section");

	    (async function() {
	        if (!Shopify.checkout) {
	            return;
	        }

	        const products = Shopify.checkout.line_items;
	        const condition = products.some(product => product.title.includes('Bucket Hat') && product.quantity < 5);

	        let appendToBody = await fetch('/?sections=custom-thank-you-block')
	            .then(response => response.json())
	            .then(data => {
	            	condition && containerToAdd.append(createDiv(data['custom-thank-you-block']));
	            });
    	})();
	});
</script>
How to Customize the Thank You Page (for Shopify Plus Plan)
Shopify Plus subscribers have more options for thank you page customization because this plan is designed for larger businesses that require more tailored options. Thus, either the additional functionality or the apps themselves are available only to stores using this subscription.
Also, Shopify recommends using the Checkout Extensibility upgrade, which provides advanced customization capabilities for the checkout and post-purchase experience. It is available specifically for Shopify Plus subscribers.
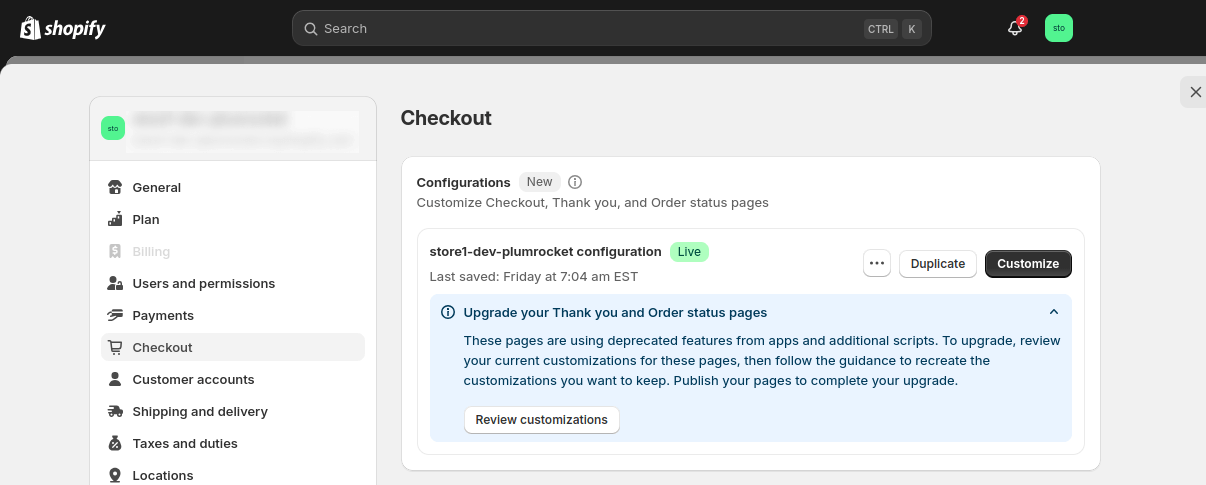
To use the Checkout Extensibility upgrade, navigate to Settings -> Checkout, and in the Configuration section, click the Review Customizations button and follow Shopify’s instructions.
Have any questions or need more help? We’re just a click away! Feel free to reach out to our development team.
