Configuring Magento 2 Coming Soon & Maintenance Page Extension
Here you will learn how to correctly configure our Coming Soon & Maintenance Page Extension for Magento 2. Please follow the instructions below.
Detailed description:
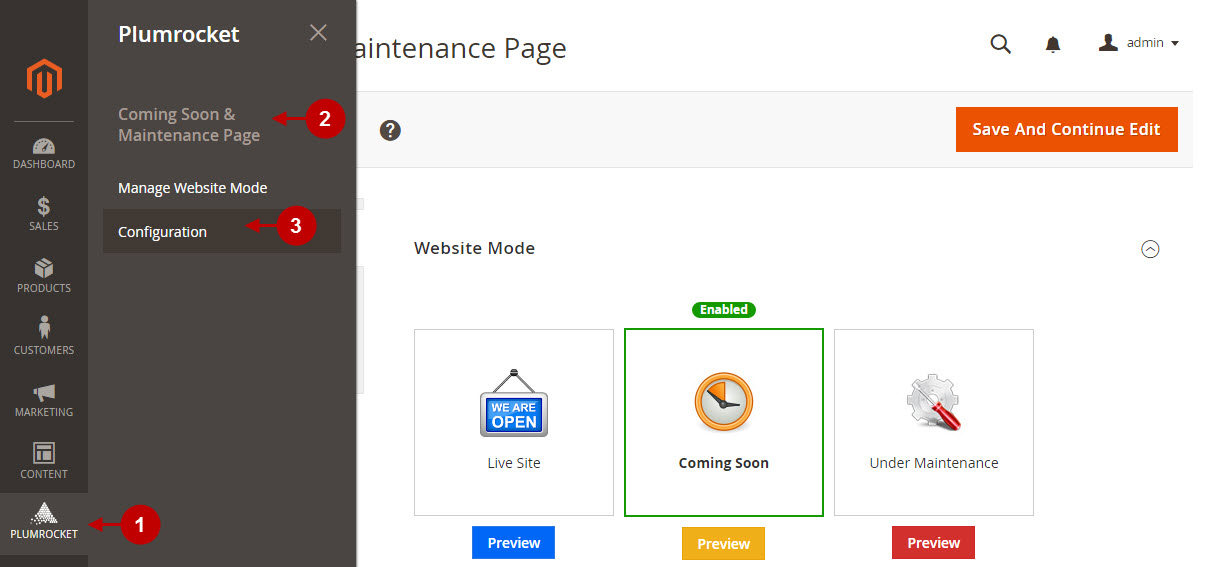
- Go to “Plumrocket” tab in the menu.
- Navigate to “Coming Soon & Maintenance Page” extension.
- Select “Configuration” section.
Step-by-Step action:
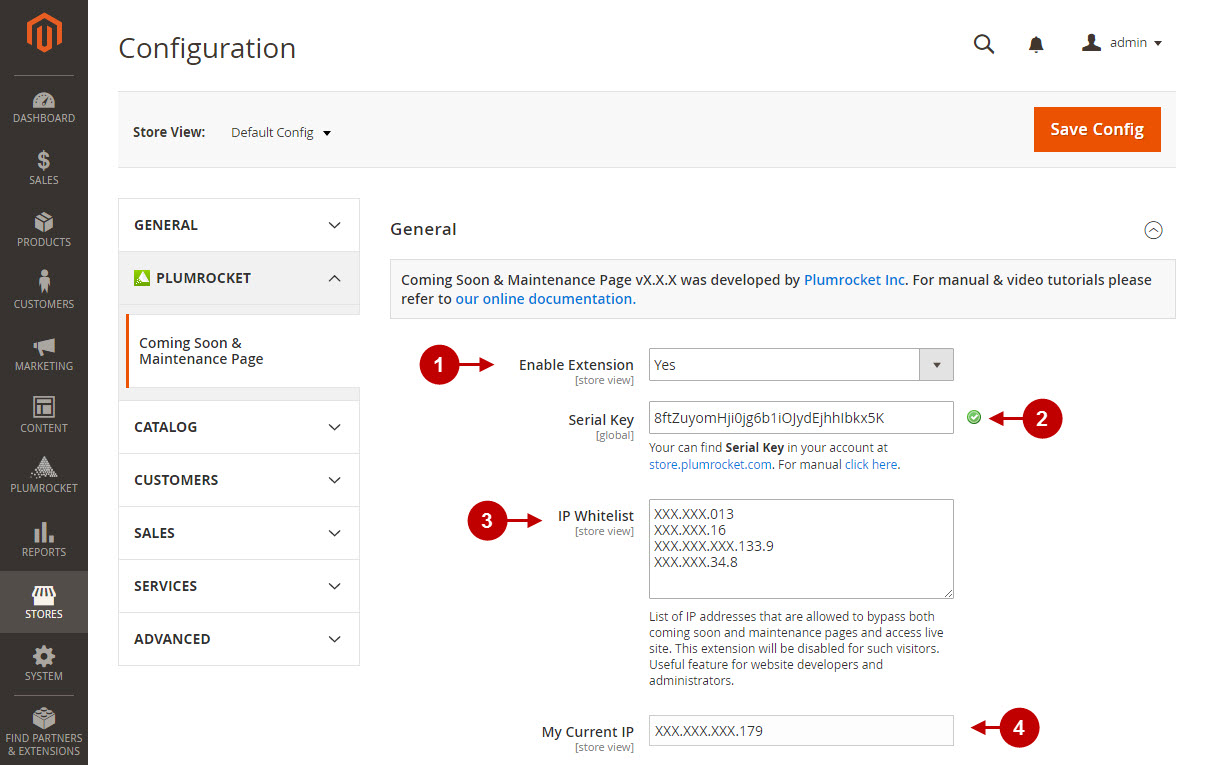
- “Enable Extension”: Select “Yes”, to enable your Magento 2 Coming Soon & Maintenance module or “No” to disable it.
- Option “Serial Key”: enter unique serial key provided after the purchase for legitimate and proper functioning of your extension. Note: in most cases this field will be pre-filled with serial key automatically and the green check mark will be displayed. Otherwise please read article Serial Key Activation in order to find and paste your serial key manually.
- Option “IP Whitelist”: here you can add list of IP addresses of users, that are allowed to bypass both coming soon and maintenance pages and access the live site. The extension will open the website for these users.
- “My Current IP”: for your convenience, your current IP will be displayed here. You can copy and paste your IP into the list of whitelisted IPs.
Detailed description:
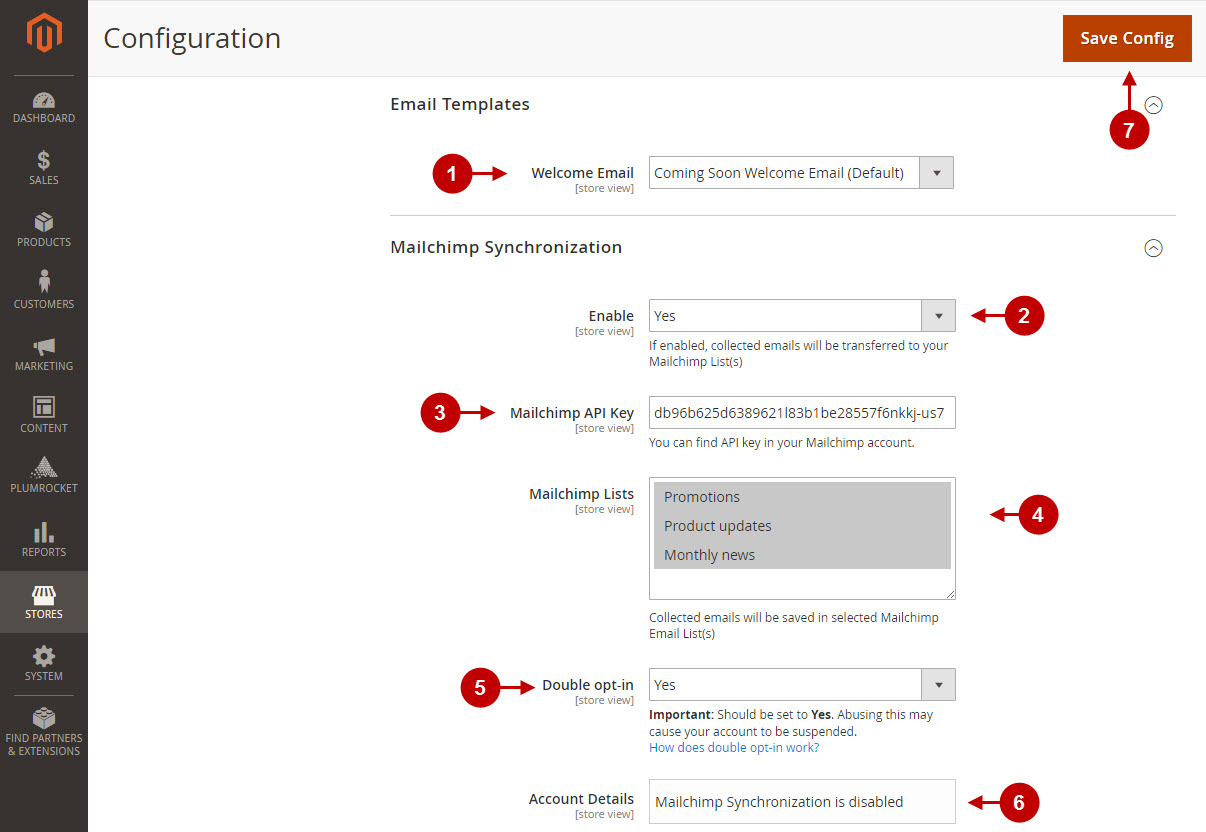
- Option “Welcome Email”: lets you choose the template that will generate welcome email about successful subscription.
- “Enable Synchronization”: if enabled, this option allows you to transfer collected emails to your MailChimp List(s).
- Option “MailChimp API key”: allows you to enter MailChimp API key. This is an API key that can be retrieved from your MailChimp account (read more information about MailChimp API key).
- Option “MailChimp Lists”: lets you select the MailChimp Email List(s) where the collected emails will be saved to. List(s) will appear after you indicate your MailChimp API Key and save your changes).
- Option “Double opt-in”: allows to activate Double opt-in. Note: read more information about double opt-in process in MailChimp.
- “Account Details”: shows your MailChimp Account details. (They will appear after you specify your MailChimp API Key).
- Press “Save Config” button to save your changes.
Managing Magento 2 Coming Soon Page
Detailed description:
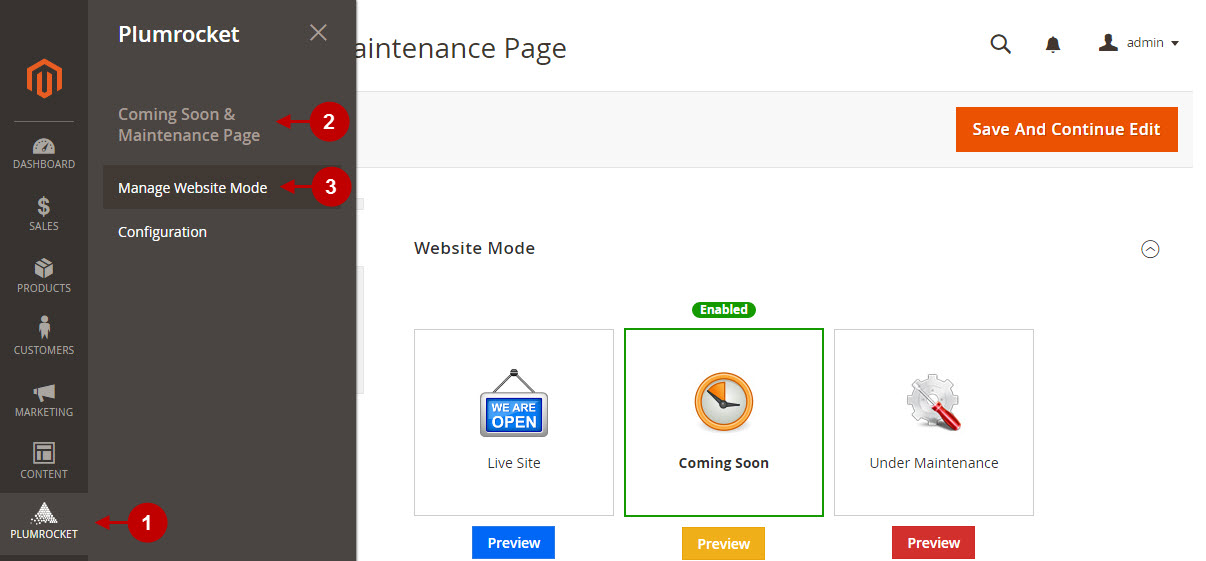
- Go to “Plumrocket” tab in the menu.
- Navigate to “Coming Soon & Maintenance Page” extension.
- Select “Manage Website Mode” section.
Detailed description:
- Choose “Coming Soon” website mode.
- Select “Coming Soon Page” from the menu.
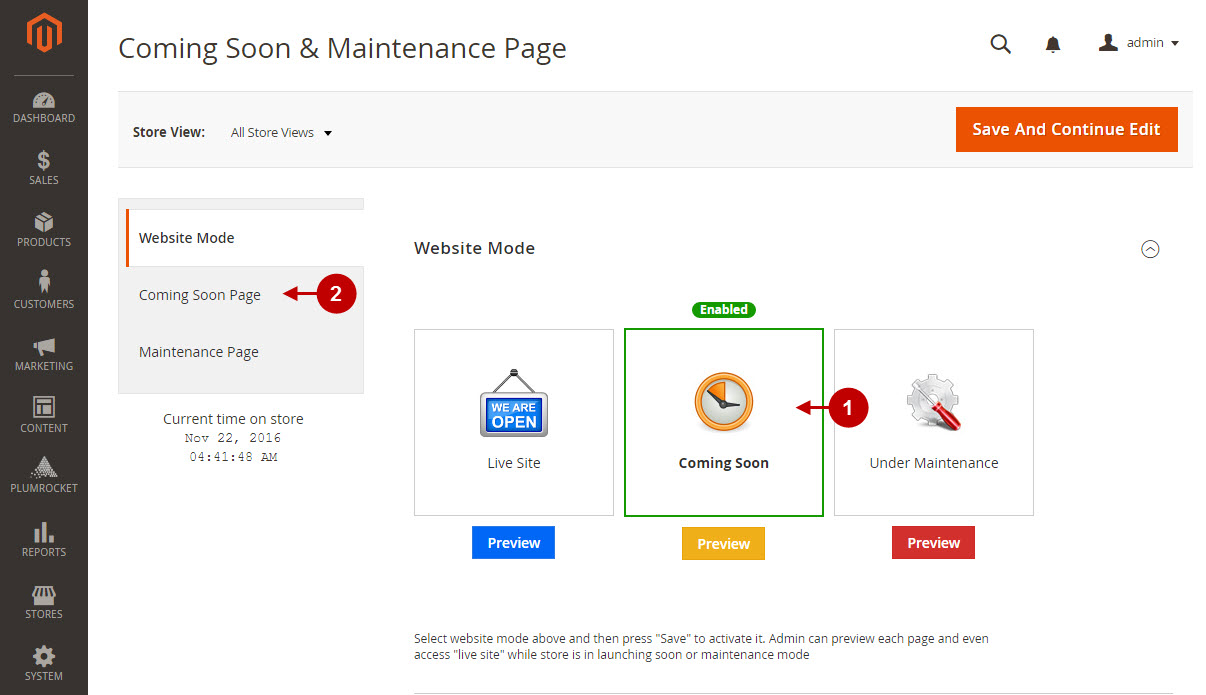
Detailed description:
- Option “Enable Sign-up Form”: allows you to enable or disable the subscription form.
- Option “User Sign-Up Method”: choose the way for visitor’s sign-up process. Possible options are: “Sign-up for email newsletter only”, “Register customer account & sign-up for newsletter”.
- Option “User Sign-Up Method With Social Networks”: set to “Yes” if you want to allow quick login with social networks. If set to “Yes”, remember to enable Social Login Pro or Twitter & Facebook login extension that is integrated with this Coming Soon & Maintenance extension.
- Option “Enable Form Fields”: allows you to select, enable, rename and define the sort order of the additional fields for visitors in the “coming soon” sign-up form.
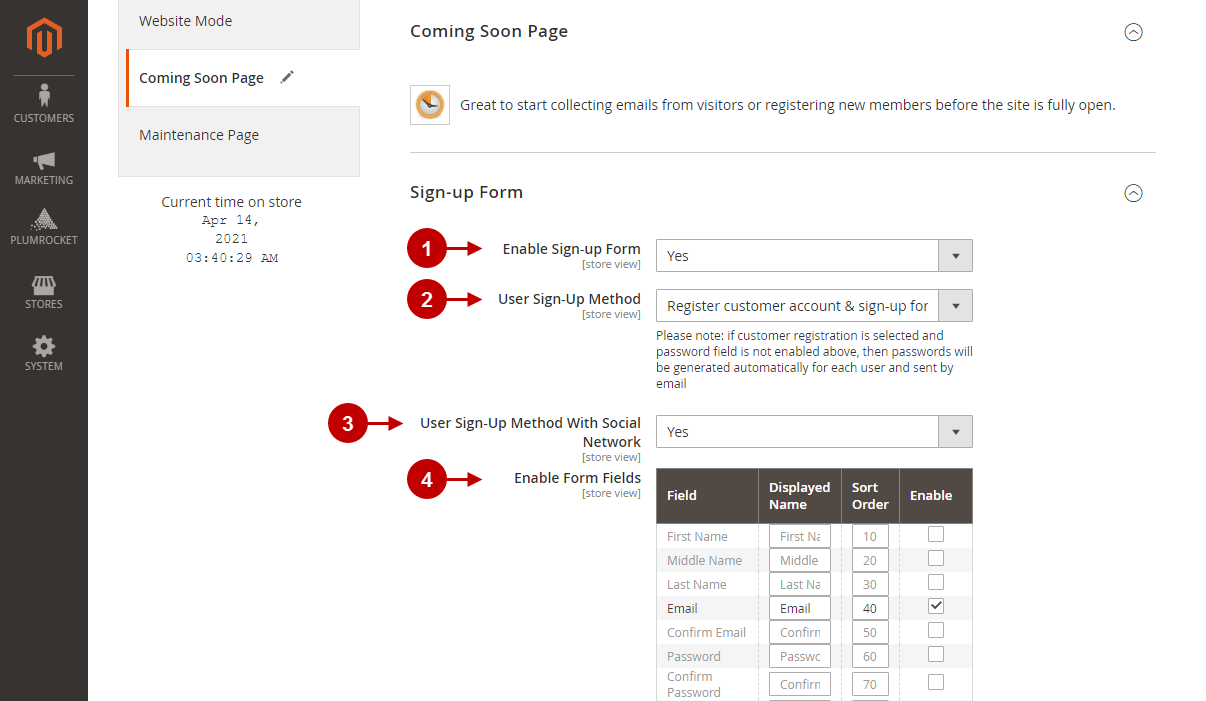
Detailed description:
- Option “Launch Date & Time”: this option lets you set up the launch day of your website. Note : this launch date will be used for countdown timer.
- Option “Launch Date Action”: choose an action that will be executed on launch date. Possible options are “Switch to Live Site Mode”, “Do nothing”.
- Option “Show Launch Countdown Timer”: allows you to display launch countdown timer.
- Option “Countdown Timer Format”: specify the countdown timer format.
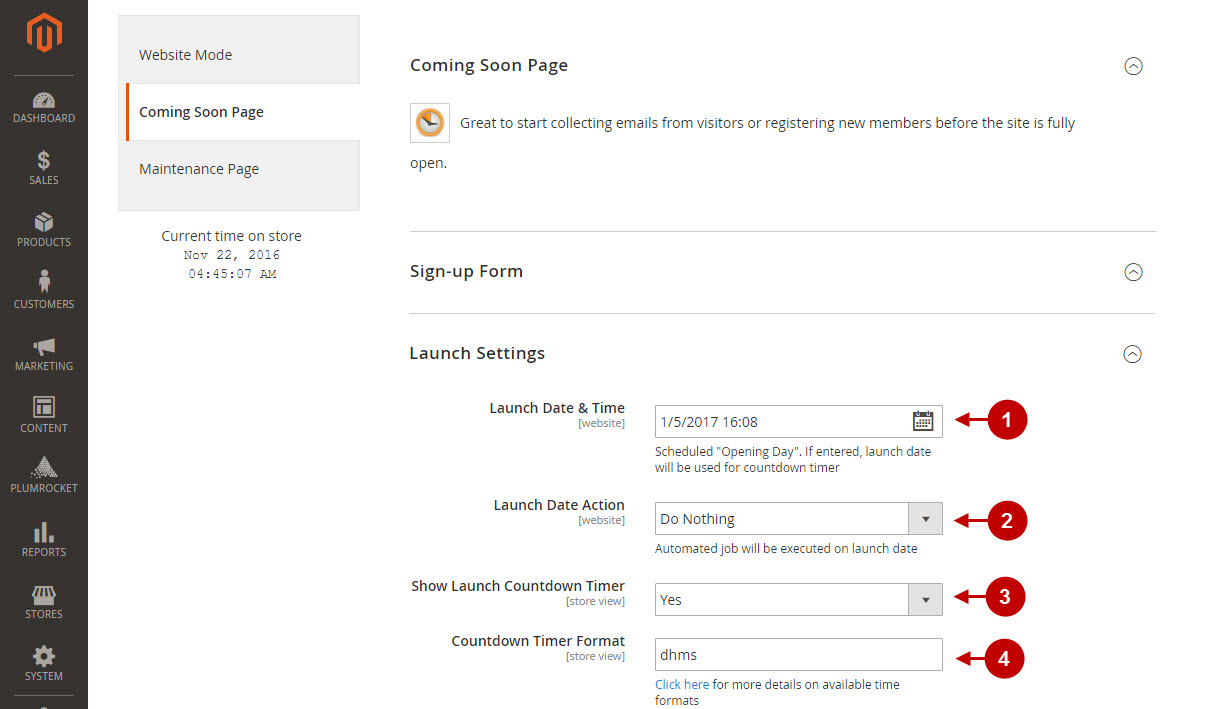
Detailed description:
- Option “Heading Text”: allows you to set the heading text for the coming soon page.
- Option “Welcome Text”: lets you set the welcome text for your visitors.
- Option “Registration Confirmation Text”: specify the registration confirmation text for the coming soon page. This text will be displayed after visitors subscribe to your “coming soon” sign-up form.
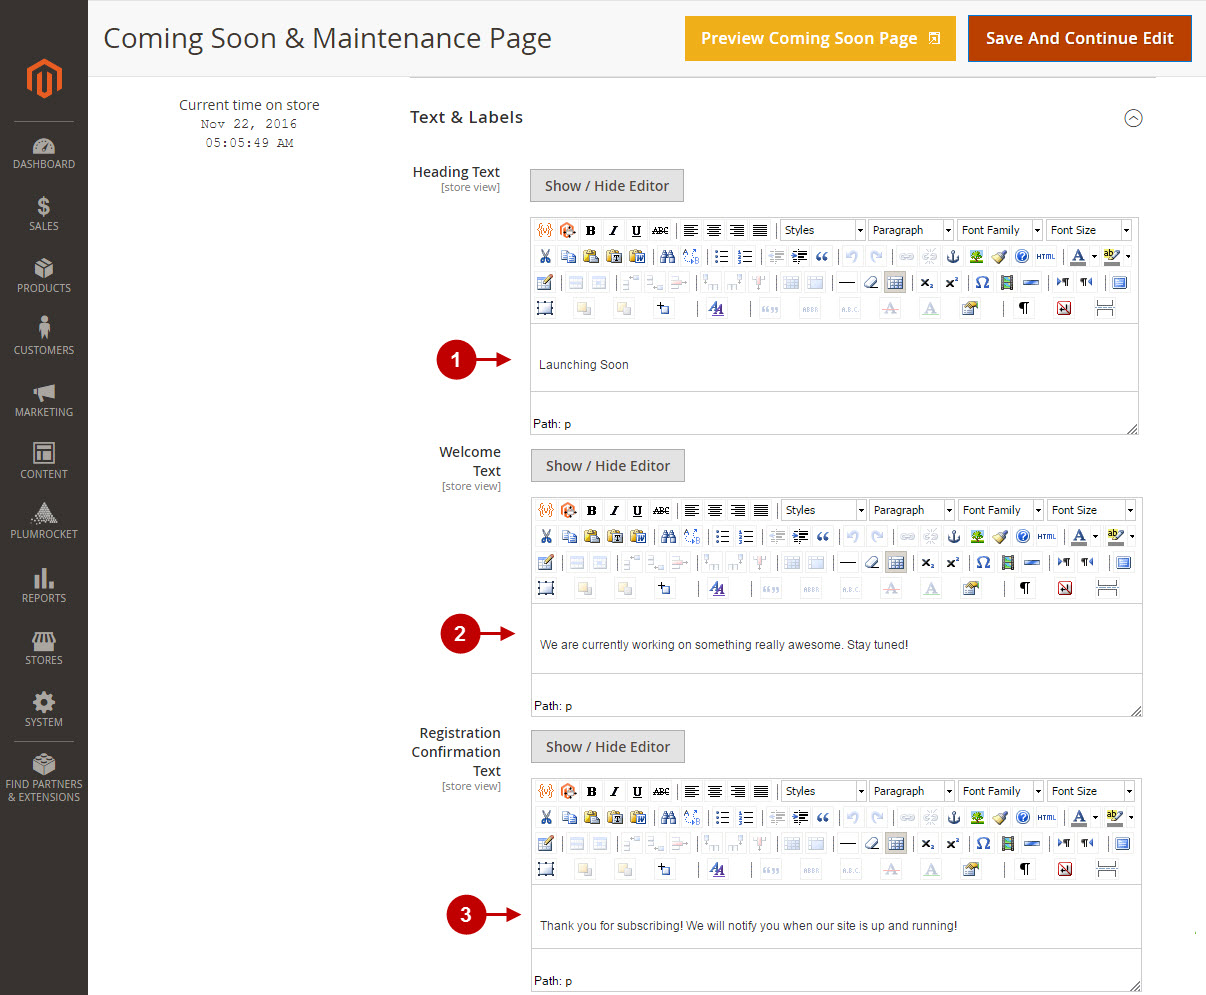
Detailed description:
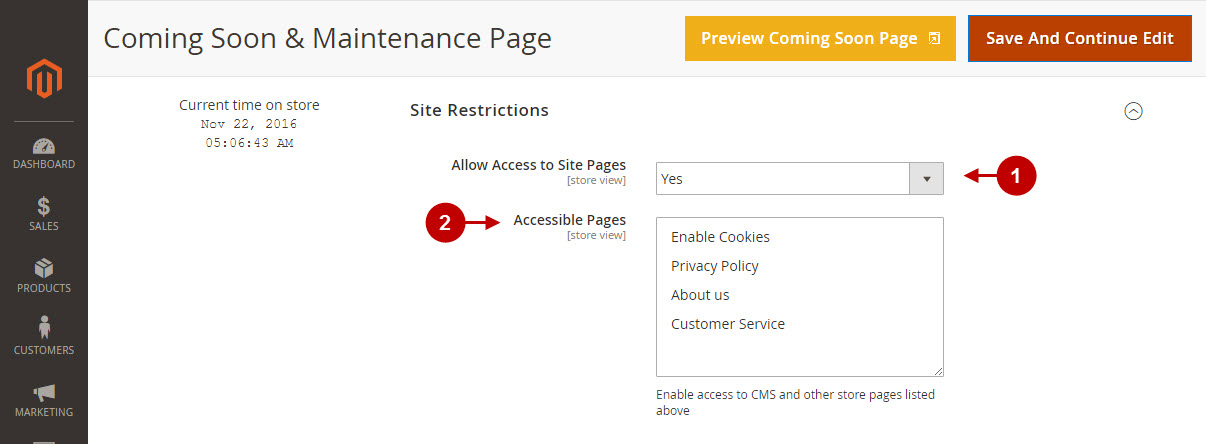
- Option “Allow Access to Site Pages”: allows your visitors to get an access to certain CMS pages.
- Option “Accessible Pages”: lets you select which exactly CMS and store pages will be available to your visitors. Note: in order to add new CMS page, go to Admin Panel -> Content-> Pages -> Add New Page.
Detailed description:
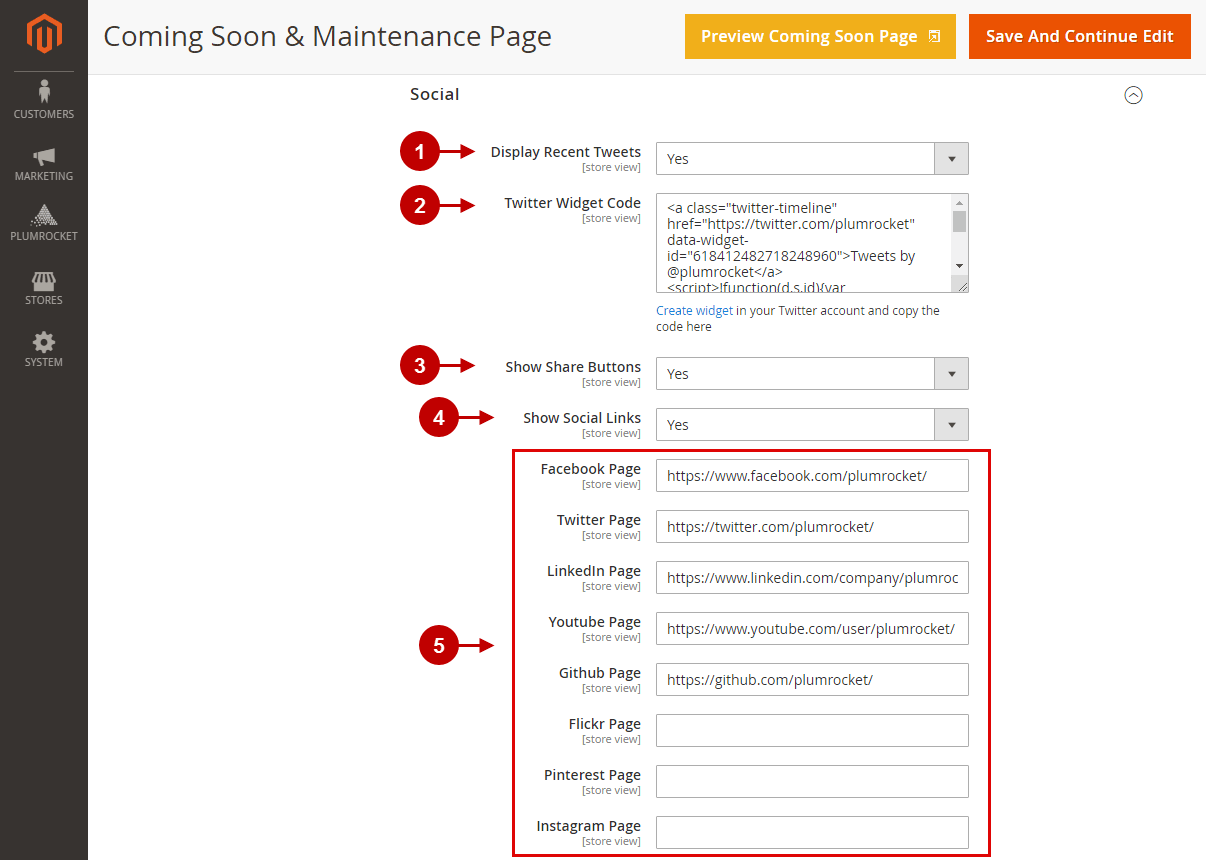
- “Display Recent Tweets”: this option allows you to broadcast recent tweets from your Twitter account on your Magento 2 “Coming Soon” page.
- Option “Twitter Widget Code”: in order to display the recent tweets, you need to create a widget here. After you have created the twitter widget – copy and paste provided widget code into this text area.
- Option “Show Share Buttons”: lets you display social share buttons on your “coming soon” page.
- Option “Show Social Links”: allows you to display the social links of your website.
- Option “Social Network Pages”: these fields allow you to add links for the social network pages of your website. These links will show up on your “coming soon” page. You can add social links for the following social networks: “Facebook”, “Twitter”, “LinkedIn”, “Google+”, “Youtube”, “Github”, “Flickr”, “Pinterest”, “Instagram”.
Detailed description:
- Option “Page Title”: allows you to specify the page title.
- Option “Meta Description”: lets you add short meta description for the “coming soon” page.
- Option “Meta Keywords”: this option allows you to enter meta keywords, thus making your Coming Soon page more SEO-friendly.

Detailed description:
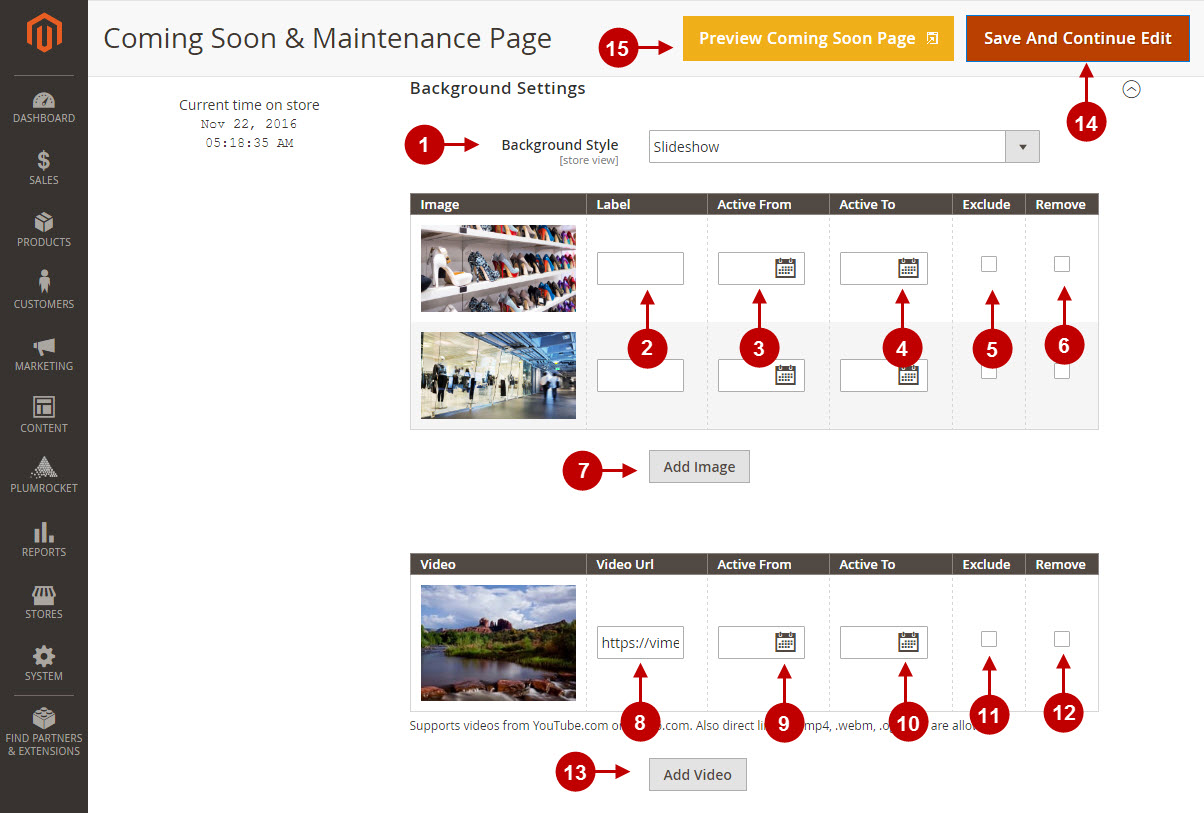
- Option “Background Style”: lets you select the background style of your “coming soon” page. Possible options are: “Single Image”, “Slideshow”, “Video Background”.
- Option “Label”: allows you set the label for the background image.
- Option “Active From”: specify the activity timeframe, when the image will serve as a “coming soon” page background.
- Option “Active To”: allows you set the time when this image will no longer be displayed.
- Option “Exclude”: allows you to deactivate the image without removing it.
- Option “Remove”: here you can remove the image from the list of your background images.
- Option “Add Image”: allows you to select the image for the background.
- Option “Video Url”: enter the URL of the video that will serve as a background of your “coming soon” page. Note: you can add videos from Youtube or Vimeo.com, as well as direct links to .mp4, .webm, ogv, video files.
- Option “Active From”: specify the activity timeframe when this video will be displayed in the background of “coming soon” page.
- Option “Active To”: allows you to set the time when this video will no longer be displayed.
- Option “Exclude”: lets you disable the video without removing it.
- Option “Remove”: allows you to remove the video from the list of videos.
- “Add Video”: allows you to add more videos.
- Press “Save And Continue Edit” button to save your changes.
- Press “Preview Coming Soon Page” to preview the “Coming soon” page without enabling it.
Here’s how the “Coming Soon” page will look like on your frontend.
Detailed description:
- This is how your default magento 2 logo will be displayed on coming soon & maintenance page.
- Here’s how the heading text section will be displayed.
- This is the welcome text section of the coming soon page.
- If enabled, this is how the launch countdown timer will look like.
- This is the sign-up section of the coming soon page.
- Here’s how the social section will look like.
- This section will display the pages that will be still available for the visitors.

Managing Magento 2 Maintenance Page
Detailed description:
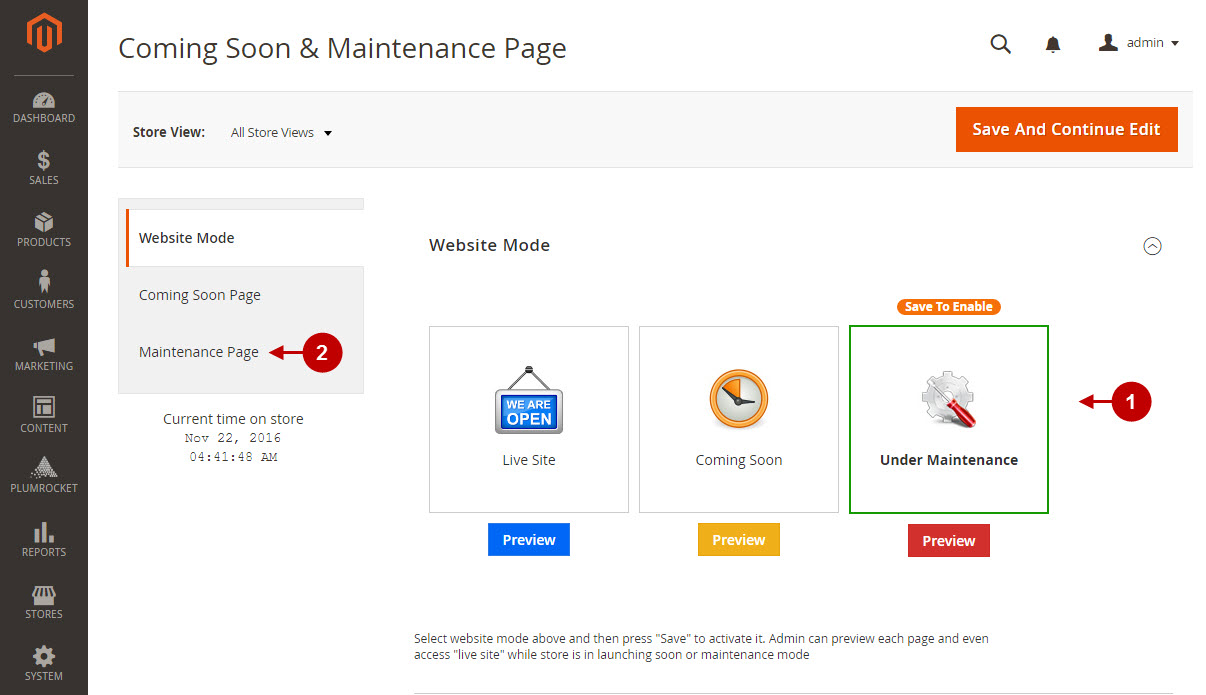
- Press “Manage Website Mode” tab.
- Select “Maintenance Page” website mode.
- Click on “Maintenance Page” from the menu.
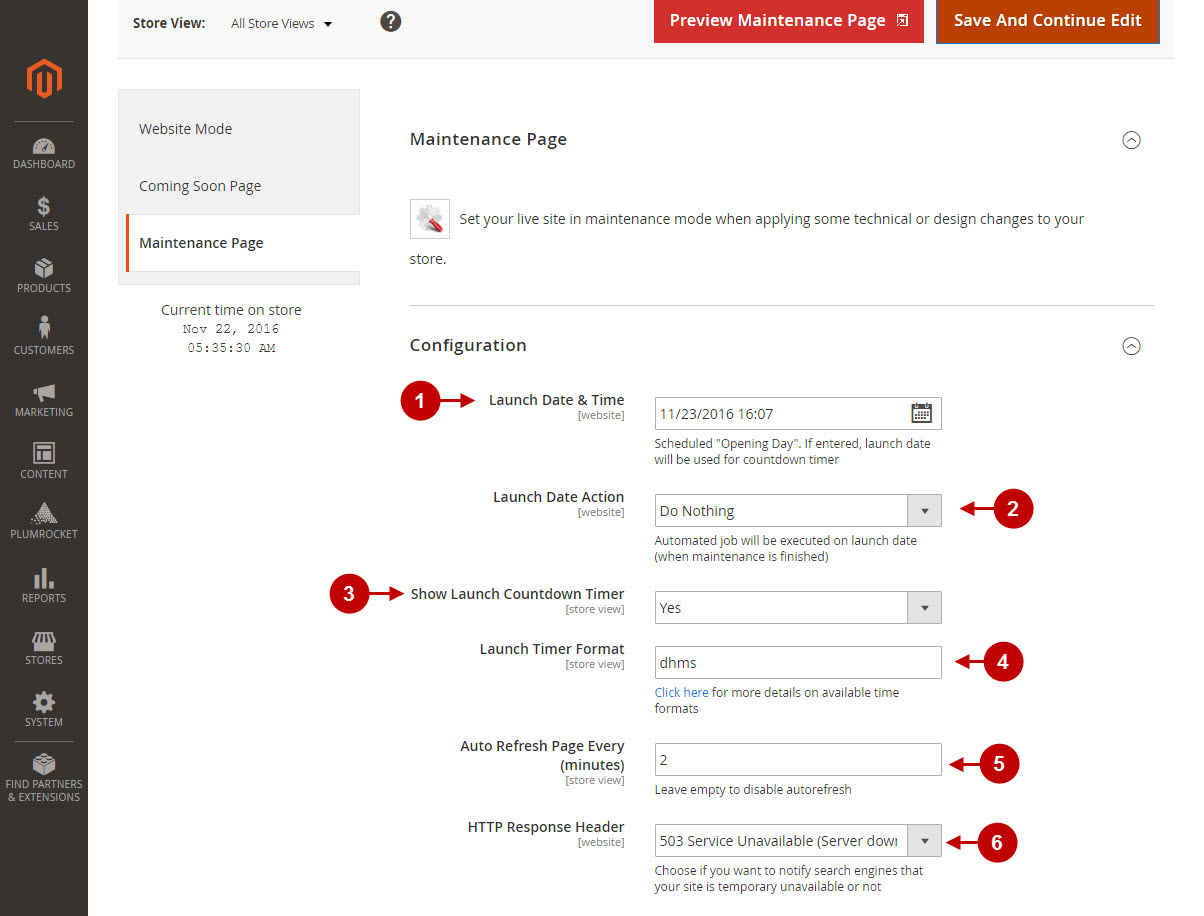
Detailed description:
- “Launch Date & Time”: this option allows you to set up the launch day of your website. Note : countdown timer will be based on this date.
- Option “Launch Date Action”: choose an action to be executed on launch date. Possible options are “Switch to “Live Site” Mode”, “Do nothing”.
- Option “Show Launch Countdown Timer”: allows you to display launch countdown timer.
- Option “Countdown Timer Format”: specify the countdown timer format.
- “Auto Refresh Page Every (minutes)”: this option allows you to specify how often the maintenance page will be auto refreshed. Leave this input form empty to disable auto refresh.
- Option “HTTP Response Header”: allows you to provide the search engines with the information about the current state of your site. Possible options are: “200 Ok (Success)” and “503 Service Unavailable (Server down for maintenance)”.
Detailed description:
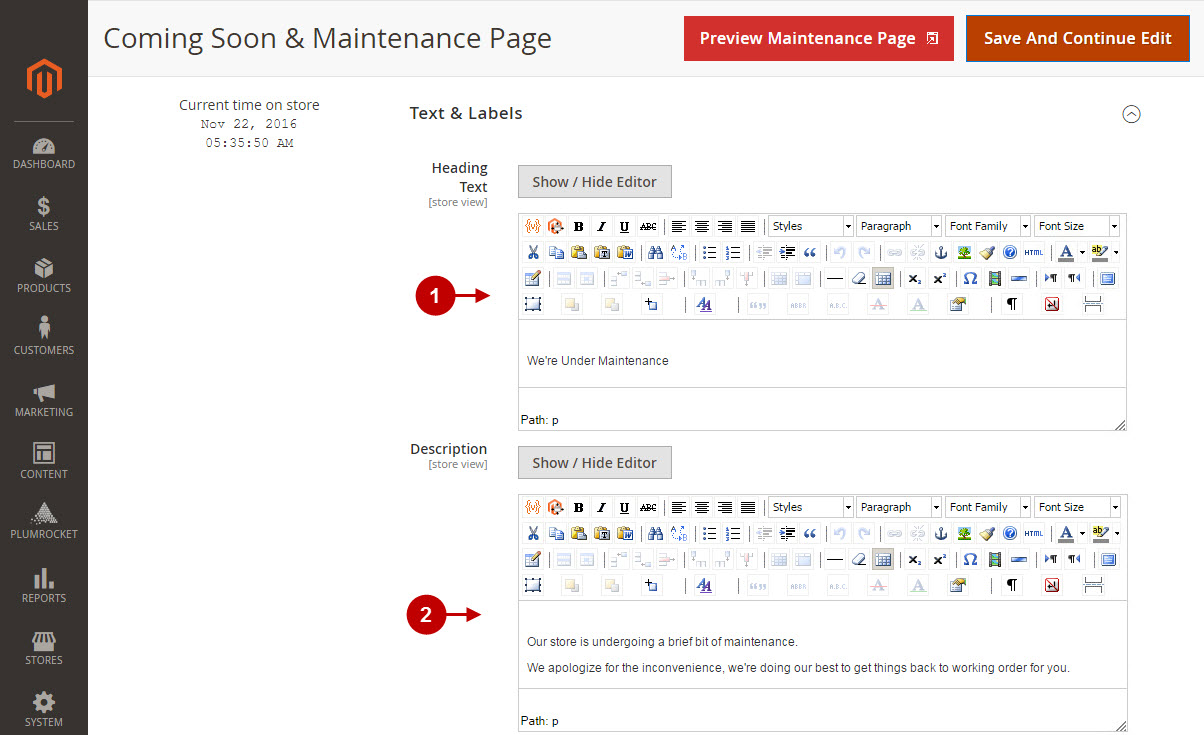
- Option “Heading Text”: allows you to specify the heading text for the maintenance page.
- Option “Description”: enter short description for the maintenance page if needed.
Detailed description:
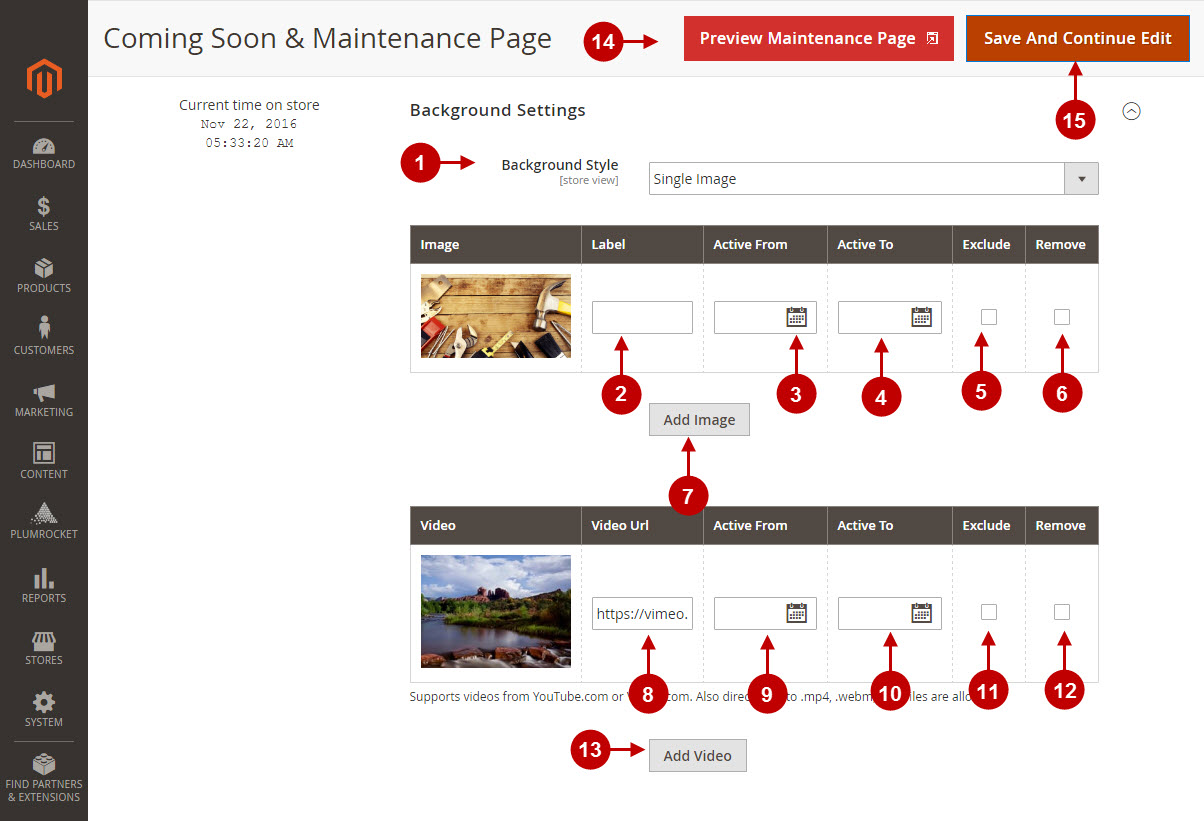
- Option “Background Style”: lets you select the background style of your maintenance page. Possible options are: “Single Image”, “Slideshow”, “Video Background”.
- Option”Label”: allows you set the label name for the background image.
- Option “Active From”: set the time from when this image will be displayed in the background.
- Option “Active To”: allows you set the time when this image will no longer be displayed.
- Option “Exclude”: lets you exclude the image from the list of images.
- Option “Remove”: remove the image from the list of your background images.
- Option “Add Image”: allows you to select the image for the background.
- Option “Video Url”: Here you can enter the URL of the Video. Note: you can add videos from Youtube or Vimeo.com, as well as direct links to .mp4, .webm, ogv, files.
- Option “Active From”: here you can set the time from when this video will be displayed in the background.
- Option “Active To”: allows you set the time when this video will no longer be displayed.
- Option “Exclude”: lets you exclude the video from the list.
- Option “Remove”: here you can remove the video from the list of videos.
- “Add Video”: allows you to add the selected videos.
- Press “Save And Continue Edit” button to save your changes.
- Press “Preview Maintenance Page” button to preview maintenance page without enabling it.
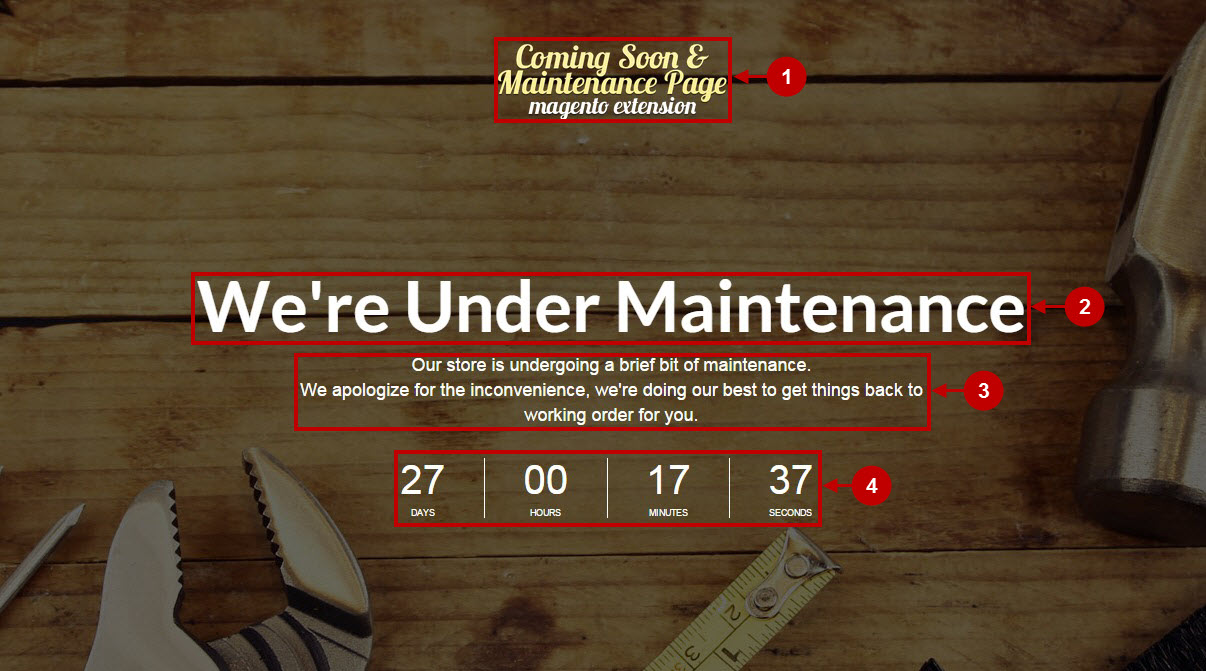
Here’s how the maintenance page will look like on your frontend.
Detailed description:
- This is how your default Magento 2 logo will look like.
- This is how the heading text of the maintenance page will be displayed.
- This is the description section of the maintenance page.
- If enabled, this is how launch countdown timer will look like.
Configuration of Magento 2 Coming Soon & Maintenance Page module is now completed.
Configuring Countdown Timer Formats
You can configure how the countdown timer is presented via the “Countdown Timer Format” option. The following characters may be used for this option:
- “y” for years*
- “o” for months*
- “w” for weeks*
- “d” for days*
- “h” for hours*
- “m” for minutes*
- “s” for seconds.*
