Configuring Private Sales and Flash Sales Extension
In this section you will learn how to configure Magento Private Sales and Flash Sales Extension correctly. Please, follow the instructions below.
Step-by-Step action:
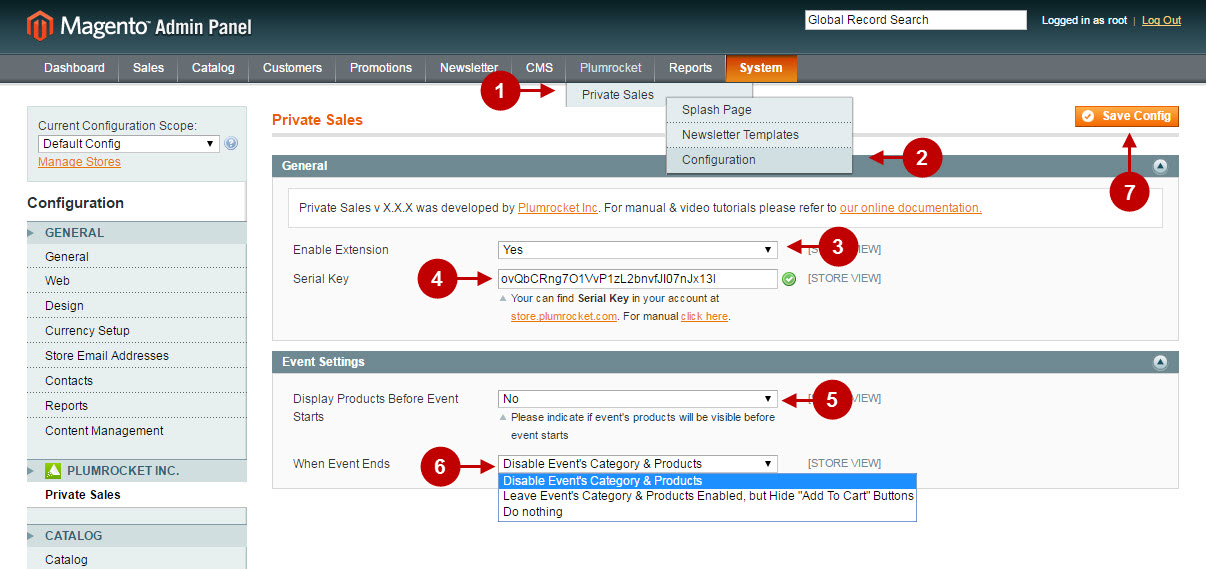
- Go to “Plumrocket” tab in the main menu > select “Private Sales and Flash Sales” extension.
- Select “Configuration” section.
- Option “Enable Extension”: allows to enable or disable flash sales module.
- Option “Serial Key”: enter unique serial key provided after the purchase for legitimate and proper functioning of your extension. Note: In most cases this field will be pre-filled with serial key automatically and the green check mark will be displayed. Otherwise please read article Serial Key Activation in order to find and paste your serial key manually.
- Option “Display Products Before Event Starts”: allows to display or hide products before your sales event starts.
- Option “When Event Ends”: option allows to select the action that will take place after the sales event ends. You can disable the category or products, set products as “Out of stock”or leave the products enabled.
- Once you configured all the settings – please make sure to save your changes.
Configuring Private Sales and Flash Sales Homepage
Here you will learn how to turn the needed category into the Flash Sales Homepage. Flash Sales Homepage is the category, that will reflect all flash sales events within.
Step-by-Step action:
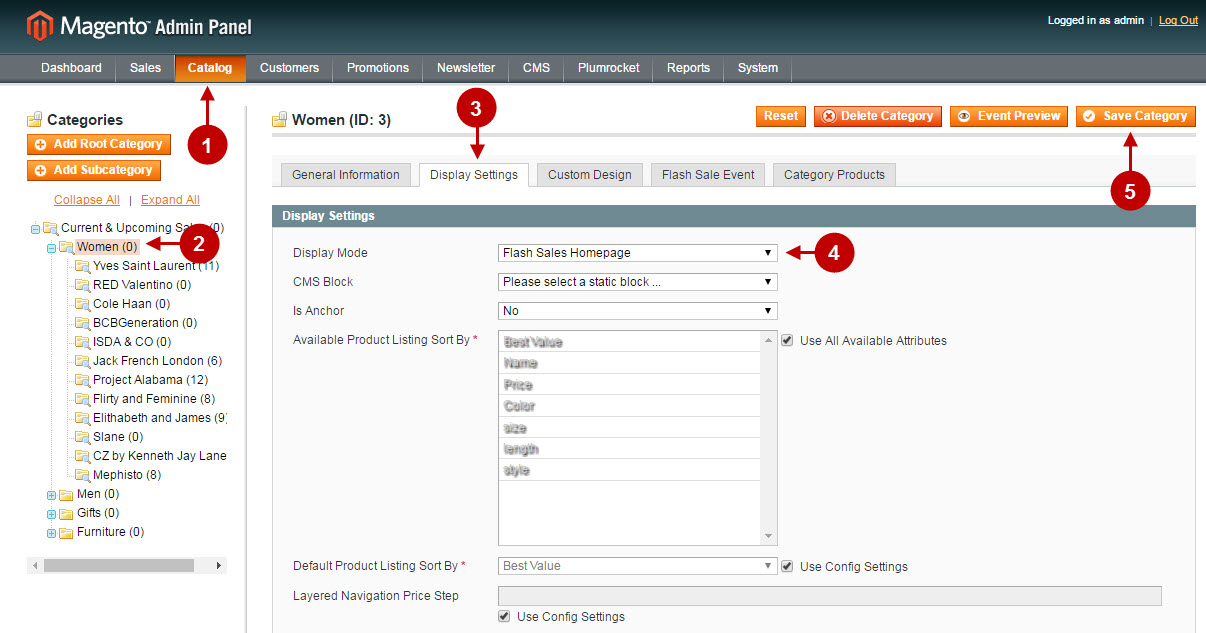
- Go to “Catalog” tab > select “Manage Categories” section.
- Select the required category.
- Navigate to “Display Settings” tab.
- Choose “Flash Sales Homepage” for “Display Mode”.
- Save your changes by pressing “Save Category” button.
Step-by-Step action:
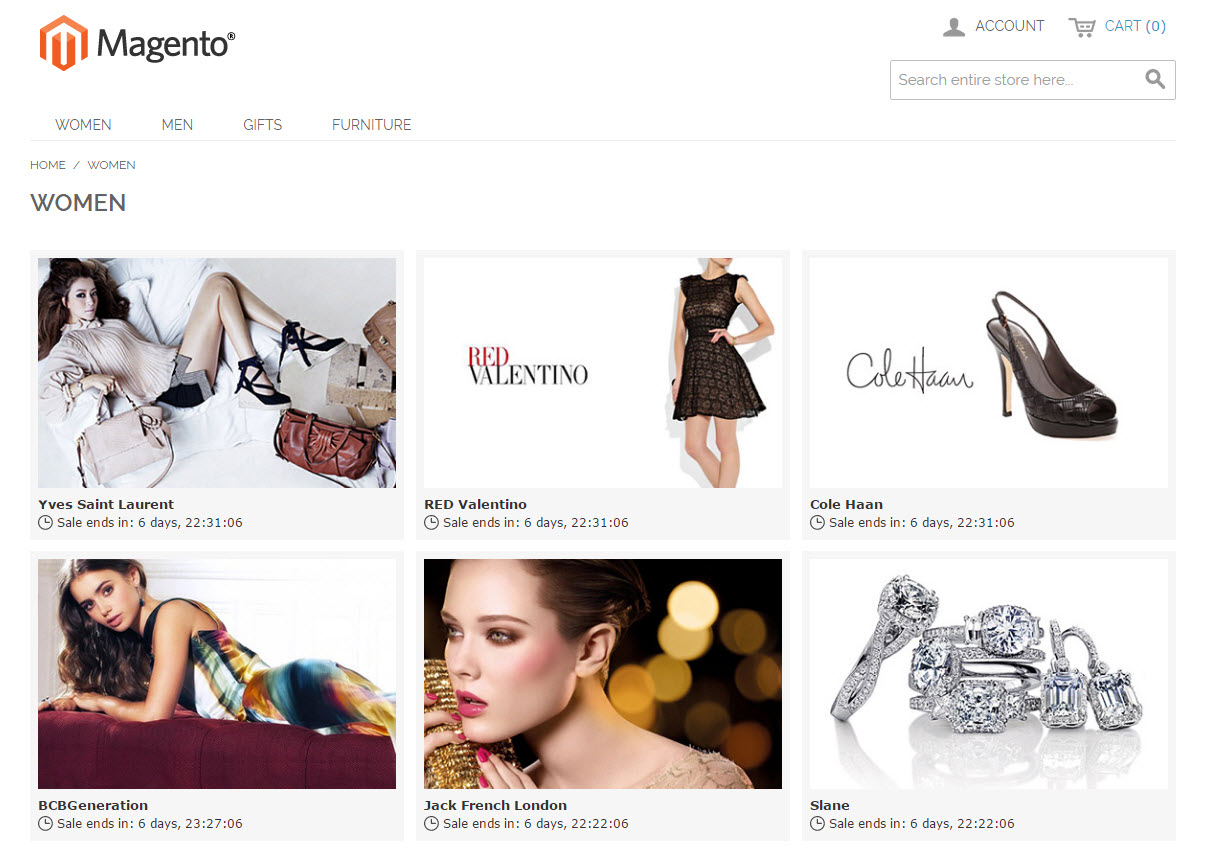
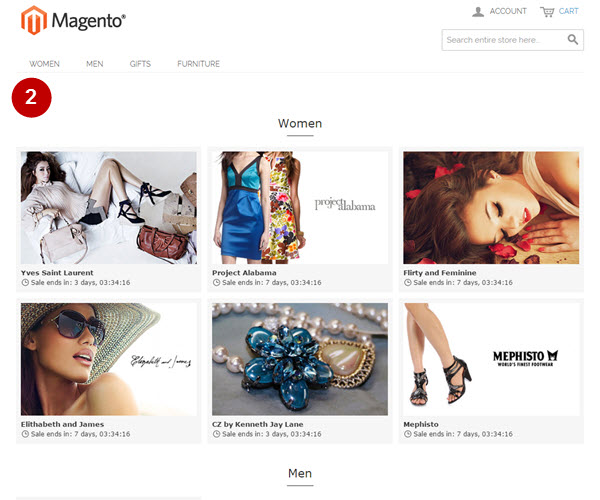
This is how Flash Sales Homepage looks like on Magento frontend.
Configuring Flash Sale and Private Sale Event
Configuring Flash Sale and Private Sale Event For a Category
Follow the instructions below to be able to set up a flash sale event for a category.
Step-by-Step action:
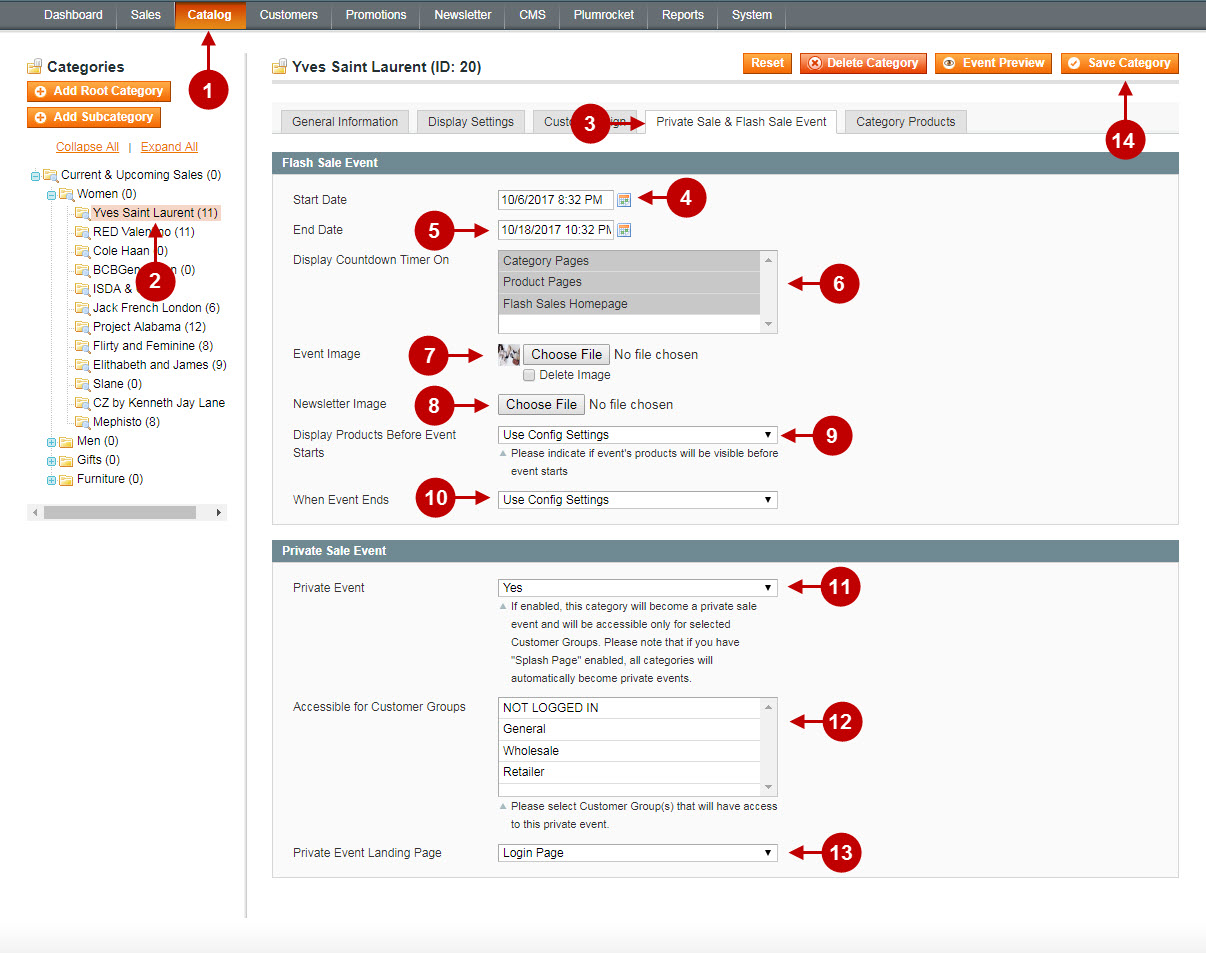
- Go to “Catalog” tab > select “Manage Categories” section.
- Select the required category.
- Go to “Flash Sale Event” tab.
- Option “Start Date”: allows to set the start date of sale event. Note: you can enter start date without specifying end date of the flash sale event. In this case, the event will not include the countdown timer.
- Option “End Date”: allows to set the end date of sale event.
- Option “Display Countdown Timer On”: allows to select the pages the countdown timer will be displayed on.
- Option “Event Image”: allows you to upload an image that will be displayed for this event on the Homepage.
- Option “Newsletter Image”: allows you to upload an event image that will be included into a newsletter email template.
- Option “Display Products Before Event Starts”: allows to display or hide products before your sales event starts. You can also use the settings that have been previously set up for this category, by selecting “Use Config Settings” button.
- Option “When Event Ends”: allows to select the action that will take place after the sales event ends. You can also use the settings that have been previously set up for this category, by selecting “Use Configuration” button.
- Option “Private Event”: allows to turn a separate category into Magento private sale event. You can also use the settings that have been previously configured selecting “Use Config Settings” button. Note: If you choose “Yes” option in this field, you will be able to select the landing page for this private sale event, visible for all guest visitors.
- Option “Accessible for Customer Groups”: allows admin to select the customer group(s) that will have an access to this private event.
- Option “Private Event Landing Page”: allows admin to set the landing page customers will be redirected to, if they do not have an access to the private event.
- Save your changes by pressing “Save Category” button.
Please, note that the Private Sales and Flash Sales extension does not modify the Magento prices logic. If you need to set up the special price for the Flash Sale and Private Sale Event on a Category – please make sure to configure the Catalog Price Rules using this Magento guide .
Step-by-Step action:
- This is how the flash sale event timer looks like on Category Page of Magento frontend.
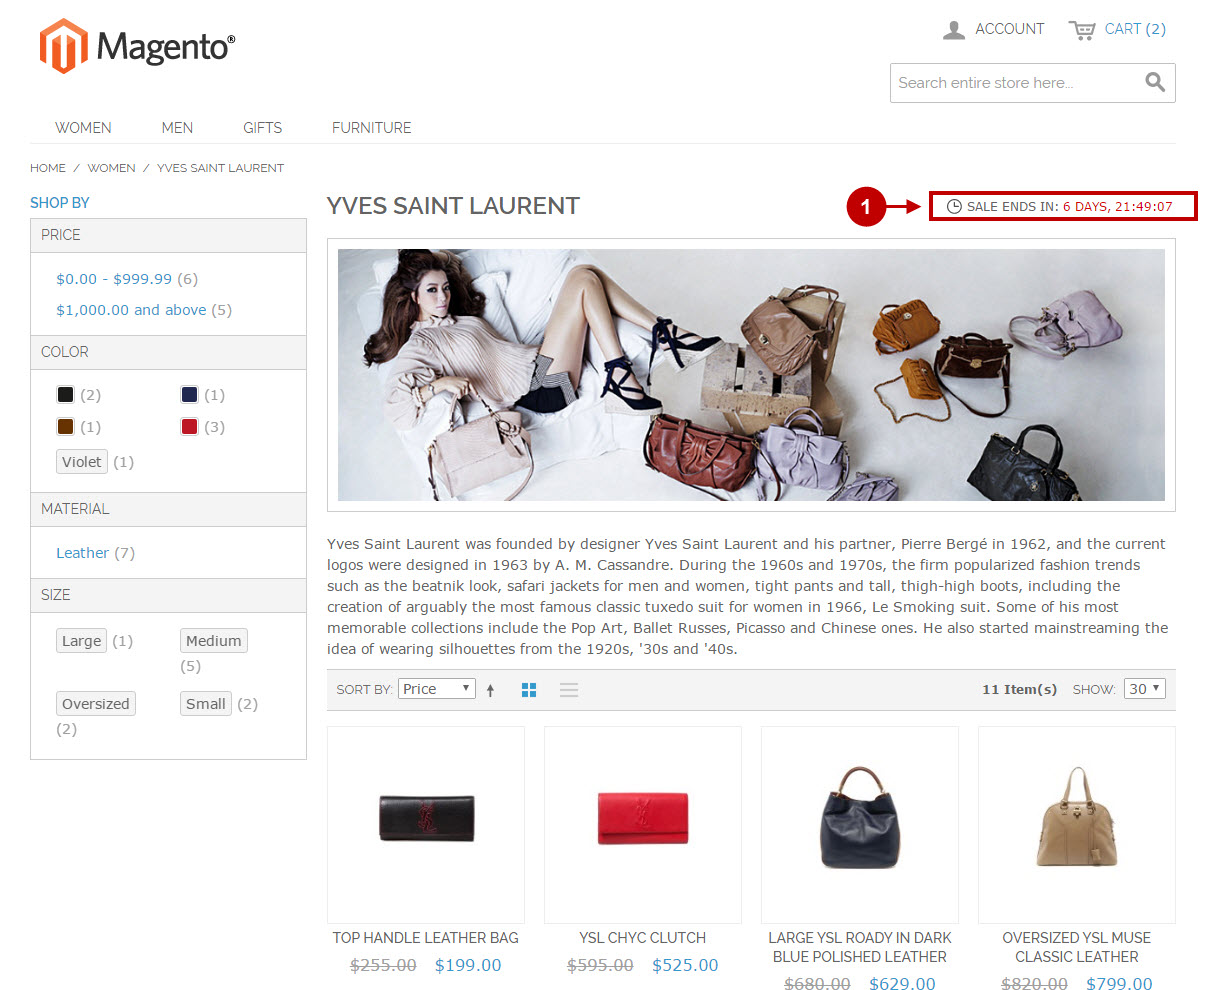
Step-by-Step action:
This is how the private sale event looks like on Events Page of Magento frontend.
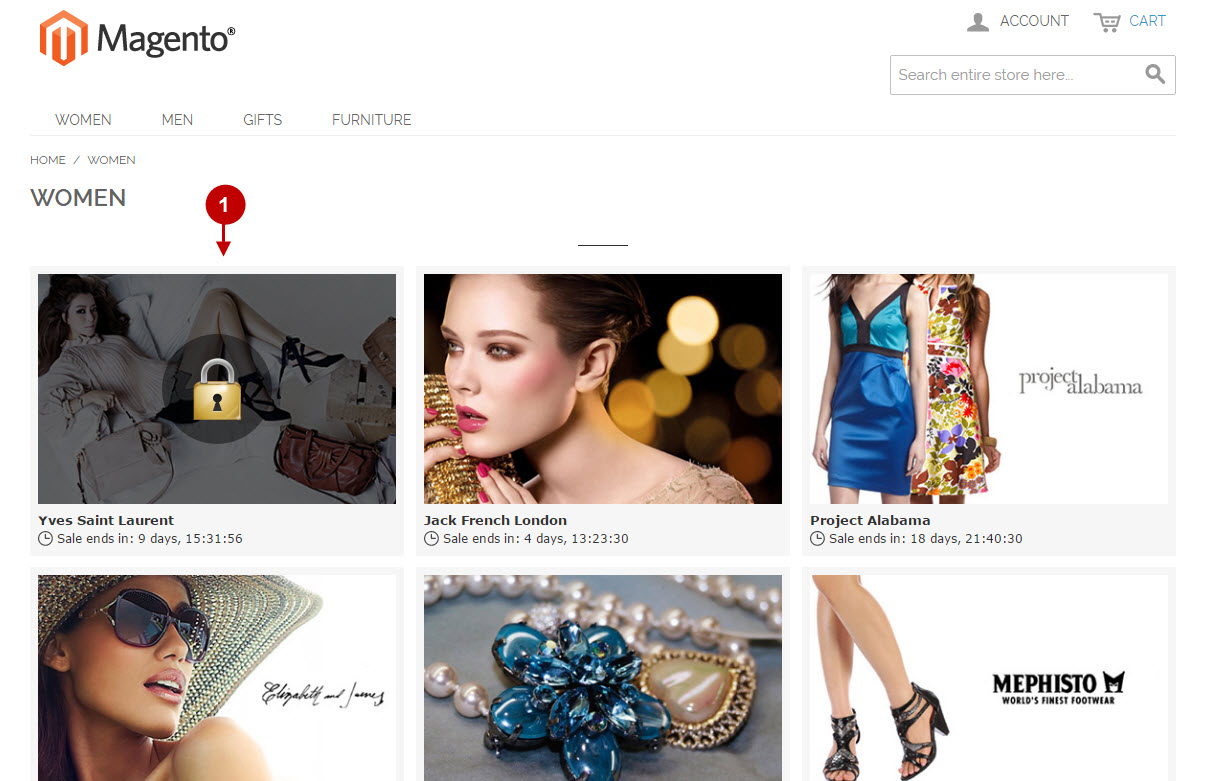
Configuring Flash Sale and Private Sale Event For a Product
Follow the instructions below to be able to set up a flash sale event for a single product.
Step-by-Step action:
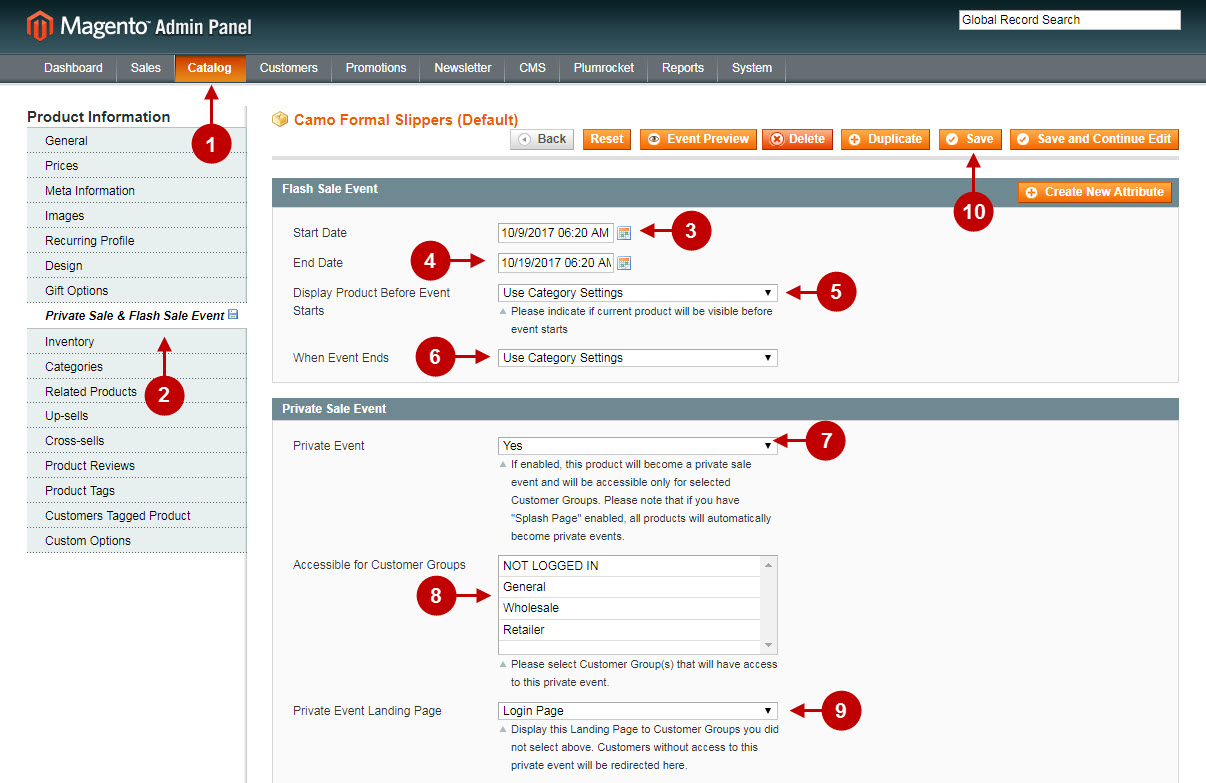
- Go to “Catalog” tab > select “Manage Products” section > choose the required product.
- Go to “Flash Sale Event” tab.
- Option “Start Date”: allows to set the start date of sale event. Note: you can enter start date without specifying end date of the flash sale event. In this case no countdown timer will be shown.
- Option “End Date”: allows to set the end date of sale event.
- Option “Display Product Before Event Starts”: allows to display or hide product before your sales event starts. You can also use the settings, that have been previously set up for this product by selecting “Use Config Settings” button.
- Option “When Event Ends”: allows to select the action that will take place after the sales event ends. You can also use the settings that have been previously set up selecting “Use Config Settings” button.
- Option “Private Event”: allows to turn a separate Magento product into the private sale event. You can also use the settings that have been previously configured for a parent category by selecting “Use Parent Category Settings” button. Note: If you choose “Yes” option in this field, you will be able to select landing page for this private sale event, visible for all guest visitors.
- Option “Accessible for Customer Groups”: allows admin to select the customer group(s) that will have an access to this private event.
- Option “Private Event Landing Page”: allows admin to set the landing page customers will be redirected to, if they do not have an access to the private event.
- Save your changes by pressing “Save” button.
Please, note that the Private Sales and Flash Sales extension does not modify the Magento prices logic. If you need to set up the special price for the Flash Sale and Private Sale Event on a Product – please make sure to configure the Special Price for the products using this Magento guide
Step-by-Step action:
- This is how the flash sale event timer looks like on Product Page on Magento frontend.
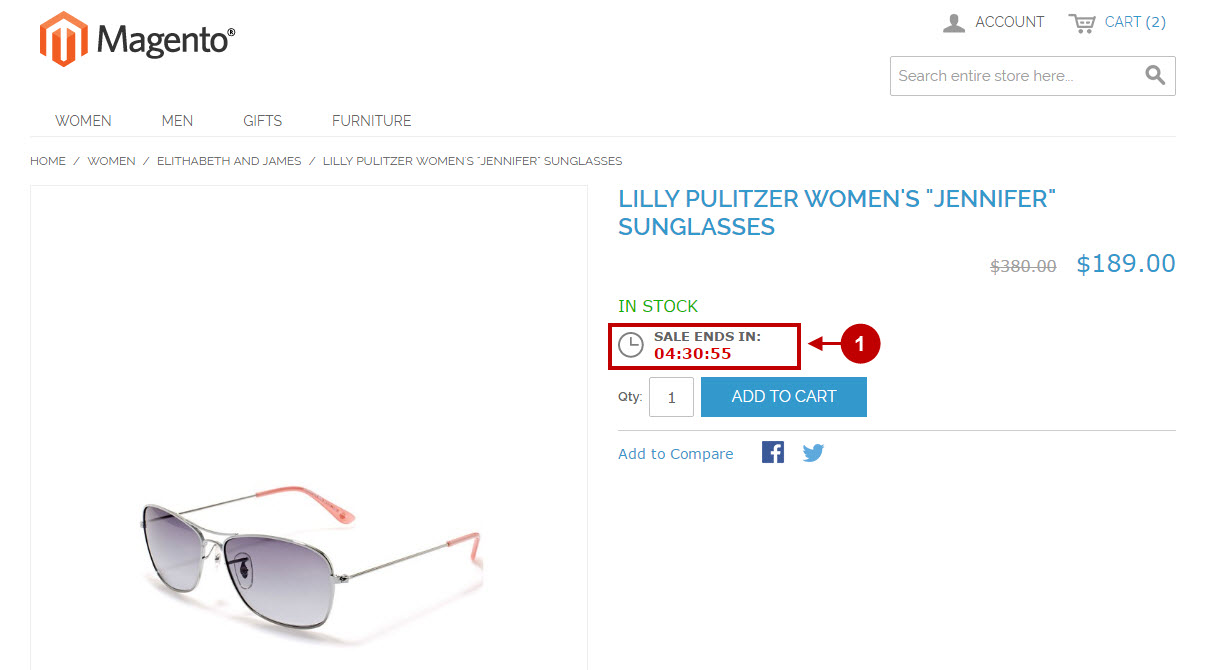
Preview Mode
Once you have set up your category and saved all the changes you can preview the category.
Step-by-Step action:
- Go to the required category, select ” Flash Sale Event” tab and press the “Event Preview” button.

Step-by-Step action:
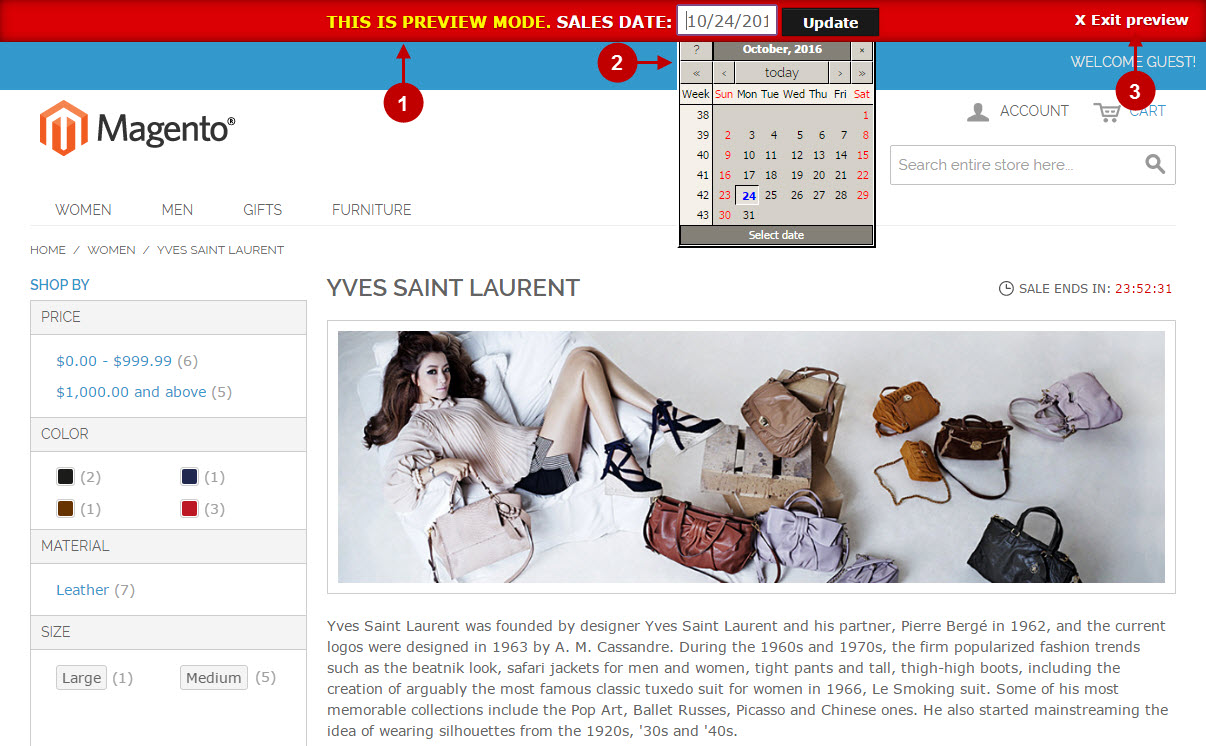
- This is the notification of the preview mode.
- If you choose the date here, you will be able to see how exactly the category will look like on the specified date.
- Press “Exit preview”, in order to exit the preview mode.
Splash Page Configuration
In this section you will find a detailed description of Magento Private Sales and Flash Extension features and settings that can be reached at the admin panel following the access path Plumrocket -> Private Sales and Flash Sales -> Splash Page.
First, open the Splash Page Configuration menu as shown below.
Step-by-Step action:
- Click on the “Plumrocket” tab in main menu.
- Go to “Private Sales and Flash Sales” tab.
- Select “Splash Page”.

General
“General” tab allows to enable or disable Splash Page and edit the content of the text block that appears next to the Log-in form.
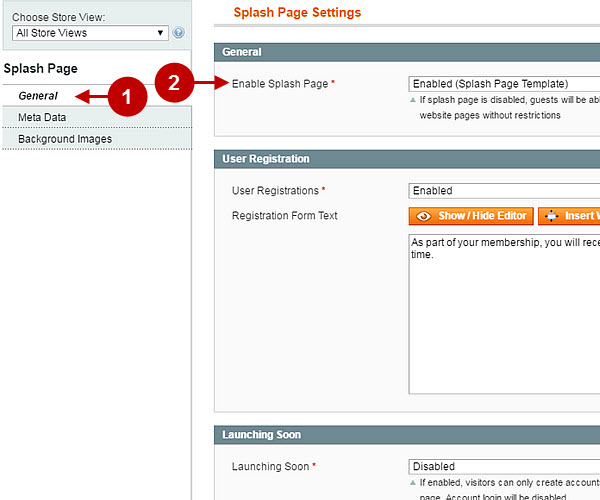
The screenshots below show the settings of this tab when the Splash is enabled. For your convenience and better understanding we have highlighted the options corresponding to different blocks in the front-end.
Enabled Splash Page
Detailed description:
- Click on the “General” tab to access the settings.
- Option “Enable Splash Page”: enables or disables the Splash Page. Once the Splash is enabled, the users will only be able to access your website after registration.
Magento Admin Panel
Website Frontend
Disabled Splash Page
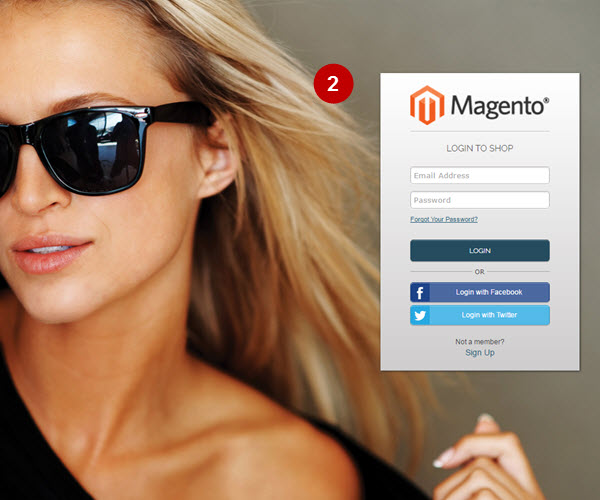
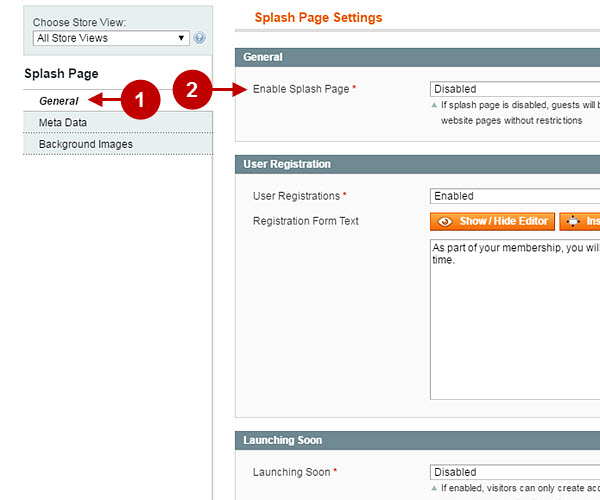
The following screenshots show the settings of this tab when the Splash page is disabled.
Detailed description:
- Click on the “General” tab to access the settings.
- Option “Enable Splash Page”: enables or disables the Splash Page. Once the Splash is disabled, the users will be able to access your website without registration.
Magento Admin Panel
Website Frontend
User Registration
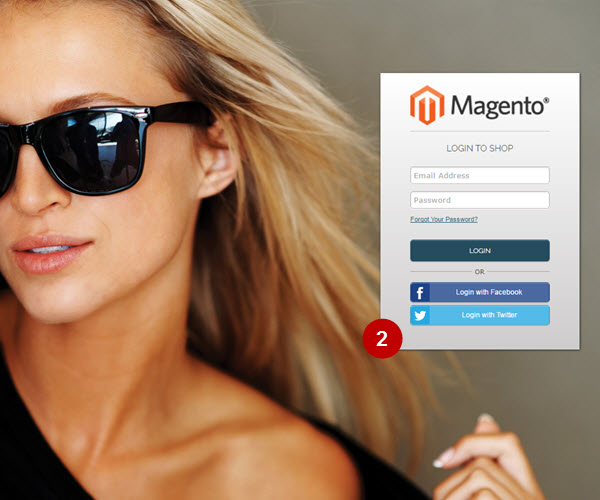
- User Registration Enabled
- User Registration Disabled
- Launching Soon Mode Enabled
- Launching Soon Mode Disabled
The tab “User Registration” allows the administrator to control the functions of user registration, as well as “Launching Soon” mode.
User Registration Enabled
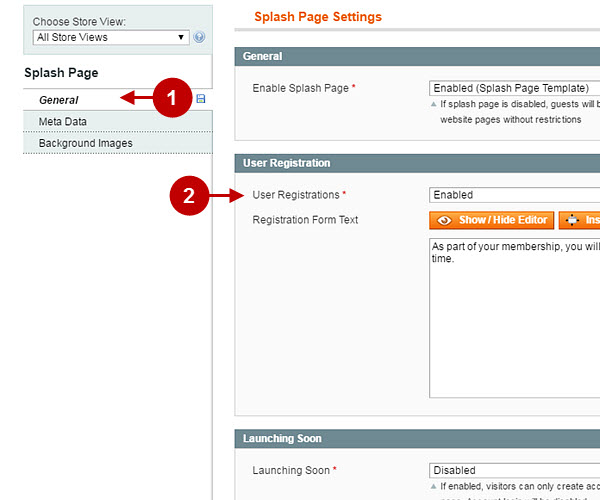
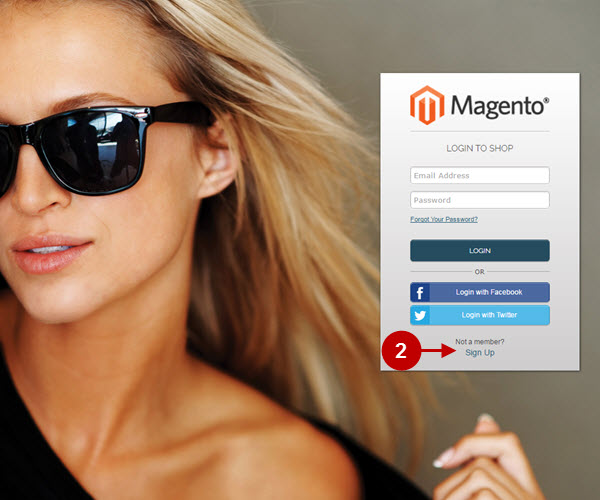
The screenshots below show the User Registration settings when the function of user registration is enabled. For your convenience and better understanding we have highlighted the options corresponding to different blocks on the front-end.
Detailed description:
- Go to “General” tab > select “User Registration” option to access the settings.
- Option “User Registrations” enables or disables registration at the website. If the registration is enabled, the users will be able to use the “Sign Up” link on the Splash page to get registered.
Magento Admin Panel
Website Frontend
User Registration Disabled
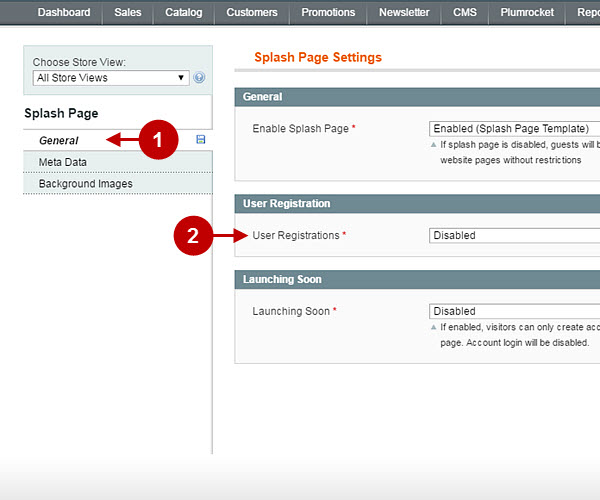
The screenshots below show the User Registration settings when the function of user registration is disabled.
Detailed description:
- Go to “General” tab > select “User Registration” option to access the settings.
- Option “User Registrations” enables or disables user registration. If the registration is disabled – users will not be able to use the “Sign Up” link on the Splash page to get registered (the link will disappear).
Magento Admin Panel
Website Frontend
“Launching Soon” Mode Enabled
“Launching Soon” Mode is a special website mode, that allows your prospective customers to get registered at the website before all of its events and services are launched. The option of logging in the system is inaccessible in this mode.
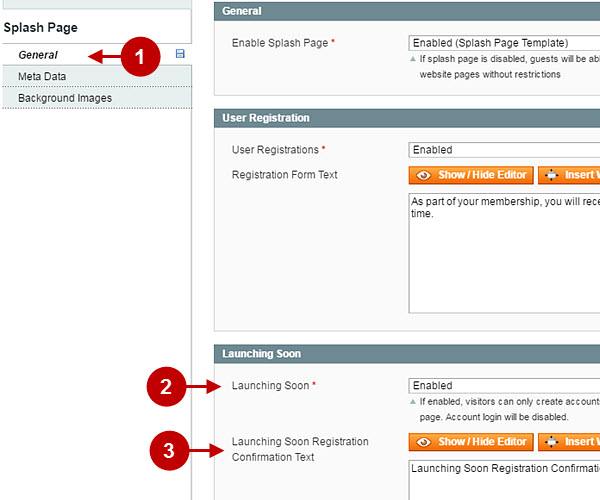
The screenshots below represent the settings tab, when the Launching Soon Mode is enabled.
Detailed description:
- Go to “General” tab to access the settings.
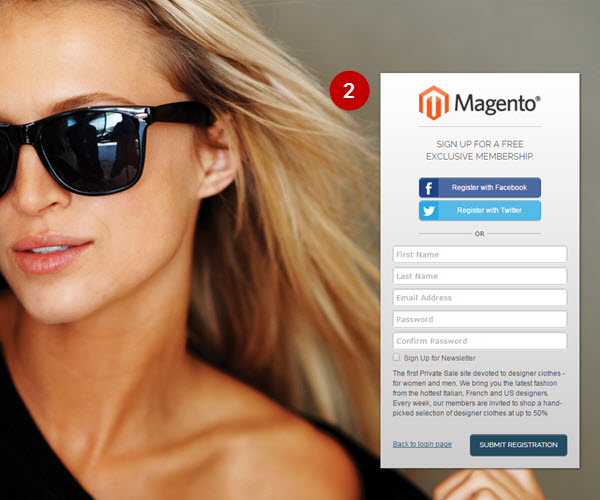
- Option “Launching Soon” enables or disable the mode. If the Launching Soon Mode is enabled, the users will only see the registration form and the “Submit Registration” button on the Splash Page. The “Log in” form will be visually unavailable.
- Option “Launching Soon Registration Confirmation Text’: Website administrator can edit the text that appears after successful registration when the website functions in the Launching Soon Mode. As a rule, this text block contains brief information concerning the purpose and the opening date of the website.
Magento Admin Panel
Website Frontend
“Launching Soon” Mode Disabled
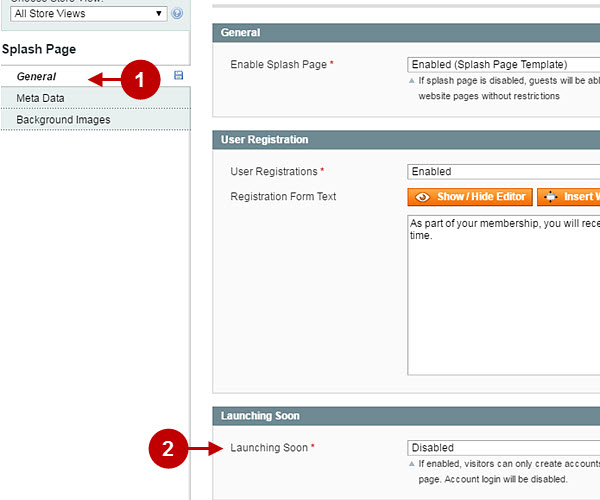
The screenshots below show the tab settings when the “Launching Soon” mode is disabled.
Detailed description:
- Go to “General” tab to access the settings.
- Option “Launching Soon” enables or disables the mode. If the “Launching Soon” mode is disabled, the users will be able to log in after successful registration. The registration and login forms will be available to all users.
Magento Admin Panel
Website Frontend

Meta Data
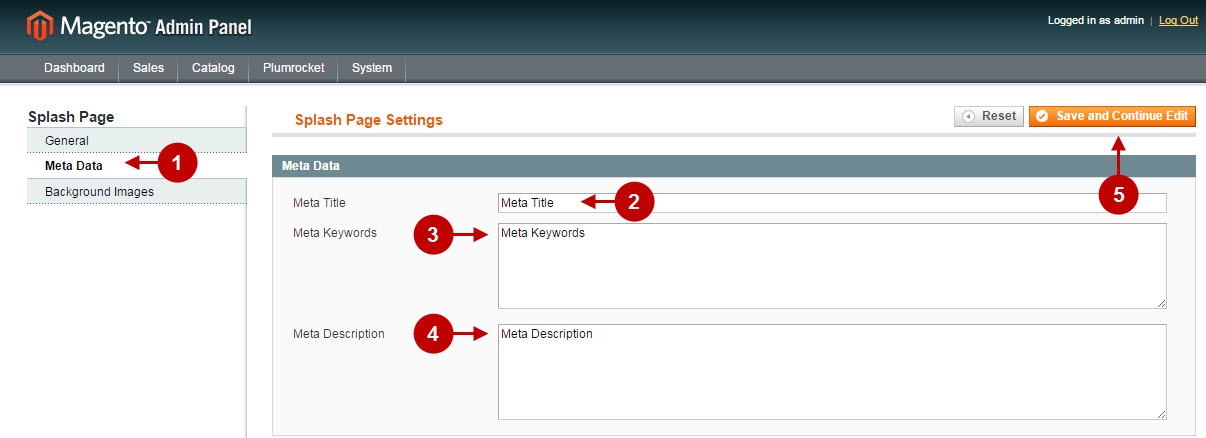
The “Meta Data” tab allows to edit the Splash page meta-tags.
Detailed description:
- Go to “Meta Data” tab to access the settings.
- Option “Meta Title”: enter the meta title of the Splash page.
- Option “Meta Keywords”: enter the meta keywords for the Splash page here.
- Option “Meta Description”: provide short meta description for the Splash page in this field.
- Save your changes by pressing “Save and Continue Edit” button.
Images
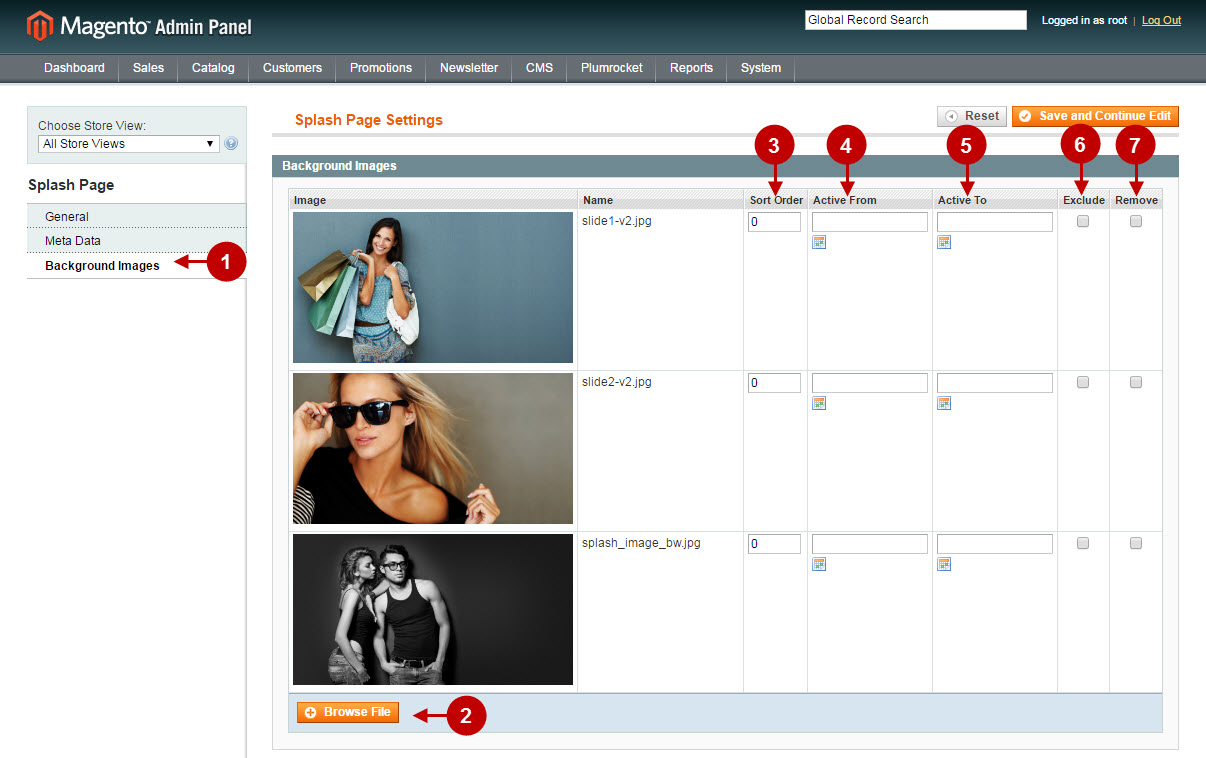
The tab “Images” allows to edit the background image of the Splash page.
The screenshots below show a detailed description of the settings and options of this tab.
Detailed description:
- Go to “Background Images” tab to access the settings.
- Option “Browse File”: this button launches the interface to upload new images. Recommended width of picture: 2000px .
- Option “Sort Order”: the parameters determining the sequence of images are set in this field.
- Option “Active From”: sets the starting date of the image display. If it is set by default (00/00/00) – the image will be permanently displayed on the Splash page.
- Option “Active To”: sets the ending date of the image display. If it is set by default (00/00/00) – the image will be permanently displayed on the Splash page.
- Option “Exclude”: allows you to temporarily exclude the image from the list, not showing it on the website.
- Option “Remove”: deletes the image.
Managing Newsletter Templates
In this section you will find a detailed description of Magento Private Sales and Flash Sales Extension features and settings, that can be reached at the admin panel following the access path Plumrocket -> Private Sales and Flash Sales-> Newsletter Templates.
First, open the Newsletter Templates Configuration menu as shown below.
Step-by-Step action:
- Click on the “Plumrocket” tab in main menu.
- Go to “Private Sales and Flash Sales” tab.
- Select “Newsletter Templates”.

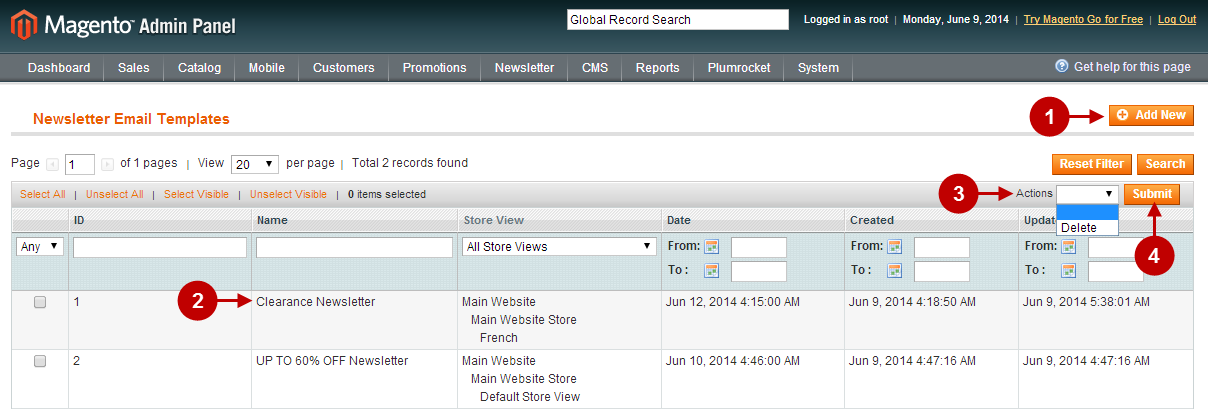
Here you can manage your Newsletter Templates. To do this, follow the steps below.
Step-by-Step action:
- Click on the “Add New” button to create Newsletter Template.
- Column “Name” indicates the Newsletter Template name.
- You can delete the selected Newsletter Template by choosing “Delete” action.
- You can submit your action by clicking on “Submit” button.
Creating Newsletter Template
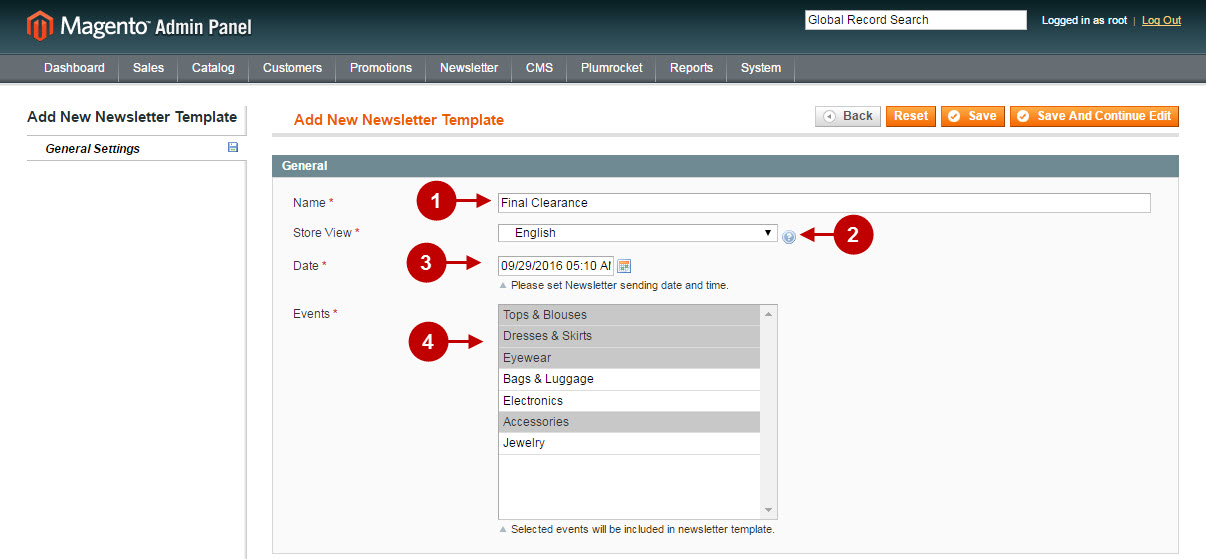
In order to create Newsletter Template, please follow the steps below.
Step-by-Step action:
- Indicate your Newsletter Template name.
- Select the store view for your Newsletter Template.
- Set the Newsletter sending date and time. Note: Setting the date will load all the events which will be active at the date and time of sending.
- Select the events that you want to display in the Newsletter.
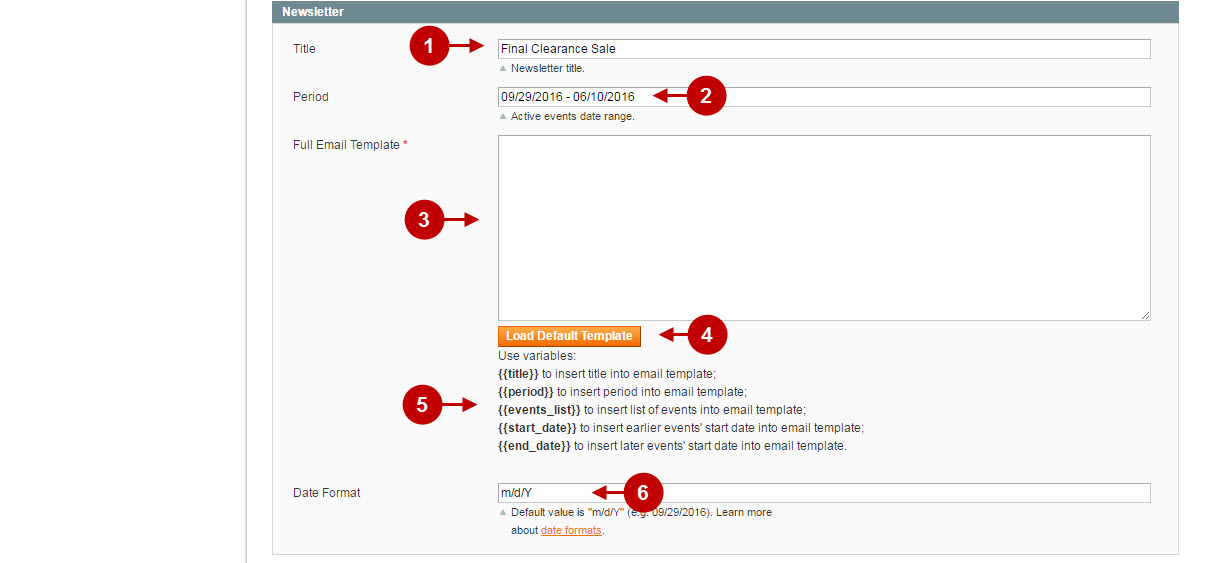
Step-by-Step action:
- Indicate your Newsletter title.
- Indicate the active events date range. There are 2 possible options here: a) You can set the date range manually; b)You can leave this field empty. In this case the system will pick up the start date of first active selected event, and the end date of the last active selected event and paste these dates into the field.
- Insert your own full Email Template here. Note: In case you don’t have your own Email Template – skip this step and proceed to the next step.
- Click on “Load Default Template”. Note: This will load the default template predefined by the system which you can edit as needed.
- You can use provided variables if needed.
- Indicate the “Date Format” for your Newsletter.
Step-by-Step action:
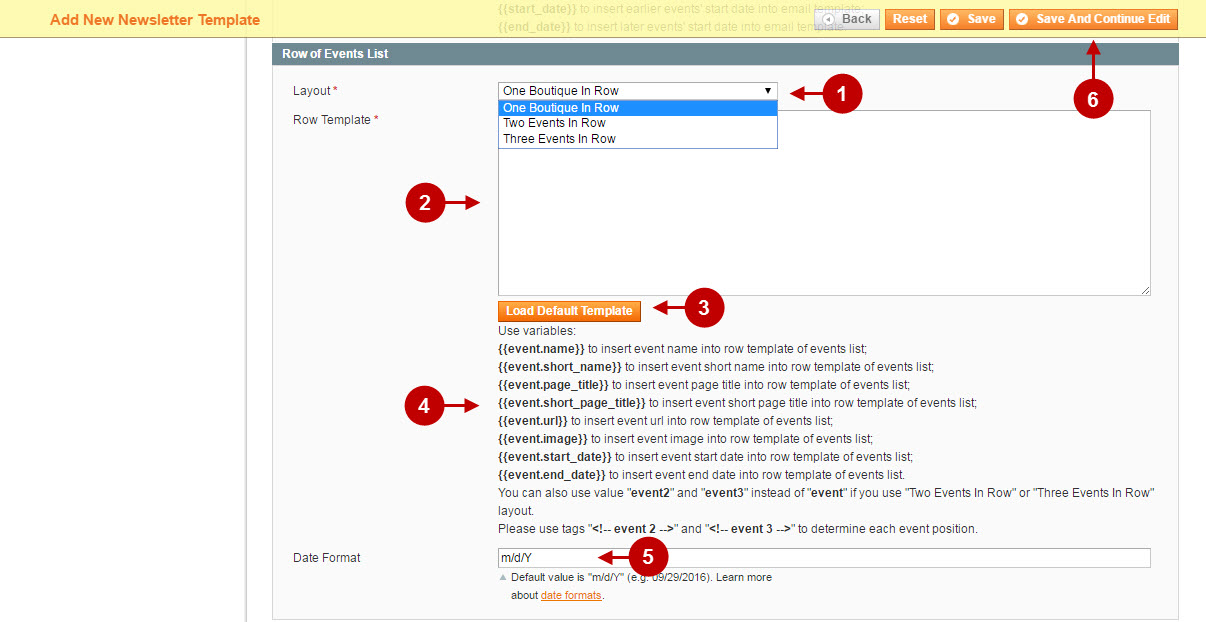
- Choose the needed layout for the template from the drop-down.
- Insert your own “Row” Template here. Note: In case you don’t have your own “Row” Template – skip this step and proceed to the next step.
- Click on “Load Default Template”. Note: This will load the default template predefined by the system which you can edit as needed.
- You can use these variables if needed.
- Indicate the “Date Format” for start and end dates of your events.
- Click the “Save And Continue Edit” button to save your changes. Note: It is required to save your changes in order for “Preview” and “Generate” buttons to appear.
After your Newsletter Template is ready, you can see how it looks like by following the steps below.
Step-by-Step action:
- Click the “Preview” button to see how your Newsletter Template will appear in the email.

Once you are done with making changes to your Newsletter Template – you can generate its HTML code for pasting into some email sending system (e.g. MailChimp.com). To do this please follow the steps below.
Step-by-Step action:
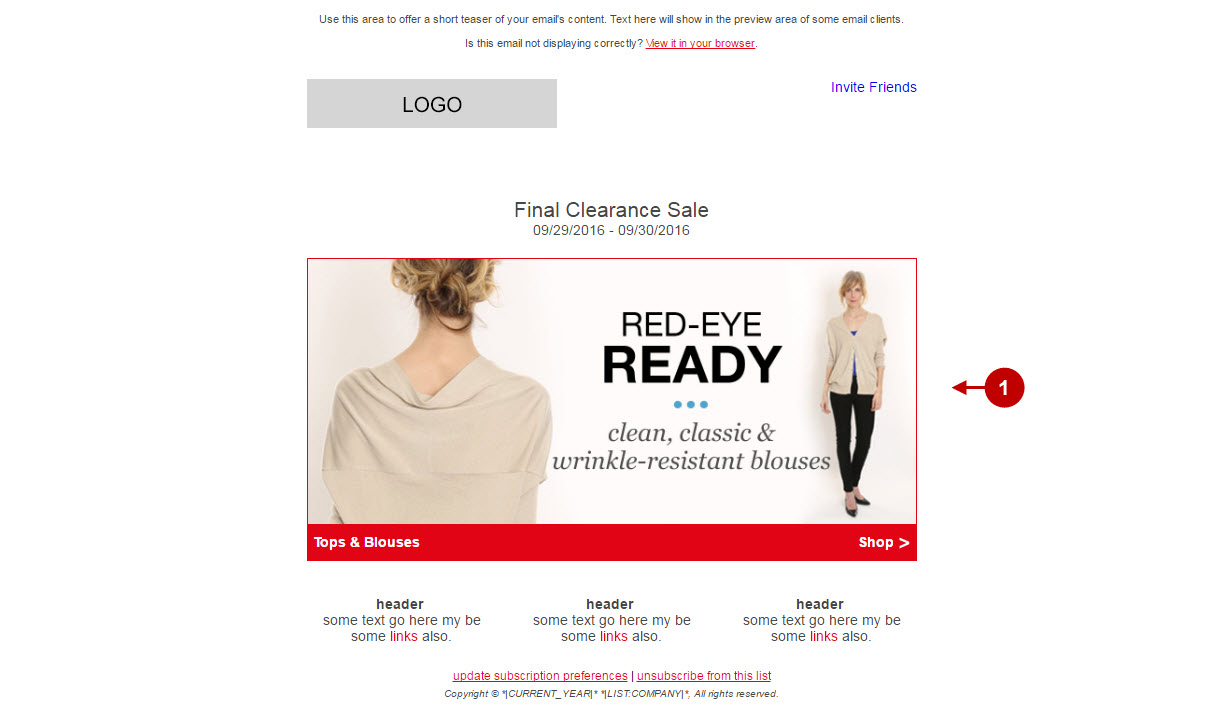
- This is how the default Newsletter Template will look like in the email.
Step-by-Step action:
- Click the “Generate HTML” button to generate the Newsletter Template in form of HTML code.

Step-by-Step action:
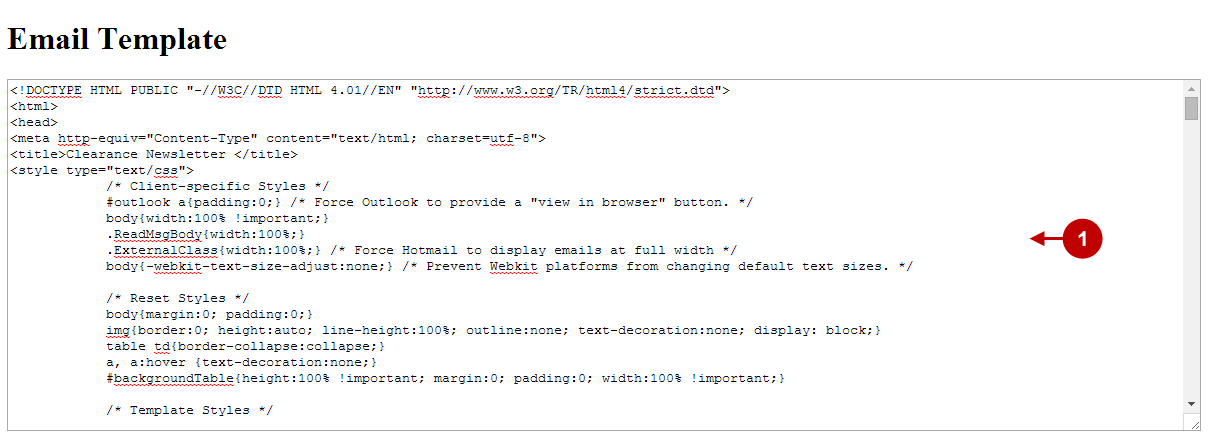
- This is an example of the default Newsletter Template HTML code generated by the system for pasting into your email sending system (e.g. MailChimp).
Important Information:
You can make your membership website more attractive with Magento 1 Themes. Private Sales mobile and desktop themes are designed with the latest features observed in today’s most popular membership websites.
