Configuring Auto Invoice Extension
Here you will learn how to configure Plumrocket Magento Auto Invoice.
Step-by-Step action:
- Press the “System” tab in the menu.
- Select “Configuration”.

Step-by-Step action:
- Option “Enable Plumrocket Auto Invoice”: Select “Yes” in the drop-down menu in order to enable the Auto Invoice Extension or “No” if you want to disable the extension.
- Option “Send Invoice”: this option allows to set the condition, when an invoice will be sent to a customer. If you choose “After order is created” option, an invoice will be sent to a customer right after an order is created. If you select “After order is shipped” option, an invoice will be sent to a customer once an order is shipped.
-
Option “Capture Amount”:
allows you to specify how you will capture payments from your customers. Magento has 3 capture methods. See full description below.
- Capture Online – when the Invoice is submitted, the system will capture the payment through the third party payment gateway. You will have the ability to create a Credit Memo, or Void the Invoice;
- Capture Offline -when the Invoice is submitted, the system will not capture the payment. It will be assumed that the payment is going to be captured directly through the gateway, and you will no longer have the option to capture this payment through Magento. You will have the ability to create a Credit Memo, but you will not have the option to Void the Invoice (even though the Order used an online payment, the Invoice is essentially an offline Invoice);
- Not Capture – when the Invoice is submitted, the system will not capture the payment. However, it will be assumed that you will capture the payment through Magento at a later date. Therefore, there will be a Capture button in the completed Invoice. Before capturing, you will be able to cancel the Invoice, and after capturing, you will be able to Credit Memo and Void the Invoice. Note: Do not select Not Capture from the drop-down unless you are certain that you are going to capture the payment through Magento at a later date. You will not be able to create a Credit Memo until the payment has been captured using the Capture button.
- Press “Save config” to save the changes.

In order to preview the Extension frontend, follow the instructions below:
Detailed description:
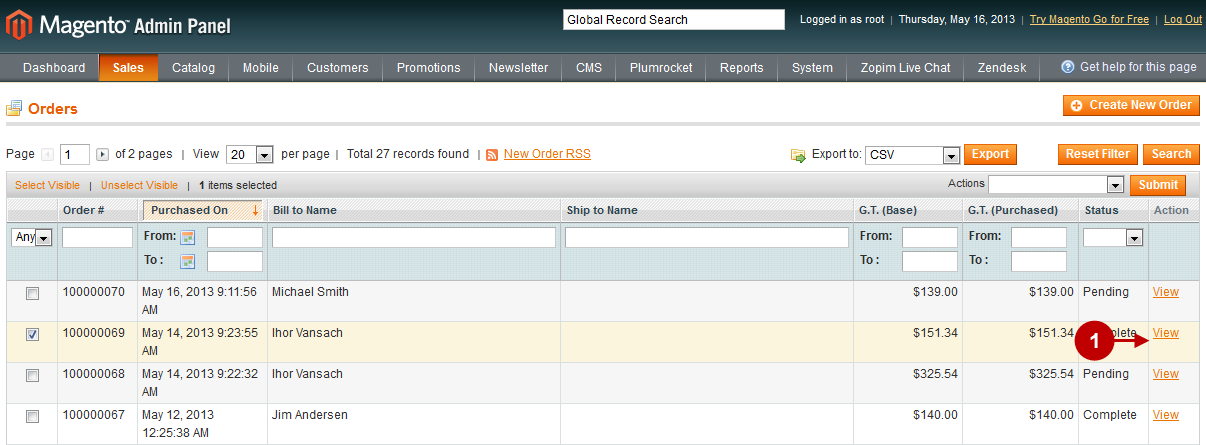
- Select “Sales” in the menu.
- Select “Orders”.

Detailed description:
- Choose any order and press “View”.

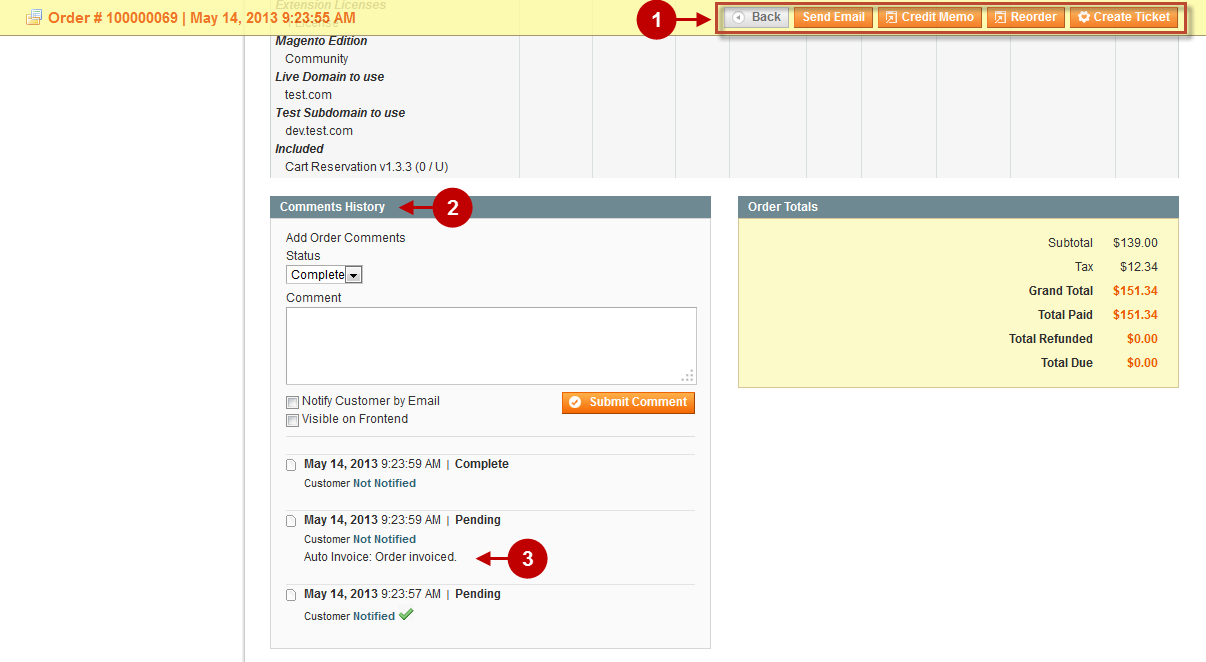
This order information page contains the following details.
Important Information:
For the Magento Auto Invoice Extension to function properly, make sure there is a Cron Job for Magento set up at your store. For more details how to configure Cron Job read article How to setup a Cron Job in Magento.
Detailed description:
- You can see that there is no “Invoice” button that has been previously used to manually process invoice.
- Move to the field “Comments History”.
- The notification “Order invoiced” informs you that the invoice has already been sent to the customer.

Was this article helpful?
