The Magento 2 Data Feed Generator extension allows you to create and manage various product feeds for third-party platforms and integrations. The following guide describes how to configure the ChatGPT Product Feed that can be used with ChatGPT to provide product information to users.
Step-by-step guide:
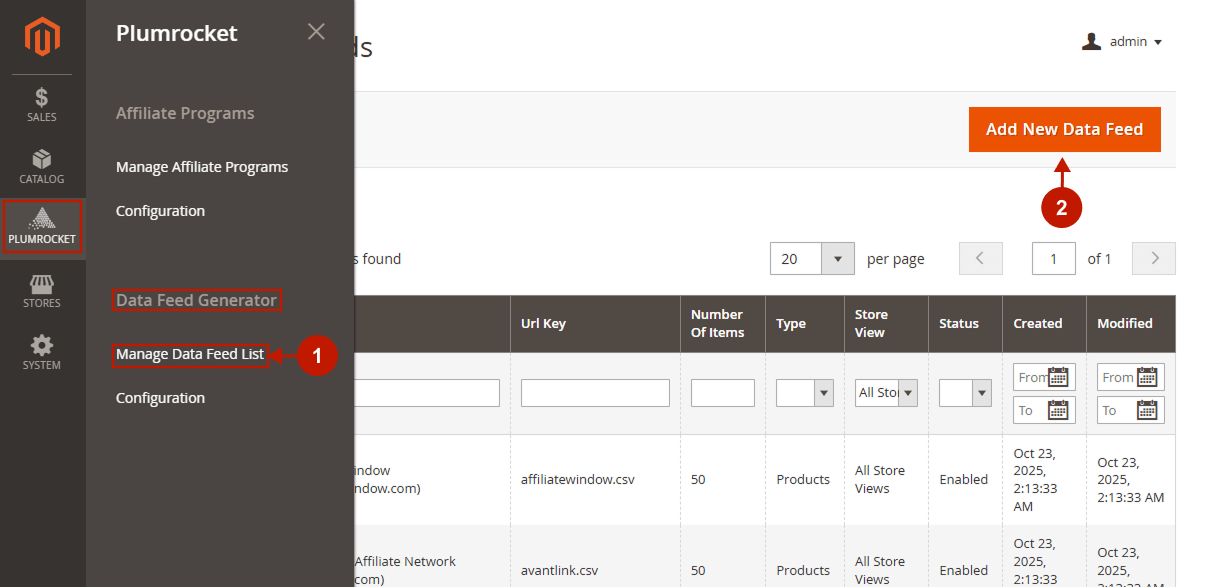
- Go to Plumrocket -> Data Feed Generator -> Manage Data Feed List.
- Press the Add New Data Feed button
General Settings
Step-by-step guide:
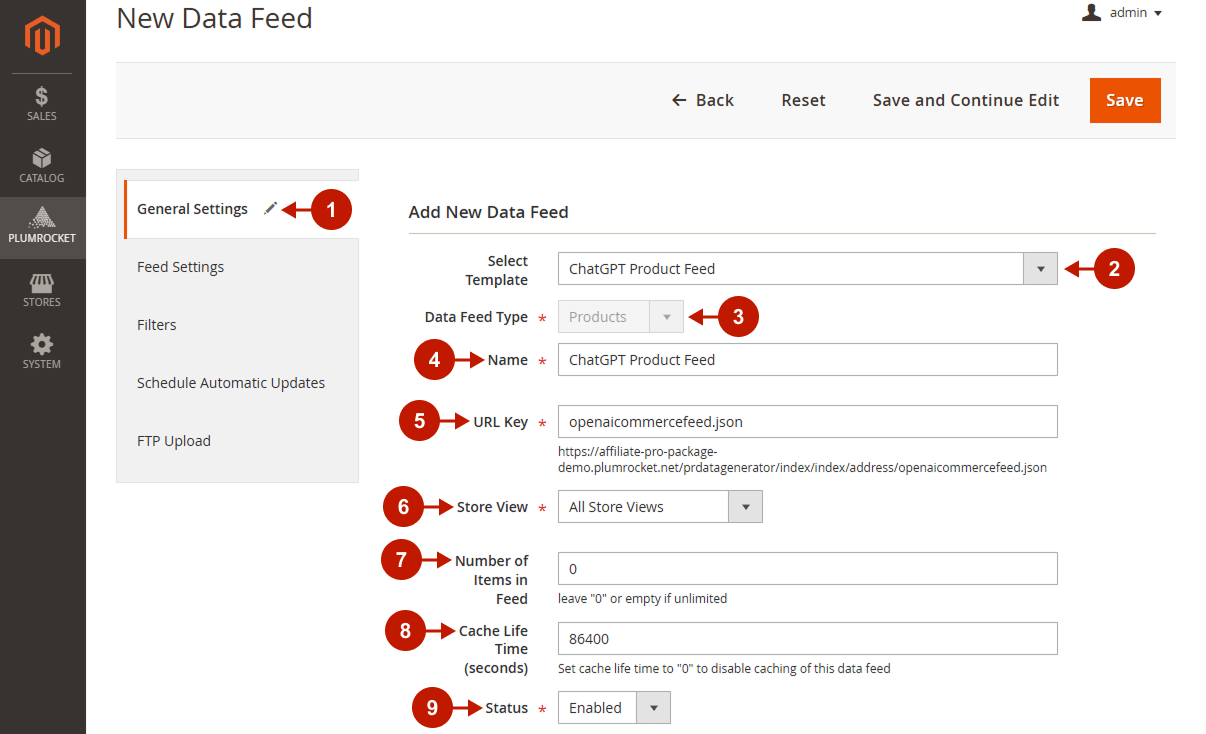
- Go to General settings tab.
- “Select Template”: choose the ChatGPT Product Feed from the dropdown.
- “Data Feed Type” field allows you to select products or categories to be included into your data feed.
- Enter name of the data feed or edit the existing one in the “Name” field.
- In the “URL key” field specify the data feed url.
- Select the store view where the data feed will be generated and used in the “Store View” field.
- In this field specify the number of items. Leave “0” or empty, if the number of items is unlimited.
- In the “Cache Life Time (seconds)” field you can set the cache life time for this particular Data feed. In order to disable caching for this data feed, set cache life time to “0”.
- In the “Status” field you may enable or disable this data feed.
Feed Settings
Product Discovery & Checkout
Step-by-step guide:
- Go to the Feed Settings tab.
- Enable GPT Search Discovery: set to Yes to allow your products to appear in ChatGPT-powered shopping experiences. Set to No to exclude them.
- Enable Instant Checkout: set to Yes if you want to allow users to instantly purchase products via ChatGPT shopping flow.
- Include Product Reviews Data: set to Yes to include product reviews in the feed, allowing ChatGPT to display them when presenting products.

Seller & Policy Information
Step-by-step guide:
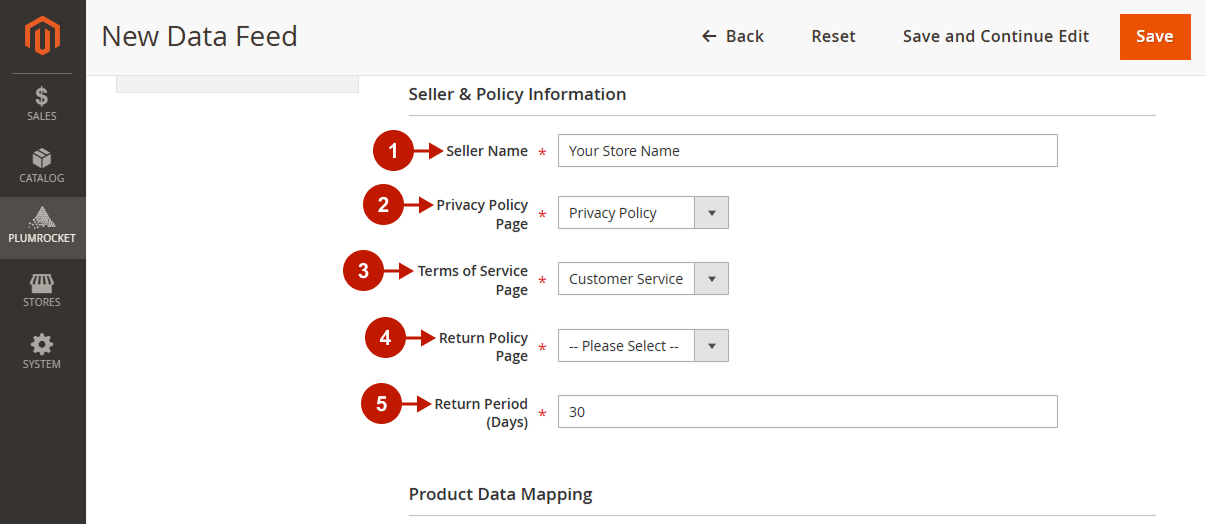
- Seller Name: enter the name of your store or seller that will appear in the ChatGPT product data feed.
- Privacy Policy Page: select the CMS page that contains your store’s Privacy Policy.
- Terms of Service Page: select the CMS page that contains your store’s Terms of Service.
- Return Policy Page: select the CMS page that contains your store’s Return Policy.
- Return Period (Days): enter the number of days customers have to return purchased products.
Product Data Mapping
Step-by-step guide:
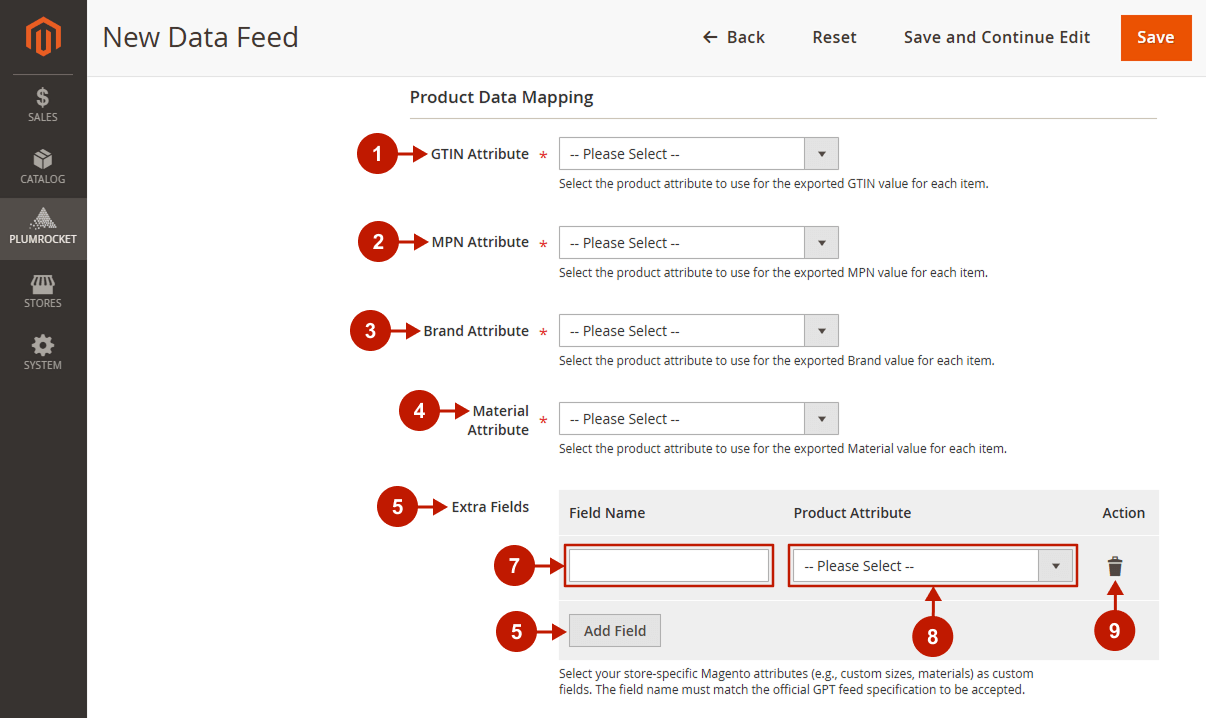
- GTIN Attribute: select the product attribute that stores the GTIN (Global Trade Item Number) for your products.
- MPN Attribute: select the product attribute that stores the MPN (Manufacturer Part Number) for your products.
- Brand Attribute: select the product attribute that stores the brand or manufacturer name.
- Material Attribute: select the product attribute that stores the material used for the product.
- Extra Fields: select additional Magento product attributes to be included in the GPT data feed. These attributes can represent store-specific information (such as custom sizes or styles). Important: The field name must match the official GPT feed specification to be accepted.
- Add Field: click this button to create a new custom field for the GPT data feed.
- Field Name: enter the name of the custom field according to the GPT feed specification.
- Product Attribute: select the corresponding Magento attribute that will provide data for this field.
- Delete Field: click this button to remove the selected custom field from the feed configuration.
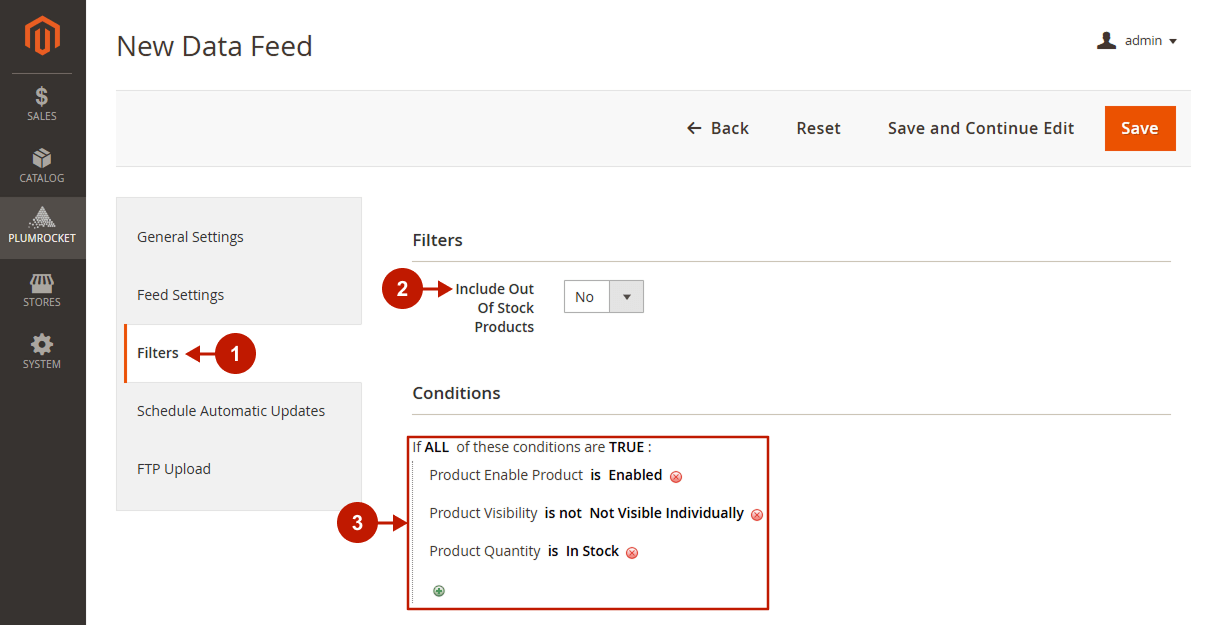
Filters
Step-by-step guide:
- Go to the Filters tab.
- Specify if the Out of Stock Products should be included in the feed.
- Set the conditions of the filter rules in order to include (or exclude) specific products and categories in the data feed.
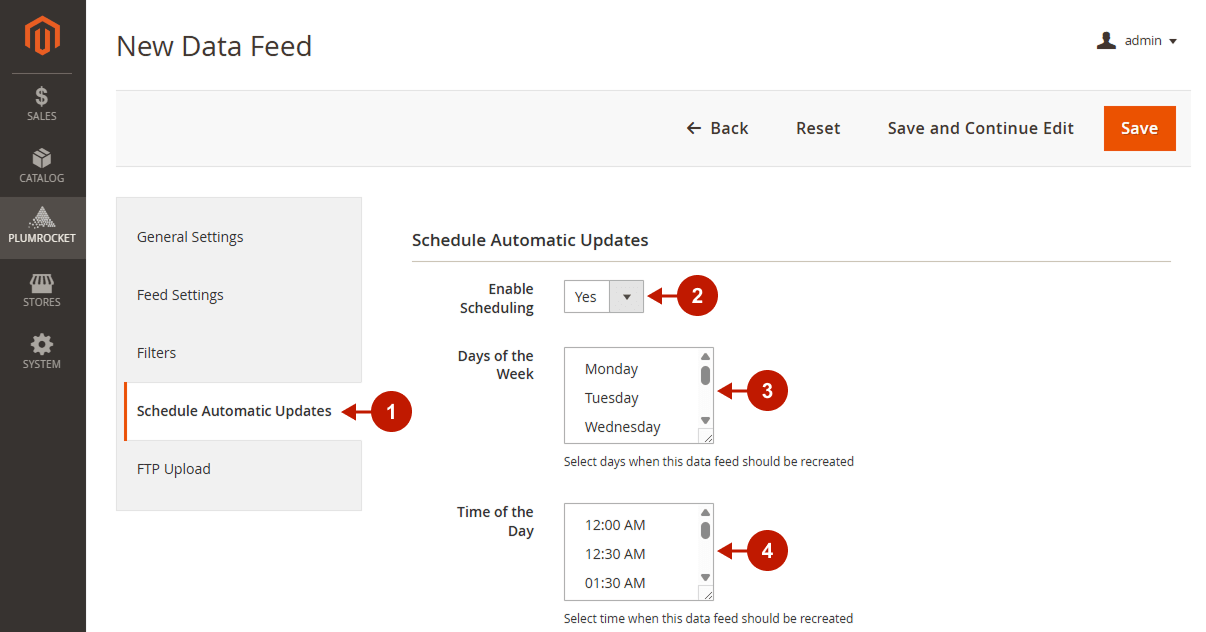
Schedule Automatic Updates
Step-by-step guide:
- Go to the Schedule Automatic Updates tab.
- Enable the Scheduling.
- Specify the Days of the Week when the Data Feed should be updated.
- Specify the Time of the Day when the Data Feed should be updated.
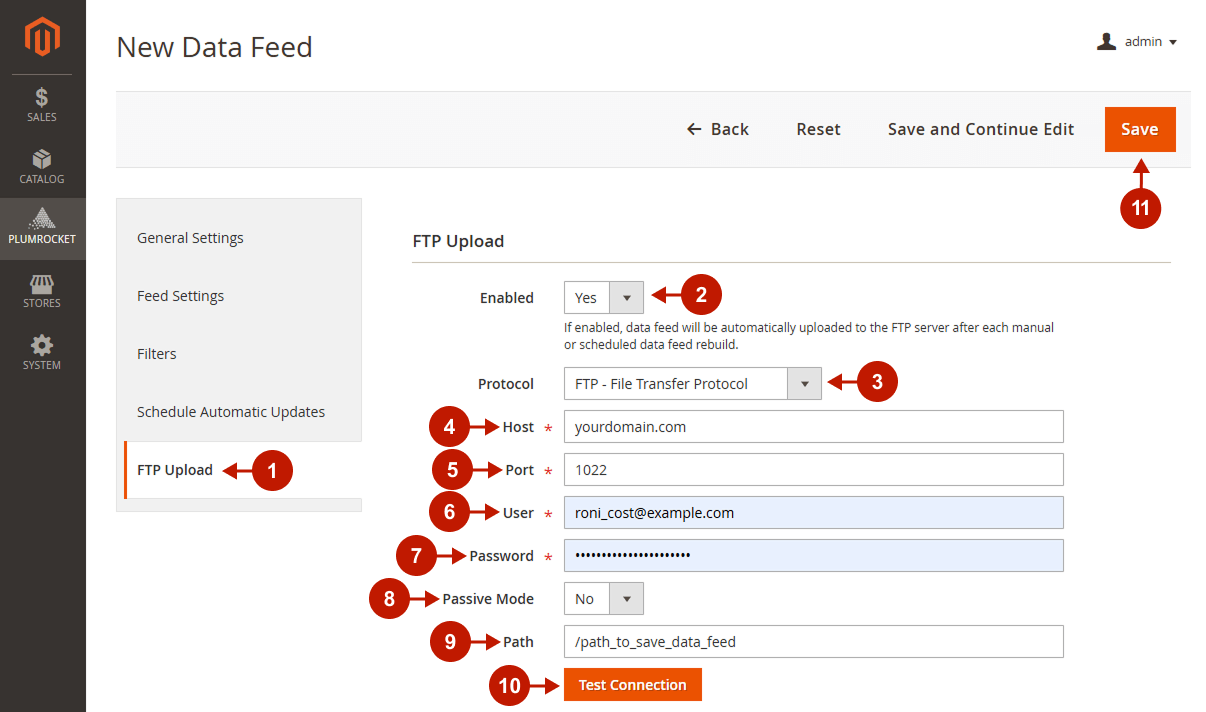
FTP Upload
Step-by-step guide:
- Go to the FTP Upload tab.
- Enable the FTP Upload. If you enable this option, the data feed will be automatically uploaded to the FTP server after each manual or scheduled data feed rebuild.
- Choose the Protocol (FTP or SFTP SSH).
- Specify your Host.
- Specify the Port.
- Enter your FTP/SFTP SSH User.
- Specify the user Password.
- Enable or disable the Passive Mode. This option is only available for the FTP protocol. If you enable it, the data connections will be initiated by the client instead of the server, which can be useful if the client is behind a firewall. Please note that Passive Mode can only be enabled after a successful login; otherwise, the operation will fail.
- Specify the Path where you would like to save the Data Feed.
- Test if the Connection works properly.
- Save your changes.
Was this article helpful?