Getting Started
Please check our step-by-step guide to get started with the Cookie Consent extension in minutes.
We recommend the following steps to configure the Cookie Consent extension correctly:
- Determine which data protection laws (GDPR, CCPA, LGDP, or others) your store needs to comply with.
- Configure the Main Settings of the module.
- (Optional) View default Cookie Categories and edit them.
- Browse the provided list of Magento cookies and add your own cookie if necessary.
- Configure Cookie Consent Banner.
- Configure the Cookie Settings Panel.
- Enable the extension.
- (Optional) Add the “Cookies Settings” link.
- (Optional) Configure Google Tag Manager functionality.
- (Optional) To block custom scripts’ execution before a customer allows cookies, read our Developer Guide.
Configuration
General
Follow the steps below to learn how to configure Magento 2 Cookie Consent extension correctly.
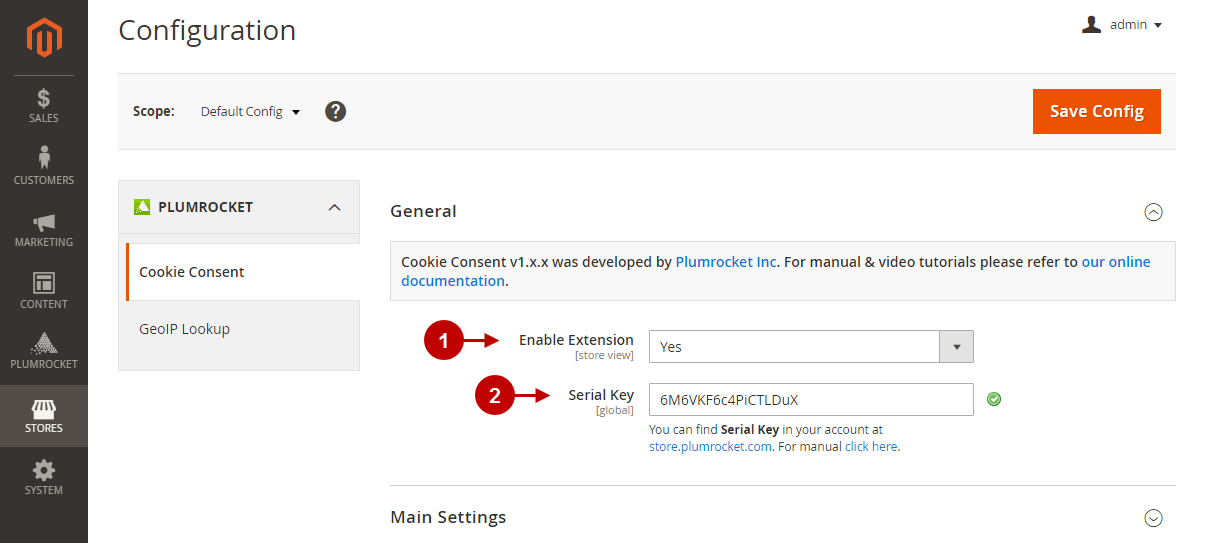
In the main menu go to the “Plumrocket” tab > select “Cookie Consent” extension > navigate to the “Configuration” section.
Step-by-step guide:
- “Enable Extension”: this option allows you to enable or disable this Cookie Consent extension.
- “Serial Key”: enter the unique serial key provided to you after purchasing the extension. Note: In most cases, this field will be pre-filled with a serial key automatically, and the green checkmark will be displayed. To find and paste your serial key manually, read the Serial Key Activation article.
Main Settings
Step-by-step guide:
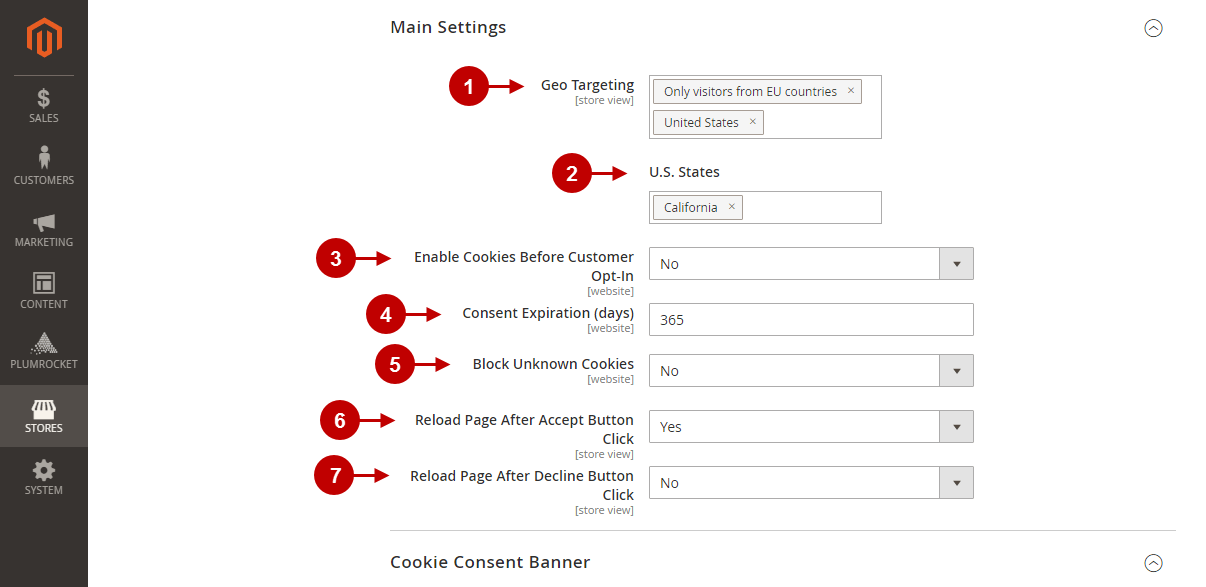
- “Geo Targeting“: select countries in order to show cookie notice only to visitors from the selected countries.
- “U.S. States“: you can select one or multiple U.S. states. For example, select “California” to comply with the CCPA law.
- “Enable Cookies Before Customer Opt-In“: when set to “Yes”, all cookies will be already enabled until the customer accepts or declines them. We recommend enabling this feature for CCPA law, where consent for collecting personal data is not required.
- “Consent Expiration (days)“: set the number of days when the consent cookies expire. After the expiration date, a customer will be prompted again to accept or decline cookies.
- “Block Unknown Cookies“: when set to “Yes”, all cookies not listed in the Manage Cookies grid will be blocked until a visitor accepts all cookies.
- “Reload Page After Accept Button Click“: when set to “Yes”, the website page will reload after a user clicks the “Accept Cookies Button”. This option helps to enable certain javascript and third-party cookies. We recommend setting this option to “Yes” if the “Enable Cookies Before Customer Opt-In” option above is set to “No”.
- “Reload Page After Decline Button Click“: when set to “Yes”, the website page will reload after a user clicks “Decline Cookies Button”. It helps to disable certain javascript and third-party cookies. We recommend setting this option to “Yes” if the “Enable Cookies Before Customer Opt-In” option above is set to “Yes”.
Cookie Consent Banner
Step-by-step guide:
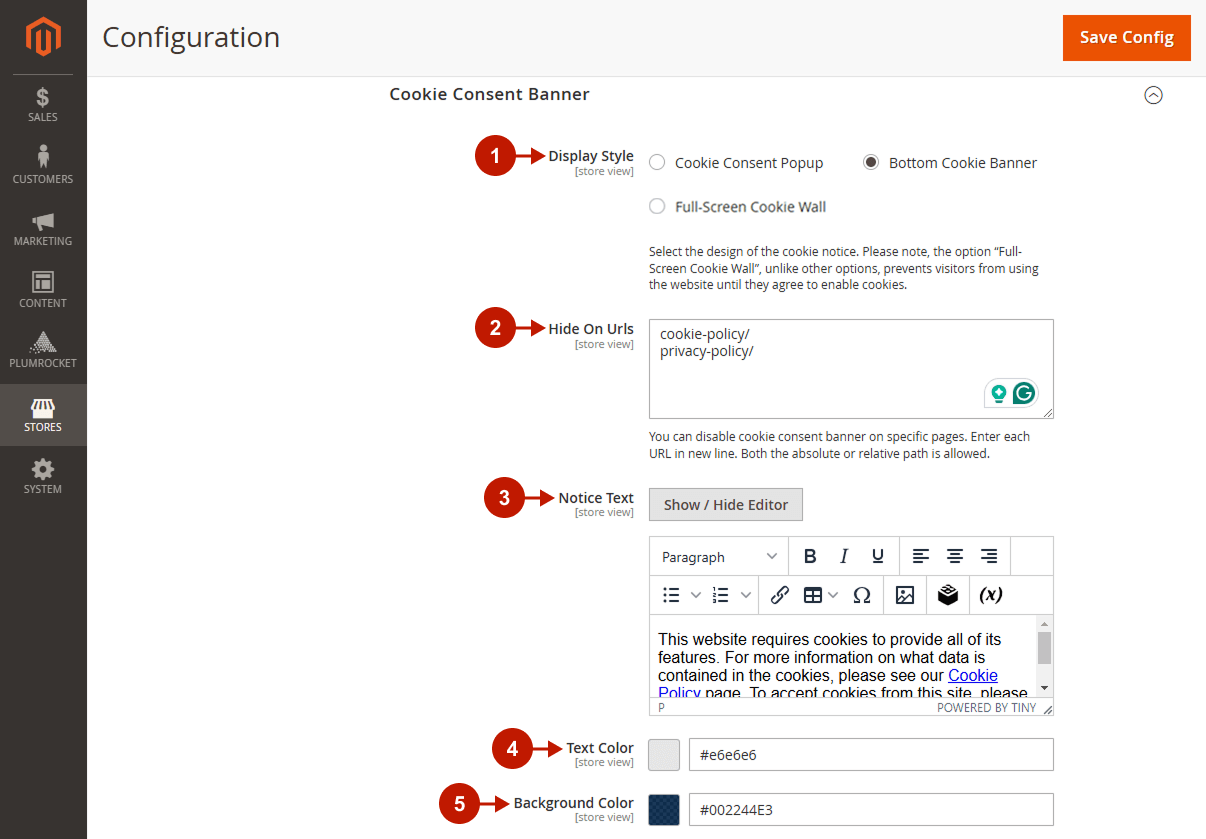
- “Display Style“: select the way you want to show the cookie notice to visitors. Select from the Popup, Bottom Banner, or Full-screen Wall. Please note, the option “Full-Screen Cookie Wall,” unlike other options, prevents visitors from using the website until they agree to enable cookies.
- “Hide On Urls“: you can disable the cookie consent banner on specific pages. Enter each URL in a new line. Both absolute or relative paths are allowed.
- “Notice Text“: enter the text asking to agree with the cookies that will be displayed on the cookie consent banner.
- “Text Color“: specify the color of the text.
- “Background Color“: choose the color of the background.
Accept Button
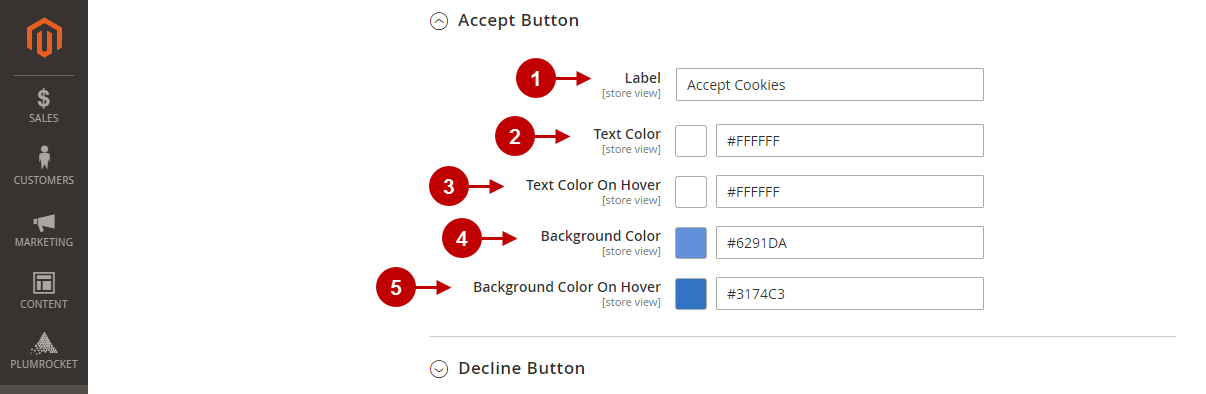
The cookie notice banner contains Accept, Decline, and Settings buttons. In this section, learn how to configure the appearence of the Accept Button.
Step-by-step guide:
- “Label“: enter the name of the accept button here: “Allow Cookies”, “Accept”, etc.
- “Text Color“: select the Accept Button text color by clicking on the color picker or entering the hex color in the field.
- “Text Color On Hover“: select the color in which the text changes when hovering the mouse cursor over the button.
- “Background Color“: select the background color of the accept button.
- “Background Color On Hover“: select the background color to which the background changes when hovering the mouse cursor over it.
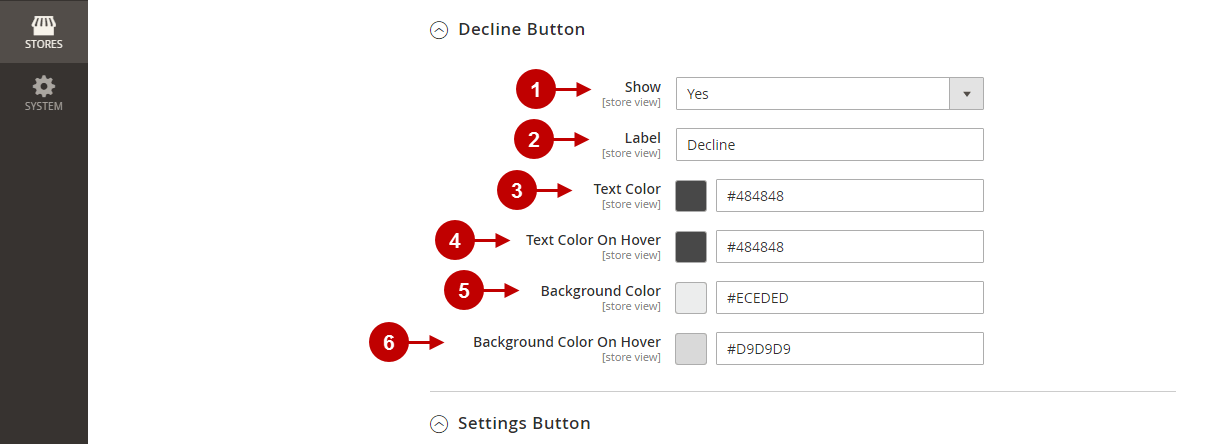
Decline Button
In this section, learn how to configure the appearence of the Decline Button.
Step-by-step guide:
- “Show“: when set to “Yes”, the decline button is displayed on the cookie consent banner. You are also able to hide this button by setting this option to “No”. Therefore, users will not be able to decline cookies.
- “Label“: enter the name of the decline button here.
- “Text Color“: select the Decline Button text color by clicking on the color picker or entering the hex color in the field.
- “Text Color On Hover“: select the color to which the text changes when hovering the mouse cursor over the button.
- “Background Color“: select the background color text of the decline button.
- “Background Color On Hover“: select the color to which the background changes when hovering the mouse cursor over it.
Settings Button
In this section, learn how to enable and configure the settings button appearance. The settings button is displayed next to the accept and decline button. By pressing it, users can go to settings, read cookie categories description, and manage their consent preferences.
Step-by-step guide:
- “Show“: when set to “Yes, Settings Button is enabled and displayed on the cookie consent banner.
- “Label“: enter the name of the link.
- “Type“: select whether the settings option should be displayed as a link or a button.
- “Link color“: specify the link color if you selected the type above as a link.
- “Link Color On Hover“: select the color to which the link changes when hovering the mouse cursor over it.

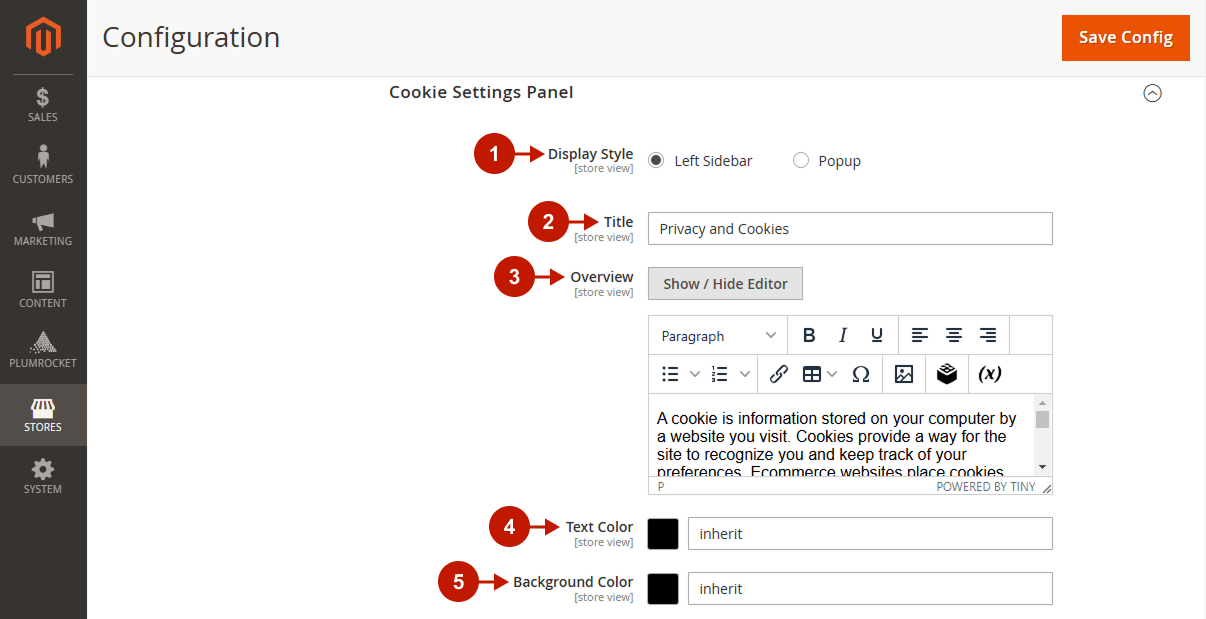
Cookie Settings Panel
Learn how to configure the Cookie Settings Panel. Users can go there by clicking the Settings Button.
Step-by-step guide:
- “Display Style“: select the way you want to show the cookie settings panel to visitors. Select from the Left Sidebar or Popup.
- “Title“: enter the title of the Cookie Settings Panel here.
- “Overview“: enter the overview text of the Cookie Settings Panel.
- “Text Color“: select the color of the text.
- “Background Color“: select the background color of the Cookie Settings Panel.
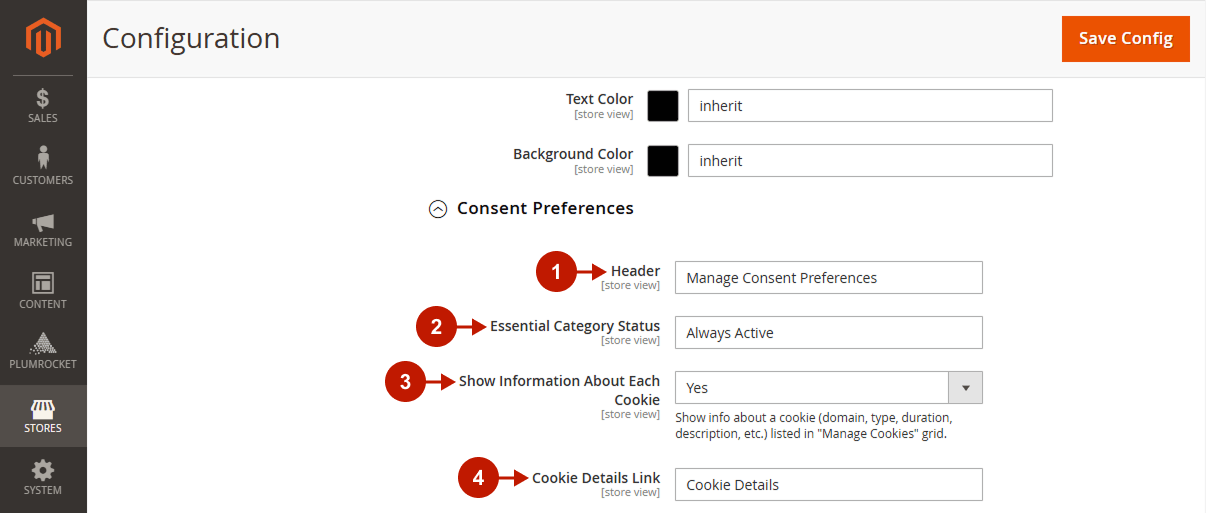
Consent Preferences
Step-by-step guide:
- “Header“: specify the consent preferences header.
- “Essential Category Status“: specify the essential category status.
- “Show Information About Each Cookie“: set “Yes” to display information about a cookie.
- “Cookie Details Link“: type the cookie details link text.
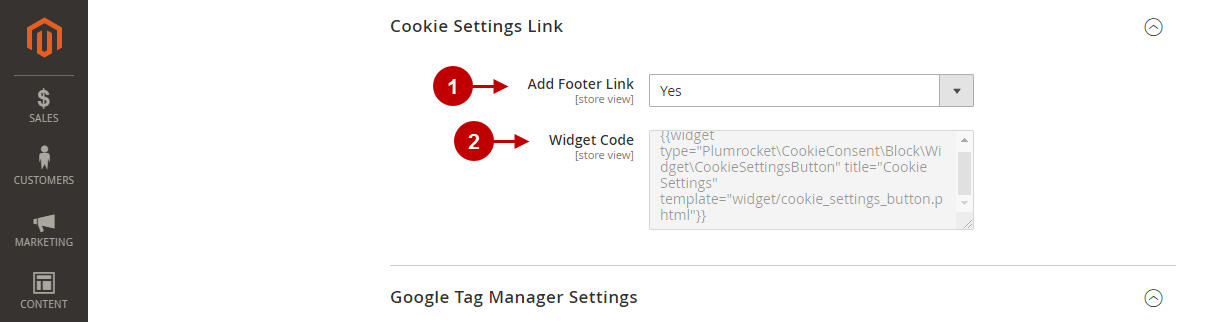
Cookie Settings Link
Step-by-step guide:
- “Add Footer Link“: set to “Yes” if you want to automatically add the “Cookie Settings” link in the website footer. By clicking on this link, your customers and guest visitors can manage their cookie settings at any time. If you want to add this link manually, please use the widget code below.
- “Widget Code“: use this Magento Widget Code to insert the “Cookie Settings” link anywhere across your store. Widgets are useful when you need to manually display the Cookie Settings button in the website footer, Privacy Policy, Cookie Policy page, etc.
Additional Information:
If you have the Data Privacy extension installed (it comes bundled with GDPR, CCPA, and LGPD extensions), the Cookie Settings button is automatically displayed in the My Privacy Center Dashboard. By clicking on it, customers can access the Sookie Settings Panel and change their cookie preferences.
Integrations
Google Tag Manager Settings
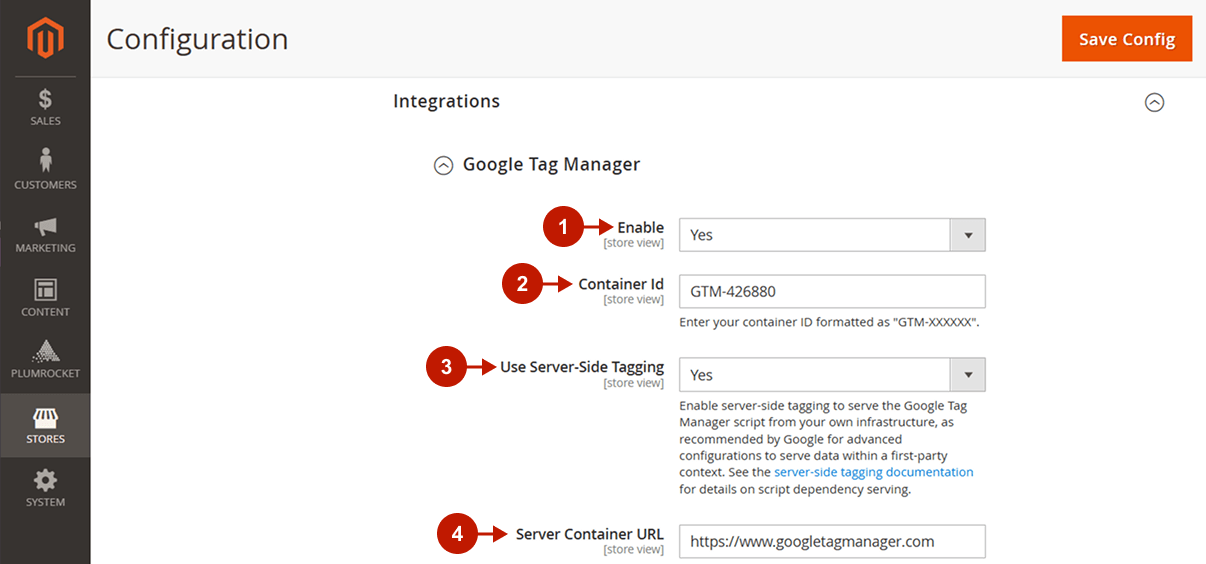
Step-by-step guide:
- “Enable“: set to “Yes” to enable Google Tag Manager.
- “Container Id“: enter your container ID. To find it, go to Tag Manager -> Workspace -> find your container ID at the top of the window, formatted as “GTM-XXXXXX”. If you don’t have a GTM account and Container, please Create a GTM Account using our step-by-step guide.
- “Use Server-Side Tagging”: set “Yes” to enable server-side tagging, which serves the Google Tag Manager script from your own infrastructure for advanced configurations that deliver data within a first-party context, as recommended by Google. Please check the official guide.
- “Server Container URL”: enter the URL of your tagging server. This must be the public URL that receives tracking requests for your server-side tagging setup (e.g. https://gtm.example.com or https://analytics.example.com).
Step-by-step guide:
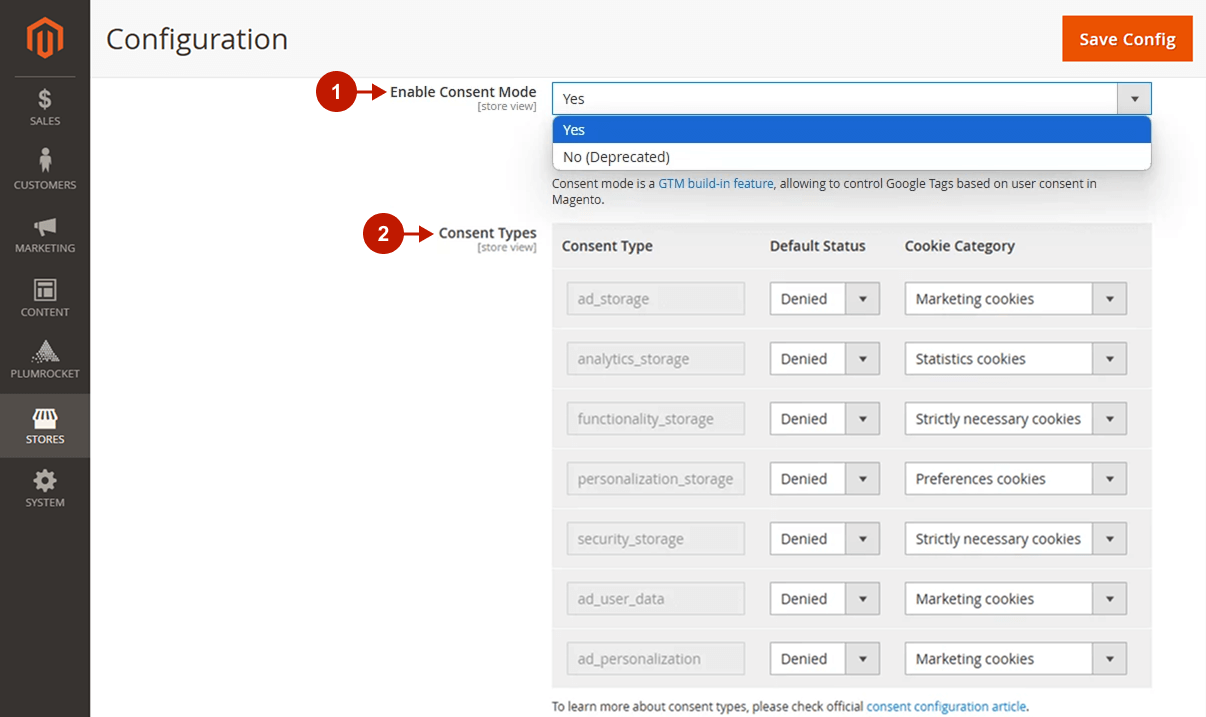
- “Enable Consent Mode“:
- (Recommended) set to “Yes” to enable GTM Consent Mode – a GTM built-in feature that allows you to associate each individual Consent Type with a specific Cookie Category and adjust how the tags behave based on user consent status for these categories. This mode is more flexible and recommended.
- 2. “Consent Types“: set up consent types that are used to control each individual tag firing in Google Tag Manager. Please check our GTM Consent Mode Configuration article to learn how to correctly configure consent types.
- (Deprecated) set to “No” to assign GTM Script to a specific cookie category, so that the entire GTM will be enabled/disabled depending on whether a user agrees to that cookie category.
- (Recommended) set to “Yes” to enable GTM Consent Mode – a GTM built-in feature that allows you to associate each individual Consent Type with a specific Cookie Category and adjust how the tags behave based on user consent status for these categories. This mode is more flexible and recommended.
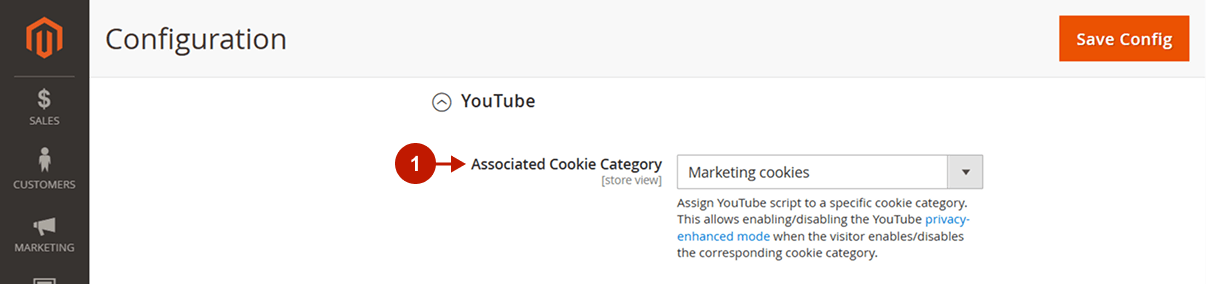
YouTube Settings
Step-by-step guide:
- Choose the Associated Cookie Category for the YouTube script.
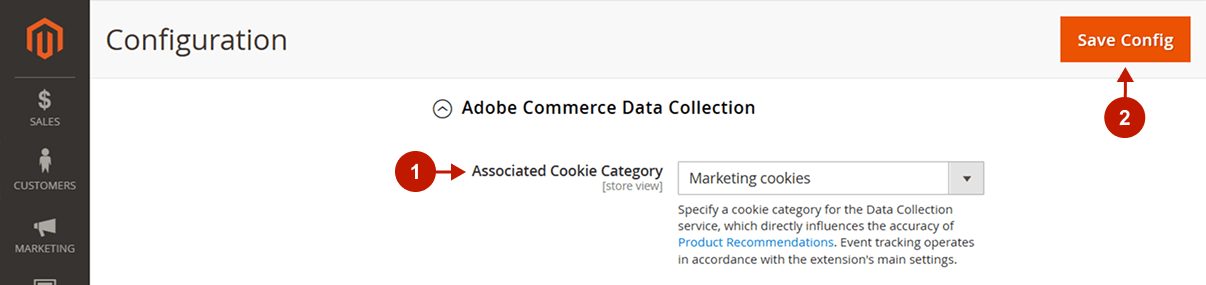
Adobe Commerce Data Collection Settings
Step-by-step guide:
- Choose the Associated Cookie Category for the Data Collection service.
- Save your changes.
Cookie Categories
In the main menu go to the “Plumrocket” tab > select “Cookie Consent” extension > navigate to the “Cookie Categories” section.
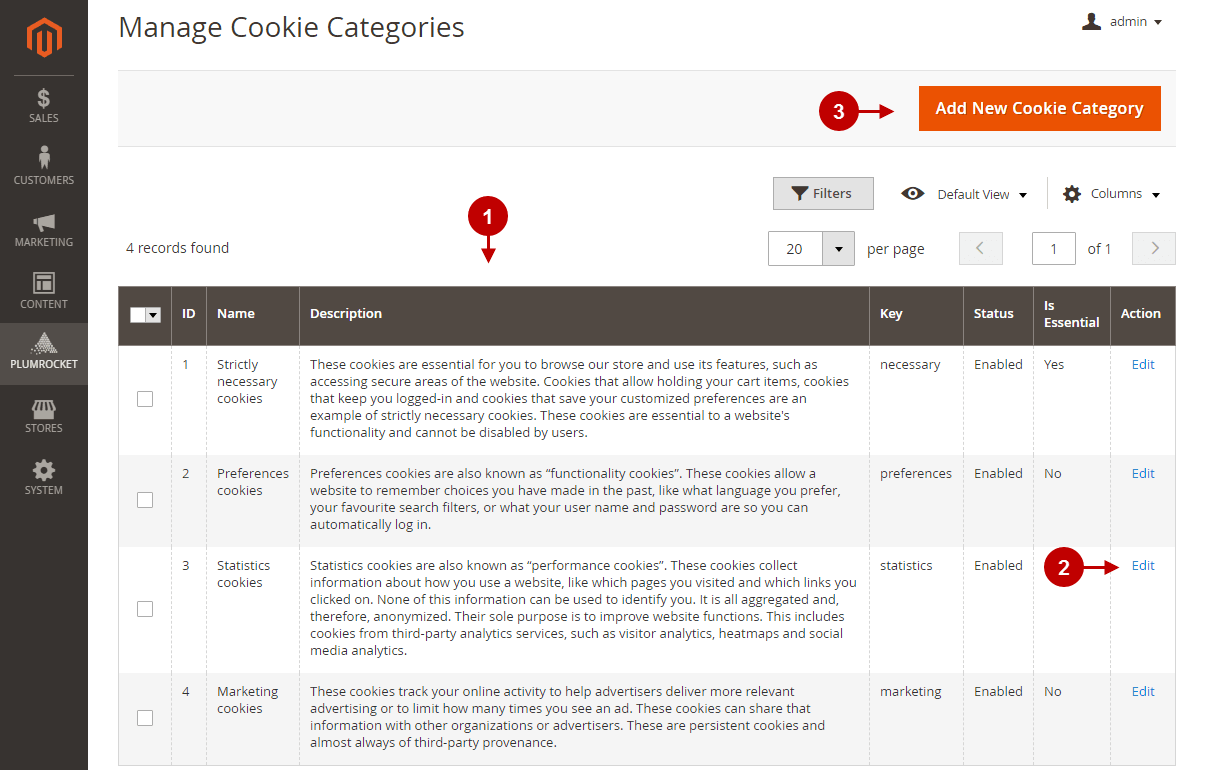
Manage Cookie Categories
In this section, learn how to manage and edit Cookie Categories. Four main categories are created in this module by default, and more than 30 cookies are already categorized for your convenience. These categories are displayed for customers on the Cookie Settings Panel.
Step-by-step guide:
- Manage Cookie Categories Grid allows you to manage available cookie categories and add new ones:
- “Name“: the name of the category.
- “Description“: the full description of the category, namely what cookies are used, the reason, benefits, and more. Customers can read it on the Cookie Settings Panel and decide whether to agree with them or not.
- “Key“: it is a category identifier. The key is used when you need to block cookies manually in the code.
- “Status“: the category with the “Enabled” status is visible on your Magento store frontend.
- “Is Essential“: the cookie category with the “Yes” value is defined as “essential”. Users are not allowed to disable the essential categories in the frontend. An example of essential cookies would be session cookies, persistent cookies, shopping cart cookies, etc.
- “Action“: click on the “Edit” button to be able to enable/disable the category or change its options.
- “Edit“: click the “Edit” button on the particular category line to change the category settings. Go to the Edit Cookie Category section to learn more.
- Click the “Add New Cookie Category” button to add a new category. Follow the Edit Cookie Category steps to get it right.
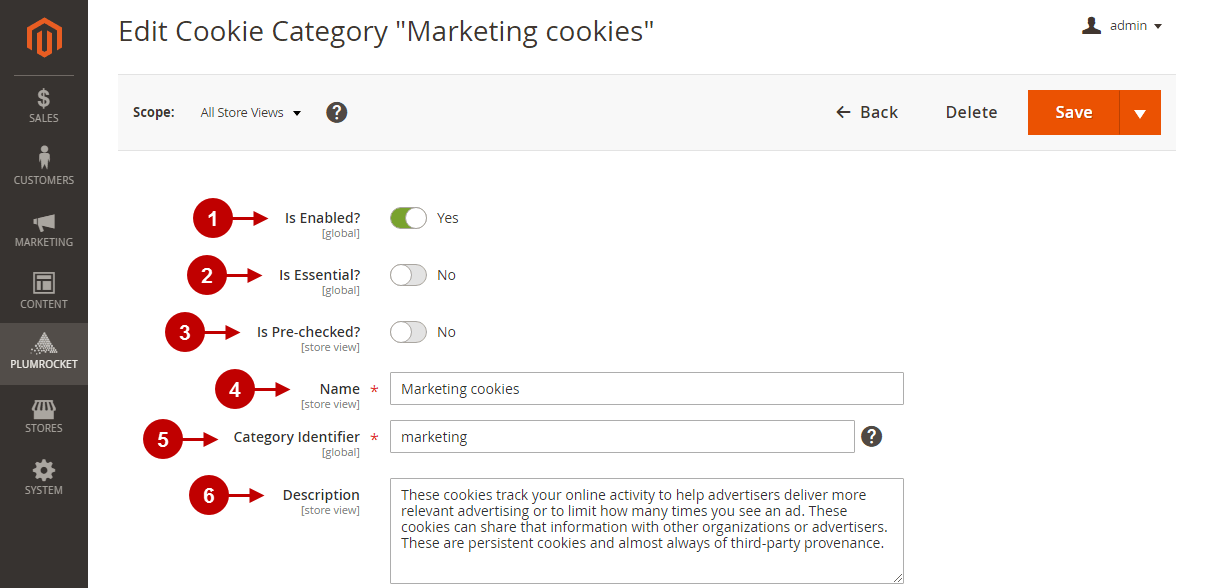
Edit Cookie Category
In this section, you can learn how to edit or add new cookie categories correctly.
Step-by-step guide:
- “Is Enabled?“: this option indicates whether the category is visible on the frontend.
- “Is Essential?“: if the cookie category is defined as “essential”, then users are not allowed to disable it in the frontend. An example of essential cookies would be session cookies, persistent cookies, shopping cart cookies, etc.
- “Is Pre-checked?“: this option indicates whether the category switcher is “ON” by default in the Cookie Settings Panel. Please note, the cookies from this category will be accepted only after a visitor confirms the choices.
- “Name“: enter the name of the category here.
- “Category Identifier“: enter the category identifier in this field. It is useful when you need to block cookies manually in the code. We recommend using the following identifiers for default Cookie Categories: “necessary”, “preference”, “statistic”, and “marketing”. See our Developer Guide for more info.
- “Description“: enter the full description of the category, namely what cookies are used, the reason, benefits, and more. Customers can read it on the Cookie Settings Panel and decide whether to agree with them or not.
Step-by-step guide:
- “Sort Order“: enter a category position in the “Cookie Settings Panel”. The category with a value of 0 will be displayed in the first position.
- “Head Scripts“: in this field, enter scripts and HTML that will be included right after the opening <body> tag. They will be executed if a customer enables the corresponding cookie category.
- “Footer Miscellaneous HTML“: in this field, enter scripts and HTML that will be included right before the closing </body> tag. They will be executed if a customer enables the corresponding cookie category.
- “Save“: press the Save button to save your changes.

Cookies
Learn how to manage, edit and add new cookies in this section.
In the main menu go to the “Plumrocket” tab > select “Cookie Consent” extension > navigate to the “Cookies” section.
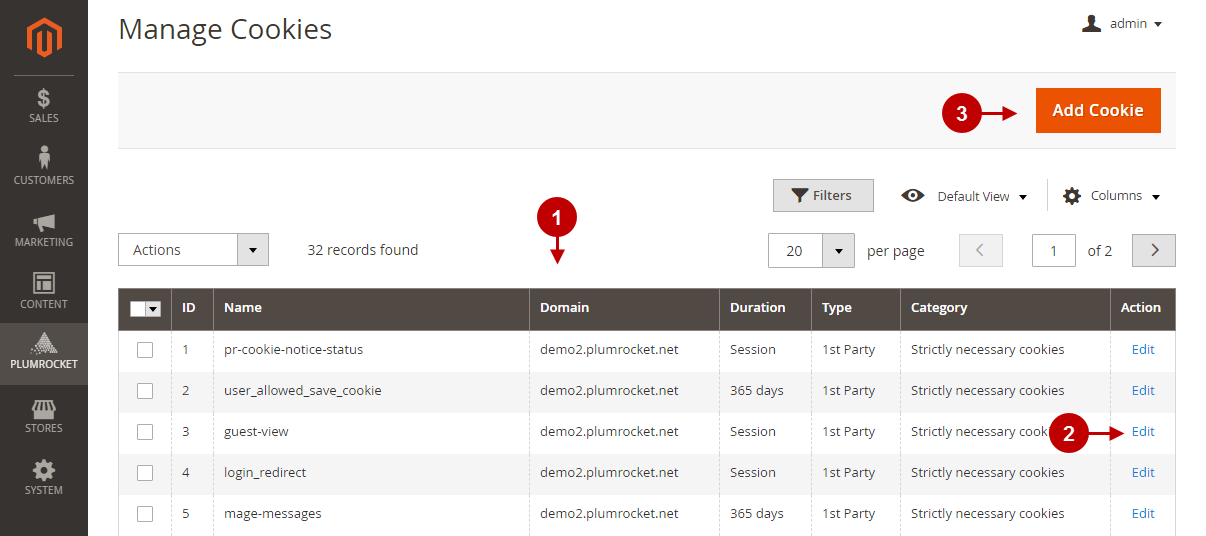
Manage Cookies
Step-by-step guide:
- Manage Cookies Grid allows you to keep track of all used cookies, manage and edit them:
- “Name“: the name of the cookie.
- “Domain“: the domain for which the cookie is valid.
- “Duration“: the period when the cookie expires. When set to 0 or omitted, the cookie will expire at the end of the session.
- “Type“: the type of cookie determines whether it is set by Magento store or a third-party service.
- “Category“: displays the name of the category to which this cookie belongs to.
- “Action“: the “edit” button is clickable and allows you to edit a cookie.
- “Edit“: see the Edit Cookie section to learn more about how to edit a cookie.
- “Add Cookie“: click on this button to add a new cookie. Follow the Edit Cookie instructions to get it right.
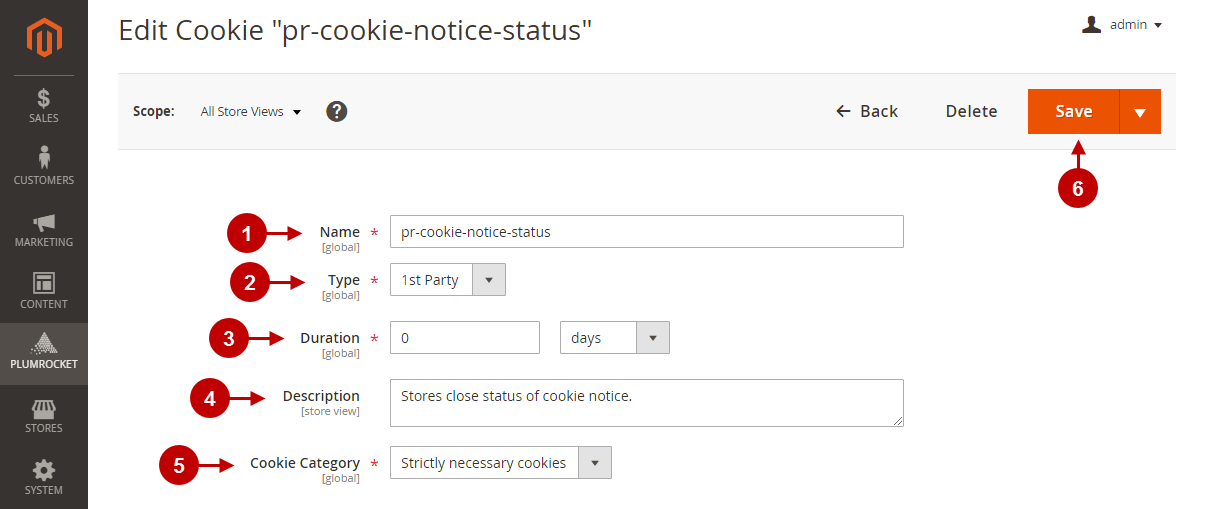
Edit Cookie
Follow the steps below to edit or add cookies correctly.
Step-by-step guide:
- “Name“: enter the name of the cookie in this field.
- “Type“: specify the type of the cookie here. The first-party cookie is set by your Magento store. A third-party cookie is set by a third-party service via code loaded on your website. If you selected the third-party cookie type, you need to enter the domain for which the cookie is valid in the latter field. If this attribute is not specified, the Magento base URL is used as the default value.
- “Duration“: set the period when the cookie should expire. If set to 0 or omitted, the cookie will expire at the end of the session (when the browser closes).
- “Description“: enter the description of the cookie on this field.
- “Cookie Category“: select the category of the cookie you created earlier.
- “Save“: press on the Save button to save the changes.
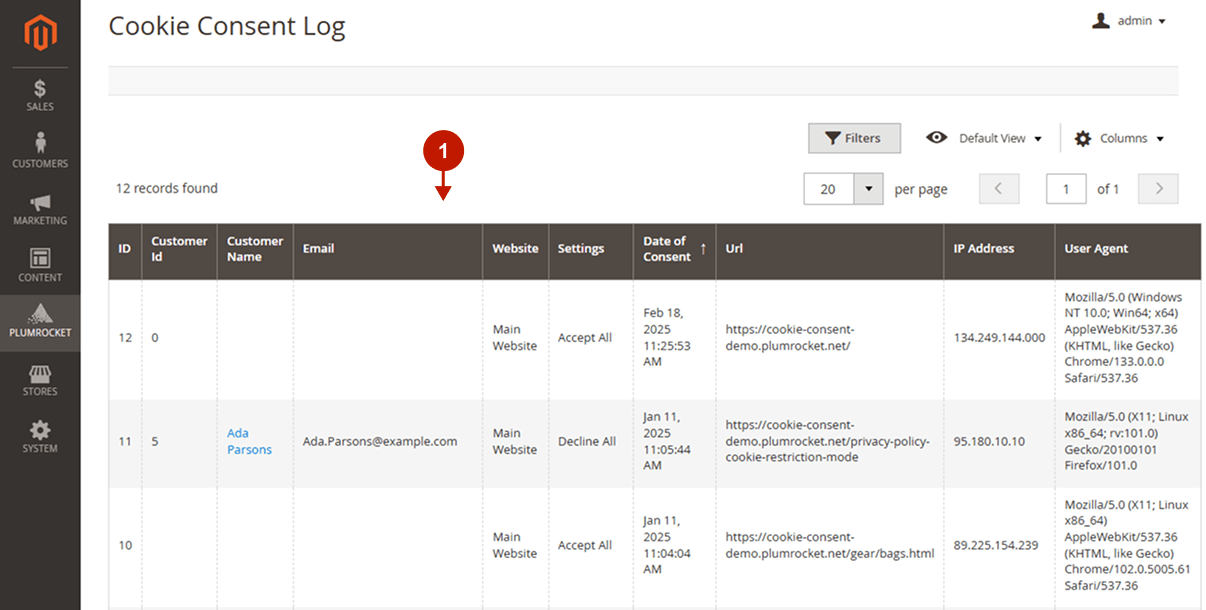
Cookie Consent Log
Some of the data protection laws require storing collected cookie consent data. Whenever a user gives consent or declines it, the extension records it in the log.
In the main menu go to the “Plumrocket” tab > select “Cookie Consent” extension > navigate to the “Cookie Consent Log” section.
Step-by-step guide:
- Cookie Consent Log Grid allows you to view all collected information about users’ cookie consents:
- “Customer ID“.
- “Customer Name“: the customer name. Click on it to see the customer information.
- “Email“: a customer email.
- “Website“: the website collected cookies.
- “Settings“: the information about a user’s declined or accepted cookies in Cookie Settings Panel.
- “Date of Consent“: the date when a user gave consent.
- “Url”: the URL of the page where the consent was opt-in.
- “IP Address”: a user’s IP Address.
- “User Agent”: information about the user’s browser.
Important Information:
This Cookie Consent Extension is based on a IP Geolocation Lookup Extension. The IP Address Geolocation plugin is free and included in this package. Please, click here to learn how to configure it correctly.