Caching is the main part of any web server. With platforms like Magento 2, it is more important to install the cache for one essential reason. It can drastically reduce the load on your online store and speeds up the page response which improves performance and user experience, and enhances sales. Among the variety of cache options on today’s market, Varnish is one of the most popular to consider. So, let’s explore the importance of Magento 2 Varnish and find out the steps of its installation on your store.

What is Varnish and How Does It Work with Magento 2
Varnish Cache is an open-source web application accelerator that is designed for content-heavy dynamic websites like Magento 2. Since Varnish is used only with HTTP protocol, it is also known as caching HTTP reverse proxy. However, there is a possibility to configure Varnish with HTTPS protocol with the help of NgniX acting as a proxy.
If you are running Magento 2, it is essential to know that the platform supports Varnish 4.x and 5.x. Below, you can see a basic view of Varnish in your Magento topology:
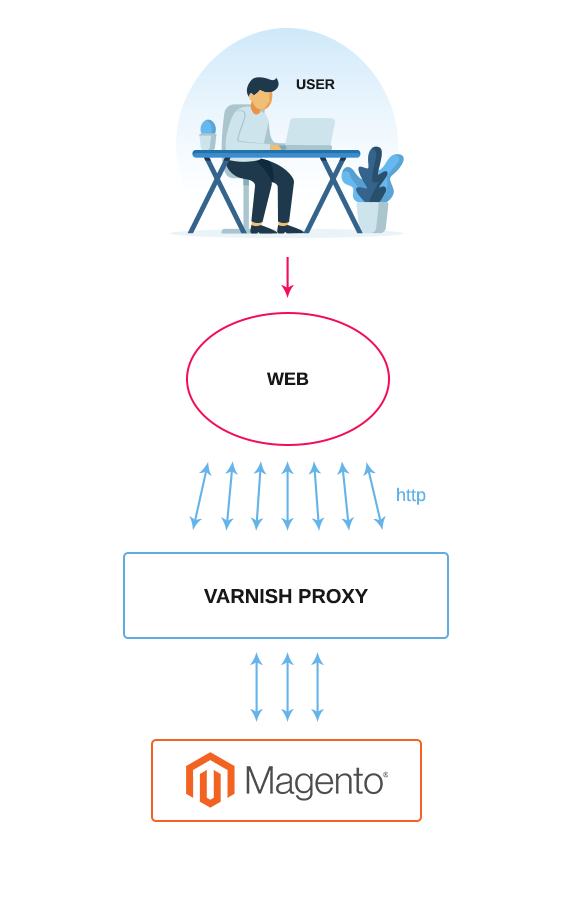
As you can see in the preceding figure, HTTP requests to the webserver result in a number of requests for CSS, HTML, JavaScript, and images. All of them are also called assets. Varnish Сache goes next and passes all requests to the web server.
Since the web server returns the assets, the cacheable assets are stored in Varnish. Any future requests are fulfilled by Varnish which means the requests no longer reach the server. As a result, Varnish returns the cached content very quickly. Hence, you get a faster response time to return content to visitors and a reduced amount of requests passing straight to Magento 2.
It is important to remember that assets cached by Varnish either expire automatically at a configurable interval or are replaced by newer versions of the same assets. Also, you can clear the cache manually in 2 different ways:
1) Using the web interface, follow the path:
Magento Admin Panel→System→Cache Management
After that, click “Flush Magento Cache”
2) Using the command line, run the command:
$ php bin/magento cache:cleanNote, Magento recommends using Varnish in production since built-in full-page caching is much slower than Varnish Proxy.
How to Benefit from Magento 2 Varnish as HTTP Processor
Varnish includes Varnish Configuration Language (VCL) that is the core configuration mechanism for this cache. It is a domain-specific language (DSL) used for writing hooks. The hooks are called at critical points of request handling.
Compared to other HTTP caches, VCL makes Varnish more adjustable and configurable. After being loaded, a VCL script is translated to С and compiled to a shared object by the system compiler. Then it is loaded straight into Varnish that can be configured without a restart.
Each request passes through Varnish which lets you influence which way the request is handled. All you require is to change the VCL code. To be more specific, you can:
- assign certain requests to particular backends;
- alter the requests and responses;
- make Varnish perform various actions relying on the request properties.
So, that’s exactly why Varnish stands out among other HTTP processors. Keep reading to learn how to set up Varnish for your Magento 2 store in the right way.
How to Install and Configure Varnish Cache with Apache 2 Web Server
Now, when you have become acquainted with the main advantages of Magento 2 Varnish, it is important to learn the process of cache installation with the platform. However, before completing a task, you should set up Varnish with Apache 2 by taking the following steps:
1. Go to Console and use the command to start installing Varnish:
$ sudo apt-get install varnish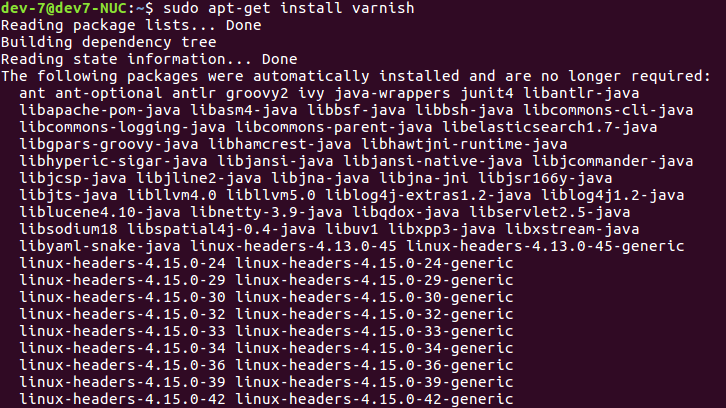
2. If you want to disable, enable or turn on Varnish automatically, you can execute the following commands:
$ sudo systemctl stop varnish.service
$ sudo systemctl start varnish.service
$ sudo systemctl enable varnish.service
3. To check Varnish’s status, you should run the command:
$ sudo systemctl status varnish.service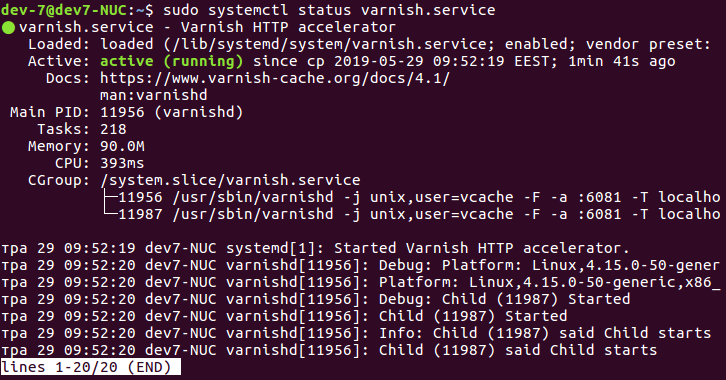
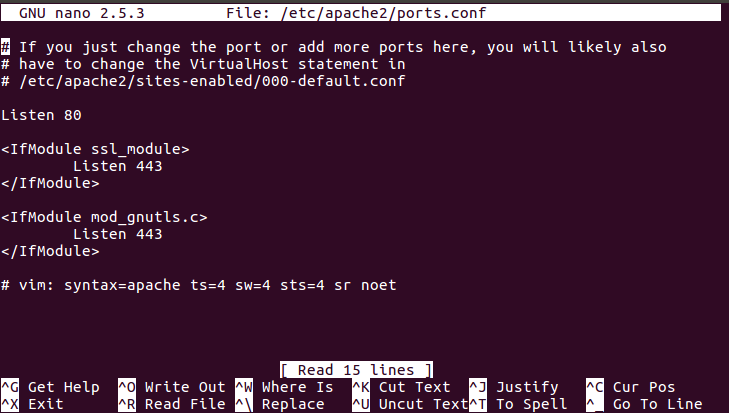
4. It is important to configure Varnish to listen to all traffic on Port 80 that is a default port for Apache 2. In this case, you should use a different port like 8080 for this web server. To put the rules that redirect all the traffic from port 80 to 8080, open the file with the help of the command:
$ sudo nano /etc/apache2/ports.confand change line Listen 80 to Listen 8080
5. The next step is to modify your Virtualhost configuration. In our case apache virtual host configuration file is located here:
$ sudo nano /etc/apache2/sites-available/000-default.confThen, change line <VirtualHost *:80> to <VirtualHost *:8080>.
6. After that, you should restart Apache2 by running the following command in the file:
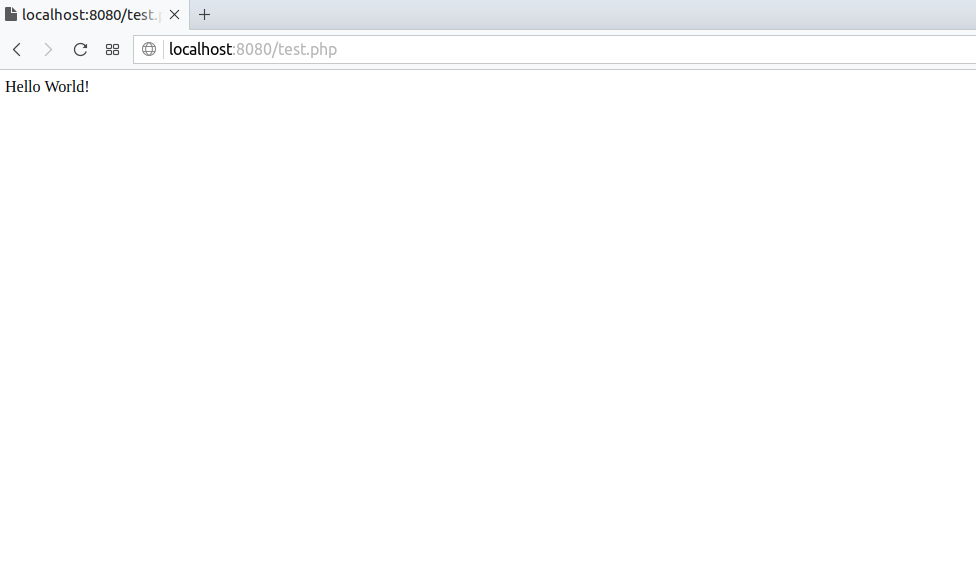
$ sudo systemctl restart apache2.service7. Now, you can see that the Apache web server works on 8080 port:
8. Now, you should set up Varnish to listen to Port 80. Open the file:
$ sudo nano /etc/default/varnishThen, insert the code:
DAEMON_OPTS="-a :80 \
-T localhost:6082 \
-f /etc/varnish/default.vcl \
-S /etc/varnish/secret \
-s malloc,256m"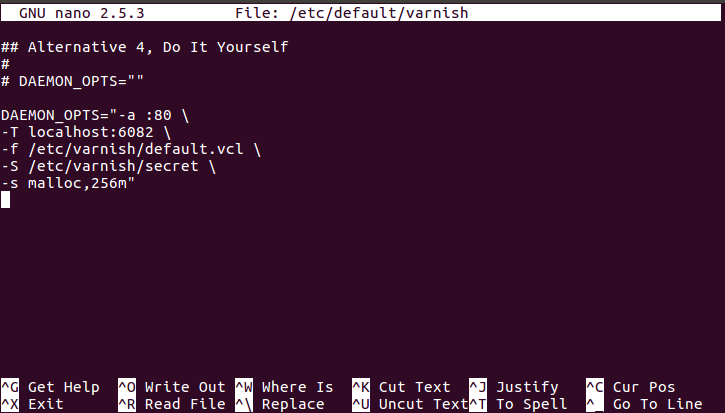
9. Open file /etc/varnish/default.vcl and set up the following parameters:
backend default {
.host = "127.0.0.1";
.port = "8080";
}
10. Insert the configurations in the file:
$ sudo nano /lib/systemd/system/varnish.serviceChange the line:
ExecStart=/usr/sbin/varnishd -j unix,user=vcache -F -a :6081 -T localhost:6082 -f /etc/varnish/default.vcl
with
ExecStart=/usr/sbin/varnishd -j unix,user=vcache -F -a :80 -T localhost:6082 -f /etc/varnish/default.vcl
11. Restart Varnish and Apache2 with commands:
$ sudo systemctl restart apache2.service
$ sudo systemctl restart varnish.service
12. Let’s check if Varnish listens to port 80 and Apache2 to port 8080 properly. So, run the command:
$ netstat -plunt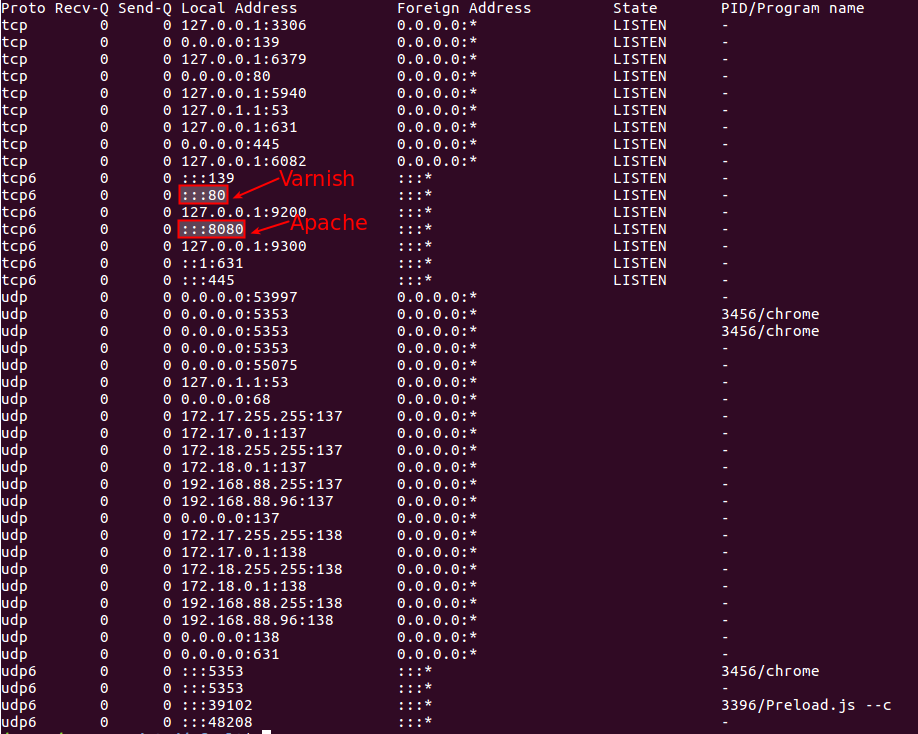
13. Now, it is time to check the results. View the browser response header and find the records:
Via: 1.1 varnish-v4
X-Varnish: 32779
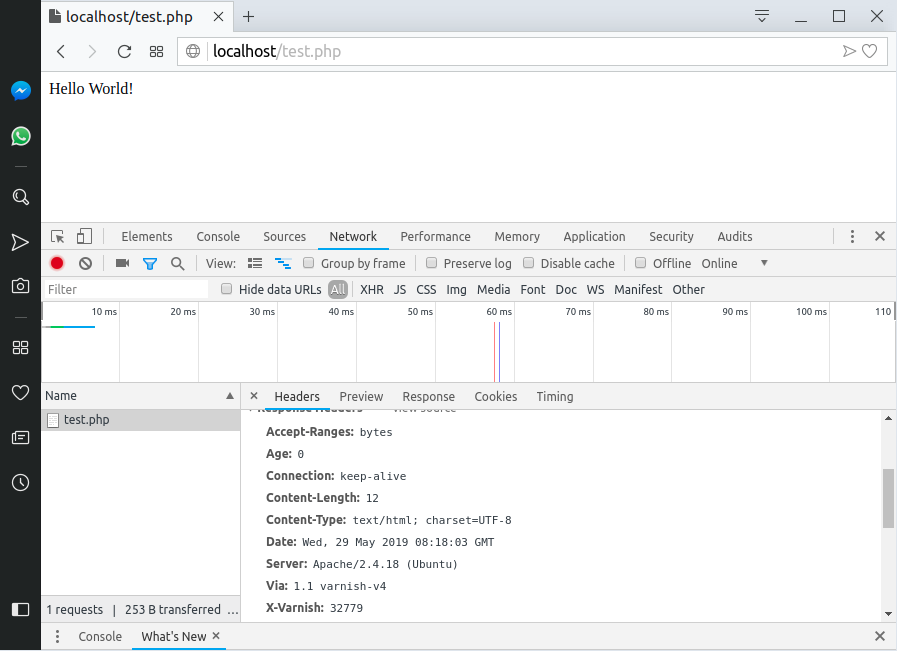
If the above-mentioned records are present, it means the page content is received from Varnish Cache. Also, you can check whether Varnish works properly with the help of Varnish logs by running the command:
$ varnishlog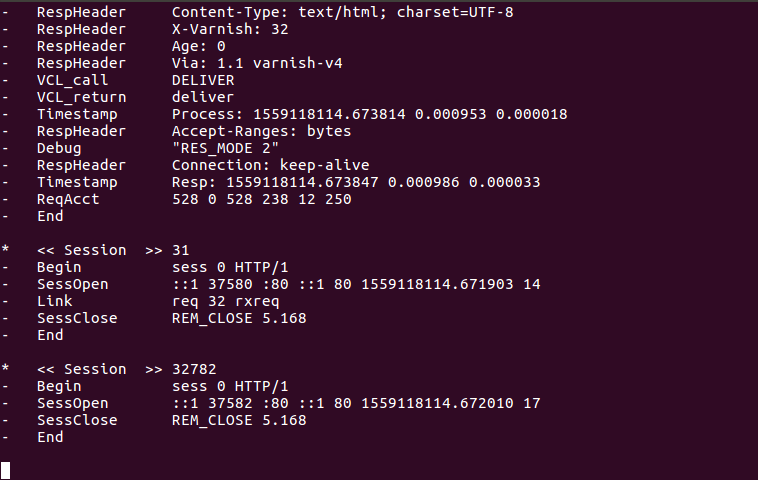
In case you want to make your online store faster and don’t know how, check out the Magento 2 Speed Optimization: Step-by-Step Instructions article for useful insights.
How to Set Up Magento 2 Varnish Easily
All in all, after the successful configuration of Varnish with Apache2, you are ready for Magento 2 Varnish setup. So, consider the following steps:
Step 1. Go to Magento 2 cache configurations
Go to Magento 2 cache configurations: Store > Configuration > System > Full Page Cache
Step 2. Set up Backend Host and Backend Port
Fill out Backend Host and Backend Port fields in accordance with your Varnish configurations. For example, if you performed all steps from this manual, your settings will look like the screen below.
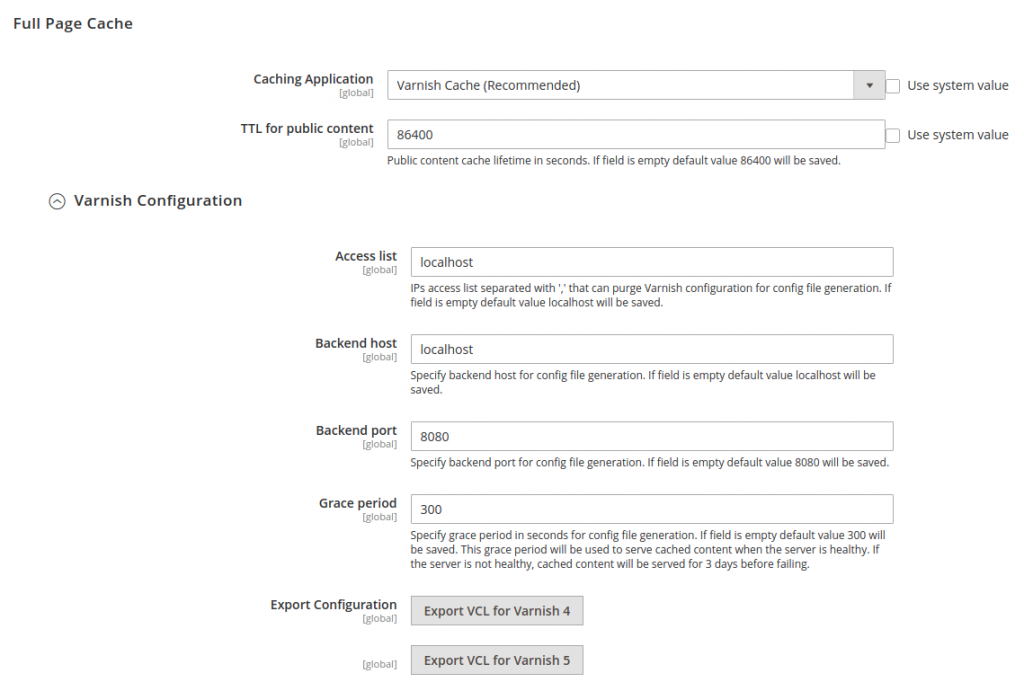
Press the “Save” button in the right corner.
Step 3. Export VCL for Varnish 4
Then, click “Export VCL for Varnish 4” for Varnish generation with your Magento 2 Varnish version.
Step 4. Replace the default Varnish configuration
After that, you should replace the default Varnish configuration /etc/varnish/default.vcl with the configuration exported from your Magento 2 store. Run the following commands:
$ cp /etc/varnish/default.vcl /etc/varnish/default.vcl.bak2
$ mv <download_directory>/varnish.vcl default.vcl
$ cp <download_directory>/default.vcl /etc/varnish/default.vcl
Step 5. Restart Varnish
Finally, restart Varnish with the command:
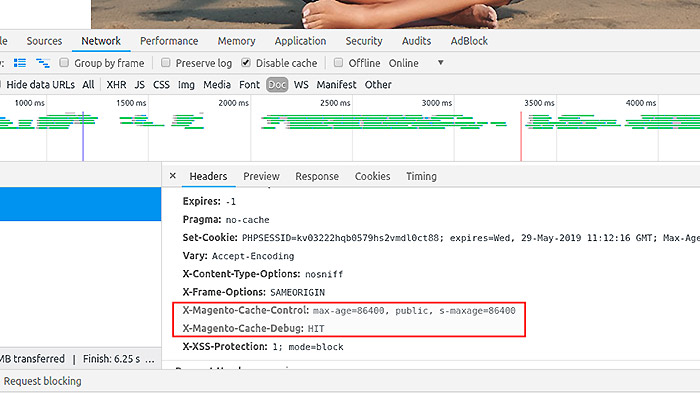
$ sudo systemctl restart varnish.serviceNow, your Magento 2 online store works with Varnish Cache. Just open your store in the browser and check the page headers using browser developer tools.
As you can see, Magento 2 Varnish Cache configuration takes a lot of steps to complete a task. In order to avoid missing any details during the process, you can ask the Plumrocket team for professional help. So, get a quote to estimate the time and cost of your Magento 2 Varnish implementation.
Wrapping Up
By and large, Varnish can provide a number of benefits for your Magento 2 online business starting from improved website speed & performance to enhancing customer experience. Also, Varnish continues serving cached content to visitors even if your site is unresponsive. And if you ever run into any challenges or are short on time to configure Varnish and Magento in the right way, don’t hesitate to contact the Plumrocket team of professionals.