Cloudflare is a service (content-provider) that allows speeding up of the work of the Magento online shop. It helps to protect your store from the threat of a variety of harmful bots, blocking them before they “hit” the server (it has Built-in Security). This prevents the server from losing traffic and resources which in turn leads to speed improvement. Cloudflare uses CDN technology, a geographically distributed network infrastructure that allows you to distribute content to the end-users on the Internet.

How Cloudflare Works
If a website works through CloudFlare, its traffic is redirected through the intelligent global service network where the delivery time is optimized so the visitors can quickly get to the desired web page. Check out the following diagram that displays how the website works with and without Cloudflare implementation:

As you can see, the static data from Cloudflare websites are cached in the global service network. In other words, the static data gets cashed when the users visit the website, so they don’t interact directly with the server where the site is located. It allows the user to save server bandwidth, protect it from different types of bots and attacks, as well as increase the website performance.
If you want to improve your website performance and avoid missing any details during Magento and Cloudflare integration, you can take advantage of the Magento Speed Optimization Service offered by Plumrocket.
How to Set Up Magento with Cloudflare
Since Cloudflare plays an essential role in Magento optimization by allowing you to improve the website load speed, it is essential to know the main steps of Magento and Cloudflare configuration:
Step 1. Create an account at Cloudflare & add your website to the service
Create an account, and add your website to the service. Cloudflare provides customers with free CDN, yet if you want to use more features, it is required to use a paid plan that includes additional optimisation tools:
- Image optimisations with Polish;
- Mobile optimisations with Mirage;
- More Page Rules included.
Find more information about Cloudflare subscriptions here.
Step 2. Set up Magento store Base URLs
After completing the steps on the Cloudflare side, you need to set up the Magento store backend:
For Magento 1:
- Go to System menu -> Configurations -> General -> Web
- Open the Unsecure and Secure sections and change the Base URL to http://www.example.com and https://www.example.com accordingly. Then, clear the cache.
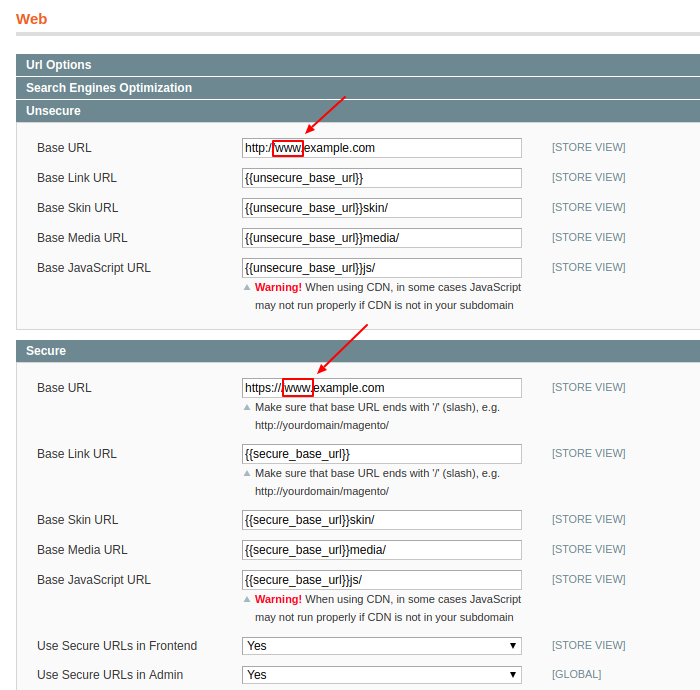
For Magento 2:
- Go to the STORES menu -> Configuration -> General -> Web
- Open Base URLs and Base URLs (Secure) and change the Base URL to http://www.example.com and https://www.example.com accordingly, and clear the cache.
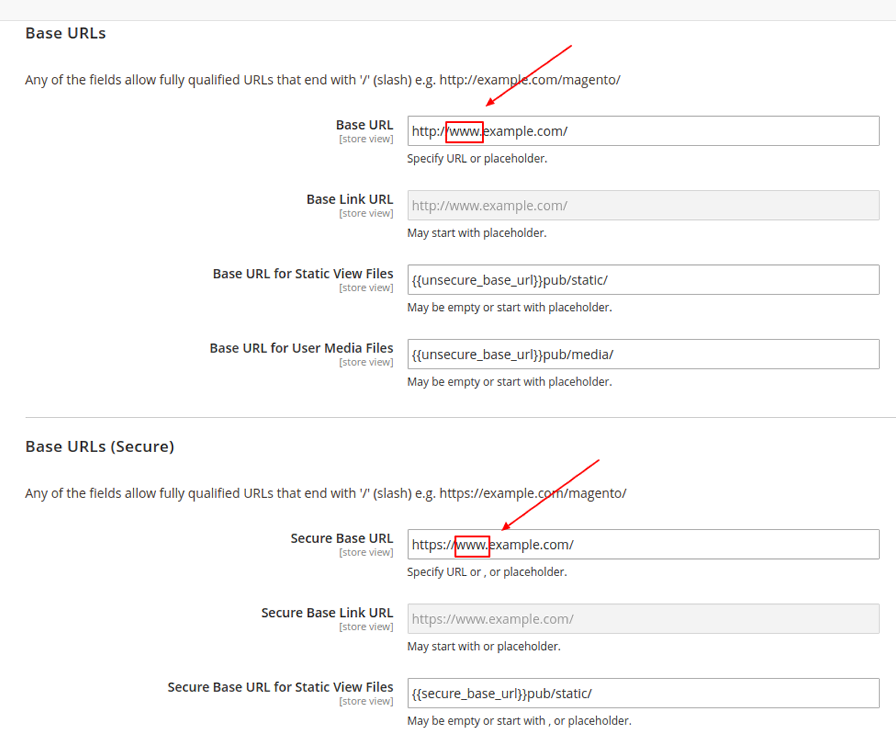
So, if you complete the above-mentioned steps, your Magento online store will easily work with Cloudflare. However, if you want to achieve the best results for your website performance and avoid any errors, it is suggested to make additional Cloudflare settings.
Step 3. Manage cryptography settings for your website
Go to the Cloudflare control panel and select Crypto in the menu. If you use SSL for your website, select SSL Full. In this case, the connection between the user and Cloudflare, and the connection between Cloudflare and the server where the site is hosted will be done via HTTPS.
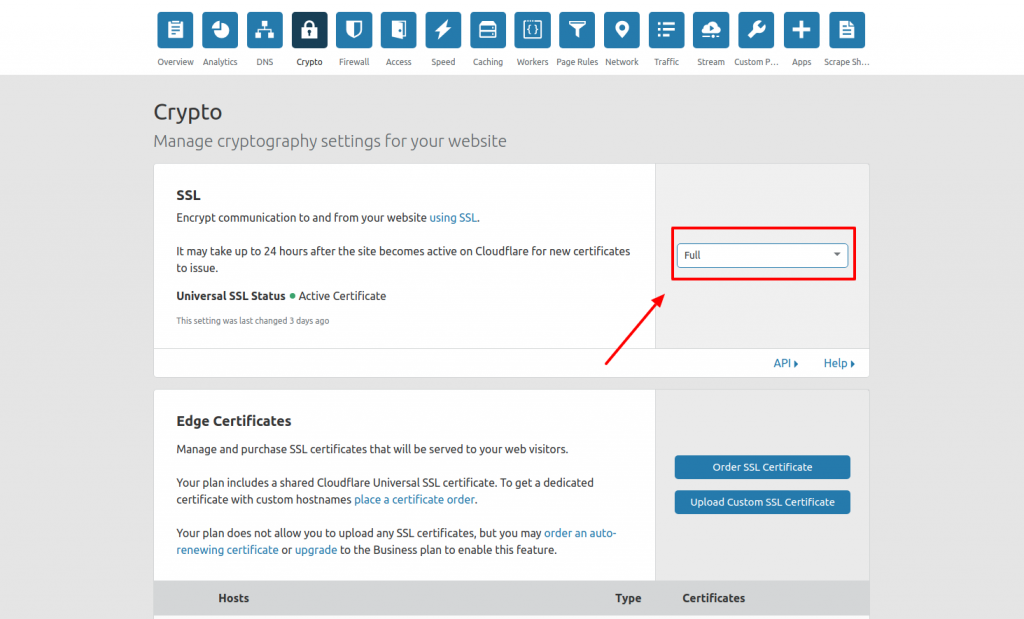
In case you can’t install the SSL certificate for your site, but need to provide access to the site via HTTPS using Cloudflare, you should select the SSL Flexible for SSL option in the Crypto Menu. Thus, the site will be available via HTTPS, and Cloudflare will have access to the server via HTTP.

Note: when you use the SSL Flexible parameter, you can face the looping problem – ERR_TOO_MANY_REDIRECTS.
The looping problem occurs when the value of SSL Flexible is selected. When a user navigates to the site, Cloudflare sets variables on the server, showing that access is provided through port 443 via HTTPS. Meanwhile, Cloudflare is making a call to the origin server (where the Magento store is located) through port 80 via HTTP. Magento takes into account the previously passed Cloudflare variables to the server and redirects to HTTPS. As a result, you will see a loop between Cloudflare and your server. In order to solve this issue, you should consider adding the following directive to your .htaccess file:
● For Apache server set directive:
SetEnvIf HTTPS On HTTPS = on
● For Nginx server:
SetEnvIf X-Forwarded-Proto https HTTPS = on
Step 4. Manage performance settings for your website
Now, go to the Speed menu to manage website performance. There, take into consideration the following functions:
- Auto Minify – provides minification of JavaScript, CSS, and HTML – it is recommended to enable it.
- Polish – allows you to optimize pictures by reducing their size without losing quality, helping to decrease loading time.
- Railgun – offers you to compress previously uncached web objects up to 99.6% by applying methods similar to those used when compressing high-quality videos. As a result, average productivity will be increased up to 200%. Note, this feature is only available for Pro accounts.
- Enable Accelerated Mobile Links – use Cloudflare to identify the links that contain AMP content and convert them to AML after enabling AML for your website. When a user clicks on an AMP link, Cloudflare starts displaying this page inside the iframe by extracting it from its cache.
- Brotli – accelerates the page load time for HTTPS traffic using the brotli compression algorithm.
- Mirage (Beta) – allows you to increase website page load speed on mobile devices with a slow internet connection.
- Rocket Loader – is an asynchronous JavaScript loader combined with a browser, that can safely run any JavaScript code on the client’s side.
* Note: Mirage and Accelerated Mobile Links are currently running in Beta mode.
Step 5. Set up Page Rules
Cloudflare has the ability to customize Page Rules that allows you to select or remove the features on the specified pages of the site. You can find more information on how to set up its Page Rules here.
Problems That May Occur When Using Rocket Loader
Among the various Cloudflare tools, Rocket Loader provides you with an opportunity to benefit from the following functionality:
- Download all scripts asynchronously
- Combine all script requests to a single request that can get multiple responses
- Use Local Storage for most browsers and save scripts there
- Avoid a process of downloading scripts every time
Even though Rocket Loader offers a number of advantages, the beta version of the tool can lead to some issues. For instance, you may have a case when third-party scripts (like googleapis script) are used on several website pages. Rocket Loader is enabled on the Product Page and disabled on the Magento Checkout page using the Disable Performance option. When the Rocket Loader is applied to the script at least on one page, this script with Rocket Loader will be applied to all website pages. As a result, the Checkout page will not work or load properly due to the occurred error.
If you want to resolve the above-mentioned issue, it is important to reconfigure the rules for the Checkout Page. There is a possibility to enable and disable the Speed Menu functions on the separate website pages. So, go to Page Rules settings for website pages and add a new rule.
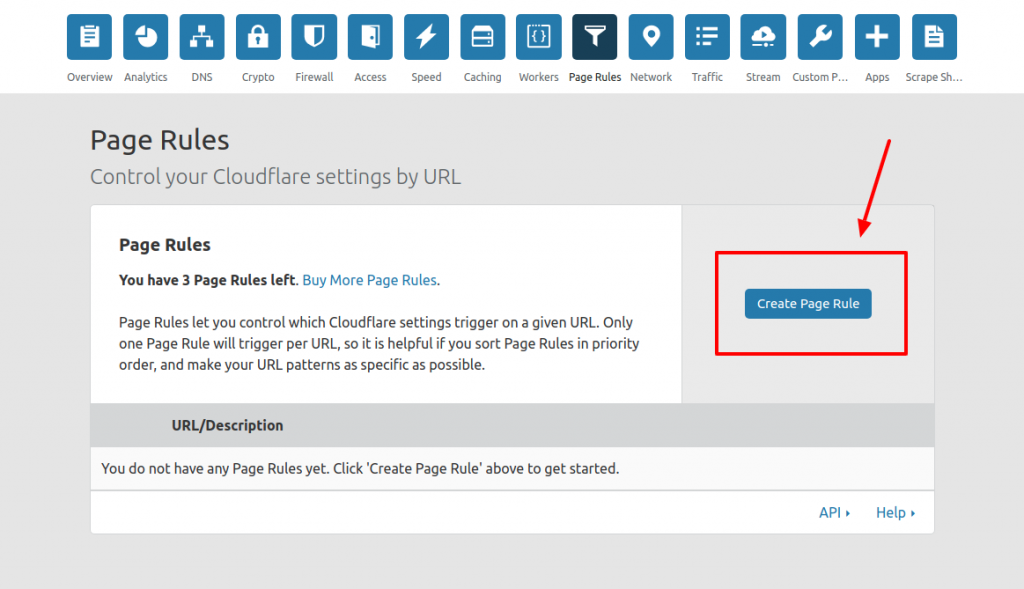
Then, select the following options in the Rule Settings:
- Rocket Loader Off
- Disable Performance
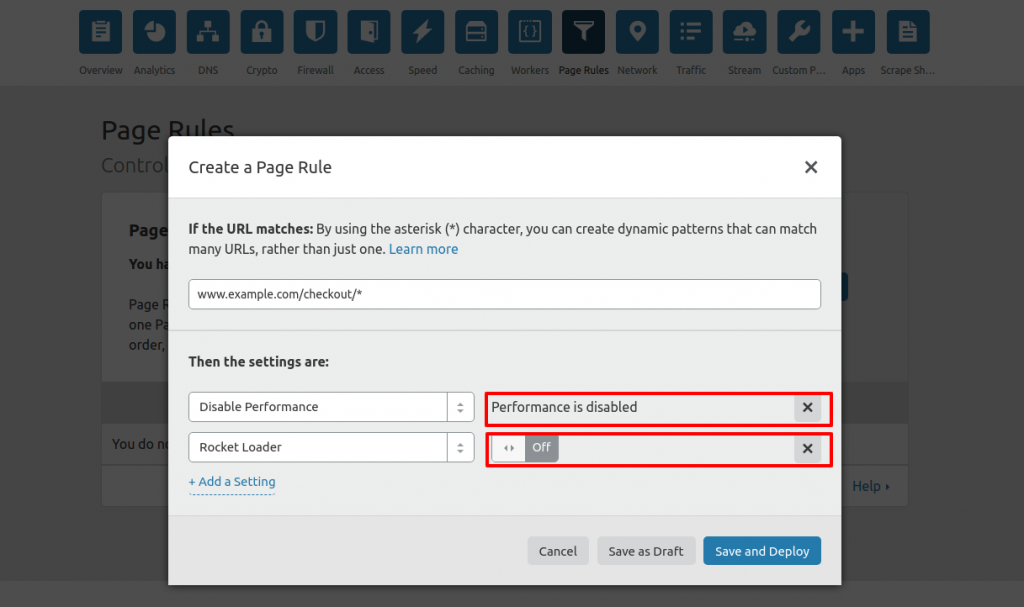
Hence, the Rocket Loader function will be disabled for the Checkout Page and will not be applied for that particular page and script.
Conclusion
As you can see, Cloudflare improves the security and performance of your Magento website, as well as decreased bandwidth. Since Cloudflare and Magento integration is a part of the Magento Speed Optimization Service provided by Plumrocket, select one of the most suitable plans and get the professional team to enhance Magento speed significantly.Step 4
