Integrating affiliate programs into an online store is an excellent opportunity to increase its audience and sales. There are plenty of affiliate programs available so that online retailers can always find beneficial conditions for collaboration.
Among different types of affiliate programs, Pay Per Sale (PPS) and Pay Per Lead (PPL) are the most commonly used. In the PPS program, the tracking code is placed on the checkout success page to confirm that the purchase was successful, while the PPL program tracks account registrations.
Affiliate programs rely on JS tags, also known as pixels, to track conversions. However, adding them to a Magento 2 website can cause some difficulties for people who are not tech-savvy. This tutorial provides a general understanding and a detailed guide on how to add a Magento 2 affiliate tracking code to the checkout page for the Pay Per Sale program.
Let’s discuss two options for adding Magento 2 affiliate tracking code:
1. How to Add a Magento 2 Affiliate Tracking Code Using a Custom Module
To begin with, you need to create a custom Magento module. For this, you need to create a folder hierarchy from the root of the Magento app/code/Vendor/Module, where you should replace Vendor and Module with your own values.
Please note: In the code snippets below, we changed Vendor_Module to Developer_AffiliateTracking, as an example. So, while using these snippets, don’t forget to substitute your own values.
Next, in the module, you need to create the registration.php file and the etc/module.xml file with the following content:
<?php

use Magento\Framework\Component\ComponentRegistrar;

ComponentRegistrar::register(ComponentRegistrar::MODULE, 'Developer_AffiliateTracking', __DIR__);
<?xml version="1.0"?>
<config xmlns:xsi="http://www.w3.org/2001/XMLSchema-instance" xsi:noNamespaceSchemaLocation="urn:magento:framework:Module/etc/module.xsd">
    <module name="Developer_AffiliateTracking" >
        <sequence>
        </sequence>
    </module>
</config>
Since the PPS program tracks the fact of product purchases, the affiliate tracking code for Magento must be added to the checkout success page. To do this, create a view/frontend/layout/checkout_onepage_success.xml file within the module and add the following code:
<?xml version="1.0"?>
<page xmlns:xsi="http://www.w3.org/2001/XMLSchema-instance" layout="1column" xsi:noNamespaceSchemaLocation="urn:magento:framework:View/Layout/etc/page_configuration.xsd">
    <body>
        <referenceContainer name="content">
            <block class="Developer\AffiliateTracking\Block\TrackingCode" name="affiliate.tracking.code" template="Developer_AffiliateTracking::tracking_code.phtml" before="-"/>
        </referenceContainer>
    </body>
</page>
Next, for the layout to work correctly, you need to create two additional files: Block/TrackingCode.php and view/frontend/templates/tracking_code.phtml, with the following code:
<?php

declare(strict_types=1);

namespace Developer\AffiliateTracking\Block;

use Magento\Checkout\Model\Session;
use Magento\Customer\Model\Session as CustomerSession;
use Magento\Framework\View\Element\Template;

class TrackingCode extends Template
{

    /**
     * @var \Magento\Checkout\Model\Session
     */
    private Session $checkoutSession;

    /**
     * @var \Magento\Customer\Model\Session
     */
    private CustomerSession $customerSession;

    /**
     * @param \Magento\Checkout\Model\Session                  $checkoutSession
     * @param \Magento\Customer\Model\Session                  $customerSession
     * @param \Magento\Framework\View\Element\Template\Context $context
     * @param array                                            $data
     */
    public function __construct(
        Session $checkoutSession,
        CustomerSession $customerSession,
        Template\Context $context,
        array $data = []
    ) {
        parent::__construct($context, $data);
        $this->checkoutSession = $checkoutSession;
        $this->customerSession = $customerSession;
    }

    /**
     * @return string
     */
    public function getPartnerId()
    {
        return '123456789';
    }
}
<?php
/** @var Developer\AffiliateTracking\Block\TrackingCode $block */
?>

<!-- Criteo Loader File -->
<script type="text/javascript"
        src="//dynamic.criteo.com/js/ld/ld.js?a=<?= $block->getPartnerId(); ?>">
</script>
<!-- END Criteo Loader File -->

<!-- Criteo Sales Tag -->
<script type="text/javascript">
    window.criteo_q = window.criteo_q || [];
    var deviceType = /iPad/.test(navigator.userAgent) ? "t" : /Mobile|iP(hone|od)|Android|BlackBerry|IEMobile|Silk/.test(navigator.userAgent) ? "m" : "d";
    window.criteo_q.push(
        { event: "setAccount", account: "<?= $block->getPartnerId(); ?>"}
    );
</script>
<!-- END Criteo Sales Tag -->
After that, you need to execute the following commands on the Magento server to deploy changes:
php bin/magento cache:flush
php bin/magento setup:upgrade
php bin/magento setup:di:compile
php bin/magento setup:static-content:deploy
Once a new order is successfully created, the added scripts will send the necessary information to the affiliate program. This script can be viewed via the browser’s Dev Tools.

2. How to Add Affiliate Tracking Code in Magento 2 Using Affiliate Programs Extension
When you manually add code to track sales through an affiliate program, you need to regularly check whether the added code continues to function correctly after an update to the affiliate network script. If the code stops working, modifications to the custom module will be necessary.
This process can be quite complicated for merchants without development skills or a professional in their team. Therefore, using the Magento 2 Affiliate Programs Extension is a great solution to this problem.
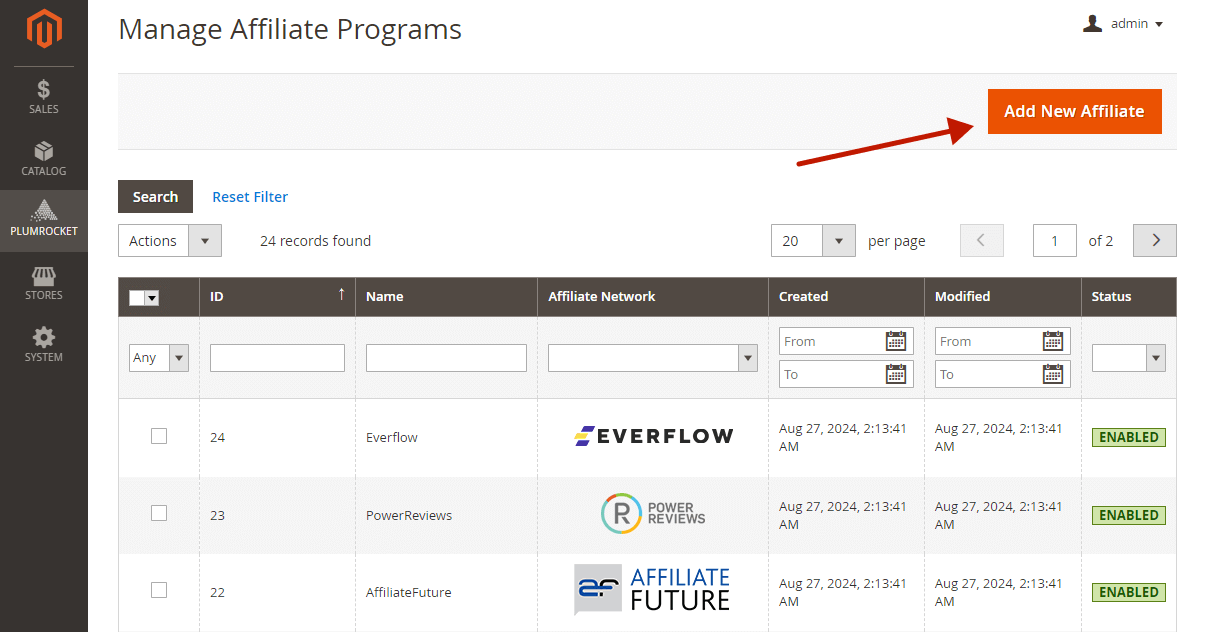
With this extnesion, you can add a tracking code through the admin panel. For this, go to Plumrocket -> Affiliate Programs -> Manage Affiliate Programs and click the Add New Affiliate button at the top.

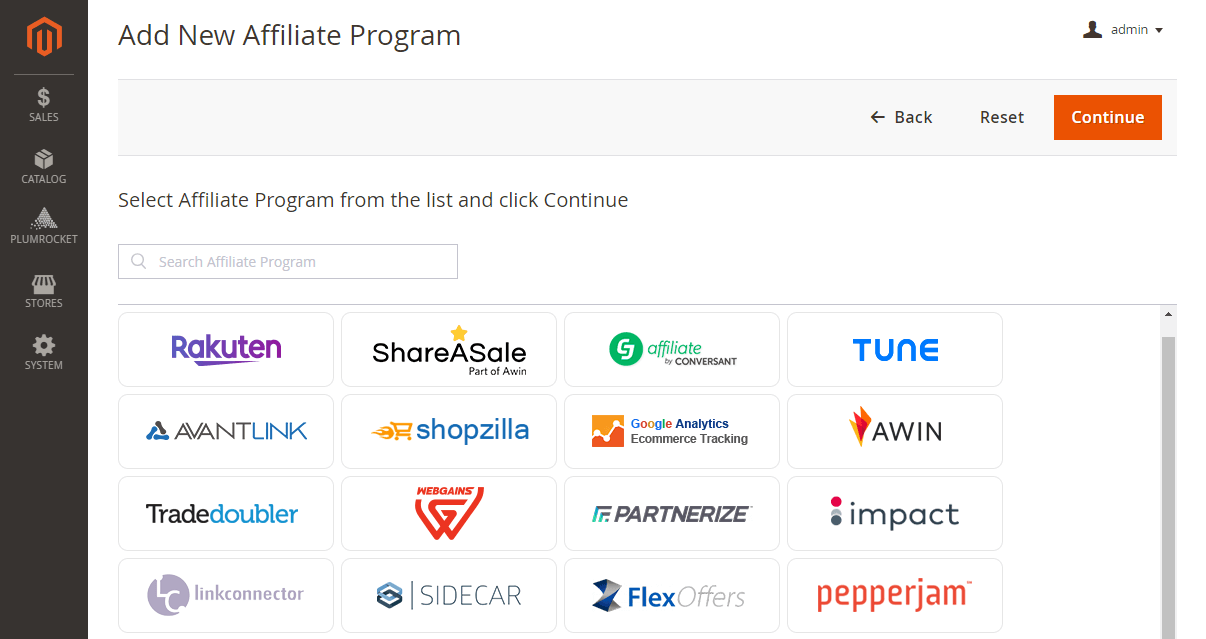
Then, select the required affiliate program from the list or choose the custom option if you did not find the necessary one.

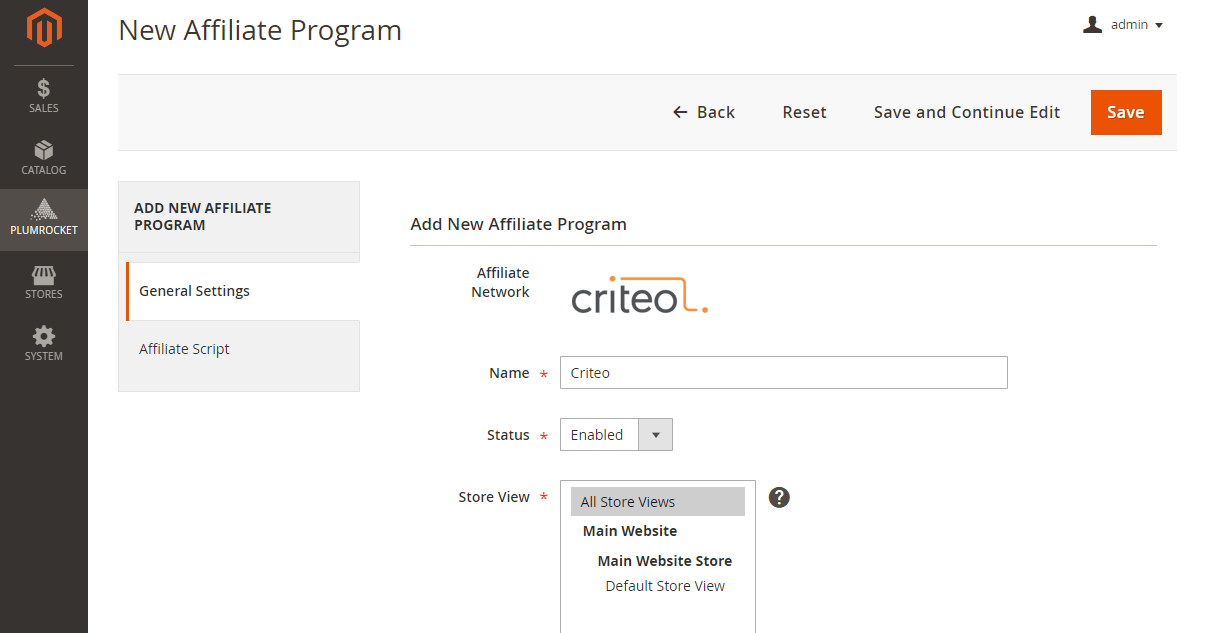
Under the General Settings tab, enable the program and select store views for which to apply it.

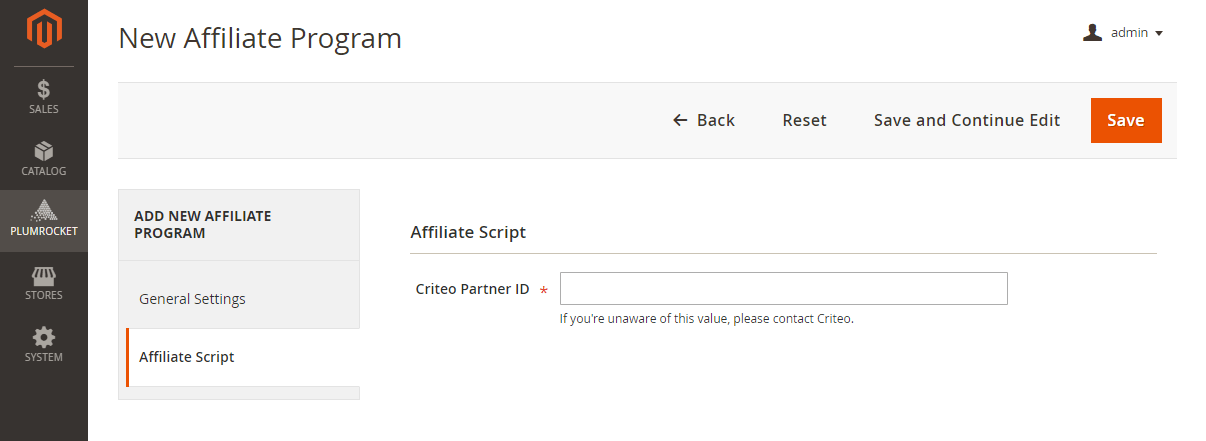
Go to the Affiliate Scripts tab and enter an ID or other credentials provided by your program. For example, to connect to the Criteo partner program, only the Criteo Partner ID field is required, which you can obtain on the partner program side.

That’s it. Now, after the successful placement of the order, the pixel will fire, and the affiliate program will receive information about it from the Magento store.
Conclusion
Affiliate programs are a great way to expand the reach of your store, which benefits both the store owner and advertising platforms. Since programs mostly rely on JS tags, adding affiliate tracking code to Magento 2 can be challenging for people not familiar with technical details.
This tutorial provides detailed steps to add affiliate tracking code manually by creating a custom module. As an alternative option, you can leverage Magento 2 Affiliate Programs Extension. Using the extension, a merchant can easily configure and manage active programs on the Magento store and create new ones without the help of a developer.
